User Manual
Page 1
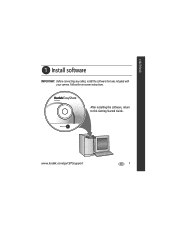
After installing the software, return to this Getting Started Guide. www.kodak.com/go/c875support 1 Follow the on-screen instructions. ENGLISH ᕡ Install software IMPORTANT: Before connecting any cables, install the software that was included with your camera.
After installing the software, return to this Getting Started Guide. www.kodak.com/go/c875support 1 Follow the on-screen instructions. ENGLISH ᕡ Install software IMPORTANT: Before connecting any cables, install the software that was included with your camera.
User Manual
Page 3
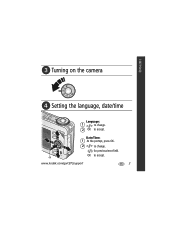
OK www.kodak.com/go/c875support 3 ENGLISH ᕣ Turning on the camera ᕤ Setting the language, date/time Language: 1 to change . for previous/next field. OK to accept. Date/Time: 1 At the prompt, press OK. 2 to change . 2 OK to accept.
OK www.kodak.com/go/c875support 3 ENGLISH ᕣ Turning on the camera ᕤ Setting the language, date/time Language: 1 to change . for previous/next field. OK to accept. Date/Time: 1 At the prompt, press OK. 2 to change . 2 OK to accept.
User Manual
Page 6
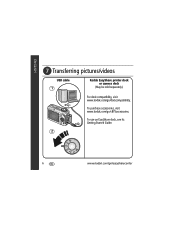
ENGLISH ᕧ Transferring pictures/videos USB cable 1 Kodak EasyShare printer dock or camera dock (May be sold separately.) For dock compatibility, visit www.kodak.com/go /c875accessories. To purchase accessories, visit www.kodak.com/go /dockcompatibility. To use an EasyShare dock, see its Getting Started Guide. 2 6 www.kodak.com/go/easysharecenter
ENGLISH ᕧ Transferring pictures/videos USB cable 1 Kodak EasyShare printer dock or camera dock (May be sold separately.) For dock compatibility, visit www.kodak.com/go /c875accessories. To purchase accessories, visit www.kodak.com/go /dockcompatibility. To use an EasyShare dock, see its Getting Started Guide. 2 6 www.kodak.com/go/easysharecenter
User Manual
Page 7
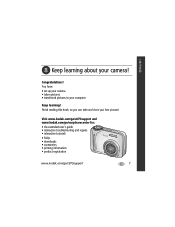
You have: • set up your camera • taken pictures • transferred pictures to your best pictures! Visit www.kodak.com/go/c875support and www.kodak.com/go/easysharecenter for: • the extended user's guide • interactive troubleshooting and repairs • interactive ...tutorials • FAQs • downloads • accessories • printing information • product registration www.kodak.com/go/c875support 7 Finish reading this book, so you can take and share your computer Keep learning! Congratulations! ENGLISH ᕨ Keep ...
You have: • set up your camera • taken pictures • transferred pictures to your best pictures! Visit www.kodak.com/go/c875support and www.kodak.com/go/easysharecenter for: • the extended user's guide • interactive troubleshooting and repairs • interactive ...tutorials • FAQs • downloads • accessories • printing information • product registration www.kodak.com/go/c875support 7 Finish reading this book, so you can take and share your computer Keep learning! Congratulations! ENGLISH ᕨ Keep ...
User Manual
Page 10
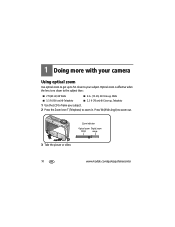
1 Doing more with your camera Using optical zoom Use optical zoom to get up , Telephoto 1 Use the LCD to frame your subject. Zoom indicator Optical zoom Digital zoom range range 3 Take the picture or video. 10 www.kodak.com/go/easysharecenter Optical zoom is effective when the lens is no closer to the subject than: ■ 2 ft (60 cm) @ Wide ■ 4 in . Press W (Wide Angle) to your subject. 2 Press the Zoom lever T (Telephoto) to zoom in . (10 cm) @ Close-up, Wide ■ 3.3 ft (100 cm) @ Telephoto ■ 2.3 ft (70 cm) @ Close-up to 5X closer to zoom out.
1 Doing more with your camera Using optical zoom Use optical zoom to get up , Telephoto 1 Use the LCD to frame your subject. Zoom indicator Optical zoom Digital zoom range range 3 Take the picture or video. 10 www.kodak.com/go/easysharecenter Optical zoom is effective when the lens is no closer to the subject than: ■ 2 ft (60 cm) @ Wide ■ 4 in . Press W (Wide Angle) to your subject. 2 Press the Zoom lever T (Telephoto) to zoom in . (10 cm) @ Close-up, Wide ■ 3.3 ft (100 cm) @ Telephoto ■ 2.3 ft (70 cm) @ Close-up to 5X closer to zoom out.

User Manual
Page 11
... for an acceptable 4 x 6-in some menu selections. Using camera Help Use camera Help to familiarize yourself with your camera Using digital zoom Use digital zoom in any Still mode to get up to 25X magnification. 1 Press the Zoom lever (T) to exit.) www.kodak.com/go/c875support 11 Help is available while you are viewing a menu. NOTE...
... for an acceptable 4 x 6-in some menu selections. Using camera Help Use camera Help to familiarize yourself with your camera Using digital zoom Use digital zoom in any Still mode to get up to 25X magnification. 1 Press the Zoom lever (T) to exit.) www.kodak.com/go/c875support 11 Help is available while you are viewing a menu. NOTE...
User Manual
Page 12
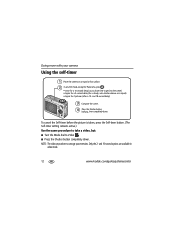
... : • Once for a 10-second delay (so you have time to Video . ■ Press the Shutter button completely down . Doing more with your camera Using the self-timer 1 Place the camera on a tripod) • Again for 2 pictures (after a 10- Only the 2- and 10-second options are available in video mode. 12 www...
... : • Once for a 10-second delay (so you have time to Video . ■ Press the Shutter button completely down . Doing more with your camera Using the self-timer 1 Place the camera on a tripod) • Again for 2 pictures (after a 10- Only the 2- and 10-second options are available in video mode. 12 www...
User Manual
Page 13
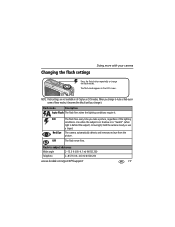
... require it . Fill Red Eye Off The flash fires every time you change the flash modes. The camera automatically detects and removes red eye from the picture. In low light, hold the camera steady or use a tripod. The flash never fires. NOTE: Flash settings are not available in shadow ...behind the subject). Flash-to change to Auto or Red-eye in the LCD screen. Changing the flash settings Doing more with your camera Press the flash button repeatedly to -subject distances Wide angle 2-13.5 ft (0.6-4.1 m) @ ISO 200 Telephoto 2-8.5 ft (0.6-2.6 m) @ ISO 200 www...
... require it . Fill Red Eye Off The flash fires every time you change the flash modes. The camera automatically detects and removes red eye from the picture. In low light, hold the camera steady or use a tripod. The flash never fires. NOTE: Flash settings are not available in shadow ...behind the subject). Flash-to change to Auto or Red-eye in the LCD screen. Changing the flash settings Doing more with your camera Press the flash button repeatedly to -subject distances Wide angle 2-13.5 ft (0.6-4.1 m) @ ISO 200 Telephoto 2-8.5 ft (0.6-2.6 m) @ ISO 200 www...
User Manual
Page 14
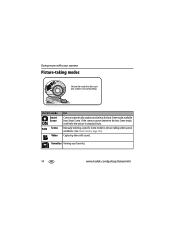
Manually selecting a specific Scene mode for picture-taking under special conditions. (See Scene modes, page 16.) Capturing video with your camera Picture-taking modes Choose the mode that best suits your favorites. 14 www.kodak.com/go/easysharecenter Use this mode Smart Scene SCN Scene Video For Camera automatically analyzes and selects the best Scene mode available from Smart Scene. Favorites Viewing your subjects and surroundings. Doing more with sound. If the camera cannot determine the best Scene mode, it will take the picture in standard Auto.
Manually selecting a specific Scene mode for picture-taking under special conditions. (See Scene modes, page 16.) Capturing video with your camera Picture-taking modes Choose the mode that best suits your favorites. 14 www.kodak.com/go/easysharecenter Use this mode Smart Scene SCN Scene Video For Camera automatically analyzes and selects the best Scene mode available from Smart Scene. Favorites Viewing your subjects and surroundings. Doing more with sound. If the camera cannot determine the best Scene mode, it will take the picture in standard Auto.
User Manual
Page 15
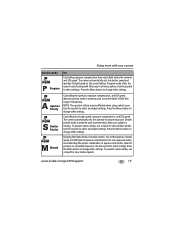
... sets the aperture for slow shutter speeds. To prevent camera shake, use a tripod for slow shutter speeds. Use the Joystick to select settings. Use the Joystick to select and adjust settings. www.kodak.com/go/c875support 15 Program mode offers the ease of aperture and shutter speed to produce an acceptable exposure...
... sets the aperture for slow shutter speeds. To prevent camera shake, use a tripod for slow shutter speeds. Use the Joystick to select settings. Use the Joystick to select and adjust settings. www.kodak.com/go/c875support 15 Program mode offers the ease of aperture and shutter speed to produce an acceptable exposure...
User Manual
Page 16
...pictures, page 19. Landscape Far-away scenes. Auto-focus framing marks are not available in motion. Press the Menu button to change other camera settings. NOTE: If the mode descriptions turn off, press the OK button. 3 Press the OK button to choose a capture mode. ...-created" mode. For applying P, A, S, M plus any Custom settings (exposure compensation and ISO speed) which are in Landscape. 16 www.kodak.com/go/easysharecenter Panorama See Taking panoramic pictures, page 19. Right-Left Sport Subjects that are saved independent of people. Scene modes 1 Turn the...
...pictures, page 19. Landscape Far-away scenes. Auto-focus framing marks are not available in motion. Press the Menu button to change other camera settings. NOTE: If the mode descriptions turn off, press the OK button. 3 Press the OK button to choose a capture mode. ...-created" mode. For applying P, A, S, M plus any Custom settings (exposure compensation and ISO speed) which are in Landscape. 16 www.kodak.com/go/easysharecenter Panorama See Taking panoramic pictures, page 19. Right-Left Sport Subjects that are saved independent of people. Scene modes 1 Turn the...
User Manual
Page 17
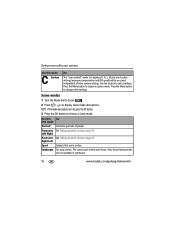
...use a tripod. Shutter speed > 1/180 sec. Night Distant scenery at night. Party People indoors. Place the camera on the zoom position. Museum SelfPortrait Close-ups 2.5 ft (64 cm) away from yourself. Children Action pictures ...of movement, Shot while the subject appears still. Doing more with your camera Use this For SCN mode Close-up mode for color text.) Fireworks Flash does not fire. Use available light.... Backlight* Subjects that are disabled. Panning Shooting a fast-moving subject. www.kodak.com/go/c875support 17
...use a tripod. Shutter speed > 1/180 sec. Night Distant scenery at night. Party People indoors. Place the camera on the zoom position. Museum SelfPortrait Close-ups 2.5 ft (64 cm) away from yourself. Children Action pictures ...of movement, Shot while the subject appears still. Doing more with your camera Use this For SCN mode Close-up mode for color text.) Fireworks Flash does not fire. Use available light.... Backlight* Subjects that are disabled. Panning Shooting a fast-moving subject. www.kodak.com/go/c875support 17
User Manual
Page 18
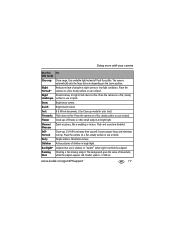
It automatically selects the proper exposure for the face when taking pictures indoors or outdoors, in sunsets. * This camera features Face Detection for Portrait, Night Portrait, and Backlight settings. Doing more with your camera Use this For SCN mode Candle Light Captures the ambiance of the candle light. Sunset Preserves the deep hues seen in bright or low-light conditions, or at night. 18 www.kodak.com/go/easysharecenter
It automatically selects the proper exposure for the face when taking pictures indoors or outdoors, in sunsets. * This camera features Face Detection for Portrait, Night Portrait, and Backlight settings. Doing more with your camera Use this For SCN mode Candle Light Captures the ambiance of the candle light. Sunset Preserves the deep hues seen in bright or low-light conditions, or at night. 18 www.kodak.com/go/easysharecenter

User Manual
Page 19
... the OK button. 3 Take the first picture. After you are not. (Picture size is set with your camera Taking panoramic pictures Use panorama to "stitch" up to 3.1 MP for each picture. Get 1 panoramic picture www.kodak.com/go/c875support 19 Exposure and white balance are automatically stitched together. 1 2 3 Take 2 or 3 pictures. individual...
... the OK button. 3 Take the first picture. After you are not. (Picture size is set with your camera Taking panoramic pictures Use panorama to "stitch" up to 3.1 MP for each picture. Get 1 panoramic picture www.kodak.com/go/c875support 19 Exposure and white balance are automatically stitched together. 1 2 3 Take 2 or 3 pictures. individual...
User Manual
Page 20
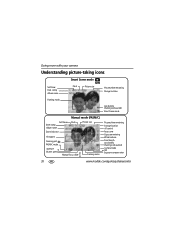
Doing more with your camera Understanding picture-taking icons Smart Scene mode Self-timer Date stamp Album name Flash Picture size Pictures/time remaining Storage location Framing marks Low battery (... speed Manual-focus slider Framing marks Pictures/time remaining Storage location AF control Focus zone Exposure metering White balance Focal length Low battery (flashing=exhausted) Camera mode ISO Exposure compensation 20 www.kodak.com/go/easysharecenter
Doing more with your camera Understanding picture-taking icons Smart Scene mode Self-timer Date stamp Album name Flash Picture size Pictures/time remaining Storage location Framing marks Low battery (... speed Manual-focus slider Framing marks Pictures/time remaining Storage location AF control Focus zone Exposure metering White balance Focal length Low battery (flashing=exhausted) Camera mode ISO Exposure compensation 20 www.kodak.com/go/easysharecenter
User Manual
Page 21
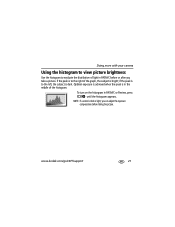
... the peak is to the left, the subject is dark or light, you can adjust the exposure compensation before or after you take a picture. www.kodak.com/go/c875support 21 NOTE: If a scene is dark. To turn on the histogram in PASM/C before taking the picture. if the peak is to... right of the graph, the subject is in the middle of light in PASM/C or Review, press until the histogram appears. Doing more with your camera Using the histogram to view picture brightness Use the histogram to evaluate the distribution of the histogram.
... the peak is to the left, the subject is dark or light, you can adjust the exposure compensation before or after you take a picture. www.kodak.com/go/c875support 21 NOTE: If a scene is dark. To turn on the histogram in PASM/C before taking the picture. if the peak is to... right of the graph, the subject is in the middle of light in PASM/C or Review, press until the histogram appears. Doing more with your camera Using the histogram to view picture brightness Use the histogram to evaluate the distribution of the histogram.
User Manual
Page 24
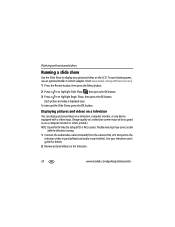
..., computer monitor, or any device equipped with pictures/videos Running a slide show is running. 1 Connect the audio/video cable (included) from the camera USB, A/V Out port to display your television user's guide for details. 2 Review pictures/videos on the LCD. Each picture and video is correct...the Slide Show to the television video-in port (yellow) and audio-in port (white). See your pictures/videos on the television. 24 www.kodak.com/go /c875accessories.) 1 Press the Review button, then press the Menu button. 2 Press to highlight Slide Show , then press the OK ...
..., computer monitor, or any device equipped with pictures/videos Running a slide show is running. 1 Connect the audio/video cable (included) from the camera USB, A/V Out port to display your television user's guide for details. 2 Review pictures/videos on the LCD. Each picture and video is correct...the Slide Show to the television video-in port (yellow) and audio-in port (white). See your pictures/videos on the television. 24 www.kodak.com/go /c875accessories.) 1 Press the Review button, then press the Menu button. 2 Press to highlight Slide Show , then press the OK ...
User Manual
Page 25
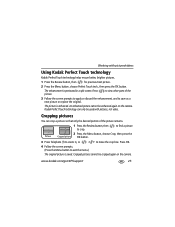
... enhanced picture cannot be enhanced again on the camera. Kodak Perfect Touch technology can crop a picture so that only the desired portion of the 3 Follow the screen prompts to apply or discard the enhancement, and to exit the menu.) The original picture is saved. www.kodak.com/go/c875support 25 Cropped pictures cannot...
... enhanced picture cannot be enhanced again on the camera. Kodak Perfect Touch technology can crop a picture so that only the desired portion of the 3 Follow the screen prompts to apply or discard the enhancement, and to exit the menu.) The original picture is saved. www.kodak.com/go/c875support 25 Cropped pictures cannot...
User Manual
Page 28
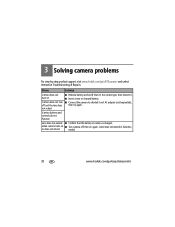
...; Insert a new or charged battery. ■ Connect the camera to a Kodak 3-volt AC adapter (sold separately), then try again. 3 Solving camera problems For step-by-step product support, visit www.kodak.com/go /easysharecenter Status Solution Camera does not turn off and the lens does not retract ■... Remove battery and verify that the battery in Favorites or does not retract mode.) 28 www.kodak.com/go /c875support and select Interactive Troubleshooting & Repairs. when camera turns on ■ Turn camera off, then on Camera does not turn on again. (Lens does not extend in...
...; Insert a new or charged battery. ■ Connect the camera to a Kodak 3-volt AC adapter (sold separately), then try again. 3 Solving camera problems For step-by-step product support, visit www.kodak.com/go /easysharecenter Status Solution Camera does not turn off and the lens does not retract ■... Remove battery and verify that the battery in Favorites or does not retract mode.) 28 www.kodak.com/go /c875support and select Interactive Troubleshooting & Repairs. when camera turns on ■ Turn camera off, then on Camera does not turn on again. (Lens does not extend in...
User Manual
Page 30
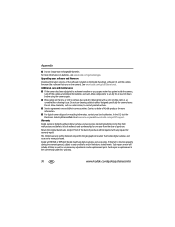
... or LCD to be required with a soft, lint-free cloth or an untreated lens-cleaning tissue. Warranty Kodak warrants Kodak EasyShare digital cameras and accessories (excluding batteries) to remove dust and dirt. For more information. ■ For digital camera disposal or recycling information, contact your software and firmware Download the latest versions of the software included on...
... or LCD to be required with a soft, lint-free cloth or an untreated lens-cleaning tissue. Warranty Kodak warrants Kodak EasyShare digital cameras and accessories (excluding batteries) to remove dust and dirt. For more information. ■ For digital camera disposal or recycling information, contact your software and firmware Download the latest versions of the software included on...


