User Manual
Page 9
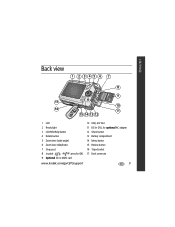
ENGLISH Back view 1 2 345 6 7 8 9 17 10 16 11 15 14 13 12 1 LCD 2 Ready light 3 LCD/Info/Help button 4 Delete button 5 Zoom lever (wide angle) 6 Zoom lever (telephoto) 7 Strap post 8 Joystick ( , press for OK) 9 Optional SD or MMC card 10 USB, A/V Out 11 DC-In (3V), for optional AC adapter 12 Share button 13 Battery compartment 14 Menu button 15 Review button 16 Tripod socket 17 Dock connector www.kodak.com/go/c875support 9
ENGLISH Back view 1 2 345 6 7 8 9 17 10 16 11 15 14 13 12 1 LCD 2 Ready light 3 LCD/Info/Help button 4 Delete button 5 Zoom lever (wide angle) 6 Zoom lever (telephoto) 7 Strap post 8 Joystick ( , press for OK) 9 Optional SD or MMC card 10 USB, A/V Out 11 DC-In (3V), for optional AC adapter 12 Share button 13 Battery compartment 14 Menu button 15 Review button 16 Tripod socket 17 Dock connector www.kodak.com/go/c875support 9
User Manual
Page 24
...television, computer monitor, or any device equipped with pictures/videos Running a slide show is running. 1 Connect the audio/video cable (included) from the camera USB, A/V Out port to highlight Begin Show, then press the OK button. See your pictures/videos on the LCD. Working with a video input. ...when printed.) NOTE: Ensure that the Video Out setting (NTSC or PAL) is correct. To save battery power, use an optional Kodak 3-volt AC adapter. (Visit www.kodak.com/go /easysharecenter To interrupt the Slide Show, press the OK button. The slide show stops if you connect a cable while ...
...television, computer monitor, or any device equipped with pictures/videos Running a slide show is running. 1 Connect the audio/video cable (included) from the camera USB, A/V Out port to highlight Begin Show, then press the OK button. See your pictures/videos on the LCD. Working with a video input. ...when printed.) NOTE: Ensure that the Video Out setting (NTSC or PAL) is correct. To save battery power, use an optional Kodak 3-volt AC adapter. (Visit www.kodak.com/go /easysharecenter To interrupt the Slide Show, press the OK button. The slide show stops if you connect a cable while ...
User Manual
Page 28
.... ■ Insert a new or charged battery. ■ Connect the camera to a Kodak 3-volt AC adapter (sold separately), then try again. when camera turns on again. (Lens does not extend in camera is charged. Status Solution Camera does not turn on Camera does not turn off , then on ■ Turn camera off and the lens does not retract ■ Remove...
.... ■ Insert a new or charged battery. ■ Connect the camera to a Kodak 3-volt AC adapter (sold separately), then try again. when camera turns on again. (Lens does not extend in camera is charged. Status Solution Camera does not turn on Camera does not turn off , then on ■ Turn camera off and the lens does not retract ■ Remove...
User Manual
Page 29
...children. ■ Do not allow it may be hot. ■ Read and follow all warnings and instructions supplied by Kodak, such as an AC adapter, may result in an airplane, observe all instructions of batteries according to touch metal objects, including coins. For additional ...allow batteries to local and national regulations. Contact your local health provider. www.kodak.com/go/c875support 29 Kodak AC adapters and battery chargers are no user-serviceable parts inside the product, contact Kodak customer support. ■ In the unlikely event that battery fluid leaks onto your...
...children. ■ Do not allow it may be hot. ■ Read and follow all warnings and instructions supplied by Kodak, such as an AC adapter, may result in an airplane, observe all instructions of batteries according to touch metal objects, including coins. For additional ...allow batteries to local and national regulations. Contact your local health provider. www.kodak.com/go/c875support 29 Kodak AC adapters and battery chargers are no user-serviceable parts inside the product, contact Kodak customer support. ■ In the unlikely event that battery fluid leaks onto your...


