User Manual
Page 1
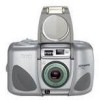
ENGLISH/ESPAÑOL/FRANÇAIS CAMERA IDENTIFICATION 3 2 1 10 1 Shutter button 2 Zoom dial 3 Format-selector switch 4 Lens cover/flash 4 5 Light sensor 6 Viewfinder 7 Auto-focus sensors 8 Lens 9 Red-eye-reduction/ self-timer lamp 10 Film-door lever 5 6 7 8 9 Unfold the front and back flaps of this manual to view the camera's parts. No. 919 5504 Printed in U.S.A. Unfold the front and back flaps of this manual to view the camera's parts. Consumer Imaging EASTMAN KODAK COMPANY Rochester, NY 14650 Kodak C750 Zoom Camera © Eastman Kodak Company, 2000 Pt.
ENGLISH/ESPAÑOL/FRANÇAIS CAMERA IDENTIFICATION 3 2 1 10 1 Shutter button 2 Zoom dial 3 Format-selector switch 4 Lens cover/flash 4 5 Light sensor 6 Viewfinder 7 Auto-focus sensors 8 Lens 9 Red-eye-reduction/ self-timer lamp 10 Film-door lever 5 6 7 8 9 Unfold the front and back flaps of this manual to view the camera's parts. No. 919 5504 Printed in U.S.A. Unfold the front and back flaps of this manual to view the camera's parts. Consumer Imaging EASTMAN KODAK COMPANY Rochester, NY 14650 Kodak C750 Zoom Camera © Eastman Kodak Company, 2000 Pt.

User Manual
Page 2
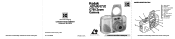
... 14 19 18 17 11 Battery door 12 Viewfinder eyepiece 13 Flash/cameraready lamp 14 LCD panel 15 Flash-mode button 16 Mode button 17 Strap post 18 Film door 19 Tripod socket 15 20 Mid-roll-change (MRC) button 21 Enter/self-timer 16 button 22 Select button 23 Menu button This device complies with the limits for a Class B digital device, pursuant to Part 15 of the FCC Rules...
... 14 19 18 17 11 Battery door 12 Viewfinder eyepiece 13 Flash/cameraready lamp 14 LCD panel 15 Flash-mode button 16 Mode button 17 Strap post 18 Film door 19 Tripod socket 15 20 Mid-roll-change (MRC) button 21 Enter/self-timer 16 button 22 Select button 23 Menu button This device complies with the limits for a Class B digital device, pursuant to Part 15 of the FCC Rules...

User Manual
Page 3
... date of the Advanced Photo System! to 7:00 p.m. (Eastern time) Monday through Friday at 1 (800) 465-6325, ext. 36100; When you for Canada) or call: Kodak (USA only) from 8:00 a.m. For warranty purposes, please keep your camera available. to 5:00 p.m. (Eastern time) Monday through Friday at http://www.kodak.com (for US) or http://www.kodak.ca (for buying this KODAK ADVANTIX Camera. ENGLISH KODAK ADVANTIX C750 Zoom Camera...
... date of the Advanced Photo System! to 7:00 p.m. (Eastern time) Monday through Friday at 1 (800) 465-6325, ext. 36100; When you for Canada) or call: Kodak (USA only) from 8:00 a.m. For warranty purposes, please keep your camera available. to 5:00 p.m. (Eastern time) Monday through Friday at http://www.kodak.com (for US) or http://www.kodak.ca (for buying this KODAK ADVANTIX Camera. ENGLISH KODAK ADVANTIX C750 Zoom Camera...
User Manual
Page 4
... 5 Loading the battery 5 Setting the language 6 List of languages 7 Date and time imprinting 8 Setting the date and time 8 ATTACHING THE STRAP 9 CONTROL-BUTTON ACTUATOR .......... 10 LOW-BATTERY INDICATOR 10 BATTERY TIPS 10 POWER SHUT-OFF 11 LOADING THE FILM 11 TAKING PICTURES 13 Typical print sizes (formats 14 Using the focus lock 15 Tips for better pictures 15 USING THE ZOOM LENS 16 TAKING FLASH PICTURES 17 Flash-to-subject distance 18 Flash/warning-lamp signals 18 FLASH MODES 19 Auto flash...
... 5 Loading the battery 5 Setting the language 6 List of languages 7 Date and time imprinting 8 Setting the date and time 8 ATTACHING THE STRAP 9 CONTROL-BUTTON ACTUATOR .......... 10 LOW-BATTERY INDICATOR 10 BATTERY TIPS 10 POWER SHUT-OFF 11 LOADING THE FILM 11 TAKING PICTURES 13 Typical print sizes (formats 14 Using the focus lock 15 Tips for better pictures 15 USING THE ZOOM LENS 16 TAKING FLASH PICTURES 17 Flash-to-subject distance 18 Flash/warning-lamp signals 18 FLASH MODES 19 Auto flash...

User Manual
Page 5
... adjusts to match each format selection. The flash system: - Date and time/title imprinting • The date, time, and cassette ID number are printed on the back of the prints. delivers brighter light for clearer, more colorful pictures for a full description of the flip flash and the red-eye-reduction mode, - provides extra red-eye reduction with the extension of available services...
... adjusts to match each format selection. The flash system: - Date and time/title imprinting • The date, time, and cassette ID number are printed on the back of the prints. delivers brighter light for clearer, more colorful pictures for a full description of the flip flash and the red-eye-reduction mode, - provides extra red-eye reduction with the extension of available services...
User Manual
Page 6
...; You can remove your film in mid-roll to optimize lighting and color for the processed film. The camera uses KODAK ADVANTIX Film. organize by dedicating individual film rolls to identify the status of the film inside the cassette. The film cassette, unlike the traditional 35 mm cartridge, communicates the status of film. switch film speeds in mid-roll and later reload it and continue taking pictures. MRC...
...; You can remove your film in mid-roll to optimize lighting and color for the processed film. The camera uses KODAK ADVANTIX Film. organize by dedicating individual film rolls to identify the status of the film inside the cassette. The film cassette, unlike the traditional 35 mm cartridge, communicates the status of film. switch film speeds in mid-roll and later reload it and continue taking pictures. MRC...
User Manual
Page 7
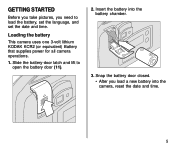
Snap the battery door closed. • After you need to open the battery door (11). 2. Insert the battery into the camera, reset the date and time. 5 Slide the battery-door latch and lift to load the battery, set the language, and set the date and time. Loading the battery This camera uses one 3-volt lithium KODAK KCR2 (or equivalent) Battery that supplies power for all camera operations. 1. GETTING STARTED Before you take pictures, you load a new battery into the battery chamber. 3.
Snap the battery door closed. • After you need to open the battery door (11). 2. Insert the battery into the camera, reset the date and time. 5 Slide the battery-door latch and lift to load the battery, set the language, and set the date and time. Loading the battery This camera uses one 3-volt lithium KODAK KCR2 (or equivalent) Battery that supplies power for all camera operations. 1. GETTING STARTED Before you take pictures, you load a new battery into the battery chamber. 3.
User Manual
Page 10
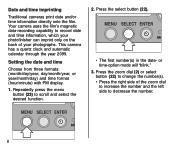
... number(s) in the date- Setting the date and time Choose from three formats: (month/day/year, day/month/year, or year/month/day) and time format (hour/minute) with PM display. 1. Press the zoom dial (2) or select button (22) to change the number(s). • Press the right side of your photographs. or time-option mode will "blink." 3. Your camera uses the film's magnetic data-recording capability to record date and time information...
... number(s) in the date- Setting the date and time Choose from three formats: (month/day/year, day/month/year, or year/month/day) and time format (hour/minute) with PM display. 1. Press the zoom dial (2) or select button (22) to change the number(s). • Press the right side of your photographs. or time-option mode will "blink." 3. Your camera uses the film's magnetic data-recording capability to record date and time information...
User Manual
Page 12
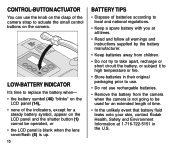
... Environment Information at 1-716-722-5151 in the U.S. LOW-BATTERY INDICATOR It's time to replace the battery when- • the battery symbol (40) "blinks" on the LCD panel (14), • none of the indicators, except for a steady battery symbol, appear on the LCD panel and the shutter button (1) cannot be operated, or • the LCD panel is blank when the lens cover/flash (4) is...
... Environment Information at 1-716-722-5151 in the U.S. LOW-BATTERY INDICATOR It's time to replace the battery when- • the battery symbol (40) "blinks" on the LCD panel (14), • none of the indicators, except for a steady battery symbol, appear on the LCD panel and the shutter button (1) cannot be operated, or • the LCD panel is blank when the lens cover/flash (4) is...
User Manual
Page 13
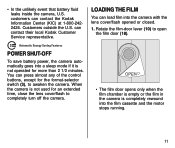
... completely turn off the camera. When the camera is not used for an extended time, close the lens cover/flash to open the film door (18). Customers outside the U.S. OPEN • The film door opens only when the film chamber is empty or the film in the camera is not operated for the format-selector switch (3), to awaken the camera. POWER SHUT-OFF To save battery power, the camera automatically goes into a sleep mode if it...
... completely turn off the camera. When the camera is not used for an extended time, close the lens cover/flash to open the film door (18). Customers outside the U.S. OPEN • The film door opens only when the film chamber is empty or the film in the camera is not operated for the format-selector switch (3), to awaken the camera. POWER SHUT-OFF To save battery power, the camera automatically goes into a sleep mode if it...

User Manual
Page 15
... size(s) that you use to turn on the subject. Slide the format-selector switch (3) to show the selected field of view. Completely lift up the lens cover/ flash (4) to uncover the lens (8) and to expose the film. 1. Look through the viewfinder eyepiece (12) placing the Auto Focus (AF) brackets on the camera. 2. The viewfinder changes to select C, H, or P format. TAKING PICTURES You can take Classic (C), Group/HDTV (H)*, and Panoramic (P) pictures...
... size(s) that you use to turn on the subject. Slide the format-selector switch (3) to show the selected field of view. Completely lift up the lens cover/ flash (4) to uncover the lens (8) and to expose the film. 1. Look through the viewfinder eyepiece (12) placing the Auto Focus (AF) brackets on the camera. 2. The viewfinder changes to select C, H, or P format. TAKING PICTURES You can take Classic (C), Group/HDTV (H)*, and Panoramic (P) pictures...
User Manual
Page 18
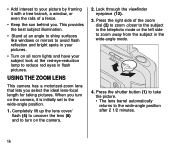
...-angle mode. Look through the viewfinder eyepiece (12). 3. USING THE ZOOM LENS This camera has a motorized-zoom lens that lets you . This provides the best subject illumination. • Stand at an angle to shiny surfaces like windows or mirrors to avoid flash reflection and bright spots in your pictures. • Turn on all room lights and have your picture by framing it is initially set to...
...-angle mode. Look through the viewfinder eyepiece (12). 3. USING THE ZOOM LENS This camera has a motorized-zoom lens that lets you . This provides the best subject illumination. • Stand at an angle to shiny surfaces like windows or mirrors to avoid flash reflection and bright spots in your pictures. • Turn on all room lights and have your picture by framing it is initially set to...

User Manual
Page 19
... FLASH PICTURES In dim light, such as indoors or outdoors in heavy shade, or on page 18). 17 The special flip-flash plus system of film in close-up the lens cover/ flash (4) to uncover the lens (8) and to turn on the camera. 2. Partially press down the shutter button to conserve the battery life. 1. When the flash/camera-ready lamp (13) glows green, fully press down the shutter button...
... FLASH PICTURES In dim light, such as indoors or outdoors in heavy shade, or on page 18). 17 The special flip-flash plus system of film in close-up the lens cover/ flash (4) to uncover the lens (8) and to turn on the camera. 2. Partially press down the shutter button to conserve the battery life. 1. When the flash/camera-ready lamp (13) glows green, fully press down the shutter button...

User Manual
Page 20
Shutter button locks. • Flash not fully charged • Camera movement • Beyond the flash range 18 Flash-to-subject distance ISO Film Wide Speed (24 mm) Tele (60 mm) 50 2 to 10 ft 2 to 7 ft (0.6 to 3.0 m) (0.6 to 2.1 m) 100 2 to 14 ft 2 to 10 ft (0.6 to 4.3 ... m) 800 2 to 41 ft 2 to 28 ft (0.6 to 12.5 m) (0.6 to 8.5 m) 1600 2 to 57 ft 2 to 39 ft (0.6 to 17.4 m) (0.6 to 11.9 m) Flash/warning-lamp signals Lamp Indicator Situation Glows green Glows red "Blinks" red • Camera ready for picture-taking • Subject between 8 in. (20 cm) and 2 ft (0.6 m) from...
Shutter button locks. • Flash not fully charged • Camera movement • Beyond the flash range 18 Flash-to-subject distance ISO Film Wide Speed (24 mm) Tele (60 mm) 50 2 to 10 ft 2 to 7 ft (0.6 to 3.0 m) (0.6 to 2.1 m) 100 2 to 14 ft 2 to 10 ft (0.6 to 4.3 ... m) 800 2 to 41 ft 2 to 28 ft (0.6 to 12.5 m) (0.6 to 8.5 m) 1600 2 to 57 ft 2 to 39 ft (0.6 to 17.4 m) (0.6 to 11.9 m) Flash/warning-lamp signals Lamp Indicator Situation Glows green Glows red "Blinks" red • Camera ready for picture-taking • Subject between 8 in. (20 cm) and 2 ft (0.6 m) from...

User Manual
Page 21
... use high-speed film because the shutter speed in flash pictures. Use a tripod or place the camera on the camera help to capture the ambiance of the camera), you do not want to use the flash-off , or auto-flash without red-eye reduction. Repeatedly press the flash-mode button (15) to view the choices on faces) may occur. Flash off When you can select fill flash, flash off feature. Choose the flash mode that best...
... use high-speed film because the shutter speed in flash pictures. Use a tripod or place the camera on the camera help to capture the ambiance of the camera), you do not want to use the flash-off , or auto-flash without red-eye reduction. Repeatedly press the flash-mode button (15) to view the choices on faces) may occur. Flash off When you can select fill flash, flash off feature. Choose the flash mode that best...
User Manual
Page 23
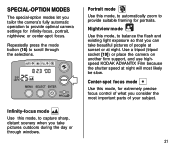
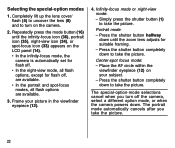
... Nightview mode Use this mode, to provide optimal camera settings for portraits. Use a tripod (tripod socket [19]) or place the camera on another firm support, and use highspeed KODAK ADVANTIX Film because the shutter speed at night. Repeatedly press the mode button (16) to provide suitable framing for infinity-focus, portrait, nightview, or center-spot focus. AUTO FILL EXP LEFT MODE MENU SELECT ENTER Infinity-focus mode Use this mode, to balance the flash and existing light exposure so...
... Nightview mode Use this mode, to provide optimal camera settings for portraits. Use a tripod (tripod socket [19]) or place the camera on another firm support, and use highspeed KODAK ADVANTIX Film because the shutter speed at night. Repeatedly press the mode button (16) to provide suitable framing for infinity-focus, portrait, nightview, or center-spot focus. AUTO FILL EXP LEFT MODE MENU SELECT ENTER Infinity-focus mode Use this mode, to balance the flash and existing light exposure so...
User Manual
Page 24
... on your picture in the viewfinder eyepiece (12). 4. Press the shutter button completely down . Frame your subject. - Repeatedly press the mode button (16) until the zoom lens adjusts for flash off the camera, select a different option mode, or when the camera powers down to turn off , are available. • In the portrait and spot-focus modes, all flash options are available. 3. Completely lift up the lens cover/ flash (4) to uncover the lens (8) and...
... on your picture in the viewfinder eyepiece (12). 4. Press the shutter button completely down . Frame your subject. - Repeatedly press the mode button (16) until the zoom lens adjusts for flash off the camera, select a different option mode, or when the camera powers down to turn off , are available. • In the portrait and spot-focus modes, all flash options are available. 3. Completely lift up the lens cover/ flash (4) to uncover the lens (8) and...

User Manual
Page 25
Completely lift up the lens cover/ flash (4) to uncover the lens (8) and to turn on the LCD panel (14). 23 USING THE SELF-TIMER Use the self-timer feature when you see the self-timer lamp (9). • The self-timer lamp on the front of the camera blinks for yourself in pictures. 1. Press the shutter button (1). 6. Quickly position yourself in the composed picture making sure that you want to include yourself in it...
Completely lift up the lens cover/ flash (4) to uncover the lens (8) and to turn on the LCD panel (14). 23 USING THE SELF-TIMER Use the self-timer feature when you see the self-timer lamp (9). • The self-timer lamp on the front of the camera blinks for yourself in pictures. 1. Press the shutter button (1). 6. Quickly position yourself in the composed picture making sure that you want to include yourself in it...

User Manual
Page 30
... the auto-film rewind. 2. CARING FOR YOUR CAMERA • Protect the camera from dust, moisture, sudden impact, and excessive heat. Never wipe a dry lens. 1. Do not use solvents or harsh or abrasive cleaners on the camera body. • If the lens appears dirty, breathe on the camera strap to disassemble or repair the camera or flash unit by yourself. 28 Gently press the mid-roll-change button...
... the auto-film rewind. 2. CARING FOR YOUR CAMERA • Protect the camera from dust, moisture, sudden impact, and excessive heat. Never wipe a dry lens. 1. Do not use solvents or harsh or abrasive cleaners on the camera body. • If the lens appears dirty, breathe on the camera strap to disassemble or repair the camera or flash unit by yourself. 28 Gently press the mid-roll-change button...

User Manual
Page 31
... improperly loaded Camera in sleep mode Flash/camera ready lamp "blinks" red Flash/camera ready lamp glows red and shutter button locks Lens cover/flash closed Flash not fully charged Camera movement Subject beyond the flash range Subject between 8 in (20 cm) and 2 ft (0.6 m) from camera Solution Replace or reload the battery Replace or reload the battery Replace or reload the battery Press mode-selector button or close and reopen lens cover/flash Open lens cover/flash Wait for lamp to glow green Hold camera...
... improperly loaded Camera in sleep mode Flash/camera ready lamp "blinks" red Flash/camera ready lamp glows red and shutter button locks Lens cover/flash closed Flash not fully charged Camera movement Subject beyond the flash range Subject between 8 in (20 cm) and 2 ft (0.6 m) from camera Solution Replace or reload the battery Replace or reload the battery Replace or reload the battery Press mode-selector button or close and reopen lens cover/flash Open lens cover/flash Wait for lamp to glow green Hold camera...


