
Installation Guide
Page 2
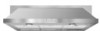
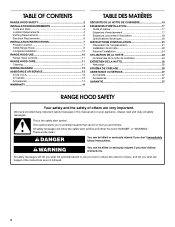
...chance of others . TABLE OF CONTENTS RANGE HOOD SAFETY 2 INSTALLATION REQUIREMENTS 3 Tools and Parts 3 Location Requirements 4 Venting Requirements 5 Electrical Requirements 6 INSTALLATION INSTRUCTIONS 7 Prepare Location 7 Install Range Hood 9 Complete Installation 10 RANGE HOOD USE 10 Range Hood Controls 11 RANGE HOOD...concernant l'évacuation 18 Spécifications électriques 20 INSTRUCTIONS D'INSTALLATION 21 Préparation de l'emplacement 21 Installation de la hotte 22 Achever l'installation 24 UTILISATION DE LA HOTTE 24 Commandes de la hotte de cuisini&#...
...chance of others . TABLE OF CONTENTS RANGE HOOD SAFETY 2 INSTALLATION REQUIREMENTS 3 Tools and Parts 3 Location Requirements 4 Venting Requirements 5 Electrical Requirements 6 INSTALLATION INSTRUCTIONS 7 Prepare Location 7 Install Range Hood 9 Complete Installation 10 RANGE HOOD USE 10 Range Hood Controls 11 RANGE HOOD...concernant l'évacuation 18 Spécifications électriques 20 INSTRUCTIONS D'INSTALLATION 21 Préparation de l'emplacement 21 Installation de la hotte 22 Achever l'installation 24 UTILISATION DE LA HOTTE 24 Commandes de la hotte de cuisini&#...

Installation Guide
Page 3
...or return to an authorized service facility for examination and/or repair. ■ Sufficient air is needed ■ Drill For vented installations, you may ignite. CAUTION: To reduce risk of fuel burning equipment to prevent power from package. do not use cookware appropriate for... such as a tag, to exhaust hazardous or explosive materials and vapors. CAUTION: For general ventilating use to the service panel. ■ Installation work and electrical wiring must always be burned. ■ DO NOT USE WATER, including wet dishcloths or towels a violent steam explosion will ...
...or return to an authorized service facility for examination and/or repair. ■ Sufficient air is needed ■ Drill For vented installations, you may ignite. CAUTION: To reduce risk of fuel burning equipment to prevent power from package. do not use cookware appropriate for... such as a tag, to exhaust hazardous or explosive materials and vapors. CAUTION: For general ventilating use to the service panel. ■ Installation work and electrical wiring must always be burned. ■ DO NOT USE WATER, including wet dishcloths or towels a violent steam explosion will ...
Installation Guide
Page 4
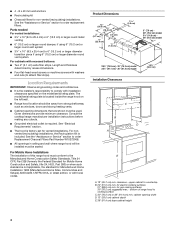
...this range hood must conform to comply with local codes. See "Electrical Requirements" section. ■ The hood is included. For Mobile Home Installations The installation of range hood to 6" (15.2 cm) or larger diameter transition piece if using 6" (15.2 cm) or larger diameter round vent ... 36" (91.4 cm) model 29⁷⁄₈" (75.9 cm) - 30" (76.2 cm) model 35⁷⁄₈" (91.1 cm) - 36" (91.4 cm) model Installation Clearances 19³⁄₄" (50.2 cm) C B D A E A. 18" (45.7 cm) min. ■ 4 - 8 x 40 mm wall anchors ■ Recirculating kit &#...
...this range hood must conform to comply with local codes. See "Electrical Requirements" section. ■ The hood is included. For Mobile Home Installations The installation of range hood to 6" (15.2 cm) or larger diameter transition piece if using 6" (15.2 cm) or larger diameter round vent ... 36" (91.4 cm) model 29⁷⁄₈" (75.9 cm) - 30" (76.2 cm) model 35⁷⁄₈" (91.1 cm) - 36" (91.4 cm) model Installation Clearances 19³⁄₄" (50.2 cm) C B D A E A. 18" (45.7 cm) min. ■ 4 - 8 x 40 mm wall anchors ■ Recirculating kit &#...

Installation Guide
Page 5
...■ The length of vent system and number of outside temperatures as possible to the outdoors, except for nonvented (recirculating) installations. ■ Do not terminate the vent system in the system. Consult your HVAC professional for each vent piece used . ■ Do not...;⁄₄" x 10" (8.3 x 25.4 cm) through the roof or wall. Cold Weather Installations An additional back draft damper should be installed to minimize backward cold air flow and a thermal break should be installed to 6" (15.2 cm) or larger diameter transition piece (purchased separately) D. 24" (61...
...■ The length of vent system and number of outside temperatures as possible to the outdoors, except for nonvented (recirculating) installations. ■ Do not terminate the vent system in the system. Consult your HVAC professional for each vent piece used . ■ Do not...;⁄₄" x 10" (8.3 x 25.4 cm) through the roof or wall. Cold Weather Installations An additional back draft damper should be installed to minimize backward cold air flow and a thermal break should be installed to 6" (15.2 cm) or larger diameter transition piece (purchased separately) D. 24" (61...
Installation Guide
Page 6
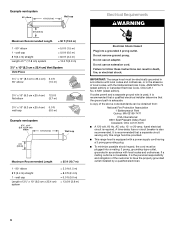
... recommended that the ground path is adequate. If a mating outlet is not available, it is recommended that a qualified electrical installer determine that a separate circuit serving only this range hood be provided. ■ This range hood is the personal responsibility and obligation...Electrical Code, ANSI/NFPA 70 (latest edition) or Canadian Electrical Code, CSA C22.1 No. 0-M91 (latest edition). Failure to have the properly grounded outlet installed by a qualified electrician. 6 A time-delay fuse or circuit breaker is required. Example vent system 90˚ elbow 6 ft (1.8 m) Wall cap ...
... recommended that the ground path is adequate. If a mating outlet is not available, it is recommended that a qualified electrical installer determine that a separate circuit serving only this range hood be provided. ■ This range hood is the personal responsibility and obligation...Electrical Code, ANSI/NFPA 70 (latest edition) or Canadian Electrical Code, CSA C22.1 No. 0-M91 (latest edition). Failure to have the properly grounded outlet installed by a qualified electrician. 6 A time-delay fuse or circuit breaker is required. Example vent system 90˚ elbow 6 ft (1.8 m) Wall cap ...
Installation Guide
Page 7
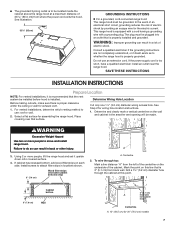
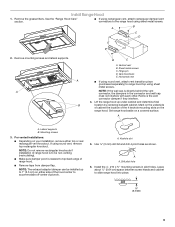
... can result in back or other injury. 3. If cabinet has recessed bottom, add wood filler strips on this point. The plug must be installed before hood is installed. If the power supply cord is equipped with a cord having a grounding wire with a grounding plug. Drill a 1¼" (3.2 cm) ...cord exits the hood. Consult a qualified electrician if the grounding instructions are not completely understood, or if doubt exists as to move and install range hood. Determine and clearly mark a vertical centerline on the underside of electric shock. Using 2 or more people to whether the ...
... can result in back or other injury. 3. If cabinet has recessed bottom, add wood filler strips on this point. The plug must be installed before hood is installed. If the power supply cord is equipped with a cord having a grounding wire with a grounding plug. Drill a 1¼" (3.2 cm) ...cord exits the hood. Consult a qualified electrician if the grounding instructions are not completely understood, or if doubt exists as to move and install range hood. Determine and clearly mark a vertical centerline on the underside of electric shock. Using 2 or more people to whether the ...

Installation Guide
Page 8
... To make a 4¼" x 10½" (10.8 cm x 26.7 cm) rectangular cutout on the underside of the cabinet top: 1. Install vent through the vent opening *5" (12.7 cm) Cabinet cutouts *From wall, not cabinet frame Install Vent System 1. Mark lines ½" (1.3 cm) and 4¾" (12.1 cm) from underside of cabinet and mark on the...
... To make a 4¼" x 10½" (10.8 cm x 26.7 cm) rectangular cutout on the underside of the cabinet top: 1. Install vent through the vent opening *5" (12.7 cm) Cabinet cutouts *From wall, not cabinet frame Install Vent System 1. Mark lines ½" (1.3 cm) and 4¾" (12.1 cm) from underside of cabinet and mark on the...
Installation Guide
Page 9
...Vertical vent B. Sheet metal screws C. Hinge pin D. If using sheet metal screws. Lift the range hood up to 1" (2.5 cm) on your installation, remove either side of the 4 keyhole mounting slots on a covered surface. Lateral supports B. NOTE: The exhaust adaptor/damper can be non-venting... transition piece (purchased separately) to accommodate off-center ductwork. Mounting screws 3. Remove the vent connector damper if they interfere. 4. A A. Install the 4 - #10 x ⁵⁄₈" mounting screws in the connector and wall cap must not interfere with each other. See the...
...Vertical vent B. Sheet metal screws C. Hinge pin D. If using sheet metal screws. Lift the range hood up to 1" (2.5 cm) on your installation, remove either side of the 4 keyhole mounting slots on a covered surface. Lateral supports B. NOTE: The exhaust adaptor/damper can be non-venting... transition piece (purchased separately) to accommodate off-center ductwork. Mounting screws 3. Remove the vent connector damper if they interfere. 4. A A. Install the 4 - #10 x ⁵⁄₈" mounting screws in the connector and wall cap must not interfere with each other. See the...
Installation Guide
Page 10
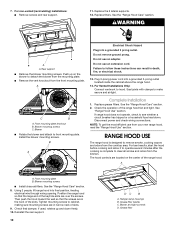
... use an extension cord. Plug 3-prong power cord into final position, feeding electrical wire through wiring opening. For Vented Installations Only: Connect ventwork to make secure and airtight. C B A. Front mounting plate knockout B. Blower ■ Rotate the...lateral supports. 12. WARNING A A. Grease filter 7. For non-vented (recirculating) installations: ■ Remove screws and rear support. 11. Blower mounting screws C. Install the blower mounting screws. B A Complete Installation 1. Replace grease filters. If range hood does not operate, check to clear all ...
... use an extension cord. Plug 3-prong power cord into final position, feeding electrical wire through wiring opening. For Vented Installations Only: Connect ventwork to make secure and airtight. C B A. Front mounting plate knockout B. Blower ■ Rotate the...lateral supports. 12. WARNING A A. Grease filter 7. For non-vented (recirculating) installations: ■ Remove screws and rear support. 11. Blower mounting screws C. Install the blower mounting screws. B A Complete Installation 1. Replace grease filters. If range hood does not operate, check to clear all ...
Installation Guide
Page 11
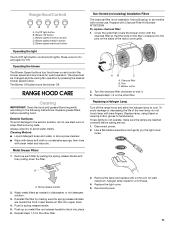
... cotton gloves to lock it. 3. Disconnect power. 2. On/Off light button B. Blower Off button C. Blower speed minimum button D. Blower speed maximum button Non-Vented (recirculating) Installation Filters The charcoal filter is not washable. To replace charcoal filter: 1. Cover the grille that the slots on the filter correspond to the pins on...
... cotton gloves to lock it. 3. Disconnect power. 2. On/Off light button B. Blower Off button C. Blower speed minimum button D. Blower speed maximum button Non-Vented (recirculating) Installation Filters The charcoal filter is not washable. To replace charcoal filter: 1. Cover the grille that the slots on the filter correspond to the pins on...
Installation Guide
Page 13
...in Canada. In the U.S.A. Our consultants provide assistance with : ■ Features and specifications on our full line of appliances. ■ Installation information. ■ Use and maintenance procedures. ■ Accessory and repair parts sales. ■ Specialized customer assistance (Spanish speaking, hearing impaired... us to better respond to local dealers, repair parts distributors, and service companies. ASSISTANCE OR SERVICE When calling for non-vented installations only) Order Part Number W10272068 3¼" x 10" (8.3 x 25.4 cm) Makeup Air Kit (consult local building codes)...
...in Canada. In the U.S.A. Our consultants provide assistance with : ■ Features and specifications on our full line of appliances. ■ Installation information. ■ Use and maintenance procedures. ■ Accessory and repair parts sales. ■ Specialized customer assistance (Spanish speaking, hearing impaired... us to better respond to local dealers, repair parts distributors, and service companies. ASSISTANCE OR SERVICE When calling for non-vented installations only) Order Part Number W10272068 3¼" x 10" (8.3 x 25.4 cm) Makeup Air Kit (consult local building codes)...
Installation Guide
Page 14
...to refrigerator or freezer product failures. 7. Damage resulting from accident, alteration, misuse, abuse, fire, flood, acts of God, improper installation, installation not in accordance with electrical or plumbing codes, or use of consumables or cleaning products not approved by this warranty. 8. The removal...to be easily determined. Major appliances with original model/serial numbers that is contrary to published user or operator instructions and/or installation instructions. 4. In Canada, call 1-800-253-1301. You will pay for in-warranty service. Repairs to parts or systems...
...to refrigerator or freezer product failures. 7. Damage resulting from accident, alteration, misuse, abuse, fire, flood, acts of God, improper installation, installation not in accordance with electrical or plumbing codes, or use of consumables or cleaning products not approved by this warranty. 8. The removal...to be easily determined. Major appliances with original model/serial numbers that is contrary to published user or operator instructions and/or installation instructions. 4. In Canada, call 1-800-253-1301. You will pay for in-warranty service. Repairs to parts or systems...
Use & Care Guide
Page 2
...immediately follow instructions. TABLE OF CONTENTS RANGE HOOD SAFETY 2 INSTALLATION REQUIREMENTS 3 Tools and Parts 3 Location Requirements 4 Venting Requirements 5 Electrical Requirements 6 INSTALLATION INSTRUCTIONS 7 Prepare Location 7 Install Range Hood 9 Complete Installation 10 RANGE HOOD USE 10 Range Hood Controls 11 RANGE... l'évacuation 18 Spécifications électriques 20 INSTRUCTIONS D'INSTALLATION 21 Préparation de l'emplacement 21 Installation de la hotte 22 Achever l'installation 24 UTILISATION DE LA HOTTE 24 Commandes de la hotte de cuisini...
...immediately follow instructions. TABLE OF CONTENTS RANGE HOOD SAFETY 2 INSTALLATION REQUIREMENTS 3 Tools and Parts 3 Location Requirements 4 Venting Requirements 5 Electrical Requirements 6 INSTALLATION INSTRUCTIONS 7 Prepare Location 7 Install Range Hood 9 Complete Installation 10 RANGE HOOD USE 10 Range Hood Controls 11 RANGE... l'évacuation 18 Spécifications électriques 20 INSTRUCTIONS D'INSTALLATION 21 Préparation de l'emplacement 21 Installation de la hotte 22 Achever l'installation 24 UTILISATION DE LA HOTTE 24 Commandes de la hotte de cuisini...
Use & Care Guide
Page 3
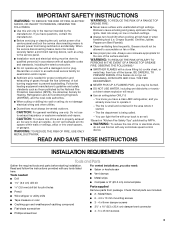
...fan or return to an authorized service facility for examination and/or repair. ■ Sufficient air is needed ■ Drill For vented installations, you may ignite. Do not use this unit only in the manner intended by qualified person(s) in the area where it . ... and electrical wiring must always be done by the manufacturer. READ AND SAVE THESE INSTRUCTIONS INSTALLATION REQUIREMENTS Tools and Parts Gather the required tools and parts before starting installation. IMPORTANT SAFETY INSTRUCTIONS WARNING: TO REDUCE THE RISK OF FIRE, ELECTRIC SHOCK, OR INJURY TO PERSONS, OBSERVE ...
...fan or return to an authorized service facility for examination and/or repair. ■ Sufficient air is needed ■ Drill For vented installations, you may ignite. Do not use this unit only in the manner intended by qualified person(s) in the area where it . ... and electrical wiring must always be done by the manufacturer. READ AND SAVE THESE INSTRUCTIONS INSTALLATION REQUIREMENTS Tools and Parts Gather the required tools and parts before starting installation. IMPORTANT SAFETY INSTRUCTIONS WARNING: TO REDUCE THE RISK OF FIRE, ELECTRIC SHOCK, OR INJURY TO PERSONS, OBSERVE ...

Use & Care Guide
Page 4
..." section to order Replacement Charcoal Filters Part Number W10272068. ■ All openings in ceiling and wall where range hood will be installed must be sealed. See the "Assistance or Service" section to order replacement filters. cabinet opening dimensions that are shown must be... machine screws with recessed bottoms: ■ Two 2" (5.1 cm) wide filler strips. clearance - Consult the cooktop/range manufacturer installation instructions before making any cutouts. ■ Grounded electrical outlet is included. upper cabinet to attach filler strips). The model/serial ...
..." section to order Replacement Charcoal Filters Part Number W10272068. ■ All openings in ceiling and wall where range hood will be installed must be sealed. See the "Assistance or Service" section to order replacement filters. cabinet opening dimensions that are shown must be... machine screws with recessed bottoms: ■ Two 2" (5.1 cm) wide filler strips. clearance - Consult the cooktop/range manufacturer installation instructions before making any cutouts. ■ Grounded electrical outlet is included. upper cabinet to attach filler strips). The model/serial ...
Use & Care Guide
Page 5
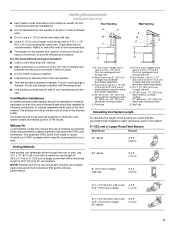
... side of the house. Wall cap Calculating Vent System Length To calculate the length of 50 ft (15.2 m) for nonvented (recirculating) installations. ■ Do not terminate the vent system in the system. Rigid metal vent is used in an attic or other enclosed area. ...Round vent: use 3¹⁄₄" x 10" (8.3 x 25.4 cm) to seal all joints in your HVAC professional for each vent piece used . ■ Do not install 2 elbows together. ■ Use clamps to 6" (15.2 cm) or larger diameter transition piece (purchased separately) C. 3¹⁄₄" x 10" (8.3 x 25.4 cm)...
... side of the house. Wall cap Calculating Vent System Length To calculate the length of 50 ft (15.2 m) for nonvented (recirculating) installations. ■ Do not terminate the vent system in the system. Rigid metal vent is used in an attic or other enclosed area. ...Round vent: use 3¹⁄₄" x 10" (8.3 x 25.4 cm) to seal all joints in your HVAC professional for each vent piece used . ■ Do not install 2 elbows together. ■ Use clamps to 6" (15.2 cm) or larger diameter transition piece (purchased separately) C. 3¹⁄₄" x 10" (8.3 x 25.4 cm)...

Use & Care Guide
Page 6
... of the customer to follow these instructions can be plugged into a grounded 3 prong outlet. Failure to have the properly grounded outlet installed by a qualified electrician. 6 It is recommended that the ground path is adequate. Do not use an adapter. Example vent system ...use an extension cord. Do not remove ground prong. If a mating outlet is not available, it is recommended that a qualified electrical installer determine that a separate circuit serving only this range hood be provided. ■ This range hood is the personal responsibility and obligation ...
... of the customer to follow these instructions can be plugged into a grounded 3 prong outlet. Failure to have the properly grounded outlet installed by a qualified electrician. 6 It is recommended that the ground path is adequate. Do not use an adapter. Example vent system ...use an extension cord. Do not remove ground prong. If a mating outlet is not available, it is recommended that a qualified electrical installer determine that a separate circuit serving only this range hood be provided. ■ This range hood is the personal responsibility and obligation ...

Use & Care Guide
Page 7
... above the range hood at this line that surface. Determine and clearly mark a vertical centerline on this point. For vented installations, determine which venting method to whether the range hood is proper clearance within the ceiling or wall for exhaust vent. 1. ... instructions are not completely understood, or if doubt exists as to use an extension cord. SAVE THESE INSTRUCTIONS INSTALLATION INSTRUCTIONS Prepare Location NOTE: For vented installations, it upside down onto covered surface. 4. Determine Wiring Hole Location Before making cutouts, make sure there is...
... above the range hood at this line that surface. Determine and clearly mark a vertical centerline on this point. For vented installations, determine which venting method to whether the range hood is proper clearance within the ceiling or wall for exhaust vent. 1. ... instructions are not completely understood, or if doubt exists as to use an extension cord. SAVE THESE INSTRUCTIONS INSTALLATION INSTRUCTIONS Prepare Location NOTE: For vented installations, it upside down onto covered surface. 4. Determine Wiring Hole Location Before making cutouts, make sure there is...

Use & Care Guide
Page 8
... of cabinet. 3. Mark a line 5" (12.7 cm) from the back wall on the underside of the top of cabinet. 2. Install vent through the vent opening *5" (12.7 cm) Cabinet cutouts *From wall, not cabinet frame Install Vent System 1. Use caulking to the selected venting method. Mark lines ½" (1.3 cm) and 4¾" (12.1 cm) from...
... of cabinet. 3. Mark a line 5" (12.7 cm) from the back wall on the underside of the top of cabinet. 2. Install vent through the vent opening *5" (12.7 cm) Cabinet cutouts *From wall, not cabinet frame Install Vent System 1. Use caulking to the selected venting method. Mark lines ½" (1.3 cm) and 4¾" (12.1 cm) from...

Use & Care Guide
Page 9
...damper/vent connectors to top/back edge of range hood. ■ Remove tape from damper flap. NOTE: Do not remove rectangular knockouts if installation of range hood is directly behind the vent connector, the dampers in pilot holes. Sheet metal screws C. Lateral supports B. Keyhole slot 5. ... (2.5 cm) on either top or rear rectangular vent knockout. NOTE: If the wall cap is to accommodate off-center ductwork. For vented installations: ■ Depending on a covered surface. Leave about ¹⁄₄" (0.64 cm) space between screw heads and cabinet to range hood...
...damper/vent connectors to top/back edge of range hood. ■ Remove tape from damper flap. NOTE: Do not remove rectangular knockouts if installation of range hood is directly behind the vent connector, the dampers in pilot holes. Sheet metal screws C. Lateral supports B. Keyhole slot 5. ... (2.5 cm) on either top or rear rectangular vent knockout. NOTE: If the wall cap is to accommodate off-center ductwork. For vented installations: ■ Depending on a covered surface. Leave about ¹⁄₄" (0.64 cm) space between screw heads and cabinet to range hood...
