
Installation Instructions
Page 1
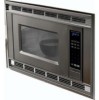
... 30" (76,2 cm) : (Y)RBS305PD, GBS307PD, (Y)KEBI101D, (Y)KEBS107D Table of Contents / Table des matières MICROWAVE OVEN SAFETY 1 INSTALLATION INSTRUCTIONS 2 Tools and Parts 2 Minimum Cutout Dimensions 2 Trim Kit Frame Dimensions 2 Electrical Requirements 2 Microwave Oven Preparation 3 Bottom Duct Assembly 3 Side Duct and Upper Duct Assembly 3 Anti-Tip Bracket Installation 4 Microwave Oven Placement 4 Trim Kit Frame Installation 4 SÉCURITÉ DU FOUR À MICRO-ONDES 5 INSTRUCTIONS D'INSTALLATION...
... 30" (76,2 cm) : (Y)RBS305PD, GBS307PD, (Y)KEBI101D, (Y)KEBS107D Table of Contents / Table des matières MICROWAVE OVEN SAFETY 1 INSTALLATION INSTRUCTIONS 2 Tools and Parts 2 Minimum Cutout Dimensions 2 Trim Kit Frame Dimensions 2 Electrical Requirements 2 Microwave Oven Preparation 3 Bottom Duct Assembly 3 Side Duct and Upper Duct Assembly 3 Anti-Tip Bracket Installation 4 Microwave Oven Placement 4 Trim Kit Frame Installation 4 SÉCURITÉ DU FOUR À MICRO-ONDES 5 INSTRUCTIONS D'INSTALLATION...
Installation Instructions
Page 2
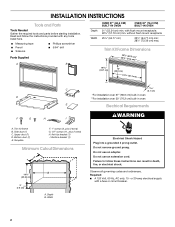
....0 cm) 24¹⁄₈" (61.3 cm) C D E F G H I . Bottom duct (1) E. Trim kit frame B. Read and follow these instructions can result in oven Electrical Requirements WARNING Electrical Shock Hazard Plug into a grounded 3 prong outlet. Width 2.1 cm) *For installation over 27" (68.6 cm) built-in oven **For installation over 30" (76.2 cm) built-in death, fire, or electrical shock. with...
....0 cm) 24¹⁄₈" (61.3 cm) C D E F G H I . Bottom duct (1) E. Trim kit frame B. Read and follow these instructions can result in oven Electrical Requirements WARNING Electrical Shock Hazard Plug into a grounded 3 prong outlet. Width 2.1 cm) *For installation over 27" (68.6 cm) built-in oven **For installation over 30" (76.2 cm) built-in death, fire, or electrical shock. with...

Installation Instructions
Page 3
... side of side duct. 2. GROUNDING INSTRUCTIONS ■ For all cord connected appliances: The microwave oven must be grounded. Bend tabs upward. Recommended: ■ A time-delay fuse or time-delay circuit breaker. ■ A separate circuit serving only this microwave oven. SAVE THESE INSTRUCTIONS Microwave Oven Preparation 1. Bottom Duct Assembly 1. Tabs of microwave oven) A. Bottom bracket B. 1/2" screws (2) 2. Install bottom duct with existing screw.
... side of side duct. 2. GROUNDING INSTRUCTIONS ■ For all cord connected appliances: The microwave oven must be grounded. Bend tabs upward. Recommended: ■ A time-delay fuse or time-delay circuit breaker. ■ A separate circuit serving only this microwave oven. SAVE THESE INSTRUCTIONS Microwave Oven Preparation 1. Bottom Duct Assembly 1. Tabs of microwave oven) A. Bottom bracket B. 1/2" screws (2) 2. Install bottom duct with existing screw.

Installation Instructions
Page 4
... of cutout floor. 4. NOTE: Bottom bracket must be flat against cutout floor in the front. 2. Pilot hole C. 1" screw D. Make sure the trim kit frame is correct as stated in microwave oven. 3. Save this installation instruction for anti-tip bracket. (Use 5/64" drill.) 3. Bottom bracket 2. Cutout opening B. Center line C. Cutout opening B. Mounting hole B. On cutout floor...
... of cutout floor. 4. NOTE: Bottom bracket must be flat against cutout floor in the front. 2. Pilot hole C. 1" screw D. Make sure the trim kit frame is correct as stated in microwave oven. 3. Save this installation instruction for anti-tip bracket. (Use 5/64" drill.) 3. Bottom bracket 2. Cutout opening B. Center line C. Cutout opening B. Mounting hole B. On cutout floor...


