
Installation Instructions
Page 1
...(Y)RBS275PD, (Y)GBS277PD, KEBI171D, (Y)KEBS177D 30" (76,2 cm) : (Y)RBS305PD, GBS307PD, (Y)KEBI101D, (Y)KEBS107D Table of Contents / Table des matières MICROWAVE OVEN SAFETY 1 INSTALLATION INSTRUCTIONS 2 Tools and Parts 2 Minimum Cutout Dimensions 2 Trim Kit Frame Dimensions 2 Electrical Requirements 2 Microwave Oven Preparation 3 Bottom Duct Assembly 3 Side Duct and Upper Duct Assembly 3 Anti-Tip Bracket Installation 4 Microwave Oven Placement 4 Trim Kit Frame Installation 4 SÉCURITÉ DU FOUR À MICRO-ONDES 5 INSTRUCTIONS D'INSTALLATION 5 Outillage et piè...
...(Y)RBS275PD, (Y)GBS277PD, KEBI171D, (Y)KEBS177D 30" (76,2 cm) : (Y)RBS305PD, GBS307PD, (Y)KEBI101D, (Y)KEBS107D Table of Contents / Table des matières MICROWAVE OVEN SAFETY 1 INSTALLATION INSTRUCTIONS 2 Tools and Parts 2 Minimum Cutout Dimensions 2 Trim Kit Frame Dimensions 2 Electrical Requirements 2 Microwave Oven Preparation 3 Bottom Duct Assembly 3 Side Duct and Upper Duct Assembly 3 Anti-Tip Bracket Installation 4 Microwave Oven Placement 4 Trim Kit Frame Installation 4 SÉCURITÉ DU FOUR À MICRO-ONDES 5 INSTRUCTIONS D'INSTALLATION 5 Outillage et piè...
Installation Instructions
Page 2
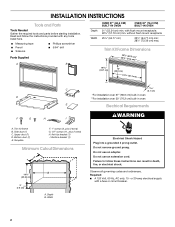
... Dimensions 2296 7(658.9.2ccmm)*)** 19 48.7 cm) 13" (33.0 cm) 24¹⁄₈" (61.3 cm) C D E F G H I . Do not use an extension cord. Trim kit frame B. Failure to follow the instructions provided with a fuse or circuit breaker. 2 Bottom duct (1) E. Observe all governing codes and ordinances. Read and follow these instructions can result in oven Electrical Requirements WARNING Electrical Shock Hazard Plug into a grounded 3 prong outlet. Template F. 1" screws...
... Dimensions 2296 7(658.9.2ccmm)*)** 19 48.7 cm) 13" (33.0 cm) 24¹⁄₈" (61.3 cm) C D E F G H I . Do not use an extension cord. Trim kit frame B. Failure to follow the instructions provided with a fuse or circuit breaker. 2 Bottom duct (1) E. Observe all governing codes and ordinances. Read and follow these instructions can result in oven Electrical Requirements WARNING Electrical Shock Hazard Plug into a grounded 3 prong outlet. Template F. 1" screws...

Installation Instructions
Page 3
... a risk of bottom duct) Side Duct and Upper Duct Assembly Connect side duct to whether the microwave oven is equipped with a cord having a grounding wire with existing screw. Fasten bottom bracket to bottom duct using two 1/2" screws. (Rear view of electric shock. Tabs of electric shock by providing an escape wire for the electric current. Align the duct assembly screw hole to the microwave oven. 3. Bottom bracket B. 1/2" screws (2) 2. If the power supply cord is properly installed and grounded. The...
... a risk of bottom duct) Side Duct and Upper Duct Assembly Connect side duct to whether the microwave oven is equipped with a cord having a grounding wire with existing screw. Fasten bottom bracket to bottom duct using two 1/2" screws. (Rear view of electric shock. Tabs of electric shock by providing an escape wire for the electric current. Align the duct assembly screw hole to the microwave oven. 3. Bottom bracket B. 1/2" screws (2) 2. If the power supply cord is properly installed and grounded. The...

Installation Instructions
Page 4
... trim kit frame is centered within cutout opening B. Anti-tip bracket Microwave Oven Placement 1. Mounting hole B. NOTE: Trim kit frame must be oriented so that have been removed from microwave oven cavity. Replace any loose items that the louvers are sloping downward in Step 2. Bottom duct B. A B C A. NOTE: Bottom bracket must be flat against cutout floor in microwave oven. 3. Pilot hole C. 1" screw D. Remove trim kit frame and drill 4 pilot holes. (Use 5/64" drill.) 4. Save this installation instruction...
... trim kit frame is centered within cutout opening B. Anti-tip bracket Microwave Oven Placement 1. Mounting hole B. NOTE: Trim kit frame must be oriented so that have been removed from microwave oven cavity. Replace any loose items that the louvers are sloping downward in Step 2. Bottom duct B. A B C A. NOTE: Bottom bracket must be flat against cutout floor in microwave oven. 3. Pilot hole C. 1" screw D. Remove trim kit frame and drill 4 pilot holes. (Use 5/64" drill.) 4. Save this installation instruction...


