
Installation Instructions
Page 1
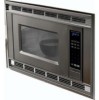
..., (Y)GBS277PD, KEBI171D, (Y)KEBS177D 30" (76,2 cm) : (Y)RBS305PD, GBS307PD, (Y)KEBI101D, (Y)KEBS107D Table of Contents / Table des matières MICROWAVE OVEN SAFETY 1 INSTALLATION INSTRUCTIONS 2 Tools and Parts 2 Minimum Cutout Dimensions 2 Trim Kit Frame Dimensions 2 Electrical Requirements 2 Microwave Oven Preparation 3 Bottom Duct Assembly 3 Side Duct and Upper Duct Assembly 3 Anti-Tip Bracket Installation 4 Microwave Oven Placement 4 Trim Kit Frame Installation 4 SÉCURITÉ DU...
..., (Y)GBS277PD, KEBI171D, (Y)KEBS177D 30" (76,2 cm) : (Y)RBS305PD, GBS307PD, (Y)KEBI101D, (Y)KEBS107D Table of Contents / Table des matières MICROWAVE OVEN SAFETY 1 INSTALLATION INSTRUCTIONS 2 Tools and Parts 2 Minimum Cutout Dimensions 2 Trim Kit Frame Dimensions 2 Electrical Requirements 2 Microwave Oven Preparation 3 Bottom Duct Assembly 3 Side Duct and Upper Duct Assembly 3 Anti-Tip Bracket Installation 4 Microwave Oven Placement 4 Trim Kit Frame Installation 4 SÉCURITÉ DU...
Installation Instructions
Page 2
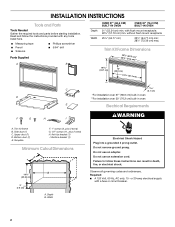
... (1) E. Anti-tip bracket (1) I A. Do not remove ground prong. INSTALLATION INSTRUCTIONS Tools and Parts Tools Needed Gather the required tools and parts before starting installation. with a fuse or circuit breaker. 2 Trim kit frame B. Observe all governing codes and ordinances. Bottom bracket (1) Minimum ...Supplied A B Depth Width OVER 27" (68.6 CM) BUILT-IN OVEN OVER 30" (76.2 CM) BUILT-IN OVEN 21" (53.34 cm) min. Template F. 1" screws (4, plus 2 extra) G. 1/2" screws (11, plus 2 extra) H. Depth B. Trim Kit Frame Dimensions 2296 7(658.9.2ccmm)*)** 19 48.7 cm) 13" (...
... (1) E. Anti-tip bracket (1) I A. Do not remove ground prong. INSTALLATION INSTRUCTIONS Tools and Parts Tools Needed Gather the required tools and parts before starting installation. with a fuse or circuit breaker. 2 Trim kit frame B. Observe all governing codes and ordinances. Bottom bracket (1) Minimum ...Supplied A B Depth Width OVER 27" (68.6 CM) BUILT-IN OVEN OVER 30" (76.2 CM) BUILT-IN OVEN 21" (53.34 cm) min. Template F. 1" screws (4, plus 2 extra) G. 1/2" screws (11, plus 2 extra) H. Depth B. Trim Kit Frame Dimensions 2296 7(658.9.2ccmm)*)** 19 48.7 cm) 13" (...

Installation Instructions
Page 3
... hole on ducts, then fasten with two 1/2" screws to back of microwave oven, and two 1/2" screws to upper duct: 1. Align the duct assembly screw hole to the microwave oven. 3. A B A. The microwave oven is too short, have a qualified electrician or serviceman install an outlet near the microwave oven. Do not use of the grounding plug can result in side duct...
... hole on ducts, then fasten with two 1/2" screws to back of microwave oven, and two 1/2" screws to upper duct: 1. Align the duct assembly screw hole to the microwave oven. 3. A B A. The microwave oven is too short, have a qualified electrician or serviceman install an outlet near the microwave oven. Do not use of the grounding plug can result in side duct...

Installation Instructions
Page 4
... drill 4 pilot holes. (Use 5/64" drill.) 4. On cutout floor, use template to microwave oven. Cutout opening B. Trim kit frame 1. A 4¹⁄₄" (10.8 cm) 3" (7.6 cm) 18 46.2 cm) A B C A. Positioning flange C. 1/2" screws Trim Kit Frame Installation A B C D B A. 1/2" screws B. A A. Place trim kit frame over microwave oven. Cutout floor 2. Slide microwave oven partway into cutout opening and slide it into place, engaging anti-tip...
... drill 4 pilot holes. (Use 5/64" drill.) 4. On cutout floor, use template to microwave oven. Cutout opening B. Trim kit frame 1. A 4¹⁄₄" (10.8 cm) 3" (7.6 cm) 18 46.2 cm) A B C A. Positioning flange C. 1/2" screws Trim Kit Frame Installation A B C D B A. 1/2" screws B. A A. Place trim kit frame over microwave oven. Cutout floor 2. Slide microwave oven partway into cutout opening and slide it into place, engaging anti-tip...

