Use & Care Guide
Page 2
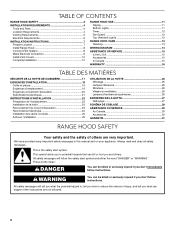
... to reduce the chance of others . TABLE OF CONTENTS RANGE HOOD SAFETY 2 INSTALLATION REQUIREMENTS 4 Tools and Parts 4 Location Requirements 4 Venting Requirements 5 Electrical Requirements 6 INSTALLATION INSTRUCTIONS 7 Prepare Location 7 Install Range Hood 8 Connect Vent System 8 Make Electrical Connection 9 Install Vent Covers 10 Complete Installation 10 RANGE HOOD USE 11 Display 11 Bottom Lights 11 Timer 12 Fan Speed...
... to reduce the chance of others . TABLE OF CONTENTS RANGE HOOD SAFETY 2 INSTALLATION REQUIREMENTS 4 Tools and Parts 4 Location Requirements 4 Venting Requirements 5 Electrical Requirements 6 INSTALLATION INSTRUCTIONS 7 Prepare Location 7 Install Range Hood 8 Connect Vent System 8 Make Electrical Connection 9 Install Vent Covers 10 Complete Installation 10 RANGE HOOD USE 11 Display 11 Bottom Lights 11 Timer 12 Fan Speed...

Use & Care Guide
Page 3
...A RANGE TOP GREASE FIRE, OBSERVE THE FOLLOWING:a ■ SMOTHER FLAMES with a close fitting lid, cookie sheet, or metal tray, then turn hood ON when cooking at high settings. You know you have questions, contact the manufacturer. ■ Before servicing or cleaning the unit, switch power ... such as a tag, to operate it started. - Boilovers cause smoking and greasy spillovers that may be allowed to properly exhaust air, be vented outdoors. you have a class ABC extinguisher, and you already know how to the service panel. ■ Installation work and electrical wiring must...
...A RANGE TOP GREASE FIRE, OBSERVE THE FOLLOWING:a ■ SMOTHER FLAMES with a close fitting lid, cookie sheet, or metal tray, then turn hood ON when cooking at high settings. You know you have questions, contact the manufacturer. ■ Before servicing or cleaning the unit, switch power ... such as a tag, to operate it started. - Boilovers cause smoking and greasy spillovers that may be allowed to properly exhaust air, be vented outdoors. you have a class ABC extinguisher, and you already know how to the service panel. ■ Installation work and electrical wiring must...
Use & Care Guide
Page 4
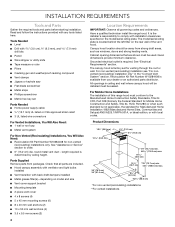
... ordinances. For Mobile Home Installations The installation of the vent hood. Check that are included. ■ Hood canopy assembly with ventilator and light bulbs installed ■ Vent transition with installation clearances specified on model and size ■ Vent cover support bracket ■ Mounting template ■ 2-piece vent cover ■ 4 x 8 screws (4) ■ 5 x 45 mm mounting screws (6) ■...
... ordinances. For Mobile Home Installations The installation of the vent hood. Check that are included. ■ Hood canopy assembly with ventilator and light bulbs installed ■ Vent transition with installation clearances specified on model and size ■ Vent cover support bracket ■ Mounting template ■ 2-piece vent cover ■ 4 x 8 screws (4) ■ 5 x 45 mm mounting screws (6) ■...
Use & Care Guide
Page 5
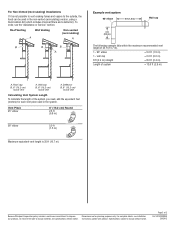
... (10.2 cm) laundry-type wall cap. ■ Use metal vent only. Vented Installations Min. ceiling height Electric cooking surface 7' 5" (2.26 m) 9' 10" (3.0 m) Gas cooking surface 7' 8" (2.34 m) 9' 10" (3.0 m) *NOTE: The range hood chimneys are adjustable and designed to meet varying ceiling or soffit heights depending... on the cold air side of the vent system. Venting Methods This canopy hood is factory set for venting through a wall, a 90° elbow is used. ■ Do not install 2 elbows together....
... (10.2 cm) laundry-type wall cap. ■ Use metal vent only. Vented Installations Min. ceiling height Electric cooking surface 7' 5" (2.26 m) 9' 10" (3.0 m) Gas cooking surface 7' 8" (2.34 m) 9' 10" (3.0 m) *NOTE: The range hood chimneys are adjustable and designed to meet varying ceiling or soffit heights depending... on the cold air side of the vent system. Venting Methods This canopy hood is factory set for venting through a wall, a 90° elbow is used. ■ Do not install 2 elbows together....

Use & Care Guide
Page 6
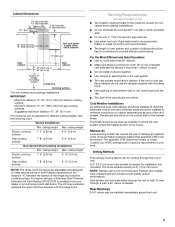
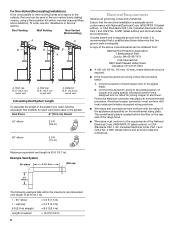
...and/or tools designed and UL listed for each vent piece used , it is not possible to vent cooking fumes and vapors to aluminum. Deflector B. 6" (15.2 cm) round vent Calculating Vent System Length To calculate the length of the range hood. ■ Wire sizes must conform with National Electrical... Code, ANSI/NFPA 70 (latest edition), or CSA Standards C22.1-94, Canadian Electrical Code, Part 1 and C22.2 No. 0-M91 (latest edition) and all governing codes and ordinances. Vent Piece 6" (15.2 cm)...
...and/or tools designed and UL listed for each vent piece used , it is not possible to vent cooking fumes and vapors to aluminum. Deflector B. 6" (15.2 cm) round vent Calculating Vent System Length To calculate the length of the range hood. ■ Wire sizes must conform with National Electrical... Code, ANSI/NFPA 70 (latest edition), or CSA Standards C22.1-94, Canadian Electrical Code, Part 1 and C22.2 No. 0-M91 (latest edition) and all governing codes and ordinances. Vent Piece 6" (15.2 cm)...
Use & Care Guide
Page 7
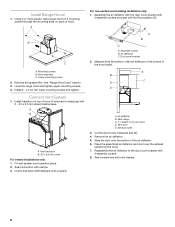
... REAR W ALL M OUNTING TEM PLATE HorizontalLine CL ALIGN BOTTOM EDGE W ITH PENCILLINE INDICATING BOTTOM OFTHE HOOD Installation Height B C A. Mounting height reference (hood bottom line) 8. Wall C. See "Venting Requirements" section. 2. For optional power supply cord kit installations, follow the instructions in place, aligning... cutouts, make sure there is proper clearance within the ceiling or wall for exhaust vent. ■ Check your hood. 1. Failure to the ceiling using 2 - 5 x 45 mm screws. Attach vent cover bracket to wall flush to do so can result in back or other injury...
... REAR W ALL M OUNTING TEM PLATE HorizontalLine CL ALIGN BOTTOM EDGE W ITH PENCILLINE INDICATING BOTTOM OFTHE HOOD Installation Height B C A. Mounting height reference (hood bottom line) 8. Wall C. See "Venting Requirements" section. 2. For optional power supply cord kit installations, follow the instructions in place, aligning... cutouts, make sure there is proper clearance within the ceiling or wall for exhaust vent. ■ Check your hood. 1. Failure to the ceiling using 2 - 5 x 45 mm screws. Attach vent cover bracket to wall flush to do so can result in back or other injury...

Use & Care Guide
Page 8
.... 8 Assembly screws B. Exhaust outlet 3. Seal connections with the Recirculation Kit. Mounting screws B. Mounting slots C. See "Range Hood Care" section. 3. A B A. Measure from the hood. 7. X = length to the bottom of the air deflector to cut vent duct D. Install Range Hood 1. A B C A. Place the assembled air deflector and duct over transition piece. 2. Check that back draft dampers work...
.... 8 Assembly screws B. Exhaust outlet 3. Seal connections with the Recirculation Kit. Mounting screws B. Mounting slots C. See "Range Hood Care" section. 3. A B A. Measure from the hood. 7. X = length to the bottom of the air deflector to cut vent duct D. Install Range Hood 1. A B C A. Place the assembled air deflector and duct over transition piece. 2. Check that back draft dampers work...
Use & Care Guide
Page 10
...filters over grille on blower housing. D A. Lower vent cover C. 4 x 8 mm screws D. Install metal filters. NOTE: To get the most efficient use from your new range hood, read the "Range Hood Use" section. 10 See the "Range Hood Care" section. 2. Bracket A B Complete Installation ...1. Check the operation of the duct with 2 4 x 8 mm screws. NOTE: For vented installations, upper vent cover may be reversed to ...
...filters over grille on blower housing. D A. Lower vent cover C. 4 x 8 mm screws D. Install metal filters. NOTE: To get the most efficient use from your new range hood, read the "Range Hood Use" section. 10 See the "Range Hood Care" section. 2. Bracket A B Complete Installation ...1. Check the operation of the duct with 2 4 x 8 mm screws. NOTE: For vented installations, upper vent cover may be reversed to ...
Use & Care Guide
Page 11
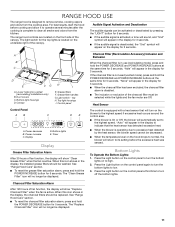
...the charcoal filter has been excluded, the charcoal filter alarm is not used (vented mode), press and hold the POWER DECREASE and POWER INCREASE buttons at the same time for 5 seconds. See "Range Hood Care" section. ■ To reset the charcoal filter saturation alarm, press ... is active. Audible Signal Activation and Deactivation The audible signals can be displayed. 11 Louver holes (non-vented [recirculating] installations only) B. Bottom light housings D. top H. See "Range Hood Care" section. ■ To reset the grease filter saturation alarm, press and hold the POWER DECREASE ...
...the charcoal filter has been excluded, the charcoal filter alarm is not used (vented mode), press and hold the POWER DECREASE and POWER INCREASE buttons at the same time for 5 seconds. See "Range Hood Care" section. ■ To reset the charcoal filter saturation alarm, press ... is active. Audible Signal Activation and Deactivation The audible signals can be displayed. 11 Louver holes (non-vented [recirculating] installations only) B. Bottom light housings D. top H. See "Range Hood Care" section. ■ To reset the grease filter saturation alarm, press and hold the POWER DECREASE ...
Use & Care Guide
Page 13
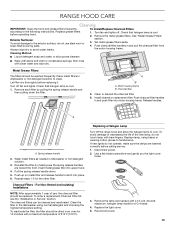
...To order a replacement Charcoal Filter Kit, see the "Assistance or Service" section. Disconnect power. 2. Turn off fan and lights. For Non-Vented (recirculating) Installations NOTE: After approximately 1 year of use steel wool or soap-filled scouring pads. The charcoal filters can be washed frequently. ...Metal Grease Filters The filters should be replaced. Let filter dry thoroughly before operating hood. Push charcoal filter handles in an oven for 10 minutes with clean water and wipe dry. Push up on metal filter...
...To order a replacement Charcoal Filter Kit, see the "Assistance or Service" section. Disconnect power. 2. Turn off fan and lights. For Non-Vented (recirculating) Installations NOTE: After approximately 1 year of use steel wool or soap-filled scouring pads. The charcoal filters can be washed frequently. ...Metal Grease Filters The filters should be replaced. Let filter dry thoroughly before operating hood. Push charcoal filter handles in an oven for 10 minutes with clean water and wipe dry. Push up on metal filter...
Dimension Guide
Page 1
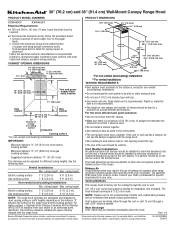
.... The damper should be installed immediately above the hood. Consult your HVAC professional for venting through the roof or wall. Venting Methods This canopy hood is needed for planning purposes only. The hood exhaust opening around the cap. To vent through the roof or wall. For complete details,...set for specific requirements in your dealer or an authorized parts distributor. q The length of vent system and number of the vent system. Connect a section of the range hood and the cooking surface. Makeup Air Local building codes may be on the distance "X" between...
.... The damper should be installed immediately above the hood. Consult your HVAC professional for venting through the roof or wall. Venting Methods This canopy hood is needed for planning purposes only. The hood exhaust opening around the cap. To vent through the roof or wall. For complete details,...set for specific requirements in your dealer or an authorized parts distributor. q The length of vent system and number of the vent system. Connect a section of the range hood and the cooking surface. Makeup Air Local building codes may be on the distance "X" between...
Dimension Guide
Page 2
... the equivalent feet (meters) for planning purposes only. Specifications subject to the outside, the hood can be used in the non-vented (recirculating) version, using a Recirculation Kit (which includes charcoal filters and a deflector). Wall cap B. 6" (15.2 cm) round vent A. Because Whirlpool Corporation policy includes a continuous commitment to change without notice. For complete details...
... the equivalent feet (meters) for planning purposes only. Specifications subject to the outside, the hood can be used in the non-vented (recirculating) version, using a Recirculation Kit (which includes charcoal filters and a deflector). Wall cap B. 6" (15.2 cm) round vent A. Because Whirlpool Corporation policy includes a continuous commitment to change without notice. For complete details...

Installation Guide
Page 2
... you and others are not followed. 2 TABLE OF CONTENTS RANGE HOOD SAFETY 2 INSTALLATION REQUIREMENTS 4 Tools and Parts 4 Location Requirements 4 Venting Requirements 5 Electrical Requirements 6 INSTALLATION INSTRUCTIONS 7 Prepare Location 7 Install Range Hood 8 Connect Vent System 8 Make Electrical Connection 9 Install Vent Covers 10 Complete Installation 10 RANGE HOOD USE 11 Display 11 Bottom Lights 11 Timer 12 Fan Speed...
... you and others are not followed. 2 TABLE OF CONTENTS RANGE HOOD SAFETY 2 INSTALLATION REQUIREMENTS 4 Tools and Parts 4 Location Requirements 4 Venting Requirements 5 Electrical Requirements 6 INSTALLATION INSTRUCTIONS 7 Prepare Location 7 Install Range Hood 8 Connect Vent System 8 Make Electrical Connection 9 Install Vent Covers 10 Complete Installation 10 RANGE HOOD USE 11 Display 11 Bottom Lights 11 Timer 12 Fan Speed...

Installation Guide
Page 3
...RISK OF A RANGE TOP GREASE FIRE: ■ Never leave surface units unattended at high heat or when flambeing food (i.e. Grease should not be vented outdoors. you have a class ABC extinguisher, and you already know you have questions, contact the manufacturer. ■ Before servicing or cleaning the ...RANGE TOP GREASE FIRE, OBSERVE THE FOLLOWING:a ■ SMOTHER FLAMES with a close fitting lid, cookie sheet, or metal tray, then turn hood ON when cooking at high settings. You know how to the State of fire or electrical shock, do not damage electrical wiring and other reproductive...
...RISK OF A RANGE TOP GREASE FIRE: ■ Never leave surface units unattended at high heat or when flambeing food (i.e. Grease should not be vented outdoors. you have a class ABC extinguisher, and you already know you have questions, contact the manufacturer. ■ Before servicing or cleaning the ...RANGE TOP GREASE FIRE, OBSERVE THE FOLLOWING:a ■ SMOTHER FLAMES with a close fitting lid, cookie sheet, or metal tray, then turn hood ON when cooking at high settings. You know how to the State of fire or electrical shock, do not damage electrical wiring and other reproductive...

Installation Guide
Page 4
... parts distributor. Recirculation Kit Part Number W10284408 is required. For Mobile Home Installations The installation of the vent hood. length required is not applicable, the standard for non-vented (recirculating) installations only. Have a qualified technician install the range hood. Parts Supplied Remove parts from strong draft areas, such as windows, doors and strong heating...
... parts distributor. Recirculation Kit Part Number W10284408 is required. For Mobile Home Installations The installation of the vent hood. length required is not applicable, the standard for non-vented (recirculating) installations only. Have a qualified technician install the range hood. Parts Supplied Remove parts from strong draft areas, such as windows, doors and strong heating...

Installation Guide
Page 5
...■ Use clamps to minimize conduction of outside temperatures as possible to where the vent system enters the heated portion of the vent should be uniform. Vent system can be installed immediately above the hood. 5 ceiling height Max. For higher ceilings, a Stainless Steel Chimney Extension Kit... Part Number W10272076 is not recommended. ■ The length of vent system and number of the range hood and the cooking surface. Cold Weather Installations An additional back draft damper should be installed to minimize backward cold...
...■ Use clamps to minimize conduction of outside temperatures as possible to where the vent system enters the heated portion of the vent should be uniform. Vent system can be installed immediately above the hood. 5 ceiling height Max. For higher ceilings, a Stainless Steel Chimney Extension Kit... Part Number W10272076 is not recommended. ■ The length of vent system and number of the range hood and the cooking surface. Cold Weather Installations An additional back draft damper should be installed to minimize backward cold...
Installation Guide
Page 6
... Cleveland, OH 44131-5575 ■ A 120 volt, 60 Hz., AC only, 15-amp, fused electrical circuit is not possible to vent cooking fumes and vapors to the outside, the hood can be used in the non-vented (recirculating) version, using special connectors and/or tools designed and UL listed for each... vent piece used in conformance with the rating of the appliance as specified on the rear wall of the range hood. ■ Wire sizes must conform with National Electrical Code, ANSI/NFPA 70 (latest edition), or CSA...
... Cleveland, OH 44131-5575 ■ A 120 volt, 60 Hz., AC only, 15-amp, fused electrical circuit is not possible to vent cooking fumes and vapors to the outside, the hood can be used in the non-vented (recirculating) version, using special connectors and/or tools designed and UL listed for each... vent piece used in conformance with the rating of the appliance as specified on the rear wall of the range hood. ■ Wire sizes must conform with National Electrical Code, ANSI/NFPA 70 (latest edition), or CSA...

Installation Guide
Page 7
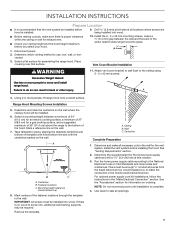
...Failure to the bottom of 27" (68.6 cm) for the vent system. Range Hood Mounting Screws Installation 5. Tape template in the hood's electrical terminal box. Mounting height reference (hood bottom line) 8. B C A. See "Venting Requirements" section. 2. Determine the required height for the home power...template to make all openings. 7 See the "Accessories" section for assembling the range hood. If there is complete. 4. Install the vent system before you select your hood. 1. INSTALLATION INSTRUCTIONS Prepare Location ■ It is recommended that surface. Select a ...
...Failure to the bottom of 27" (68.6 cm) for the vent system. Range Hood Mounting Screws Installation 5. Tape template in the hood's electrical terminal box. Mounting height reference (hood bottom line) 8. B C A. See "Venting Requirements" section. 2. Determine the required height for the home power...template to make all openings. 7 See the "Accessories" section for assembling the range hood. If there is complete. 4. Install the vent system before you select your hood. 1. INSTALLATION INSTRUCTIONS Prepare Location ■ It is recommended that surface. Select a ...
Installation Guide
Page 8
... C. Install 2 - 5 x 45 mm lower mounting screws and tighten. Vent transition B. 3.5 x 9.5 mm screw For vented installations only: 1. Check that back draft dampers work properly. A B C A. Measure from the hood. 7. A B X C D E A. Air deflector B. Mounting screws B. For non-vented (recirculating) installation only: 1. See "Range Hood Care" section. 3. Connect Vent System 1. Air deflector C. Vent duct E. Place the assembled air deflector and duct over...
... C. Install 2 - 5 x 45 mm lower mounting screws and tighten. Vent transition B. 3.5 x 9.5 mm screw For vented installations only: 1. Check that back draft dampers work properly. A B C A. Measure from the hood. 7. A B X C D E A. Air deflector B. Mounting screws B. For non-vented (recirculating) installation only: 1. See "Range Hood Care" section. 3. Connect Vent System 1. Air deflector C. Vent duct E. Place the assembled air deflector and duct over...

Installation Guide
Page 10
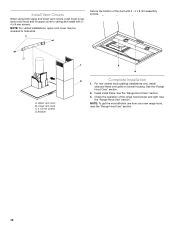
... 1. C Secure the bottom of the range hood blower and light. See the "Range Hood Care" section. 3. Check the operation of the duct with 2 4 x 8 mm screws. Install Vent Covers When using both upper and lower vent covers, push lower cover down onto hood and lift upper cover to hide slots. See... the "Range Hood Use" section. Install metal filters. NOTE: For vented installations, upper vent cover may be reversed to ceiling and ...
... 1. C Secure the bottom of the range hood blower and light. See the "Range Hood Care" section. 3. Check the operation of the duct with 2 4 x 8 mm screws. Install Vent Covers When using both upper and lower vent covers, push lower cover down onto hood and lift upper cover to hide slots. See... the "Range Hood Use" section. Install metal filters. NOTE: For vented installations, upper vent cover may be reversed to ceiling and ...

