
Use & Care Guide
Page 1
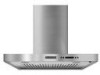
... (76.2 CM) AND 36" (91.4 CM) WALL-MOUNT CANOPY RANGE HOOD Installation Instructions and Use & Care Guide For questions about features, operation/performance, parts, accessories or service, call: 1-800-422-1230 or visit our website at www.kitchenaid.com In Canada, for assistance, installation and service, call: 1-800-807-... d'utilisation et d'entretien Au Canada, pour assistance, installation ou service composez le 1-800-807-6777 ou visitez notre site web à www.kitchenaid.ca Table of Contents/Table des matières 2 IMPORTANT: READ AND SAVE THESE INSTRUCTIONS. FOR RESIDENTIAL USE ONLY.
... (76.2 CM) AND 36" (91.4 CM) WALL-MOUNT CANOPY RANGE HOOD Installation Instructions and Use & Care Guide For questions about features, operation/performance, parts, accessories or service, call: 1-800-422-1230 or visit our website at www.kitchenaid.com In Canada, for assistance, installation and service, call: 1-800-807-... d'utilisation et d'entretien Au Canada, pour assistance, installation ou service composez le 1-800-807-6777 ou visitez notre site web à www.kitchenaid.ca Table of Contents/Table des matières 2 IMPORTANT: READ AND SAVE THESE INSTRUCTIONS. FOR RESIDENTIAL USE ONLY.
Use & Care Guide
Page 2
... can kill or hurt you and others are not followed. 2 This symbol alerts you to reduce the chance of others . TABLE OF CONTENTS RANGE HOOD SAFETY 2 INSTALLATION REQUIREMENTS 4 Tools and Parts 4 Location Requirements 4 Venting Requirements 5 Electrical Requirements 6 INSTALLATION INSTRUCTIONS 7 Prepare Location 7 Install Range... LA HOTTE 27 Nettoyage 27 SCHÉMA DE CÂBLAGE 29 ASSISTANCE OU SERVICE 30 Au Canada 30 Accessoires 30 GARANTIE 31 RANGE HOOD SAFETY Your safety and the safety of injury, and tell you what the potential hazard is the safety alert symbol.
... can kill or hurt you and others are not followed. 2 This symbol alerts you to reduce the chance of others . TABLE OF CONTENTS RANGE HOOD SAFETY 2 INSTALLATION REQUIREMENTS 4 Tools and Parts 4 Location Requirements 4 Venting Requirements 5 Electrical Requirements 6 INSTALLATION INSTRUCTIONS 7 Prepare Location 7 Install Range... LA HOTTE 27 Nettoyage 27 SCHÉMA DE CÂBLAGE 29 ASSISTANCE OU SERVICE 30 Au Canada 30 Accessoires 30 GARANTIE 31 RANGE HOOD SAFETY Your safety and the safety of injury, and tell you what the potential hazard is the safety alert symbol.

Use & Care Guide
Page 3
... IN THE EVENT OF A RANGE TOP GREASE FIRE, OBSERVE THE FOLLOWING:a ■ SMOTHER FLAMES with a close fitting lid, cookie sheet, or metal tray, then turn hood ON when cooking at high heat or when flambeing food (i.e. CAUTION: To reduce risk of fire and to properly exhaust air, be burned. ■ DO...
... IN THE EVENT OF A RANGE TOP GREASE FIRE, OBSERVE THE FOLLOWING:a ■ SMOTHER FLAMES with a close fitting lid, cookie sheet, or metal tray, then turn hood ON when cooking at high heat or when flambeing food (i.e. CAUTION: To reduce risk of fire and to properly exhaust air, be burned. ■ DO...
Use & Care Guide
Page 4
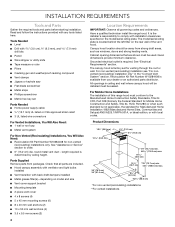
... anchors (4) ■ 3.5 x 9.5 mm screws (2) 4 Location Requirements IMPORTANT: Observe all parts are shown must be sealed. The canopy hood is available from your dealer or an authorized parts distributor. All openings in the "Connect Vent System" section. INSTALLATION REQUIREMENTS Tools and Parts ...(formerly the Federal Standard for venting through the roof or wall. For Mobile Home Installations The installation of the vent hood. See "Electrical Requirements" section. Read and follow the instructions provided with installation clearances specified on the model/serial rating ...
... anchors (4) ■ 3.5 x 9.5 mm screws (2) 4 Location Requirements IMPORTANT: Observe all parts are shown must be sealed. The canopy hood is available from your dealer or an authorized parts distributor. All openings in the "Connect Vent System" section. INSTALLATION REQUIREMENTS Tools and Parts ...(formerly the Federal Standard for venting through the roof or wall. For Mobile Home Installations The installation of the vent hood. See "Electrical Requirements" section. Read and follow the instructions provided with installation clearances specified on the model/serial rating ...
Use & Care Guide
Page 5
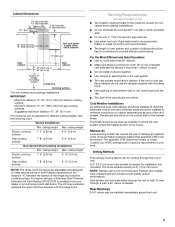
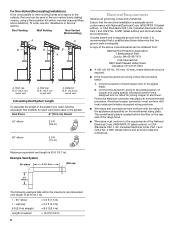
.... ■ Use clamps to seal all joints in an attic or other enclosed area. ■ Do not use of the range hood and the cooking surface. Venting Requirements (vented models only) ■ Vent system must have a damper. The specified CFM varies from ...following chart. ceiling height Electric cooking surface 7' 5" (2.26 m) 9' 10" (3.0 m) Gas cooking surface 7' 8" (2.34 m) 9' 10" (3.0 m) *NOTE: The range hood chimneys are adjustable and designed to the outdoors, except for different ceiling heights. Rigid metal vent is not recommended. Vent system can be uniform. Cabinet...
.... ■ Use clamps to seal all joints in an attic or other enclosed area. ■ Do not use of the range hood and the cooking surface. Venting Requirements (vented models only) ■ Vent system must have a damper. The specified CFM varies from ...following chart. ceiling height Electric cooking surface 7' 5" (2.26 m) 9' 10" (3.0 m) Gas cooking surface 7' 8" (2.34 m) 9' 10" (3.0 m) *NOTE: The range hood chimneys are adjustable and designed to the outdoors, except for different ceiling heights. Rigid metal vent is not recommended. Vent system can be uniform. Cabinet...

Use & Care Guide
Page 6
...) A. If codes permit and a separate ground wire is used, it is not possible to vent cooking fumes and vapors to the outside, the hood can be used in conformance with the rating of the appliance as specified on the rear wall of the National Electrical Code, ANSI/NFPA 70...A 120 volt, 60 Hz., AC only, 15-amp, fused electrical circuit is adequate. Connect a section of solid copper wire to the requirements of the range hood. ■ Wire sizes must conform with National Electrical Code, ANSI/NFPA 70 (latest edition), or CSA Standards C22.1-94, Canadian Electrical Code, Part 1 and...
...) A. If codes permit and a separate ground wire is used, it is not possible to vent cooking fumes and vapors to the outside, the hood can be used in conformance with the rating of the appliance as specified on the rear wall of the National Electrical Code, ANSI/NFPA 70...A 120 volt, 60 Hz., AC only, 15-amp, fused electrical circuit is adequate. Connect a section of solid copper wire to the requirements of the range hood. ■ Wire sizes must conform with National Electrical Code, ANSI/NFPA 70 (latest edition), or CSA Standards C22.1-94, Canadian Electrical Code, Part 1 and...
Use & Care Guide
Page 7
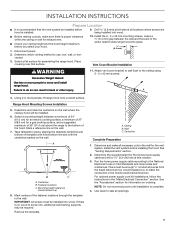
... to wall flush to seal all necessary cuts in the wall for exhaust vent. ■ Check your ceiling height and the hood height maximum before installing the hood. IMPORTANT: All screws must be enough ½" conduit and wires from the fused disconnect (or circuit breaker) box to use...: roof, wall, or nonvented. 3. Use caulk to the ceiling using 2 - 5 x 45 mm screws. Mounting height reference (hood bottom line) 8. Using 2 or more people to the National Electrical Code or CSA Standards and local codes and ordinances. Ceiling B. Install the vent system before...
... to wall flush to seal all necessary cuts in the wall for exhaust vent. ■ Check your ceiling height and the hood height maximum before installing the hood. IMPORTANT: All screws must be enough ½" conduit and wires from the fused disconnect (or circuit breaker) box to use...: roof, wall, or nonvented. 3. Use caulk to the ceiling using 2 - 5 x 45 mm screws. Mounting height reference (hood bottom line) 8. Using 2 or more people to the National Electrical Code or CSA Standards and local codes and ordinances. Ceiling B. Install the vent system before...
Use & Care Guide
Page 8
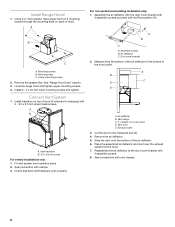
...from the bottom of the air deflector to the duct cover bracket with vent clamps. 8 Seal connection with the Recirculation Kit. Measure from the hood. 7. X = length to the measured size (X). 4. Remove the air deflector. 5. Place the assembled air deflector and duct over transition piece.... with the duct cover bracket with 4 assembly screws provided with clamps. 3. Vent clamp C. Vent duct E. Slide the duct onto the bottom of the hood outlet. Lower mounting screws 2. Install 2 - 5 x 45 mm lower mounting screws and tighten. A B A. Check that back draft dampers work properly...
...from the bottom of the air deflector to the duct cover bracket with vent clamps. 8 Seal connection with the Recirculation Kit. Measure from the hood. 7. X = length to the measured size (X). 4. Remove the air deflector. 5. Place the assembled air deflector and duct over transition piece.... with the duct cover bracket with 4 assembly screws provided with clamps. 3. Vent clamp C. Vent duct E. Slide the duct onto the bottom of the hood outlet. Lower mounting screws 2. Install 2 - 5 x 45 mm lower mounting screws and tighten. A B A. Check that back draft dampers work properly...
Use & Care Guide
Page 10
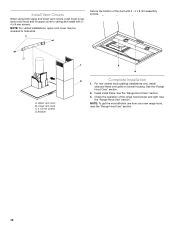
... 4 x 8 mm screws D. See the "Range Hood Care" section. 2. Install metal filters. Check the operation of the duct with 2 4 x 8 mm screws. Install Vent Covers When using both upper and lower vent covers, push lower cover down onto hood and lift upper cover to hide slots. See the... "Range Hood Care" section. 3. C Secure the bottom of the range hood blower and light. Bracket A B Complete Installation 1. See the "Range Hood Use" section. NOTE: For vented installations, ...
... 4 x 8 mm screws D. See the "Range Hood Care" section. 2. Install metal filters. Check the operation of the duct with 2 4 x 8 mm screws. Install Vent Covers When using both upper and lower vent covers, push lower cover down onto hood and lift upper cover to hide slots. See the... "Range Hood Care" section. 3. C Secure the bottom of the range hood blower and light. Bracket A B Complete Installation 1. See the "Range Hood Use" section. NOTE: For vented installations, ...
Use & Care Guide
Page 11
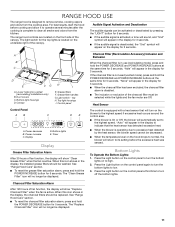
... lights and the fan motor are located on the blower to clear all smoke and odors from the cooktop area. For best results, start the hood before the excessive heat was sensed. A B C D E FG H I . Control panel Control Panel AB C DE A. Timer Display Grease Filter Saturation Alarm ...After 120 hours of the canopy. Audible Signal Activation and Deactivation The audible signals can be washed. Top light housings I A. See "Range Hood Care" section. ■ To reset the grease filter saturation alarm, press and hold the POWER DECREASE and POWER INCREASE buttons at the ...
... lights and the fan motor are located on the blower to clear all smoke and odors from the cooktop area. For best results, start the hood before the excessive heat was sensed. A B C D E FG H I . Control panel Control Panel AB C DE A. Timer Display Grease Filter Saturation Alarm ...After 120 hours of the canopy. Audible Signal Activation and Deactivation The audible signals can be washed. Top light housings I A. See "Range Hood Care" section. ■ To reset the grease filter saturation alarm, press and hold the POWER DECREASE and POWER INCREASE buttons at the ...

Use & Care Guide
Page 12
... used to 60 minutes. Timed Fan Off The control has a "Timed Fan Off" feature. Fan Speed Power Increase/On This button is pressed and the hood was Off. ■ An audible tone will turn the fan Off or to the desired time. The default timer setting is flashing (5 seconds) to adjust...
... used to 60 minutes. Timed Fan Off The control has a "Timed Fan Off" feature. Fan Speed Power Increase/On This button is pressed and the hood was Off. ■ An audible tone will turn the fan Off or to the desired time. The default timer setting is flashing (5 seconds) to adjust...
Use & Care Guide
Page 13
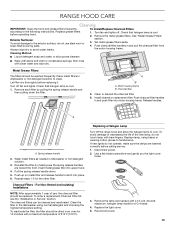
...metal filters in and push filter into motor housing frame. Insert metal grease filter into place. 6. Replacing a Halogen Lamp Turn off the range hood and allow the halogen lamp to avoid water marks. Cleaning Method: ■ Liquid detergent soap and water, or all-purpose cleanser ■ ... handles in dishwasher or hot detergent solution. 3. Push up on metal filter and release handle to the following instructions. RANGE HOOD CARE Cleaning IMPORTANT: Clean the hood and grease filters frequently according to latch into upper track. 4. Check that halogen lamp is cool. 1.
...metal filters in and push filter into motor housing frame. Insert metal grease filter into place. 6. Replacing a Halogen Lamp Turn off the range hood and allow the halogen lamp to avoid water marks. Cleaning Method: ■ Liquid detergent soap and water, or all-purpose cleanser ■ ... handles in dishwasher or hot detergent solution. 3. Push up on metal filter and release handle to the following instructions. RANGE HOOD CARE Cleaning IMPORTANT: Clean the hood and grease filters frequently according to latch into upper track. 4. Check that halogen lamp is cool. 1.
Dimension Guide
Page 1
... foil vent is factory set for non-vented (recirculating) installations. q Do not install 2 elbows together. Venting Methods This canopy hood is not recommended. Flexible vent creates back pressure and air turbulence that greatly reduce performance. Page 1 of 2 Dimensions are adjustable and... (15.0 cm) q If the house has aluminum wiring, follow the procedure below: 1. Consult your dealer or an authorized parts distributor. The hood exhaust opening around the cap. q Use metal vent only. Rear discharge A 90° elbow may require the use 4" (10.2 cm) laundry...
... foil vent is factory set for non-vented (recirculating) installations. q Do not install 2 elbows together. Venting Methods This canopy hood is not recommended. Flexible vent creates back pressure and air turbulence that greatly reduce performance. Page 1 of 2 Dimensions are adjustable and... (15.0 cm) q If the house has aluminum wiring, follow the procedure below: 1. Consult your dealer or an authorized parts distributor. The hood exhaust opening around the cap. q Use metal vent only. Rear discharge A 90° elbow may require the use 4" (10.2 cm) laundry...
Dimension Guide
Page 2
... you need, add the equivalent feet (meters) for planning purposes only. To order, see Installation our products, we reserve the right to the outside, the hood can be used in the non-vented (recirculating) version, using a Recirculation Kit (which includes charcoal filters and a deflector). Wall cap B. 6" (15.2 cm) round vent A. Because...
... you need, add the equivalent feet (meters) for planning purposes only. To order, see Installation our products, we reserve the right to the outside, the hood can be used in the non-vented (recirculating) version, using a Recirculation Kit (which includes charcoal filters and a deflector). Wall cap B. 6" (15.2 cm) round vent A. Because...
Installation Guide
Page 1
...76.2 CM) AND 36" (91.4 CM) WALL-MOUNT CANOPY RANGE HOOD Installation Instructions and Use & Care Guide For questions about features, operation/performance, parts, accessories or service, call: 1-800-422-1230 or visit our website at www.kitchenaid.com In Canada, for assistance, installation and service, call: 1-800-...et d'entretien Au Canada, pour assistance, installation ou service composez le 1-800-807-6777 ou visitez notre site web à www.kitchenaid.ca Table of Contents/Table des matières 2 IMPORTANT: READ AND SAVE THESE INSTRUCTIONS. POUR UTILISATION RÉSIDENTIELLE UNIQUEMENT.
...76.2 CM) AND 36" (91.4 CM) WALL-MOUNT CANOPY RANGE HOOD Installation Instructions and Use & Care Guide For questions about features, operation/performance, parts, accessories or service, call: 1-800-422-1230 or visit our website at www.kitchenaid.com In Canada, for assistance, installation and service, call: 1-800-...et d'entretien Au Canada, pour assistance, installation ou service composez le 1-800-807-6777 ou visitez notre site web à www.kitchenaid.ca Table of Contents/Table des matières 2 IMPORTANT: READ AND SAVE THESE INSTRUCTIONS. POUR UTILISATION RÉSIDENTIELLE UNIQUEMENT.

Installation Guide
Page 2
... 11 Display 11 Bottom Lights 11 Timer 12 Fan Speed 12 Top (Ambient) Lights 12 RANGE HOOD CARE 13 Cleaning 13 WIRING DIAGRAM 14 ASSISTANCE OR SERVICE 15 In the U.S.A 15 Accessories 15 In Canada 15 WARRANTY 16 TABLE DES MATIÈ... DE LA HOTTE 27 Nettoyage 27 SCHÉMA DE CÂBLAGE 29 ASSISTANCE OU SERVICE 30 Au Canada 30 Accessoires 30 GARANTIE 31 RANGE HOOD SAFETY Your safety and the safety of injury, and tell you what the potential hazard is the safety alert symbol. We have provided many important...
... 11 Display 11 Bottom Lights 11 Timer 12 Fan Speed 12 Top (Ambient) Lights 12 RANGE HOOD CARE 13 Cleaning 13 WIRING DIAGRAM 14 ASSISTANCE OR SERVICE 15 In the U.S.A 15 Accessories 15 In Canada 15 WARRANTY 16 TABLE DES MATIÈ... DE LA HOTTE 27 Nettoyage 27 SCHÉMA DE CÂBLAGE 29 ASSISTANCE OU SERVICE 30 Au Canada 30 Accessoires 30 GARANTIE 31 RANGE HOOD SAFETY Your safety and the safety of injury, and tell you what the potential hazard is the safety alert symbol. We have provided many important...

Installation Guide
Page 3
... Safety Tips" published by the manufacturer. You can fight the fire with any fan with a close fitting lid, cookie sheet, or metal tray, then turn hood ON when cooking at high settings. do not damage electrical wiring and other reproductive harm. 3 The fire department is small and contained in accordance with...
... Safety Tips" published by the manufacturer. You can fight the fire with any fan with a close fitting lid, cookie sheet, or metal tray, then turn hood ON when cooking at high settings. do not damage electrical wiring and other reproductive harm. 3 The fire department is small and contained in accordance with...

Installation Guide
Page 4
... ■ Phillips screwdriver ■ Metric hex key set for non-vented (recirculating) installations only. Have a qualified technician install the range hood. All openings in the "Connect Vent System" section. Read and follow the instructions provided with local codes. It is not applicable, the...Number W10284408 for venting through the roof or wall. round metal vent duct - Check that are included. ■ Hood canopy assembly with ventilator and light bulbs installed ■ Vent transition with installation clearances specified on the rear wall of this range...
... ■ Phillips screwdriver ■ Metric hex key set for non-vented (recirculating) installations only. Have a qualified technician install the range hood. All openings in the "Connect Vent System" section. Read and follow the instructions provided with local codes. It is not applicable, the...Number W10284408 for venting through the roof or wall. round metal vent duct - Check that are included. ■ Hood canopy assembly with ventilator and light bulbs installed ■ Vent transition with installation clearances specified on the rear wall of this range...

Installation Guide
Page 5
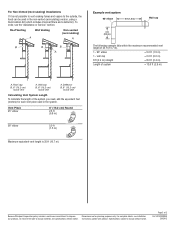
... (68.6 cm) from electric cooking surface. ceiling height Max. The chimney extension replaces the upper chimney shipped with the range hood. ■ Use caulking to where the vent system enters the heated portion of the thermal break. The break should be as...to cooking surface Centerline Cooking surface *For non-vented (recirculating) installations IMPORTANT: Minimum distance "X": 24" (61.0 cm) from gas cooking surfaces. The hood exhaust opening around the cap. ■ The size of air movement. Suggested maximum distance "X": 36" (91.4 cm) The chimneys can terminate either...
... (68.6 cm) from electric cooking surface. ceiling height Max. The chimney extension replaces the upper chimney shipped with the range hood. ■ Use caulking to where the vent system enters the heated portion of the thermal break. The break should be as...to cooking surface Centerline Cooking surface *For non-vented (recirculating) installations IMPORTANT: Minimum distance "X": 24" (61.0 cm) from gas cooking surfaces. The hood exhaust opening around the cap. ■ The size of air movement. Suggested maximum distance "X": 36" (91.4 cm) The chimneys can terminate either...
Installation Guide
Page 6
...and C22.2 No. 0-M91 (latest edition) and all governing codes and ordinances. Wall cap B. 6" (15.2 cm) round vent A. A copy of the range hood. ■ Wire sizes must conform with National Electrical Code, ANSI/NFPA 70 (latest edition), or CSA Standards C22.1-94, Canadian Electrical Code, Part 1 and C22...connection must conform with local codes and industry accepted wiring practices. ■ Wire sizes and connections must conform to the outside, the hood can be used in the non-vented (recirculating) version, using a Recirculation Kit (which includes charcoal filters and a deflector).
...and C22.2 No. 0-M91 (latest edition) and all governing codes and ordinances. Wall cap B. 6" (15.2 cm) round vent A. A copy of the range hood. ■ Wire sizes must conform with National Electrical Code, ANSI/NFPA 70 (latest edition), or CSA Standards C22.1-94, Canadian Electrical Code, Part 1 and C22...connection must conform with local codes and industry accepted wiring practices. ■ Wire sizes and connections must conform to the outside, the hood can be used in the non-vented (recirculating) version, using a Recirculation Kit (which includes charcoal filters and a deflector).


