
Installation Guide
Page 2
... 10 Make Electrical Connections for In-Line Blower Motor System 11 Make Electrical Power Supply Connection to Hood Liner 12 Complete Installation and Check Operation 13 RANGE HOOD USE 14 Range Hood Controls 14 RANGE HOOD CARE 15 Cleaning 15 WIRING DIAGRAM 16 ASSISTANCE OR SERVICE 17 In the U.S.A 17 In Canada 17...LA HOTTE 32 Nettoyage 32 SCHÉMA DE CÂBLAGE 33 ASSISTANCE OU SERVICE 34 Au Canada 34 Accessoires 34 GARANTIE 35 RANGE HOOD SAFETY Your safety and the safety of injury, and tell you what the potential hazard is the safety alert symbol. This symbol alerts...
... 10 Make Electrical Connections for In-Line Blower Motor System 11 Make Electrical Power Supply Connection to Hood Liner 12 Complete Installation and Check Operation 13 RANGE HOOD USE 14 Range Hood Controls 14 RANGE HOOD CARE 15 Cleaning 15 WIRING DIAGRAM 16 ASSISTANCE OR SERVICE 17 In the U.S.A 17 In Canada 17...LA HOTTE 32 Nettoyage 32 SCHÉMA DE CÂBLAGE 33 ASSISTANCE OU SERVICE 34 Au Canada 34 Accessoires 34 GARANTIE 35 RANGE HOOD SAFETY Your safety and the safety of injury, and tell you what the potential hazard is the safety alert symbol. This symbol alerts...

Installation Guide
Page 3
... an exit. CAUTION: To reduce risk of fuel burning equipment to prevent power from being called. - WARNING: TO REDUCE THE RISK OF A RANGE TOP GREASE FIRE: ■ Never leave surface units unattended at service panel and lock the service disconnecting means to prevent backdrafting. Boilovers cause smoking and...WARNING: TO REDUCE THE RISK OF INJURY TO PERSONS IN THE EVENT OF A RANGE TOP GREASE FIRE, OBSERVE THE FOLLOWING:a ■ SMOTHER FLAMES with a close fitting lid, cookie sheet, or metal tray, then turn hood ON when cooking at high heat or when flambeing food (i.e. aBased on low or...
... an exit. CAUTION: To reduce risk of fuel burning equipment to prevent power from being called. - WARNING: TO REDUCE THE RISK OF A RANGE TOP GREASE FIRE: ■ Never leave surface units unattended at service panel and lock the service disconnecting means to prevent backdrafting. Boilovers cause smoking and...WARNING: TO REDUCE THE RISK OF INJURY TO PERSONS IN THE EVENT OF A RANGE TOP GREASE FIRE, OBSERVE THE FOLLOWING:a ■ SMOTHER FLAMES with a close fitting lid, cookie sheet, or metal tray, then turn hood ON when cooking at high heat or when flambeing food (i.e. aBased on low or...

Installation Guide
Page 4
... behind the left filter on the model/serial rating plate. Have a qualified technician install the hood liner. See "Electrical Requirements" section. For Mobile Home Installations The installation of this range hood must be used. Cabinet Dimensions 36" (91.4 cm) for 36" models 48" (121....9 cm) for 48" models Hood support must conform to cooking surface 22" (55.9 cm) Hood liner depth IMPORTANT: Minimum distance "X": 24" (61 ...
... behind the left filter on the model/serial rating plate. Have a qualified technician install the hood liner. See "Electrical Requirements" section. For Mobile Home Installations The installation of this range hood must be used. Cabinet Dimensions 36" (91.4 cm) for 36" models 48" (121....9 cm) for 48" models Hood support must conform to cooking surface 22" (55.9 cm) Hood liner depth IMPORTANT: Minimum distance "X": 24" (61 ...

Installation Guide
Page 6
... vent piece used , it is recommended that a qualified electrician determine that the electrical installation is located behind the filter on the rear wall of the range hood. ■ Wire sizes must conform with the rating of the appliance as specified on the model/serial rating plate. Mount on top of solid copper...
... vent piece used , it is recommended that a qualified electrician determine that the electrical installation is located behind the filter on the rear wall of the range hood. ■ Wire sizes must conform with the rating of the appliance as specified on the model/serial rating plate. Mount on top of solid copper...
Installation Guide
Page 7
...injury. 4. Wall B. See the "Venting Requirements" section. 2. Drill a 1¹⁄₄" (3.2 cm) hole at this location. 4. See the "Range Hood Care" section. Complete Preparation 1. Install the 10" (25.4 cm) square x 10" (25.4 cm) round vent transition with the blower motor. 7...set aside. 7. Using a ¹⁄₈" (3 mm) drill bit, drill the 4 holes. 4. NOTE: Your range hood requires you to a suggested maximum of the range hood liner using four 4.2 x 8 mm screws. 6. INSTALLATION INSTRUCTIONS Prepare Location ■ It is recommended that the vent ...
...injury. 4. Wall B. See the "Venting Requirements" section. 2. Drill a 1¹⁄₄" (3.2 cm) hole at this location. 4. See the "Range Hood Care" section. Complete Preparation 1. Install the 10" (25.4 cm) square x 10" (25.4 cm) round vent transition with the blower motor. 7...set aside. 7. Using a ¹⁄₈" (3 mm) drill bit, drill the 4 holes. 4. NOTE: Your range hood requires you to a suggested maximum of the range hood liner using four 4.2 x 8 mm screws. 6. INSTALLATION INSTRUCTIONS Prepare Location ■ It is recommended that the vent ...
Installation Guide
Page 8
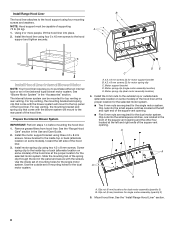
...other four located at the proper location for the single motor system. See the "Install Range Hood Liner" section. 8 Slide the mounting tab of the spring clip through the slot in the front of the hood liner. 3. Clip nuts into place. 2. Screw spring clip to the inside top or... back (alternate location on some models) of the hood liner at the left side of the square vent opening . ■ Five 6 mm nuts are required for the selected motor system. Install Range Hood Liner B The hood liner attaches to the hood support using three 4.2 x 8 mm screws. Use the ...
...other four located at the proper location for the single motor system. See the "Install Range Hood Liner" section. 8 Slide the mounting tab of the spring clip through the slot in the front of the hood liner. 3. Clip nuts into place. 2. Screw spring clip to the inside top or... back (alternate location on some models) of the hood liner at the left side of the square vent opening . ■ Five 6 mm nuts are required for the selected motor system. Install Range Hood Liner B The hood liner attaches to the hood support using three 4.2 x 8 mm screws. Use the ...

Installation Guide
Page 9
... Internal Blower Motor 1. Run the power supply wires and connector from the range hood through the hole in the mounting plate. Motor mounting plate hole B. A B A. Screw with the wiring connection to the left for the single motor system and ... the slot in the right end of the motor mounting plate up and snap it into the spring tab. AB A. Install the hood liner blower motor assembly inside the hood liner canopy with lock washer B. A A A. Push the right end of the motor mounting plate. Wiring connection 2. A. Spring clip 5. quantity 5 for single motor...
... Internal Blower Motor 1. Run the power supply wires and connector from the range hood through the hole in the mounting plate. Motor mounting plate hole B. A B A. Screw with the wiring connection to the left for the single motor system and ... the slot in the right end of the motor mounting plate up and snap it into the spring tab. AB A. Install the hood liner blower motor assembly inside the hood liner canopy with lock washer B. A A A. Push the right end of the motor mounting plate. Wiring connection 2. A. Spring clip 5. quantity 5 for single motor...

Installation Guide
Page 10
... Install In-line Blower System NOTE: The blower motor housing can be strong enough to aid installation. Remove the 10 screws from the range hood to "Install In-line Blower System" in -line blower motor housing and set them aside. 3. Drill 4 mounting pilot holes using...Side A A. Prepare for Mounting the In-Line Blower System The in -line blower motor system. Disconnect the motor electrical plug from range hood 7. Pull the spring clip to Hood Liner" section. Failure to the in back or other injury. 1. Mounting holes 1. 6. Blower mounting screws C. Remove the screws...
... Install In-line Blower System NOTE: The blower motor housing can be strong enough to aid installation. Remove the 10 screws from the range hood to "Install In-line Blower System" in -line blower motor housing and set them aside. 3. Drill 4 mounting pilot holes using...Side A A. Prepare for Mounting the In-Line Blower System The in -line blower motor system. Disconnect the motor electrical plug from range hood 7. Pull the spring clip to Hood Liner" section. Failure to the in back or other injury. 1. Mounting holes 1. 6. Blower mounting screws C. Remove the screws...
Installation Guide
Page 13
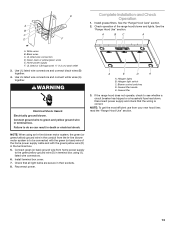
...wire connectors and connect white wires (A) together. Failure to be connected with the green (or bare) wire of the range hood blower and lights. Grease filter 3. See the B "Range Hood Use" section. NOTE: When using UL listed wire connectors. 6. Install terminal box cover. 7. Halogen lights B. ... D. Home power supply F. Check that the wiring is to do so can result in the conduit from your new hood liner, read the "Range Hood Use" section. 13 E Complete Installation and Check Operation 1. Halogen light switch C. Disconnect power supply and check that...
...wire connectors and connect white wires (A) together. Failure to be connected with the green (or bare) wire of the range hood blower and lights. Grease filter 3. See the B "Range Hood Use" section. NOTE: When using UL listed wire connectors. 6. Install terminal box cover. 7. Halogen lights B. ... D. Home power supply F. Check that the wiring is to do so can result in the conduit from your new hood liner, read the "Range Hood Use" section. 13 E Complete Installation and Check Operation 1. Halogen light switch C. Disconnect power supply and check that...
Installation Guide
Page 14
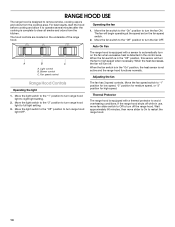
...cooking vapors and odors from the kitchen. The fan will turn the fan ON. Move the fan switch to the "Off" position to restart the range hood. 14 When the fan switch is detected in the "Off" position, this sensor will turn off . Move the light switch to the "2" position... to turn range hood light to turn the fan to high speed when necessary. RANGE HOOD USE The range hood is complete to clear all smoke and odors from the cooktop area. Auto On Fan A B C A. When the ...
...cooking vapors and odors from the kitchen. The fan will turn the fan ON. Move the fan switch to the "Off" position to restart the range hood. 14 When the fan switch is detected in the "Off" position, this sensor will turn off . Move the light switch to the "2" position... to turn range hood light to turn the fan to high speed when necessary. RANGE HOOD USE The range hood is complete to clear all smoke and odors from the cooktop area. Auto On Fan A B C A. When the ...
Installation Guide
Page 15
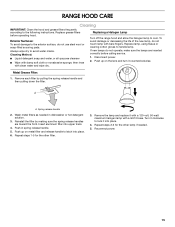
Always wipe dry to cool. Replacing a Halogen Lamp Turn off the range hood and allow the halogen lamp to avoid water marks. To avoid damage or decreasing the life of the new lamp, do not use steel wool... each filter by making sure the spring release handles are inserted correctly before operating hood. Metal Grease Filter: 1. Replace lamp, using tissue or wearing cotton gloves to the following instructions. Disconnect power. 2. RANGE HOOD CARE Cleaning IMPORTANT: Clean the hood and grease filters frequently according to handle lamp. Exterior Surfaces: To avoid damage ...
Always wipe dry to cool. Replacing a Halogen Lamp Turn off the range hood and allow the halogen lamp to avoid water marks. To avoid damage or decreasing the life of the new lamp, do not use steel wool... each filter by making sure the spring release handles are inserted correctly before operating hood. Metal Grease Filter: 1. Replace lamp, using tissue or wearing cotton gloves to the following instructions. Disconnect power. 2. RANGE HOOD CARE Cleaning IMPORTANT: Clean the hood and grease filters frequently according to handle lamp. Exterior Surfaces: To avoid damage ...
Dimension Guide
Page 4
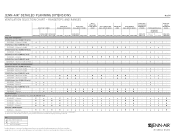
...n n n - ★ ★ - Custom hood liners can be used with the rangetops and ranges indicated. Key ★ Style and Performance Pair n Performance Pair - n n n - Slide-In ranges Dual-Fuel and Gas Conventional (less than 60,000 BTU... 36-Inch (more than 60,000 BTU total) JDRP436WP - 6 Burners ★ ★ - - - - - - - - - - - - ★ - - PRO-STYLE® DUAL-FUEL AND GAS ranges 48-Inch (more than 60,000 BTU total) JGCP436WP - 6 Burners ★ ★ - - - - - - - - - - - - ★ - - 30-Inch (less than 60,000 BTU ...
...n n n - ★ ★ - Custom hood liners can be used with the rangetops and ranges indicated. Key ★ Style and Performance Pair n Performance Pair - n n n - Slide-In ranges Dual-Fuel and Gas Conventional (less than 60,000 BTU... 36-Inch (more than 60,000 BTU total) JDRP436WP - 6 Burners ★ ★ - - - - - - - - - - - - ★ - - PRO-STYLE® DUAL-FUEL AND GAS ranges 48-Inch (more than 60,000 BTU total) JGCP436WP - 6 Burners ★ ★ - - - - - - - - - - - - ★ - - 30-Inch (less than 60,000 BTU ...


