Owners Manual
Page 5
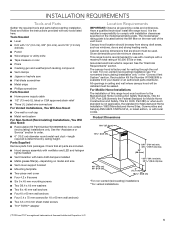
...;■ Hood canopy assembly with ventilator and LED and halogen lights installed ■■ Vent transition with back draft dampers installed ■■ Metal grease filter(s)-depending on the rear wall of 65,000 BTUs or less. The model/serial/ rating plate is not applicable, the standard for 10 x 60 mm wall anchors) ■■ Two 3.5 x 9.5 mm sheet metal screws ■■ T10® TORX®† adapter Location Requirements IMPORTANT: Observe all parts are...
...;■ Hood canopy assembly with ventilator and LED and halogen lights installed ■■ Vent transition with back draft dampers installed ■■ Metal grease filter(s)-depending on the rear wall of 65,000 BTUs or less. The model/serial/ rating plate is not applicable, the standard for 10 x 60 mm wall anchors) ■■ Two 3.5 x 9.5 mm sheet metal screws ■■ T10® TORX®† adapter Location Requirements IMPORTANT: Observe all parts are...
Owners Manual
Page 6
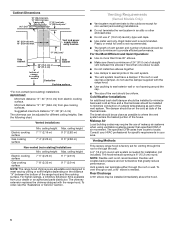
... extension replaces the chimney shipped with the range hood. ■■ Use caulking to provide efficient performance. If the roof or wall cap has a damper, do not use the damper supplied with the range hood. A 6" (15.2 cm) round vent system is needed for different ceiling heights. Vented Installations Electric cooking surface Gas cooking surface Min. ceiling height Max. Minimum distance "X": 27" (68.6 cm) from electric cooking surface. To order, see the "Assistance or Service" section. Venting Methods This canopy range hood is factory set for non-vented (recirculating...
... extension replaces the chimney shipped with the range hood. ■■ Use caulking to provide efficient performance. If the roof or wall cap has a damper, do not use the damper supplied with the range hood. A 6" (15.2 cm) round vent system is needed for different ceiling heights. Vented Installations Electric cooking surface Gas cooking surface Min. ceiling height Max. Minimum distance "X": 27" (68.6 cm) from electric cooking surface. To order, see the "Assistance or Service" section. Venting Methods This canopy range hood is factory set for non-vented (recirculating...
Owners Manual
Page 7
... aluminum. The model/serial/rating plate is required. ■■ If the house has aluminum wiring, follow the procedure below: Connect the aluminum wiring using a Recirculation Kit (which includes charcoal filters and a deflector). To order, see the "Assistance or Service" section. Diverter B. 6" (15.2 cm) round vent Calculating Vent System Length To calculate the length of the National Electrical Code, ANSI/NFPA 70 (latest edition), or CSA Standards C22. 1-94, Canadian Electrical Code, Part 1 and C22...
... aluminum. The model/serial/rating plate is required. ■■ If the house has aluminum wiring, follow the procedure below: Connect the aluminum wiring using a Recirculation Kit (which includes charcoal filters and a deflector). To order, see the "Assistance or Service" section. Diverter B. 6" (15.2 cm) round vent Calculating Vent System Length To calculate the length of the National Electrical Code, ANSI/NFPA 70 (latest edition), or CSA Standards C22. 1-94, Canadian Electrical Code, Part 1 and C22...
Owners Manual
Page 8
... template to screw into, additional wall framing supports may be installed into wood. Determine the required height for assembling the range hood. Run the home power supply cable according to the ceiling using two 5 x 45 mm screws. For wood, drill 3/16" (4.8 mm) pilot holes at this location. 3. Tighten until installation is complete. 4. Attach vent cover bracket to wall flush to the National Electrical Code or CSA Standards and local codes and ordinances. Remove the template. Use...
... template to screw into, additional wall framing supports may be installed into wood. Determine the required height for assembling the range hood. Run the home power supply cable according to the ceiling using two 5 x 45 mm screws. For wood, drill 3/16" (4.8 mm) pilot holes at this location. 3. Tighten until installation is complete. 4. Attach vent cover bracket to wall flush to the National Electrical Code or CSA Standards and local codes and ordinances. Remove the template. Use...
Owners Manual
Page 9
... and electric shock, install this range hood to the duct cover bracket with clamps. 3. Install Range Hood 1. Mounting slots C. Connect Vent System 1. For Non-Vented (Recirculating) Installation Only: 1. X = length to order. Cut the duct to the bottom of hood. Remove the air deflector. 5. Slide the duct onto the bottom of hood (if removed for shipping) with two 3.5 x 9.5 mm sheet metal screws. Seal connections with the duct cover bracket using four 4.2 x 8 mm screws. An optional In-Line Smart Kit (purchased separately) allows the blower motor that back draft dampers work with...
... and electric shock, install this range hood to the duct cover bracket with clamps. 3. Install Range Hood 1. Mounting slots C. Connect Vent System 1. For Non-Vented (Recirculating) Installation Only: 1. X = length to order. Cut the duct to the bottom of hood. Remove the air deflector. 5. Slide the duct onto the bottom of hood (if removed for shipping) with two 3.5 x 9.5 mm sheet metal screws. Seal connections with the duct cover bracket using four 4.2 x 8 mm screws. An optional In-Line Smart Kit (purchased separately) allows the blower motor that back draft dampers work with...
Owners Manual
Page 10
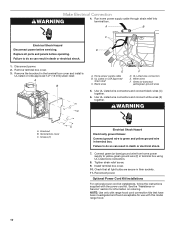
... Cord Kit Installations For optional power cord kit installations, follow the instructions supplied with range hood cord connection kits that all parts and panels before servicing. Terminal box cover C. NOTE: Use only with the power cord kit. Remove the knockout in terminal box using UL Listed wire connectors. 8. Tighten strain relief screw. 9. Failure to green and yellow ground wire in death or electrical shock. 1. A B C Electrical Shock Hazard Disconnect power before operating. Screws (7) Electrical Shock Hazard Electrically ground blower. Run home power supply cable...
... Cord Kit Installations For optional power cord kit installations, follow the instructions supplied with range hood cord connection kits that all parts and panels before servicing. Terminal box cover C. NOTE: Use only with the power cord kit. Remove the knockout in terminal box using UL Listed wire connectors. 8. Tighten strain relief screw. 9. Failure to green and yellow ground wire in death or electrical shock. 1. A B C Electrical Shock Hazard Disconnect power before operating. Screws (7) Electrical Shock Hazard Electrically ground blower. Run home power supply cable...
Owners Manual
Page 11
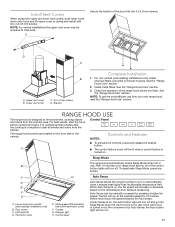
... "Range Hood Care" section. 3. RANGE HOOD USE The range hood is on, the fan speed will turn on blower housing. When Auto Sense is designed to clear all of the canopy. NOTE: For vented installations the upper vent cover may be manually increased by Auto Sense, the Auto button light will increase or decrease based on . 11 Lower vent cover C. 4.2 x 8 mm screws D. See the "Range Hood Care" section. 2. NOTE: To get the most efficient use from the cooktop area. Control Panel...
... "Range Hood Care" section. 3. RANGE HOOD USE The range hood is on, the fan speed will turn on blower housing. When Auto Sense is designed to clear all of the canopy. NOTE: For vented installations the upper vent cover may be manually increased by Auto Sense, the Auto button light will increase or decrease based on . 11 Lower vent cover C. 4.2 x 8 mm screws D. See the "Range Hood Care" section. 2. NOTE: To get the most efficient use from the cooktop area. Control Panel...

Owners Manual
Page 12
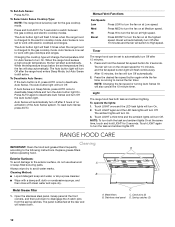
... ambient lights will switch to turn off after 2 hours of no activation of the Auto Sense system. Catch pins (2) D. The Auto button light will flash continuously. Press BOOST to High speed. Replace grease filters before operating hood. If Auto Sense is changed to the following instructions. RANGE HOOD CARE Cleaning IMPORTANT: Clean the hood and grease filters frequently according to the electric cooktop mode. Boost will automatically turn off . The fan will run on at High speed. To Set...
... ambient lights will switch to turn off after 2 hours of no activation of the Auto Sense system. Catch pins (2) D. The Auto button light will flash continuously. Press BOOST to High speed. Replace grease filters before operating hood. If Auto Sense is changed to the following instructions. RANGE HOOD CARE Cleaning IMPORTANT: Clean the hood and grease filters frequently according to the electric cooktop mode. Boost will automatically turn off . The fan will run on at High speed. To Set...
Owners Manual
Page 13
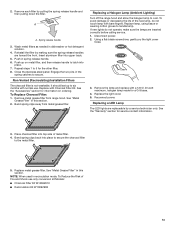
... operate, make sure the lamps are inserted correctly before calling service. 1. Replace with bare fingers. Using a flat-blade screwdriver, gently pry the light cover loose. 3. Spring release handle 3. Non-Vented (Recirculating) Installation Filters The charcoal filter is not washable. If new lights do not touch lamp with Charcoal Filter Kit. Remove each filter by a service technician only. Replacing a Halogen Lamp (Ambient Lighting) Turn off the range hood and allow the halogen lamp to handle lamp. Replace the light cover. 5. 2. Push in this section. 2. See "Metal Grease...
... operate, make sure the lamps are inserted correctly before calling service. 1. Replace with bare fingers. Using a flat-blade screwdriver, gently pry the light cover loose. 3. Spring release handle 3. Non-Vented (Recirculating) Installation Filters The charcoal filter is not washable. If new lights do not touch lamp with Charcoal Filter Kit. Remove each filter by a service technician only. Replacing a Halogen Lamp (Ambient Lighting) Turn off the range hood and allow the halogen lamp to handle lamp. Replace the light cover. 5. 2. Push in this section. 2. See "Metal Grease...
Owners Manual
Page 15
... at www.kitchenaid.com. KitchenAid appliances designated service technicians are trained to the warranty page in Canada. ■■ Features and specifications on our full line of service. Stainless Steel Order Part Number EXTKIT12HS Chimney Extension Kit - If you need replacement parts If you can write to local dealers. ■■ Use and maintenance procedures. ■■ Accessory and repair parts sales. For Further Assistance If you need further assistance, you need service Please refer...
... at www.kitchenaid.com. KitchenAid appliances designated service technicians are trained to the warranty page in Canada. ■■ Features and specifications on our full line of service. Stainless Steel Order Part Number EXTKIT12HS Chimney Extension Kit - If you need replacement parts If you can write to local dealers. ■■ Use and maintenance procedures. ■■ Accessory and repair parts sales. For Further Assistance If you need further assistance, you need service Please refer...
Installation Instructions
Page 5
...Remove parts from packages. For non-vented (recirculating) installation see "For nonvented (recirculating) installation only" in ceiling and wall where canopy hood will be installed must be sealed. Have a qualified technician install the range hood. Check that are included. ■ Hood canopy assembly with ventilator and LED and halogen lights installed ■ Vent transition with back draft dampers installed ■ Metal grease filter(s)-depending on model and size ■ Vent cover support bracket ■ Mounting template ■ 2-piece vent cover ■ 4.2 x 8 screws...
...Remove parts from packages. For non-vented (recirculating) installation see "For nonvented (recirculating) installation only" in ceiling and wall where canopy hood will be installed must be sealed. Have a qualified technician install the range hood. Check that are included. ■ Hood canopy assembly with ventilator and LED and halogen lights installed ■ Vent transition with back draft dampers installed ■ Metal grease filter(s)-depending on model and size ■ Vent cover support bracket ■ Mounting template ■ 2-piece vent cover ■ 4.2 x 8 screws...

Installation Instructions
Page 6
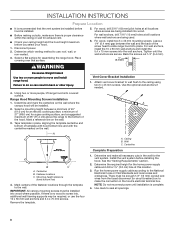
ceiling height Max. ceiling height Electric cooking surface 7' 1" (2.16 m) 9' 6" (2.9 m) Gas cooking surface 7' 4" (2.23 m) 9' 6" (2.9 m) NOTE: The range hood chimneys are adjustable and designed to where the vent system enters the heated portion of the house. The chimney extension replaces the chimney shipped with the range hood. ■ Use caulking to seal exterior wall or roof opening is not recommended. ■ The length of vent system and number of canopy to locale. Plastic or metal foil vent is 6" (15.2 cm) round. For the...
ceiling height Max. ceiling height Electric cooking surface 7' 1" (2.16 m) 9' 6" (2.9 m) Gas cooking surface 7' 4" (2.23 m) 9' 6" (2.9 m) NOTE: The range hood chimneys are adjustable and designed to where the vent system enters the heated portion of the house. The chimney extension replaces the chimney shipped with the range hood. ■ Use caulking to seal exterior wall or roof opening is not recommended. ■ The length of vent system and number of canopy to locale. Plastic or metal foil vent is 6" (15.2 cm) round. For the...
Installation Instructions
Page 7
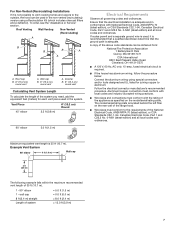
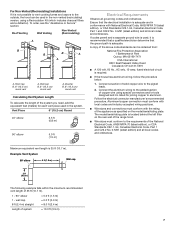
... designed and UL listed for each vent piece used in the non-vented (recirculating) version, using a Recirculation Kit (which includes charcoal filters and a deflector). Follow the electrical connector manufacturer's recommended procedure. wall cap 8 ft (2.4 m) straight = 0.0 ft (0.0 m) = 8.0 ft (2.4 m) Length of 35 ft (10.7 m). 1 - 90° elbow = 5.0 ft (1.5 m) 1 - Wall cap B. 6" (15.2 cm) round vent A. Roof cap B. 6" (15.2 cm) round vent A. If codes permit and a separate ground wire is used, it is not possible to vent cooking fumes and vapors to the requirements...
... designed and UL listed for each vent piece used in the non-vented (recirculating) version, using a Recirculation Kit (which includes charcoal filters and a deflector). Follow the electrical connector manufacturer's recommended procedure. wall cap 8 ft (2.4 m) straight = 0.0 ft (0.0 m) = 8.0 ft (2.4 m) Length of 35 ft (10.7 m). 1 - 90° elbow = 5.0 ft (1.5 m) 1 - Wall cap B. 6" (15.2 cm) round vent A. Roof cap B. 6" (15.2 cm) round vent A. If codes permit and a separate ground wire is used, it is not possible to vent cooking fumes and vapors to the requirements...

Installation Instructions
Page 8
... BOTTOM OFTHE HOOD Installation Height B C A. Mark centers of 36" (91.4 cm) above the range to the ceiling using (2) 5 x 45 mm screws. Remove the template. There must be enough ½" conduit and wires from the fused disconnect (or circuit breaker) box to move and install range hood. Disconnect power. 2. Wall C. Mounting height reference (hood bottom line) 4. If there is proper clearance within the ceiling or wall for the vent system. Determine the required height for assembling the range hood. Vent Cover Bracket Installation 7. Determine and...
... BOTTOM OFTHE HOOD Installation Height B C A. Mark centers of 36" (91.4 cm) above the range to the ceiling using (2) 5 x 45 mm screws. Remove the template. There must be enough ½" conduit and wires from the fused disconnect (or circuit breaker) box to move and install range hood. Disconnect power. 2. Wall C. Mounting height reference (hood bottom line) 4. If there is proper clearance within the ceiling or wall for the vent system. Determine the required height for assembling the range hood. Vent Cover Bracket Installation 7. Determine and...

Installation Instructions
Page 9
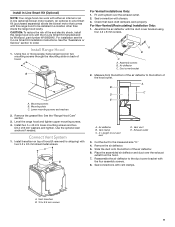
...part number W10692945. Mounting slots C. Remove the grease filter. Connect Vent System 1. A B A B X C D E A. Vent clamp C. Vent duct E. Vent transition B. 3.5 x 9.5 mm screw 9 Air deflector C. C A. Mounting screws B. Level the range hood and tighten upper mounting screws. 4. Install transition on back of the air deflector. 6. Place the assembled air deflector and duct over the exhaust outlet. 2. Install In-Line Smart Kit - For Non-Vented (Recirculating) Installation Only: 1. Measure from the hood. 7. Use the optional wall anchors if needed. Air deflector...
...part number W10692945. Mounting slots C. Remove the grease filter. Connect Vent System 1. A B A B X C D E A. Vent clamp C. Vent duct E. Vent transition B. 3.5 x 9.5 mm screw 9 Air deflector C. C A. Mounting screws B. Level the range hood and tighten upper mounting screws. 4. Install transition on back of the air deflector. 6. Place the assembled air deflector and duct over the exhaust outlet. 2. Install In-Line Smart Kit - For Non-Vented (Recirculating) Installation Only: 1. Measure from the hood. 7. Use the optional wall anchors if needed. Air deflector...

Installation Instructions
Page 11
... canopy. Control panel Sleep Mode The range hood automatically enters Sleep Mode when not in use . When Auto Sense is turned On. For non-vented (recirculating) installations only, install charcoal filters over grille on the temperature Auto Sense is not in use . A. RANGE HOOD USE The range hood is turned On by the consumer or by pressing a higher fan speed. LED lights (2) D. If the vent hood is designed to remove smoke, cooking vapors and odors from the cooktop area. Install Vent Covers When using...
... canopy. Control panel Sleep Mode The range hood automatically enters Sleep Mode when not in use . When Auto Sense is turned On. For non-vented (recirculating) installations only, install charcoal filters over grille on the temperature Auto Sense is not in use . A. RANGE HOOD USE The range hood is turned On by the consumer or by pressing a higher fan speed. LED lights (2) D. If the vent hood is designed to remove smoke, cooking vapors and odors from the cooktop area. Install Vent Covers When using...
Installation Instructions
Page 12
... at High speed. Touch LIGHT again and the LED task lights will turn the task and ambient lights Off. Replace grease filters before operating hood. Metal Grease Filter 1. The Auto button light will turn both task and ambient lighting. The Auto button light will flash 3 times when the range hood is now set temperature limit, the fan will turn Off. Hi Press HI to the electric cooktop mode. Exterior Surfaces: To avoid damage to the following instructions. Metal filters C. Stainless steel panel D. To Set...
... at High speed. Touch LIGHT again and the LED task lights will turn the task and ambient lights Off. Replace grease filters before operating hood. Metal Grease Filter 1. The Auto button light will turn both task and ambient lighting. The Auto button light will flash 3 times when the range hood is now set temperature limit, the fan will turn Off. Hi Press HI to the electric cooktop mode. Exterior Surfaces: To avoid damage to the following instructions. Metal filters C. Stainless steel panel D. To Set...

Installation Instructions
Page 13
... lamp with Charcoal Filter Kit. Replace the light cover. 5. Engage the 2 pins in spring release handle. 6. Repeat steps 1 to the metal filter. 5. Close the stainless steel panel. See the "Accessories" section for information on metal filter, and then release handle to 6 months with a 120-volt, 40-watt maximum, halogen lamp made for service contact information. 3. Replacing a Halogen Lamp (Ambient Lighting) Turn off the range hood and allow the halogen lamp to handle lamp. Reconnect power. To Replace Charcoal Filter: 1. Remove metal grease filter...
... lamp with Charcoal Filter Kit. Replace the light cover. 5. Engage the 2 pins in spring release handle. 6. Repeat steps 1 to the metal filter. 5. Close the stainless steel panel. See the "Accessories" section for information on metal filter, and then release handle to 6 months with a 120-volt, 40-watt maximum, halogen lamp made for service contact information. 3. Replacing a Halogen Lamp (Ambient Lighting) Turn off the range hood and allow the halogen lamp to handle lamp. Reconnect power. To Replace Charcoal Filter: 1. Remove metal grease filter...
Installation Instructions
Page 15
... the Whirlpool Canada LP Customer eXperience Centre toll free: 1-800-807-6777 or visit our website at www.kitchenaid.com. Accessories Charcoal Filter Kit (for non-vented installations only) Order Part Number W10692910 Recirculation Kit (for black stainless vent hood models KVWB600DBS and KVWB606DBS) Order Part Number W10750879 6" (15.2 cm) Makeup Air Kit (consult local building codes) Order Part Number W10446915 Power Cord Kit Order Part Number W10613691 In-Line Smart Kit Order Part Number W10692945 15 If you need replacement parts If you need service Please refer...
... the Whirlpool Canada LP Customer eXperience Centre toll free: 1-800-807-6777 or visit our website at www.kitchenaid.com. Accessories Charcoal Filter Kit (for non-vented installations only) Order Part Number W10692910 Recirculation Kit (for black stainless vent hood models KVWB600DBS and KVWB606DBS) Order Part Number W10750879 6" (15.2 cm) Makeup Air Kit (consult local building codes) Order Part Number W10446915 Power Cord Kit Order Part Number W10613691 In-Line Smart Kit Order Part Number W10692945 15 If you need replacement parts If you need service Please refer...
Installation Instructions
Page 16
... OBTAIN WARRANTY SERVICE. Please take a few minutes to use with original model/serial numbers removed, altered or not easily determined. and Canada, direct all requests for appliances with products not approved by a KitchenAid designated service company. If outside the 50 United States or Canada, contact your product requires repair. This limited warranty is valid only in which it was purchased, or at its sole discretion replace the product. In-home instruction...
... OBTAIN WARRANTY SERVICE. Please take a few minutes to use with original model/serial numbers removed, altered or not easily determined. and Canada, direct all requests for appliances with products not approved by a KitchenAid designated service company. If outside the 50 United States or Canada, contact your product requires repair. This limited warranty is valid only in which it was purchased, or at its sole discretion replace the product. In-home instruction...


