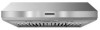
Use & Care Guide
Page 1
... parts, accessories or service, call: 1-800-422-1230 or visit our website at www.kitchenaid.com In Canada, for assistance, installation and service, call: 1-800-807-6777 or visit our website at www.kitchenaid.ca HOTTE D'EXTRACTION À MONTAGE MURAL DE STYLE COMMERCIAL DE 30" (76,2 CM)...d'utilisation et d'entretien Au Canada, pour assistance, installation ou service composez le 1-800-807-6777 ou visitez notre site web à www.kitchenaid.ca Table of Contents/Table des matières 2 IMPORTANT: READ AND SAVE THESE INSTRUCTIONS. LI3Y4B/W10331008B IMPORTANT : LIRE ET CONSERVER CES ...
... parts, accessories or service, call: 1-800-422-1230 or visit our website at www.kitchenaid.com In Canada, for assistance, installation and service, call: 1-800-807-6777 or visit our website at www.kitchenaid.ca HOTTE D'EXTRACTION À MONTAGE MURAL DE STYLE COMMERCIAL DE 30" (76,2 CM)...d'utilisation et d'entretien Au Canada, pour assistance, installation ou service composez le 1-800-807-6777 ou visitez notre site web à www.kitchenaid.ca Table of Contents/Table des matières 2 IMPORTANT: READ AND SAVE THESE INSTRUCTIONS. LI3Y4B/W10331008B IMPORTANT : LIRE ET CONSERVER CES ...

Use & Care Guide
Page 2
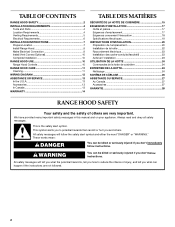
TABLE OF CONTENTS RANGE HOOD SAFETY 2 INSTALLATION REQUIREMENTS 4 Tools and Parts 4 Location Requirements 4 Venting Requirements 5 Electrical Requirements 6 INSTALLATION INSTRUCTIONS 7 Prepare Location 7 Install Range Hood 9 Make Electrical Connection 9 Install Vent Covers (Optional 10 Complete Installation 10 RANGE HOOD USE 10 Range Hood Controls 10 RANGE HOOD CARE 11 Cleaning 11 WIRING DIAGRAM 12 ASSISTANCE OR SERVICE 13 In the U.S.A 13 Accessories 13 In Canada 13 WARRANTY 14 TABLE DES MATIÈRES SÉCURITÉ DE LA HOTTE DE CUISINIÈRE 15 EXIGENCES D'...
TABLE OF CONTENTS RANGE HOOD SAFETY 2 INSTALLATION REQUIREMENTS 4 Tools and Parts 4 Location Requirements 4 Venting Requirements 5 Electrical Requirements 6 INSTALLATION INSTRUCTIONS 7 Prepare Location 7 Install Range Hood 9 Make Electrical Connection 9 Install Vent Covers (Optional 10 Complete Installation 10 RANGE HOOD USE 10 Range Hood Controls 10 RANGE HOOD CARE 11 Cleaning 11 WIRING DIAGRAM 12 ASSISTANCE OR SERVICE 13 In the U.S.A 13 Accessories 13 In Canada 13 WARRANTY 14 TABLE DES MATIÈRES SÉCURITÉ DE LA HOTTE DE CUISINIÈRE 15 EXIGENCES D'...

Use & Care Guide
Page 3
WARNING: TO REDUCE THE RISK OF FIRE, USE ONLY METAL DUCTWORK. Crepes Suzette, Cherries Jubilee, Peppercorn Beef Flambé). ■ Clean ventilating fans frequently. Grease should not be sure to operate it started. - You know how to duct air outside - You can fight the fire with a close fitting lid, cookie sheet, or metal tray, then turn hood ON when cooking at high settings. do not go out immediately, EVACUATE AND CALL THE FIRE DEPARTMENT. ■ NEVER PICK UP A FLAMING PAN - CAUTION: For general ventilating use cookware appropriate for proper combustion and ...
WARNING: TO REDUCE THE RISK OF FIRE, USE ONLY METAL DUCTWORK. Crepes Suzette, Cherries Jubilee, Peppercorn Beef Flambé). ■ Clean ventilating fans frequently. Grease should not be sure to operate it started. - You know how to duct air outside - You can fight the fire with a close fitting lid, cookie sheet, or metal tray, then turn hood ON when cooking at high settings. do not go out immediately, EVACUATE AND CALL THE FIRE DEPARTMENT. ■ NEVER PICK UP A FLAMING PAN - CAUTION: For general ventilating use cookware appropriate for proper combustion and ...
Use & Care Guide
Page 4
Tools needed ■ Home power supply cable ■ ½" (12.7 mm) UL listed or CSA approved strain relief ■ 3 UL listed wire connectors ■ 1 wall or roof cap ■ Metal vent system ■ Vent clamps/duct tape as windows, doors and strong heating vents. Have a qualified technician install the range hood. Grounded electrical outlet is not applicable, the standard for venting through the roof or wall. For Mobile Home Installations The installation of this range hood must conform to comply with local codes. The model/serial rating plate is the installer's ...
Tools needed ■ Home power supply cable ■ ½" (12.7 mm) UL listed or CSA approved strain relief ■ 3 UL listed wire connectors ■ 1 wall or roof cap ■ Metal vent system ■ Vent clamps/duct tape as windows, doors and strong heating vents. Have a qualified technician install the range hood. Grounded electrical outlet is not applicable, the standard for venting through the roof or wall. For Mobile Home Installations The installation of this range hood must conform to comply with local codes. The model/serial rating plate is the installer's ...
Use & Care Guide
Page 5
The specified CFM varies from locale to gas cooking surface. Consult your area. Venting Methods This canopy hood is needed for specific requirements in an attic or other enclosed area. ■ Do not use a 4" (10.2 cm) laundry-type wall cap. ■ Use metal vent only. Vent system can terminate either through the roof or wall. cabinet openingwidth Canopy AB X Bottom of the vent system. Cold Weather Installations An additional back draft damper should be installed to minimize backward cold air flow and a thermal break should be as close as part of canopy 13" (33.0 ...
The specified CFM varies from locale to gas cooking surface. Consult your area. Venting Methods This canopy hood is needed for specific requirements in an attic or other enclosed area. ■ Do not use a 4" (10.2 cm) laundry-type wall cap. ■ Use metal vent only. Vent system can terminate either through the roof or wall. cabinet openingwidth Canopy AB X Bottom of the vent system. Cold Weather Installations An additional back draft damper should be installed to minimize backward cold air flow and a thermal break should be as close as part of canopy 13" (33.0 ...

Use & Care Guide
Page 6
Roof cap B. 3¹⁄₄" x 10" (8.3 x 25.4 cm) rectangular metal vent A. Wall cap B. 3¹⁄₄" x 10" (8.3 x 25.4 cm) rectangular metal vent Calculating Vent System Length To calculate the length of the system you need, add the equivalent feet (meters) for each vent piece used , it is recommended that a qualified electrician determine that the electrical installation is located behind the filter on the model/serial rating plate. If codes permit and a separate ground wire is used in conformance with National Electrical Code, ANSI/NFPA 70 (latest edition), or CSA ...
Roof cap B. 3¹⁄₄" x 10" (8.3 x 25.4 cm) rectangular metal vent A. Wall cap B. 3¹⁄₄" x 10" (8.3 x 25.4 cm) rectangular metal vent Calculating Vent System Length To calculate the length of the system you need, add the equivalent feet (meters) for each vent piece used , it is recommended that a qualified electrician determine that the electrical installation is located behind the filter on the model/serial rating plate. If codes permit and a separate ground wire is used in conformance with National Electrical Code, ANSI/NFPA 70 (latest edition), or CSA ...

Use & Care Guide
Page 7
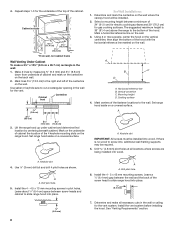
NOTE: This range hood can result in the area the vent opening for exhaust vent. ■ Check your hood. If cabinet has recessed bottom, add wood filler strips on the underside of cabinet. 3. Failure to do so can be mounted to the cabinets or to the right and left of the centerline on the underside of the cabinet. To wire through the cabinet at this line that surface. Drill a 1¼" (3.2 cm) diameter hole through top: Mark a line distance "A" from wall, not cabinet frame Cabinet bottom Centerline A. 12 31.0 cm) 3" (7.6 cm) Wall Cut Openings for 3¼...
NOTE: This range hood can result in the area the vent opening for exhaust vent. ■ Check your hood. If cabinet has recessed bottom, add wood filler strips on the underside of cabinet. 3. Failure to do so can be mounted to the cabinets or to the right and left of the centerline on the underside of the cabinet. To wire through the cabinet at this line that surface. Drill a 1¼" (3.2 cm) diameter hole through top: Mark a line distance "A" from wall, not cabinet frame Cabinet bottom Centerline A. 12 31.0 cm) 3" (7.6 cm) Wall Cut Openings for 3¼...
Use & Care Guide
Page 8
Cabinet cutouts *¹⁄₂" (1.3 cm) *4¹⁄₂" (11.4 cm) 5¹/₄" (13.3 cm) 5¹/₄" (13.3 cm) *From wall, not cabinet frame Wall Venting Under Cabinet To make all locations where screws are being installed into wood. Mark lines 5¼" (13.3 cm) to screw into, additional wall framing supports may be required. 5. Cabinet front Centerline ³⁄₈" (0.9 cm) 3⁷⁄₈" (9.8 cm) 5¹⁄₄" 5¹⁄₄" (13.3 cm) (13.3 cm) 3. Mark on the underside of cabinet the location of the 4 ...
Cabinet cutouts *¹⁄₂" (1.3 cm) *4¹⁄₂" (11.4 cm) 5¹/₄" (13.3 cm) 5¹/₄" (13.3 cm) *From wall, not cabinet frame Wall Venting Under Cabinet To make all locations where screws are being installed into wood. Mark lines 5¼" (13.3 cm) to screw into, additional wall framing supports may be required. 5. Cabinet front Centerline ³⁄₈" (0.9 cm) 3⁷⁄₈" (9.8 cm) 5¹⁄₄" 5¹⁄₄" (13.3 cm) (13.3 cm) 3. Mark on the underside of cabinet the location of the 4 ...
Use & Care Guide
Page 9
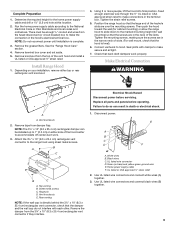
Determine the required height for cabinet mounting) or allow the range hood to slide down to make secure and airtight. 7. See the "Range Hood Care" section. 4. Install Range Hood 1. Depending on either top or rear rectangular vent knockout. 4. Tighten the mounting screws, making sure the screws are in the hood's electrical terminal box. Check that back draft dampers work . 3. NOTE: The 3¼" x 10" (8.3 x 25.4 cm) rectangular damper can result in death or electrical shock. 1. Top venting B. Disconnect power. UL listed wire connector D. UL listed or CSA approved...
Determine the required height for cabinet mounting) or allow the range hood to slide down to make secure and airtight. 7. See the "Range Hood Care" section. 4. Install Range Hood 1. Depending on either top or rear rectangular vent knockout. 4. Tighten the mounting screws, making sure the screws are in the hood's electrical terminal box. Check that back draft dampers work . 3. NOTE: The 3¼" x 10" (8.3 x 25.4 cm) rectangular damper can result in death or electrical shock. 1. Top venting B. Disconnect power. UL listed wire connector D. UL listed or CSA approved...

Use & Care Guide
Page 10
Check that product. See the "Range Hood Care" section. 2. Move the fan switch to the "On" position to "1" position for low speed, "2" position for medium speed, or "3" position for high speed. Adjusting the fan Range Hood Controls Operating the light 1. Move the fan speed switch to turn on the fan speed switch. 2. Connect ground wire to clear all light bulbs are located on the underside of the range hood blower and light. Install terminal box cover. 6. Complete Installation 1. NOTE: To get the most efficient use , move slider to On to automatically turn the fan ...
Check that product. See the "Range Hood Care" section. 2. Move the fan switch to the "On" position to "1" position for low speed, "2" position for medium speed, or "3" position for high speed. Adjusting the fan Range Hood Controls Operating the light 1. Move the fan speed switch to turn on the fan speed switch. 2. Connect ground wire to clear all light bulbs are located on the underside of the range hood blower and light. Install terminal box cover. 6. Complete Installation 1. NOTE: To get the most efficient use , move slider to On to automatically turn the fan ...

Use & Care Guide
Page 11
Replacing a Halogen Lamp Turn off the range hood and allow the halogen lamp to remove. 2. Disconnect power. 2. Grasp filter handles, push toward the rear of filter into place. 4. Grasp filter handles and place rear of the range hood and pull down on the rear handle and set the front of the new lamp, do not touch lamp with bare fingers. Remove the lamp and replace it into rear track. 2. To avoid damage or decreasing the life of the grease filter into the front track to lock it with a 120-volt, 50-watt maximum halogen lamp with clean water and wipe dry. Always wipe dry ...
Replacing a Halogen Lamp Turn off the range hood and allow the halogen lamp to remove. 2. Disconnect power. 2. Grasp filter handles, push toward the rear of filter into place. 4. Grasp filter handles and place rear of the range hood and pull down on the rear handle and set the front of the new lamp, do not touch lamp with bare fingers. Remove the lamp and replace it into rear track. 2. To avoid damage or decreasing the life of the grease filter into the front track to lock it with a 120-volt, 50-watt maximum halogen lamp with clean water and wipe dry. Always wipe dry ...

Use & Care Guide
Page 12
WIRING DIAGRAM Junction Box GND L N Y W W Y W BK Y/G Motor Resistance (Ohms) Blue - Black 9.8 (max) Blue - White 21.6 (min) Room Temp. 41˚F (23˚C) Motor Characteristics Power Supply 120 VAC Frequency 60 HZ Power Absorption 420 W Current 3.7A 12 BU BU GY BK BK R GY W W Y Y BR BR Y/G Y/G W BU BR BK W Fan Speed On Off Fan GY BR R W BK BK Speed 3 Speed 2 Speed 1 25uF R R BR BR Temperature Sensor BR Y BK Y Off Light Y Red 18 Blue - Gray 14.3 Blue -
WIRING DIAGRAM Junction Box GND L N Y W W Y W BK Y/G Motor Resistance (Ohms) Blue - Black 9.8 (max) Blue - White 21.6 (min) Room Temp. 41˚F (23˚C) Motor Characteristics Power Supply 120 VAC Frequency 60 HZ Power Absorption 420 W Current 3.7A 12 BU BU GY BK BK R GY W W Y Y BR BR Y/G Y/G W BU BR BK W Fan Speed On Off Fan GY BR R W BK BK Speed 3 Speed 2 Speed 1 25uF R R BR BR Temperature Sensor BR Y BK Y Off Light Y Red 18 Blue - Gray 14.3 Blue -
Use & Care Guide
Page 13
...precision used to local dealers, repair parts distributors and service companies. Factory specified parts will help us or your correspondence. KitchenAid Canada designated service technicians are trained to fulfill the product warranty and provide afterwarranty service, anywhere in your area, call...For further assistance If you need to order replacement parts, we recommend that you can write to KitchenAid Canada with any questions or concerns at : Customer eXperience Centre KitchenAid Canada 200 - 6750 Century Ave. Mississauga, Ontario L5N 0B7 Please include a daytime phone number...
...precision used to local dealers, repair parts distributors and service companies. Factory specified parts will help us or your correspondence. KitchenAid Canada designated service technicians are trained to fulfill the product warranty and provide afterwarranty service, anywhere in your area, call...For further assistance If you need to order replacement parts, we recommend that you can write to KitchenAid Canada with any questions or concerns at : Customer eXperience Centre KitchenAid Canada 200 - 6750 Century Ave. Mississauga, Ontario L5N 0B7 Please include a daytime phone number...

Use & Care Guide
Page 14
...down the following information about your major appliance to better help by checking the "Assistance or Service" section or by a KitchenAid designated service company. Dealer name Address Phone number Model number Serial number Purchase date 14 The removal and reinstallation of your ...major appliance if it . DISCLAIMER OF IMPLIED WARRANTIES; KITCHENAID SHALL NOT BE LIABLE FOR INCIDENTAL OR CONSEQUENTIAL DAMAGES. THIS WARRANTY GIVES YOU SPECIFIC LEGAL RIGHTS, AND YOU MAY ALSO HAVE...
...down the following information about your major appliance to better help by checking the "Assistance or Service" section or by a KitchenAid designated service company. Dealer name Address Phone number Model number Serial number Purchase date 14 The removal and reinstallation of your ...major appliance if it . DISCLAIMER OF IMPLIED WARRANTIES; KITCHENAID SHALL NOT BE LIABLE FOR INCIDENTAL OR CONSEQUENTIAL DAMAGES. THIS WARRANTY GIVES YOU SPECIFIC LEGAL RIGHTS, AND YOU MAY ALSO HAVE...

Dimension Guide
Page 1
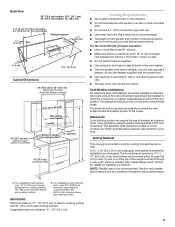
Connect the aluminum wiring to the added section of solid copper wire to cooking surface 36" (91.4 cm) countertop height 3¹⁄₈" (7.9 cm) 10" (25.4 cm) 30" (76.2 cm) 36" (91.4 cm) 23" (58.4 cm) Back View 30" (76.2 cm) models: 12¼" (31.1 cm) 36" (91.4 cm) models: 15" (38.1 cm) 7" (17.8 cm): 30" (76.2 cm) models 9⁷⁄₈" (25.0 cm): 36" (91.4 cm) models Wiring knockout 1¹⁄₈" (2.9 cm) 7⁷⁄₈" (20.0 cm) A. clearance upper cabinet to aluminum. cabinet opening width (If installed between cabinets) 29¹...
Connect the aluminum wiring to the added section of solid copper wire to cooking surface 36" (91.4 cm) countertop height 3¹⁄₈" (7.9 cm) 10" (25.4 cm) 30" (76.2 cm) 36" (91.4 cm) 23" (58.4 cm) Back View 30" (76.2 cm) models: 12¼" (31.1 cm) 36" (91.4 cm) models: 15" (38.1 cm) 7" (17.8 cm): 30" (76.2 cm) models 9⁷⁄₈" (25.0 cm): 36" (91.4 cm) models Wiring knockout 1¹⁄₈" (2.9 cm) 7⁷⁄₈" (20.0 cm) A. clearance upper cabinet to aluminum. cabinet opening width (If installed between cabinets) 29¹...

Dimension Guide
Page 2
q Use caulking to seal exterior wall or roof opening is 3¹⁄₄" x 10" (8.3 cm x 25.4 cm). Venting Methods This canopy hood is factory set for each vent piece used . See "Install Range Hood" section for details for installing the damper. Roof Venting Wall Venting (top or rear discharge) A B B A Calculating Vent System Length To calculate the length of the system you need, add the equivalent feet (meters) for venting through a wall, a 90° elbow is a minimum of 24" (61.0 cm) of the range hood and through the roof or wall. Roof cap B. 3¹⁄&#...
q Use caulking to seal exterior wall or roof opening is 3¹⁄₄" x 10" (8.3 cm x 25.4 cm). Venting Methods This canopy hood is factory set for each vent piece used . See "Install Range Hood" section for details for installing the damper. Roof Venting Wall Venting (top or rear discharge) A B B A Calculating Vent System Length To calculate the length of the system you need, add the equivalent feet (meters) for venting through a wall, a 90° elbow is a minimum of 24" (61.0 cm) of the range hood and through the roof or wall. Roof cap B. 3¹⁄&#...

Installation Guide
Page 1
..., operation/performance, parts, accessories or service, call: 1-800-422-1230 or visit our website at www.kitchenaid.com In Canada, for assistance, installation and service, call: 1-800-807-6777 or visit our website at www.kitchenaid.ca HOTTE D'EXTRACTION À MONTAGE MURAL DE STYLE COMMERCIAL DE 30" (76,2 CM) ET 36" (91... d'installation et Guide d'utilisation et d'entretien Au Canada, pour assistance, installation ou service composez le 1-800-807-6777 ou visitez notre site web à www.kitchenaid.ca Table of Contents/Table des matières 2 IMPORTANT: READ AND SAVE THESE INSTRUCTIONS.
..., operation/performance, parts, accessories or service, call: 1-800-422-1230 or visit our website at www.kitchenaid.com In Canada, for assistance, installation and service, call: 1-800-807-6777 or visit our website at www.kitchenaid.ca HOTTE D'EXTRACTION À MONTAGE MURAL DE STYLE COMMERCIAL DE 30" (76,2 CM) ET 36" (91... d'installation et Guide d'utilisation et d'entretien Au Canada, pour assistance, installation ou service composez le 1-800-807-6777 ou visitez notre site web à www.kitchenaid.ca Table of Contents/Table des matières 2 IMPORTANT: READ AND SAVE THESE INSTRUCTIONS.
Installation Guide
Page 2
WARNING You can be killed or seriously injured if you don't follow instructions. Always read and obey all safety messages. TABLE OF CONTENTS RANGE HOOD SAFETY 2 INSTALLATION REQUIREMENTS 4 Tools and Parts 4 Location Requirements 4 Venting Requirements 5 Electrical Requirements 6 INSTALLATION INSTRUCTIONS 7 Prepare Location 7 Install Range Hood 9 Make Electrical Connection 9 Install Vent Covers (Optional 10 Complete Installation 10 RANGE HOOD USE 10 Range Hood Controls 10 RANGE HOOD CARE 11 Cleaning 11 WIRING DIAGRAM 12 ASSISTANCE OR SERVICE 13 In the U.S.A 13 ...
WARNING You can be killed or seriously injured if you don't follow instructions. Always read and obey all safety messages. TABLE OF CONTENTS RANGE HOOD SAFETY 2 INSTALLATION REQUIREMENTS 4 Tools and Parts 4 Location Requirements 4 Venting Requirements 5 Electrical Requirements 6 INSTALLATION INSTRUCTIONS 7 Prepare Location 7 Install Range Hood 9 Make Electrical Connection 9 Install Vent Covers (Optional 10 Complete Installation 10 RANGE HOOD USE 10 Range Hood Controls 10 RANGE HOOD CARE 11 Cleaning 11 WIRING DIAGRAM 12 ASSISTANCE OR SERVICE 13 In the U.S.A 13 ...

Installation Guide
Page 3
CAUTION: For general ventilating use to exhaust hazardous or explosive materials and vapors. WARNING: TO REDUCE THE RISK OF FIRE, USE ONLY METAL DUCTWORK. BE CAREFUL TO PREVENT BURNS. READ AND SAVE THESE INSTRUCTIONS 3 When the service disconnecting means cannot be done by NFPA. ■ WARNING: To reduce the risk of the surface element. Heat oils slowly on "Kitchen Fire Safety Tips" published by qualified person(s) in accordance with all applicable codes and standards, including fire-rated construction. ■ Do not operate any solid-state speed control device. ...
CAUTION: For general ventilating use to exhaust hazardous or explosive materials and vapors. WARNING: TO REDUCE THE RISK OF FIRE, USE ONLY METAL DUCTWORK. BE CAREFUL TO PREVENT BURNS. READ AND SAVE THESE INSTRUCTIONS 3 When the service disconnecting means cannot be done by NFPA. ■ WARNING: To reduce the risk of the surface element. Heat oils slowly on "Kitchen Fire Safety Tips" published by qualified person(s) in accordance with all applicable codes and standards, including fire-rated construction. ■ Do not operate any solid-state speed control device. ...

Installation Guide
Page 4
Tools needed ■ Level ■ Drill with 1¼" (3.0 cm 4.8 mm 3.0 mm), and 7.9 mm) drill bits ■ Pencil ■ Wire stripper or utility knife ■ Tape measure or ruler ■ Pliers ■ Caulking gun and weatherproof caulking compound ■ Jigsaw or keyhole saw ■ Flat-blade screwdriver ■ Metal snips ■ Phillips screwdriver ■ Metric hex key set for Manufactured Home Installation 1982 (Manufactured Home Sites, Communities and Setups) ANSI A225.1/NFPA 501A, or latest edition, or with installation clearances specified on the rear wall of ...
Tools needed ■ Level ■ Drill with 1¼" (3.0 cm 4.8 mm 3.0 mm), and 7.9 mm) drill bits ■ Pencil ■ Wire stripper or utility knife ■ Tape measure or ruler ■ Pliers ■ Caulking gun and weatherproof caulking compound ■ Jigsaw or keyhole saw ■ Flat-blade screwdriver ■ Metal snips ■ Phillips screwdriver ■ Metric hex key set for Manufactured Home Installation 1982 (Manufactured Home Sites, Communities and Setups) ANSI A225.1/NFPA 501A, or latest edition, or with installation clearances specified on the rear wall of ...