Use & Care Guide
Page 1
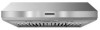
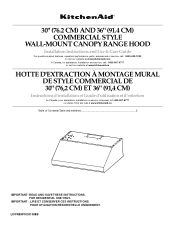
...performance, parts, accessories or service, call: 1-800-422-1230 or visit our website at www.kitchenaid.com In Canada, for assistance, installation and service, call: 1-800-807-6777 or visit our website at www.kitchenaid.ca HOTTE D'EXTRACTION À MONTAGE MURAL DE STYLE COMMERCIAL DE 30" (76,2 CM) ET ...36" (91,4 CM) Instructions d'installation et Guide d'utilisation et d'entretien Au Canada, pour assistance, installation ou service composez le 1-800-807-6777 ou visitez notre site web à www.kitchenaid.ca Table of Contents/Table des matières 2 IMPORTANT: READ AND ...
...performance, parts, accessories or service, call: 1-800-422-1230 or visit our website at www.kitchenaid.com In Canada, for assistance, installation and service, call: 1-800-807-6777 or visit our website at www.kitchenaid.ca HOTTE D'EXTRACTION À MONTAGE MURAL DE STYLE COMMERCIAL DE 30" (76,2 CM) ET ...36" (91,4 CM) Instructions d'installation et Guide d'utilisation et d'entretien Au Canada, pour assistance, installation ou service composez le 1-800-807-6777 ou visitez notre site web à www.kitchenaid.ca Table of Contents/Table des matières 2 IMPORTANT: READ AND ...

Use & Care Guide
Page 2
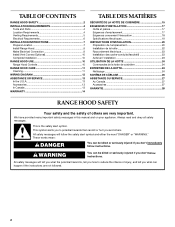
...2 TABLE OF CONTENTS RANGE HOOD SAFETY 2 INSTALLATION REQUIREMENTS 4 Tools and Parts 4 Location Requirements 4 Venting Requirements 5 Electrical Requirements 6 INSTALLATION INSTRUCTIONS 7 Prepare Location 7 Install Range Hood 9 Make Electrical Connection 9 Install Vent Covers (Optional 10 Complete Installation 10 RANGE HOOD USE 10 Range Hood Controls ...DES MATIÈRES SÉCURITÉ DE LA HOTTE DE CUISINIÈRE 15 EXIGENCES D'INSTALLATION 17 Outils et pièces 17 Exigences d'emplacement 17 Exigences concernant l'évacuation 18 Spécifications é...
...2 TABLE OF CONTENTS RANGE HOOD SAFETY 2 INSTALLATION REQUIREMENTS 4 Tools and Parts 4 Location Requirements 4 Venting Requirements 5 Electrical Requirements 6 INSTALLATION INSTRUCTIONS 7 Prepare Location 7 Install Range Hood 9 Make Electrical Connection 9 Install Vent Covers (Optional 10 Complete Installation 10 RANGE HOOD USE 10 Range Hood Controls ...DES MATIÈRES SÉCURITÉ DE LA HOTTE DE CUISINIÈRE 15 EXIGENCES D'INSTALLATION 17 Outils et pièces 17 Exigences d'emplacement 17 Exigences concernant l'évacuation 18 Spécifications é...

Use & Care Guide
Page 3
... person(s) in accordance with a damaged cord or plug. Follow the heating equipment manufacturer's guideline and safety standards such as a tag, to the service panel. ■ Installation work and electrical wiring must always be done by the National Fire Protection Association (NFPA), the American Society for Heating, Refrigeration and Air Conditioning Engineers...
... person(s) in accordance with a damaged cord or plug. Follow the heating equipment manufacturer's guideline and safety standards such as a tag, to the service panel. ■ Installation work and electrical wiring must always be done by the National Fire Protection Association (NFPA), the American Society for Heating, Refrigeration and Air Conditioning Engineers...
Use & Care Guide
Page 4
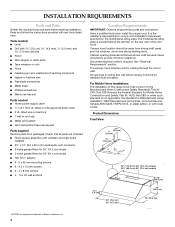
...windows, doors and strong heating vents. Check that are included. ■ Hood canopy assembly with local codes. It is the installer's responsibility to the Manufactured Home Construction Safety Standards, Title 24 CFR, Part 328 (formerly the Federal Standard for Mobile Home ...and ordinances. See "Electrical Requirements" section. Grounded electrical outlet is a registered trademark of the vent hood. For Mobile Home Installations The installation of this range hood must be away from strong draft areas, such as required Parts supplied Remove parts from packages. Product ...
...windows, doors and strong heating vents. Check that are included. ■ Hood canopy assembly with local codes. It is the installer's responsibility to the Manufactured Home Construction Safety Standards, Title 24 CFR, Part 328 (formerly the Federal Standard for Mobile Home ...and ordinances. See "Electrical Requirements" section. Grounded electrical outlet is a registered trademark of the vent hood. For Mobile Home Installations The installation of this range hood must be away from strong draft areas, such as required Parts supplied Remove parts from packages. Product ...

Use & Care Guide
Page 5
... back pressure and air turbulence that gently reduce performance. clearance upper cabinet to countertop Duct cover (if used . ■ Do not install 2 elbows together. ■ Use clamps or duct tape to seal all joints in the vent system. ■ The vent system must... as possible to cooking surface 36" (91.4 cm) countertop height Venting Requirements ■ Vent system must have a damper. Consult your HVAC professional for installing the damper. A 3¹⁄₄" x 10" (8.3 x 25.4 cm) rectangular vent system is not recommended. Vent system can terminate either through ...
... back pressure and air turbulence that gently reduce performance. clearance upper cabinet to countertop Duct cover (if used . ■ Do not install 2 elbows together. ■ Use clamps or duct tape to seal all joints in the vent system. ■ The vent system must... as possible to cooking surface 36" (91.4 cm) countertop height Venting Requirements ■ Vent system must have a damper. Consult your HVAC professional for installing the damper. A 3¹⁄₄" x 10" (8.3 x 25.4 cm) rectangular vent system is not recommended. Vent system can terminate either through ...

Use & Care Guide
Page 6
...codes and ordinances. Connect the aluminum wiring to the added section of the system you need, add the equivalent feet (meters) for installing the damper. Aluminum/copper connection must conform with the rating of the National Electrical Code, ANSI/NFPA 70 (latest edition), or CSA... (8.3 x 25.4 cm) elbow 6 ft (1.8 m) 2 ft (0.6 m) Wall cap Maximum Recommended Length = 35 ft (10.7 m) 1 - 90° elbow 8 ft (2.4 m) straight 1 - See "Install Range Hood" section for details for each vent piece used , it is recommended that a qualified electrician determine that the electrical...
...codes and ordinances. Connect the aluminum wiring to the added section of the system you need, add the equivalent feet (meters) for installing the damper. Aluminum/copper connection must conform with the rating of the National Electrical Code, ANSI/NFPA 70 (latest edition), or CSA... (8.3 x 25.4 cm) elbow 6 ft (1.8 m) 2 ft (0.6 m) Wall cap Maximum Recommended Length = 35 ft (10.7 m) 1 - 90° elbow 8 ft (2.4 m) straight 1 - See "Install Range Hood" section for details for each vent piece used , it is recommended that a qualified electrician determine that the electrical...

Use & Care Guide
Page 7
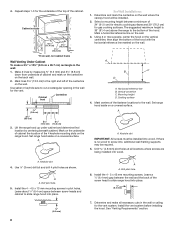
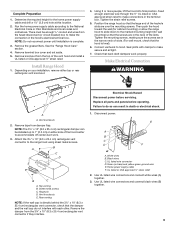
...underside of cabinet. 3. Disconnect power. 2. Select a flat surface for wiring hole location instructions. 1. Using 2 or more people to the wall. For Cabinet Installations 1. Mark the point on this point. 7⁷⁄₈" (20.0 cm) A from wall, not cabinet frame Cabinet bottom Centerline A. 12 31.0 cm...;₄" (3.2 cm) diameter wiring access hole. Failure to do so can be mounted to the cabinets or to move and install range hood. Install screws to the right and left of the centerline on the underside of cabinet. 2. See Step 2 for assembling the range ...
...underside of cabinet. 3. Disconnect power. 2. Select a flat surface for wiring hole location instructions. 1. Using 2 or more people to the wall. For Cabinet Installations 1. Mark the point on this point. 7⁷⁄₈" (20.0 cm) A from wall, not cabinet frame Cabinet bottom Centerline A. 12 31.0 cm...;₄" (3.2 cm) diameter wiring access hole. Failure to do so can be mounted to the cabinets or to move and install range hood. Install screws to the right and left of the centerline on the underside of cabinet. 2. See Step 2 for assembling the range ...
Use & Care Guide
Page 8
... ¹⁄₄" (6.4 mm) 8 A A. A B D C X A. Drill 4.8 mm) pilot holes at all necessary cuts in the wall: 1. Keyhole slot 4. A A. Install the 4 - 5 x 45 mm mounting screws. Determine and make a 3½" x 10½" (8.9 cm x 26.7 cm) rectangle in the wall or ceiling for the vent system.... surface 4. Use ¹⁄₈" (3 mm) drill bit and drill 4 pilot holes as shown. Drill pilot hole. 5. Install the vent system before installing the hood. If there is 36" (91.4 cm) above the range to the right and left of the fastener locations to ...
... ¹⁄₄" (6.4 mm) 8 A A. A B D C X A. Drill 4.8 mm) pilot holes at all necessary cuts in the wall: 1. Keyhole slot 4. A A. Install the 4 - 5 x 45 mm mounting screws. Determine and make a 3½" x 10½" (8.9 cm x 26.7 cm) rectangle in the wall or ceiling for the vent system.... surface 4. Use ¹⁄₈" (3 mm) drill bit and drill 4 pilot holes as shown. Drill pilot hole. 5. Install the vent system before installing the hood. If there is 36" (91.4 cm) above the range to the right and left of the fastener locations to ...
Use & Care Guide
Page 9
... do so can be enough ½" conduit and wires from the fused disconnect (or circuit breaker) box to make secure and airtight. 7. Install Range Hood 1. Using 2 or more people, lift the hood into final position. Connect ventwork to the National Electrical Code or CSA Standards and...1¼" (3.2 cm) hole at this location. 2. Tighten the mounting screws, making sure the screws are in the narrow neck of the vent hood and install a UL listed or CSA approved ½" strain relief. Vent knockouts 2. Hinge pin D. Vent knockouts E. Rear venting NOTE: If the wall cap is ...
... do so can be enough ½" conduit and wires from the fused disconnect (or circuit breaker) box to make secure and airtight. 7. Install Range Hood 1. Using 2 or more people, lift the hood into final position. Connect ventwork to the National Electrical Code or CSA Standards and...1¼" (3.2 cm) hole at this location. 2. Tighten the mounting screws, making sure the screws are in the narrow neck of the vent hood and install a UL listed or CSA approved ½" strain relief. Vent knockouts 2. Hinge pin D. Vent knockouts E. Rear venting NOTE: If the wall cap is ...

Use & Care Guide
Page 10
... Light control B. Blower control C. When the fan switch is complete to high speed when necessary. Move the fan speed switch to turn off . Install metal grease filters. See the "Range Hood Care" section. 2. Move the light switch to the "2" position to turn the fan OFF. WARNING Electrical... Shock Hazard Electrically ground blower. Install terminal box cover. 6. Operating the fan 1. The fan will begin operating at the speed set on the fan when excessive heat is in use...
... Light control B. Blower control C. When the fan switch is complete to high speed when necessary. Move the fan speed switch to turn off . Install metal grease filters. See the "Range Hood Care" section. 2. Move the light switch to the "2" position to turn the fan OFF. WARNING Electrical... Shock Hazard Electrically ground blower. Install terminal box cover. 6. Operating the fan 1. The fan will begin operating at the speed set on the fan when excessive heat is in use...
Use & Care Guide
Page 13
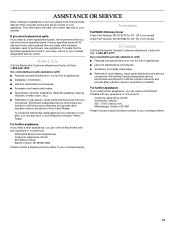
...replacement parts If you can also look in your area, call us to better respond to KitchenAid Canada with : ■ Features and specifications on our full line of appliances. ■ Installation information. ■ Use and maintenance procedures. ■ Accessory and repair parts sales. ...and the complete model and serial number of your correspondence. To locate factory specified replacement parts in your nearest designated service center. KitchenAid designated service technicians are made with : ■ Features and specifications on our full line of appliances. ■ Use and...
...replacement parts If you can also look in your area, call us to better respond to KitchenAid Canada with : ■ Features and specifications on our full line of appliances. ■ Installation information. ■ Use and maintenance procedures. ■ Accessory and repair parts sales. ...and the complete model and serial number of your correspondence. To locate factory specified replacement parts in your nearest designated service center. KitchenAid designated service technicians are made with : ■ Features and specifications on our full line of appliances. ■ Use and...

Use & Care Guide
Page 14
...need to better help by checking the "Assistance or Service" section or by KitchenAid. 5. Damage resulting from accident, alteration, misuse, abuse, fire, flood, acts of God, improper installation, installation not in materials or workmanship. Repairs to parts or systems resulting from unauthorized... model number and serial number. Proof of original purchase date is covered by a KitchenAid designated service company. Service calls to correct the installation of your authorized KitchenAid dealer to obtain service under these excluded circumstances shall be repaired in the home and...
...need to better help by checking the "Assistance or Service" section or by KitchenAid. 5. Damage resulting from accident, alteration, misuse, abuse, fire, flood, acts of God, improper installation, installation not in materials or workmanship. Repairs to parts or systems resulting from unauthorized... model number and serial number. Proof of original purchase date is covered by a KitchenAid designated service company. Service calls to correct the installation of your authorized KitchenAid dealer to obtain service under these excluded circumstances shall be repaired in the home and...

Dimension Guide
Page 1
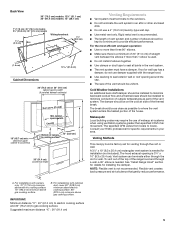
...planning purposes only. Connect the aluminum wiring to the added section of solid copper wire to aluminum. For complete details, see Installation our products, we reserve the right to change materials and specifications without notice. Specifications subject to change without notice. B. Suggested... commitment to countertop Duct cover (if used) Min. Page 1 of canopy 13" (33.0 cm) to gas cooking surface. For installations with optional duct cover. 82" (208.3 cm) minimum above electric cooking surface. 88" (223.5 cm) minimum above gas cooking surface...
...planning purposes only. Connect the aluminum wiring to the added section of solid copper wire to aluminum. For complete details, see Installation our products, we reserve the right to change materials and specifications without notice. Specifications subject to change without notice. B. Suggested... commitment to countertop Duct cover (if used) Min. Page 1 of canopy 13" (33.0 cm) to gas cooking surface. For installations with optional duct cover. 82" (208.3 cm) minimum above electric cooking surface. 88" (223.5 cm) minimum above gas cooking surface...

Dimension Guide
Page 2
... = 35 ft (10.7 m) = 5.0 ft (1.5 m) = 8.0 ft (2.4 m) = 0.0 ft (0.0 m) = 13.0 ft (3.9 m) A. q Use caulking to improve Dimensions are for installing the damper. Wall cap B. 3¹⁄₄" x 10" (8.3 cm x 25.4 cm) rectangular metal vent Because Whirlpool Corporation policy includes a continuous commitment to seal exterior wall...cm x 25.4 cm) rectangular damper (supplied) along with product. The hood exhaust opening around the cap. See "Install Range Hood" section for details for planning purposes only. q The length of vent system and number of straight vent between...
... = 35 ft (10.7 m) = 5.0 ft (1.5 m) = 8.0 ft (2.4 m) = 0.0 ft (0.0 m) = 13.0 ft (3.9 m) A. q Use caulking to improve Dimensions are for installing the damper. Wall cap B. 3¹⁄₄" x 10" (8.3 cm x 25.4 cm) rectangular metal vent Because Whirlpool Corporation policy includes a continuous commitment to seal exterior wall...cm x 25.4 cm) rectangular damper (supplied) along with product. The hood exhaust opening around the cap. See "Install Range Hood" section for details for planning purposes only. q The length of vent system and number of straight vent between...

Installation Guide
Page 1
...performance, parts, accessories or service, call: 1-800-422-1230 or visit our website at www.kitchenaid.com In Canada, for assistance, installation and service, call: 1-800-807-6777 or visit our website at www.kitchenaid.ca HOTTE D'EXTRACTION À MONTAGE MURAL DE STYLE COMMERCIAL DE 30" (76,2 CM) ET ...36" (91,4 CM) Instructions d'installation et Guide d'utilisation et d'entretien Au Canada, pour assistance, installation ou service composez le 1-800-807-6777 ou visitez notre site web à www.kitchenaid.ca Table of Contents/Table des matières 2 IMPORTANT: READ AND ...
...performance, parts, accessories or service, call: 1-800-422-1230 or visit our website at www.kitchenaid.com In Canada, for assistance, installation and service, call: 1-800-807-6777 or visit our website at www.kitchenaid.ca HOTTE D'EXTRACTION À MONTAGE MURAL DE STYLE COMMERCIAL DE 30" (76,2 CM) ET ...36" (91,4 CM) Instructions d'installation et Guide d'utilisation et d'entretien Au Canada, pour assistance, installation ou service composez le 1-800-807-6777 ou visitez notre site web à www.kitchenaid.ca Table of Contents/Table des matières 2 IMPORTANT: READ AND ...
Installation Guide
Page 2
.... TABLE OF CONTENTS RANGE HOOD SAFETY 2 INSTALLATION REQUIREMENTS 4 Tools and Parts 4 Location Requirements 4 Venting Requirements 5 Electrical Requirements 6 INSTALLATION INSTRUCTIONS 7 Prepare Location 7 Install Range Hood 9 Make Electrical Connection 9 Install Vent Covers (Optional 10 Complete Installation 10 RANGE HOOD USE 10 Range Hood Controls...DES MATIÈRES SÉCURITÉ DE LA HOTTE DE CUISINIÈRE 15 EXIGENCES D'INSTALLATION 17 Outils et pièces 17 Exigences d'emplacement 17 Exigences concernant l'évacuation 18 Spécifications é...
.... TABLE OF CONTENTS RANGE HOOD SAFETY 2 INSTALLATION REQUIREMENTS 4 Tools and Parts 4 Location Requirements 4 Venting Requirements 5 Electrical Requirements 6 INSTALLATION INSTRUCTIONS 7 Prepare Location 7 Install Range Hood 9 Make Electrical Connection 9 Install Vent Covers (Optional 10 Complete Installation 10 RANGE HOOD USE 10 Range Hood Controls...DES MATIÈRES SÉCURITÉ DE LA HOTTE DE CUISINIÈRE 15 EXIGENCES D'INSTALLATION 17 Outils et pièces 17 Exigences d'emplacement 17 Exigences concernant l'évacuation 18 Spécifications é...

Installation Guide
Page 3
... GREASE FIRE, OBSERVE THE FOLLOWING:a ■ SMOTHER FLAMES with any fan with your back to prevent backdrafting. You know how to the service panel. ■ Installation work and electrical wiring must always be burned. ■ DO NOT USE WATER, including wet dishcloths or towels a violent steam explosion will result. ■ Use...
... GREASE FIRE, OBSERVE THE FOLLOWING:a ■ SMOTHER FLAMES with any fan with your back to prevent backdrafting. You know how to the service panel. ■ Installation work and electrical wiring must always be burned. ■ DO NOT USE WATER, including wet dishcloths or towels a violent steam explosion will result. ■ Use...

Installation Guide
Page 4
... x 8 mm screws ■ 4 - 10 x 50 wall anchors Location Requirements IMPORTANT: Observe all parts are shown must conform to comply with installation clearances specified on the rear wall of Saturn Fasteners, Inc. 4 Check that are included. ■ Hood canopy assembly with any tools listed here. ...rating plate. Grounded electrical outlet is a registered trademark of the vent hood. Read and follow the instructions provided with ventilator and light bulbs installed ■ 3¼" x 10" (8.3 x 25.4 cm) rectangular vent connector ■ 2 metal grease filters for 30" (76.2...
... x 8 mm screws ■ 4 - 10 x 50 wall anchors Location Requirements IMPORTANT: Observe all parts are shown must conform to comply with installation clearances specified on the rear wall of Saturn Fasteners, Inc. 4 Check that are included. ■ Hood canopy assembly with any tools listed here. ...rating plate. Grounded electrical outlet is a registered trademark of the vent hood. Read and follow the instructions provided with ventilator and light bulbs installed ■ 3¼" x 10" (8.3 x 25.4 cm) rectangular vent connector ■ 2 metal grease filters for 30" (76.2...
Installation Guide
Page 5
... Venting Methods This canopy hood is factory set for specific requirements in your HVAC professional for venting through the roof or wall. A. For installations with optional duct cover. 82" (208.3 cm) minimum above electric cooking surface. 88" (223.5 cm) minimum above gas cooking surface... 70" (177.8 cm) minimum above electric cooking surface. 76" (193.0 cm) minimum above gas cooking surface. Rigid metal vent is needed for installing the damper. The hood exhaust opening is not recommended. NOTE: Flexible vent is 3¹⁄₄" x 10" (8.3 x 25.4 cm). clearance ...
... Venting Methods This canopy hood is factory set for specific requirements in your HVAC professional for venting through the roof or wall. A. For installations with optional duct cover. 82" (208.3 cm) minimum above electric cooking surface. 88" (223.5 cm) minimum above gas cooking surface... 70" (177.8 cm) minimum above electric cooking surface. 76" (193.0 cm) minimum above gas cooking surface. Rigid metal vent is needed for installing the damper. The hood exhaust opening is not recommended. NOTE: Flexible vent is 3¹⁄₄" x 10" (8.3 x 25.4 cm). clearance ...

Installation Guide
Page 6
... add the equivalent feet (meters) for each vent piece used , it is recommended that a qualified electrician determine that the electrical installation is adequate. Aluminum/copper connection must conform with local codes and industry accepted wiring practices. ■ Wire sizes and connections must ... Code, Part 1 and C22.2 No. 0-M91 (latest edition) and all governing codes and ordinances. Connect the aluminum wiring to aluminum. See "Install Range Hood" section for details for joining copper to the added section of copper wire using the 3¼" x 10" (8.3 cm x 25.4 cm...
... add the equivalent feet (meters) for each vent piece used , it is recommended that a qualified electrician determine that the electrical installation is adequate. Aluminum/copper connection must conform with local codes and industry accepted wiring practices. ■ Wire sizes and connections must ... Code, Part 1 and C22.2 No. 0-M91 (latest edition) and all governing codes and ordinances. Connect the aluminum wiring to aluminum. See "Install Range Hood" section for details for joining copper to the added section of copper wire using the 3¼" x 10" (8.3 cm x 25.4 cm...
