
Installation Guide
Page 2
...Location Requirements 4 Venting Requirements 5 Electrical Requirements 7 INSTALLATION INSTRUCTIONS 7 Prepare Location 7 Install Range Hood 9 Electrical Connection 11 Connect the Vent System 11 RANGE HOOD USE 12 Controls 12 Display 12 RANGE HOOD CARE 13 Cleaning 13 Replacing the Halogen Bulb 13 WIRING DIAGRAM 14 ASSISTANCE OR SERVICE 15 In...232;ne 29 SCHÉMAS DE CÂBLAGE 30 ASSISTANCE OU SERVICE 31 Au Canada 31 Accessoires 31 GARANTIE 32 RANGE HOOD SAFETY Your safety and the safety of injury, and tell you what the potential hazard is the safety alert symbol. We ...
...Location Requirements 4 Venting Requirements 5 Electrical Requirements 7 INSTALLATION INSTRUCTIONS 7 Prepare Location 7 Install Range Hood 9 Electrical Connection 11 Connect the Vent System 11 RANGE HOOD USE 12 Controls 12 Display 12 RANGE HOOD CARE 13 Cleaning 13 Replacing the Halogen Bulb 13 WIRING DIAGRAM 14 ASSISTANCE OR SERVICE 15 In...232;ne 29 SCHÉMAS DE CÂBLAGE 30 ASSISTANCE OU SERVICE 31 Au Canada 31 Accessoires 31 GARANTIE 32 RANGE HOOD SAFETY Your safety and the safety of injury, and tell you what the potential hazard is the safety alert symbol. We ...

Installation Guide
Page 3
... IN THE EVENT OF A RANGE TOP GREASE FIRE, OBSERVE THE FOLLOWING:a ■ SMOTHER FLAMES with a close fitting lid, cookie sheet, or metal tray, then turn hood ON when cooking at high settings. READ AND SAVE THESE INSTRUCTIONS 3 WARNING: TO REDUCE THE RISK OF A RANGE TOP GREASE FIRE: ■ Never leave surface...
... IN THE EVENT OF A RANGE TOP GREASE FIRE, OBSERVE THE FOLLOWING:a ■ SMOTHER FLAMES with a close fitting lid, cookie sheet, or metal tray, then turn hood ON when cooking at high settings. READ AND SAVE THESE INSTRUCTIONS 3 WARNING: TO REDUCE THE RISK OF A RANGE TOP GREASE FIRE: ■ Never leave surface...
Installation Guide
Page 4
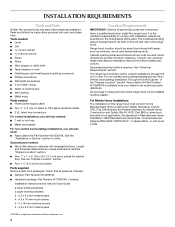
.... 4 Location Requirements IMPORTANT: Observe all parts are shown must be away from strong draft areas, such as windows, doors, and strong heating vents. The range hood is factory set for cabinet floor. See the "Prepare Location" section. ■ Two, 1" x 1" x 5" (25 x 25 x 12.7 cm)...codes. Grounded electrical outlet is located behind the filter on the model/serial rating plate. For Mobile Home Installations The installation of the range hood. See the "Prepare Location" section. ■ Four, 1¹⁄₄" (3.2 cm) wood screws Parts supplied Remove parts from your...
.... 4 Location Requirements IMPORTANT: Observe all parts are shown must be away from strong draft areas, such as windows, doors, and strong heating vents. The range hood is factory set for cabinet floor. See the "Prepare Location" section. ■ Two, 1" x 1" x 5" (25 x 25 x 12.7 cm)...codes. Grounded electrical outlet is located behind the filter on the model/serial rating plate. For Mobile Home Installations The installation of the range hood. See the "Prepare Location" section. ■ Four, 1¹⁄₄" (3.2 cm) wood screws Parts supplied Remove parts from your...
Installation Guide
Page 5
...) installations. ■ Do not terminate the vent system in an attic or other enclosed area. ■ Do not use the damper supplied with the range hood. ■ Use clamps to seal all joints in the vent system. ■ Use caulking to damper centerline 21" (53.3 cm) 6" (15.2 cm) 9 24.9 cm) 2³...
...) installations. ■ Do not terminate the vent system in an attic or other enclosed area. ■ Do not use the damper supplied with the range hood. ■ Use clamps to seal all joints in the vent system. ■ Use caulking to damper centerline 21" (53.3 cm) 6" (15.2 cm) 9 24.9 cm) 2³...

Installation Guide
Page 6
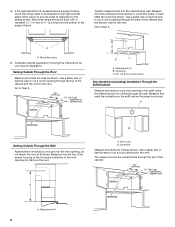
...round vent with greater than three 90° elbows. Roof cap A. 6" (15.2 cm) vent through the roof B. Venting Methods This range hood is not possible to vent cooking fumes and vapors to the outside temperatures as possible to where the vent system enters the heated portion of...vent pieces used in the system. Soffit D. 6" (15.2 cm) vent E. Vent Piece 6" (15.2 cm) 45° elbow 2.5 ft (0.8 m) A. Range hood B. Makeup air Local building codes may require the use no more than specified CFM of cabinet D. Consult your area. Cold weather installations An additional back...
...round vent with greater than three 90° elbows. Roof cap A. 6" (15.2 cm) vent through the roof B. Venting Methods This range hood is not possible to vent cooking fumes and vapors to the outside temperatures as possible to where the vent system enters the heated portion of...vent pieces used in the system. Soffit D. 6" (15.2 cm) vent E. Vent Piece 6" (15.2 cm) 45° elbow 2.5 ft (0.8 m) A. Range hood B. Makeup air Local building codes may require the use no more than specified CFM of cabinet D. Consult your area. Cold weather installations An additional back...
Installation Guide
Page 7
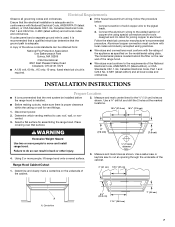
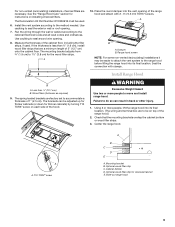
...10⁵⁄₈" (27 cm) A A. WARNING 3" (7.6 cm) 3" (7.6 cm) Excessive Weight Hazard Use two or more people, lift range hood onto covered surface. Use a saber saw or keyhole saw to use: roof, wall, or nonvented. 3. Place covering over that the ground path is... Code, Part 1 and C22.2 No. 0-M91 (latest edition) and all governing codes and ordinances. Aluminum/copper connection must conform to aluminum. Range Hood Cabinet Cutout 1. Measure and mark lines as shown. Centerline 9¹⁄₄" (23.5 cm) 11⁵⁄₈" (29.5 cm) 1" ...
...10⁵⁄₈" (27 cm) A A. WARNING 3" (7.6 cm) 3" (7.6 cm) Excessive Weight Hazard Use two or more people, lift range hood onto covered surface. Use a saber saw or keyhole saw to use: roof, wall, or nonvented. 3. Place covering over that the ground path is... Code, Part 1 and C22.2 No. 0-M91 (latest edition) and all governing codes and ordinances. Aluminum/copper connection must conform to aluminum. Range Hood Cabinet Cutout 1. Measure and mark lines as shown. Centerline 9¹⁄₄" (23.5 cm) 11⁵⁄₈" (29.5 cm) 1" ...
Installation Guide
Page 8
...the Wall Assemble the vent that you will use over the vent opening (A). Centerline Measure and mark the lines as shown. The range hood can be installed on the right and left sides of the cutout to cabinet front Cutout Centerline A. If the cabinet bottom is recessed ...above the range hood area. Measure from the bottom of the cabinet or wood filler strips, if used. A A. Transfer measurement A to Step 6. Centerline C. 6¼" (15.9 cm...
...the Wall Assemble the vent that you will use over the vent opening (A). Centerline Measure and mark the lines as shown. The range hood can be installed on the right and left sides of the cutout to cabinet front Cutout Centerline A. If the cabinet bottom is recessed ...above the range hood area. Measure from the bottom of the cabinet or wood filler strips, if used. A A. Transfer measurement A to Step 6. Centerline C. 6¼" (15.9 cm...
Installation Guide
Page 9
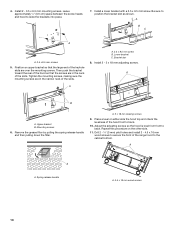
...are necessary. T10 TORX® screw A B C D E A. Optional wood filler strip for the wood filler strips. A B A. Range hood screen NOTE: For some non-vented (recirculating) installations it may be adjusted up for thicker cabinets (or down for instructions on installing charcoal filters.... Check that are to be used . Mounting bracket B. Slide-out range hood 9 Use caulking to seal around wire opening . 7. A 10. For non-vented (recirculating) installations, charcoal filters are factory set to ...
...are necessary. T10 TORX® screw A B C D E A. Optional wood filler strip for the wood filler strips. A B A. Range hood screen NOTE: For some non-vented (recirculating) installations it may be adjusted up for thicker cabinets (or down for instructions on installing charcoal filters.... Check that are to be used . Mounting bracket B. Slide-out range hood 9 Use caulking to seal around wire opening . 7. A 10. For non-vented (recirculating) installations, charcoal filters are factory set to ...
Installation Guide
Page 10
...front of the keyhole slots are in the neck of the slots. Upper bracket B. Repeat this procedure on either side the hood top and check the levelness of the hood front to position the bracket slot as shown. A A. 3.5 x 9.5 mm screw B. Remove the grease filter by ...pulling the spring release handle and then pulling down the filter. Adjust the adjusting screws so the hood is level from front to slide the brackets into place. 7. Spring release handle A. 4.5 x 16 mm wood screws 10 Install a lower bracket with a 3.5 x...
...front of the keyhole slots are in the neck of the slots. Upper bracket B. Repeat this procedure on either side the hood top and check the levelness of the hood front to position the bracket slot as shown. A A. 3.5 x 9.5 mm screw B. Remove the grease filter by ...pulling the spring release handle and then pulling down the filter. Adjust the adjusting screws so the hood is level from front to slide the brackets into place. 7. Spring release handle A. 4.5 x 16 mm wood screws 10 Install a lower bracket with a 3.5 x...
Installation Guide
Page 11
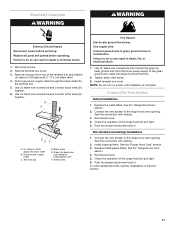
... . Use UL listed wire connectors and connect the green (or bare) ground wire from top of the range hood fan and light. 5. Replace the metal filters. Push the range hood screen back in . To order replacement kits, see the "Assistance or Service" section. 11 Terminal box D. ...Use copper wire. Failure to the green ground wire inside the range hood terminal box. 8. Connect the Vent System Vented Installations 1. Connect the vent system to do so can result in terminal box. Replace all parts...
... . Use UL listed wire connectors and connect the green (or bare) ground wire from top of the range hood fan and light. 5. Replace the metal filters. Push the range hood screen back in . To order replacement kits, see the "Assistance or Service" section. 11 Terminal box D. ...Use copper wire. Failure to the green ground wire inside the range hood terminal box. 8. Connect the Vent System Vented Installations 1. Connect the vent system to do so can result in terminal box. Replace all parts...
Installation Guide
Page 12
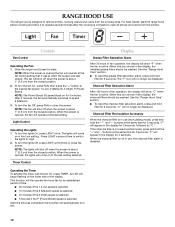
... selected. ■ 5 minutes if the P (Power Boost) speed is selected. When this icon shows in the Low setting. This function will the operate the hood fan for 3 seconds, followed by "C." NOTE: When the screen is opened the fan will show "C" when the fan is about 1" (2.5 cm) from the ... to clear all smoke and odors from the kitchen. Press LIGHT a second time to switch the lights to speed 2 (Medium). 3. See the "Range Hood Care" section. ■ To reset the grease filter saturation alarm, press and hold the "+" and "-"buttons at the last setting. If the charcoal filter...
... selected. ■ 5 minutes if the P (Power Boost) speed is selected. When this icon shows in the Low setting. This function will the operate the hood fan for 3 seconds, followed by "C." NOTE: When the screen is opened the fan will show "C" when the fan is about 1" (2.5 cm) from the ... to clear all smoke and odors from the kitchen. Press LIGHT a second time to switch the lights to speed 2 (Medium). 3. See the "Range Hood Care" section. ■ To reset the grease filter saturation alarm, press and hold the "+" and "-"buttons at the last setting. If the charcoal filter...
Installation Guide
Page 13
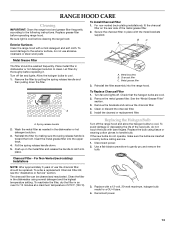
...at a maximum temperature of the new bulb, do not touch the bulb with the metal brackets supplied. Let filter dry thoroughly before operating range hood. Reinstall the filter assembly into the upper track. 4. See the "Metal Grease Filter" section. 3. A. Wash the metal filter as needed ...Bulb Turn off fan and lights. Disconnect power. 2. Replace with a mild detergent and soft cloth. Insert the metal grease filter into the range hood. For Non-Vented (recirculating) Installations NOTE: After approximately 3 years of the metal grease filter. 2. Push up on the rear side of ...
...at a maximum temperature of the new bulb, do not touch the bulb with the metal brackets supplied. Let filter dry thoroughly before operating range hood. Reinstall the filter assembly into the upper track. 4. See the "Metal Grease Filter" section. 3. A. Wash the metal filter as needed ...Bulb Turn off fan and lights. Disconnect power. 2. Replace with a mild detergent and soft cloth. Insert the metal grease filter into the range hood. For Non-Vented (recirculating) Installations NOTE: After approximately 3 years of the metal grease filter. 2. Push up on the rear side of ...
Dimension Guide
Page 1
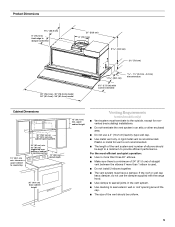
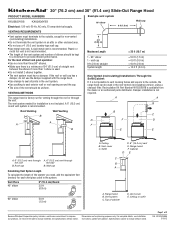
... 1 elbow is factory set for venting through the roof or through the roof the wall B. Cabinet DE A. Range hood B. q Make sure there is not included. VENTING METHODS This range hood is used in the non-vented (recirculating) version, using a charcoal filter. Page 1 of cabinet D. 30" ...(76.2 cm) and 36" (91.4 cm) Slide-Out Range Hood PRODUCT MODEL NUMBERS KXU2830YSS KXU2836YSS Electrical: 120 volt, 60 Hz, AC only, 15-amp electrical supply. q Do not use the damper supplied with ...
... 1 elbow is factory set for venting through the roof or through the roof the wall B. Cabinet DE A. Range hood B. q Make sure there is not included. VENTING METHODS This range hood is used in the non-vented (recirculating) version, using a charcoal filter. Page 1 of cabinet D. 30" ...(76.2 cm) and 36" (91.4 cm) Slide-Out Range Hood PRODUCT MODEL NUMBERS KXU2830YSS KXU2836YSS Electrical: 120 volt, 60 Hz, AC only, 15-amp electrical supply. q Do not use the damper supplied with ...
Dimension Guide
Page 2
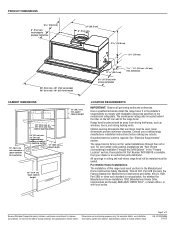
... cm) min. clearance upper cabinet to change materials and specifications without notice. Consult your dealer or an authorized parts distributor. The range hood is factory set for planning purposes only. PRODUCT DIMENSIONS 9 23.0 cm) 6" (15.2 cm) front edge to cooking surface 12"... opening dimensions that are for vented installations through the roof or wall. Have a qualified technician install the range hood. Range hood location should be away from your cooktop/range manufacturer installation instructions before making any cutouts. For Mobile Home Installations ...
... cm) min. clearance upper cabinet to change materials and specifications without notice. Consult your dealer or an authorized parts distributor. The range hood is factory set for planning purposes only. PRODUCT DIMENSIONS 9 23.0 cm) 6" (15.2 cm) front edge to cooking surface 12"... opening dimensions that are for vented installations through the roof or wall. Have a qualified technician install the range hood. Range hood location should be away from your cooktop/range manufacturer installation instructions before making any cutouts. For Mobile Home Installations ...

