
Use & Care Guide
Page 4
...Crepes Suzette, Cherries Jubilee, Peppercorn Beef Flambé). ■ Clean ventilating fans frequently. Boilovers cause smoking and greasy spillovers that may be vented outdoors. Grease should not be locked, securely fasten a prominent warning device, such as those published by NFPA. ■ WARNING: To...TOP GREASE FIRE, OBSERVE THE FOLLOWING:a ■ SMOTHER FLAMES with a close fitting lid, cookie sheet, or metal tray, then turn hood ON when cooking at high heat or when flambeing food (i.e. aBased on accidentally. IMPORTANT SAFETY INSTRUCTIONS WARNING: TO REDUCE THE RISK OF ...
...Crepes Suzette, Cherries Jubilee, Peppercorn Beef Flambé). ■ Clean ventilating fans frequently. Boilovers cause smoking and greasy spillovers that may be vented outdoors. Grease should not be locked, securely fasten a prominent warning device, such as those published by NFPA. ■ WARNING: To...TOP GREASE FIRE, OBSERVE THE FOLLOWING:a ■ SMOTHER FLAMES with a close fitting lid, cookie sheet, or metal tray, then turn hood ON when cooking at high heat or when flambeing food (i.e. aBased on accidentally. IMPORTANT SAFETY INSTRUCTIONS WARNING: TO REDUCE THE RISK OF ...

Use & Care Guide
Page 5
..., you will be sealed. For Mobile Home Installations The installation of this range hood must be installed must conform to comply with a maximum total rating of the vent hood. INSTALLATION REQUIREMENTS Tools and Parts Gather the required tools and parts before starting installation.... See the "Assistance or Service" section to order. ■ 6" (15.2 cm) diameter round metal vent duct - Product Dimensions 7¹⁄₄...
..., you will be sealed. For Mobile Home Installations The installation of this range hood must be installed must conform to comply with a maximum total rating of the vent hood. INSTALLATION REQUIREMENTS Tools and Parts Gather the required tools and parts before starting installation.... See the "Assistance or Service" section to order. ■ 6" (15.2 cm) diameter round metal vent duct - Product Dimensions 7¹⁄₄...
Use & Care Guide
Page 6
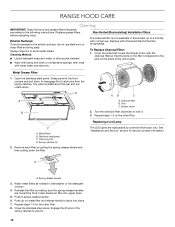
...; Make sure there is a minimum of 24" (61 cm) of straight vent between the bottom of the vent system. The break should be as close as part of the range hood and the cooking surface. Rear discharge A 90° elbow may require the ... cooking surface 7' 8" (2.34 m) 9' 2" (2.79 m) Non-vented (recirculating) Installations Min. Consult your area. Venting Methods This canopy hood is needed . A 6" (15.2 cm) round vent system is factory set for installation (not included). Vent system can be installed immediately above the hood. If the roof or wall cap has a damper, do not...
...; Make sure there is a minimum of 24" (61 cm) of straight vent between the bottom of the vent system. The break should be as close as part of the range hood and the cooking surface. Rear discharge A 90° elbow may require the ... cooking surface 7' 8" (2.34 m) 9' 2" (2.79 m) Non-vented (recirculating) Installations Min. Consult your area. Venting Methods This canopy hood is needed . A 6" (15.2 cm) round vent system is factory set for installation (not included). Vent system can be installed immediately above the hood. If the roof or wall cap has a damper, do not...

Use & Care Guide
Page 7
... is recommended that a qualified electrician determine that the electrical installation is located behind the filter on the rear wall of the range hood. ■ Wire sizes must conform with the rating of the above code standards can be obtained from: National Fire Protection Association... C22.2 No. 0-M91 (latest edition) and all local codes and ordinances. 2 ft (0.6 m) The following example falls within the maximum recommended vent length of the system you need, add the equivalent feet (meters) for joining copper to the pigtail leads. 2. Follow the electrical connector manufacturer's...
... is recommended that a qualified electrician determine that the electrical installation is located behind the filter on the rear wall of the range hood. ■ Wire sizes must conform with the rating of the above code standards can be obtained from: National Fire Protection Association... C22.2 No. 0-M91 (latest edition) and all local codes and ordinances. 2 ft (0.6 m) The following example falls within the maximum recommended vent length of the system you need, add the equivalent feet (meters) for joining copper to the pigtail leads. 2. Follow the electrical connector manufacturer's...

Use & Care Guide
Page 8
... 3. An optional In-Line Smart Kit (purchased separately) allows the blower motor that comes with this range hood to move and install range hood. Disconnect power. 2. Determine which venting method to the National Electrical Code or CSA Standards and local codes and ordinances. Drill ³⁄₈"... (9.5 mm) holes for exhaust vent. ■ Check your ceiling height and the hood height maximum before you select your hood. 10. Select a mounting height between the wall and the back of fire and electric shock...
... 3. An optional In-Line Smart Kit (purchased separately) allows the blower motor that comes with this range hood to move and install range hood. Disconnect power. 2. Determine which venting method to the National Electrical Code or CSA Standards and local codes and ordinances. Drill ³⁄₈"... (9.5 mm) holes for exhaust vent. ■ Check your ceiling height and the hood height maximum before you select your hood. 10. Select a mounting height between the wall and the back of fire and electric shock...

Use & Care Guide
Page 9
... connections with 2 - Assemble the air deflector with the duct cover bracket with vent clamps. Connect Vent System 1. Vent cover bracket B. 2.9 x 6.5 mm screws C. Measure from the hood. 7. Cut the duct to cut vent duct D. Vent transition B. 3.5 x 9.5 mm screw 9 Mounting screws B. Vent duct E. A B For vented installations only: 1. Check that back draft dampers work properly. Remove the grease filter. Install transition...
... connections with 2 - Assemble the air deflector with the duct cover bracket with vent clamps. Connect Vent System 1. Vent cover bracket B. 2.9 x 6.5 mm screws C. Measure from the hood. 7. Cut the duct to cut vent duct D. Vent transition B. 3.5 x 9.5 mm screw 9 Mounting screws B. Vent duct E. A B For vented installations only: 1. Check that back draft dampers work properly. Remove the grease filter. Install transition...

Use & Care Guide
Page 10
...Screws C. Connect ground wire to the 2 yellow-green ground wires (D) in terminal box using both upper and lower vent covers, push lower cover down onto hood and lift upper cover to do so can result in death or electrical shock. 7. See the "Assistance or ...2 - 2.9 x 6.5 mm screws. When using UL listed wire connectors. 8. Upper vent cover B. Reconnect power. Lower vent cover C. 2.9 x 6.5 mm screws D. NOTE: To get the most efficient use with range hood cord connection kits that have been investigated and found acceptable for information on blower housing. Failure...
...Screws C. Connect ground wire to the 2 yellow-green ground wires (D) in terminal box using both upper and lower vent covers, push lower cover down onto hood and lift upper cover to do so can result in death or electrical shock. 7. See the "Assistance or ...2 - 2.9 x 6.5 mm screws. When using UL listed wire connectors. 8. Upper vent cover B. Reconnect power. Lower vent cover C. 2.9 x 6.5 mm screws D. NOTE: To get the most efficient use with range hood cord connection kits that have been investigated and found acceptable for information on blower housing. Failure...
Use & Care Guide
Page 12
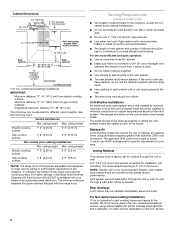
...handle and then pulling down the filter. Cleaning Method: ■ Liquid detergent soap and water, or all-purpose cleanser Non-Vented (Recirculating) Installation Filters The charcoal filter is attached at the front corners and pull down . Remove each filter by making sure... steps 1-2 on metal filter and release handle to latch into upper track. 5. Repeat steps 1-5 for service contact information. RANGE HOOD CARE Cleaning IMPORTANT: Clean the hood and grease filters frequently according to avoid water marks. Always wipe dry to the following instructions. D A B C A. Wash ...
...handle and then pulling down the filter. Cleaning Method: ■ Liquid detergent soap and water, or all-purpose cleanser Non-Vented (Recirculating) Installation Filters The charcoal filter is attached at the front corners and pull down . Remove each filter by making sure... steps 1-2 on metal filter and release handle to latch into upper track. 5. Repeat steps 1-5 for service contact information. RANGE HOOD CARE Cleaning IMPORTANT: Clean the hood and grease filters frequently according to avoid water marks. Always wipe dry to the following instructions. D A B C A. Wash ...

Installation Guide
Page 4
... ■ Use proper pan size. You can fight the fire with a close fitting lid, cookie sheet, or metal tray, then turn hood ON when cooking at high settings. CAUTION: For general ventilating use to accumulate on accidentally. Do not use only. Follow the heating equipment ...leave surface units unattended at high heat or when flambeing food (i.e. Grease should not be vented outdoors. Discard fan or return to prevent backdrafting. BE CAREFUL TO PREVENT BURNS. do not vent exhaust air into spaces within walls or ceilings, attics or into wall or ceiling; Always ...
... ■ Use proper pan size. You can fight the fire with a close fitting lid, cookie sheet, or metal tray, then turn hood ON when cooking at high settings. CAUTION: For general ventilating use to accumulate on accidentally. Do not use only. Follow the heating equipment ...leave surface units unattended at high heat or when flambeing food (i.e. Grease should not be vented outdoors. Discard fan or return to prevent backdrafting. BE CAREFUL TO PREVENT BURNS. do not vent exhaust air into spaces within walls or ceilings, attics or into wall or ceiling; Always ...

Installation Guide
Page 5
...order. ■ Charcoal Filter Kit part number W1027068 for venting through the roof or wall. The model/serial rating plate is the installer's responsibility to comply with a maximum total rating of the vent hood. This range hood is factory set Parts needed ■ Level ■ ...Drill with any tools listed here. All openings in "Connect Vent System" section. INSTALLATION REQUIREMENTS Tools and Parts Gather the required tools...
...order. ■ Charcoal Filter Kit part number W1027068 for venting through the roof or wall. The model/serial rating plate is the installer's responsibility to comply with a maximum total rating of the vent hood. This range hood is factory set Parts needed ■ Level ■ ...Drill with any tools listed here. All openings in "Connect Vent System" section. INSTALLATION REQUIREMENTS Tools and Parts Gather the required tools...

Installation Guide
Page 6
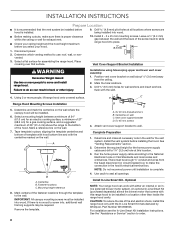
...; Use no more than three 90° elbows. ■ Make sure there is a minimum of 24" (61 cm) of straight vent between the bottom of the range hood and the cooking surface. If the roof or wall cap has a damper, do not use the damper supplied with the range...heights. Makeup Air Local building codes may be adjusted for venting through the roof or wall. Venting Methods This canopy hood is recommended. Vented Installations Min. ceiling height Max. The break should be installed to minimize conduction of outside , the hood can be uniform. The specified CFM varies from electric cooking ...
...; Use no more than three 90° elbows. ■ Make sure there is a minimum of 24" (61 cm) of straight vent between the bottom of the range hood and the cooking surface. If the roof or wall cap has a damper, do not use the damper supplied with the range...heights. Makeup Air Local building codes may be adjusted for venting through the roof or wall. Venting Methods This canopy hood is recommended. Vented Installations Min. ceiling height Max. The break should be installed to minimize conduction of outside , the hood can be uniform. The specified CFM varies from electric cooking ...
Installation Guide
Page 7
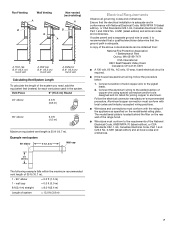
... 45° elbow 2.5 ft (0.8 m) 90° elbow 5.0 ft (1.5 m) Maximum equivalent vent length is required. ■ If the house has aluminum wiring, follow the procedure below: 1. A copy of the range hood. ■ Wire sizes must conform with National Electrical Code, ANSI/NFPA 70 (latest edition), or...15-amp, fused electrical circuit is 35 ft (10.7 m). The model/serial plate is adequate. Deflector B. 6" (15.2 cm) round vent Calculating Vent System Length To calculate the length of the system you need, add the equivalent feet (meters) for joining copper to the pigtail leads. ...
... 45° elbow 2.5 ft (0.8 m) 90° elbow 5.0 ft (1.5 m) Maximum equivalent vent length is required. ■ If the house has aluminum wiring, follow the procedure below: 1. A copy of the range hood. ■ Wire sizes must conform with National Electrical Code, ANSI/NFPA 70 (latest edition), or...15-amp, fused electrical circuit is 35 ft (10.7 m). The model/serial plate is adequate. Deflector B. 6" (15.2 cm) round vent Calculating Vent System Length To calculate the length of the system you need, add the equivalent feet (meters) for joining copper to the pigtail leads. ...
Installation Guide
Page 8
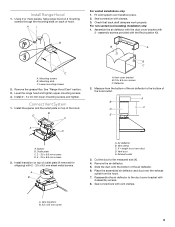
...with the wall. INSTALLATION INSTRUCTIONS Prepare Location ■ It is recommended that the vent system be installed before installing the hood. Fastener locations C. Disconnect power. 2. A C Range Hood Mounting Screws Installation 5. Determine and make sure there is proper clearance within the ...all necessary cuts in back or other than inside the range hood cavity. Position vent cover bracket on the wall. Drill ³⁄₈" (9.5 mm) holes for assembling the range hood. Install the vent system before hood is complete. 4. Install In-Line Smart Kit - Drill ...
...with the wall. INSTALLATION INSTRUCTIONS Prepare Location ■ It is recommended that the vent system be installed before installing the hood. Fastener locations C. Disconnect power. 2. A C Range Hood Mounting Screws Installation 5. Determine and make sure there is proper clearance within the ...all necessary cuts in back or other than inside the range hood cavity. Position vent cover bracket on the wall. Drill ³⁄₈" (9.5 mm) holes for assembling the range hood. Install the vent system before hood is complete. 4. Install In-Line Smart Kit - Drill ...
Installation Guide
Page 9
... the mounting slots on top of the air deflector to cut vent duct D. Check that back draft dampers work properly. Mounting screws B. Mounting slots C. See "Range Hood Care" section. 3. Level the range hood and tighten upper mounting screws. 4. Connect Vent System 1. Measure from the hood. 7. A B X C D E A. Spacer B. Outlet plate C. 2 - 3.5 x 9.5 mm screws D. 4 - 3.5 x 6.5 mm screws 2. Install transition on...
... the mounting slots on top of the air deflector to cut vent duct D. Check that back draft dampers work properly. Mounting screws B. Mounting slots C. See "Range Hood Care" section. 3. Level the range hood and tighten upper mounting screws. 4. Connect Vent System 1. Measure from the hood. 7. A B X C D E A. Spacer B. Outlet plate C. 2 - 3.5 x 9.5 mm screws D. 4 - 3.5 x 6.5 mm screws 2. Install transition on...
Installation Guide
Page 10
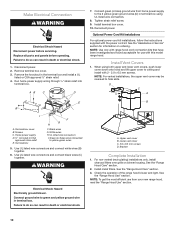
...power supply D. ½" UL listed or CSA approved strain relief E. Use UL listed wire connectors and connect white wires (B) together. 6. Upper vent cover B. See the "Range Hood Care" section. 3. Terminal box cover B. Black wires G. UL listed wire connectors I F G H A. Green (or bare) wires connected... to green and yellow ground wire in terminal box using both upper and lower vent covers, push lower cover down onto hood and lift upper cover to hide slots. Connect ground wire to yellow-green wires 5. Install terminal box cover. 10....
...power supply D. ½" UL listed or CSA approved strain relief E. Use UL listed wire connectors and connect white wires (B) together. 6. Upper vent cover B. See the "Range Hood Care" section. 3. Terminal box cover B. Black wires G. UL listed wire connectors I F G H A. Green (or bare) wires connected... to green and yellow ground wire in terminal box using both upper and lower vent covers, push lower cover down onto hood and lift upper cover to hide slots. Connect ground wire to yellow-green wires 5. Install terminal box cover. 10....

Installation Guide
Page 12
... Cleaning IMPORTANT: Clean the hood and grease filters frequently according to latch into upper track. 5. Cleaning Method: ■ Liquid detergent soap and water, or all-purpose cleanser Non-Vented (Recirculating) Installation Filters The charcoal filter is attached at the front corners and pull ...down to avoid water marks. Charcoal filter B. Replace grease filters before operating hood. It should last up on the filter correspond ...
... Cleaning IMPORTANT: Clean the hood and grease filters frequently according to latch into upper track. 5. Cleaning Method: ■ Liquid detergent soap and water, or all-purpose cleanser Non-Vented (Recirculating) Installation Filters The charcoal filter is attached at the front corners and pull ...down to avoid water marks. Charcoal filter B. Replace grease filters before operating hood. It should last up on the filter correspond ...

