Use & Care Guide
Page 3
... tell you don't immediately follow instructions. These words mean: DANGER You can kill or hurt you to cause birth defects or other reproductive harm. 3 RANGE HOOD SAFETY Your safety and the safety of others . WARNING You can happen if the instructions are very important. This symbol alerts you and others are...
... tell you don't immediately follow instructions. These words mean: DANGER You can kill or hurt you to cause birth defects or other reproductive harm. 3 RANGE HOOD SAFETY Your safety and the safety of others . WARNING You can happen if the instructions are very important. This symbol alerts you and others are...

Use & Care Guide
Page 4
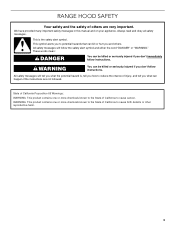
... IN THE EVENT OF A RANGE TOP GREASE FIRE, OBSERVE THE FOLLOWING:a ■ SMOTHER FLAMES with a close fitting lid, cookie sheet, or metal tray, then turn hood ON when cooking at high heat or when flambeing food (i.e. The fire department is being switched on low or medium settings. ■ Always turn off...
... IN THE EVENT OF A RANGE TOP GREASE FIRE, OBSERVE THE FOLLOWING:a ■ SMOTHER FLAMES with a close fitting lid, cookie sheet, or metal tray, then turn hood ON when cooking at high heat or when flambeing food (i.e. The fire department is being switched on low or medium settings. ■ Always turn off...

Use & Care Guide
Page 5
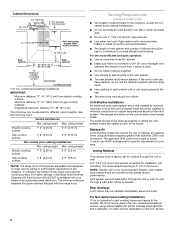
...are registered trademarks of 65,000 BTUs or less. The model/serial rating plate is determined by ceiling height. This range hood is recommended for non-vented (recirculating) installations only. See "Electrical Requirements" section. For non-vented (recirculating) Installation see... for non-vented (recirculating) installations. See "Assistance or Service" section to order. Have a qualified technician install the range hood. It is W1027068. Cabinet opening dimensions that all governing codes and ordinances. Grounded electrical outlet is W1027063. The Recirculation Kit ...
...are registered trademarks of 65,000 BTUs or less. The model/serial rating plate is determined by ceiling height. This range hood is recommended for non-vented (recirculating) installations only. See "Electrical Requirements" section. For non-vented (recirculating) Installation see... for non-vented (recirculating) installations. See "Assistance or Service" section to order. Have a qualified technician install the range hood. It is W1027068. Cabinet opening dimensions that all governing codes and ordinances. Grounded electrical outlet is W1027063. The Recirculation Kit ...
Use & Care Guide
Page 6
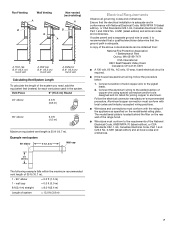
... than 1 elbow is 6" (15.2 cm) round. Consult your HVAC professional for different ceiling heights. Venting Methods This canopy hood is factory set for nonvented (recirculating) installations. ■ Do not terminate the vent system in your area. To vent through... locale to locale. ceiling height Electric cooking surface 7' 5" (2.26 m) 9' 6" (2.9 m) Gas cooking surface 7' 8" (2.34 m) 9' 6" (2.9 m) *NOTE: The range hood chimneys are adjustable and designed to meet varying ceiling or soffit heights depending on the cold air side of the thermal break. Flexible vent creates...
... than 1 elbow is 6" (15.2 cm) round. Consult your HVAC professional for different ceiling heights. Venting Methods This canopy hood is factory set for nonvented (recirculating) installations. ■ Do not terminate the vent system in your area. To vent through... locale to locale. ceiling height Electric cooking surface 7' 5" (2.26 m) 9' 6" (2.9 m) Gas cooking surface 7' 8" (2.34 m) 9' 6" (2.9 m) *NOTE: The range hood chimneys are adjustable and designed to meet varying ceiling or soffit heights depending on the cold air side of the thermal break. Flexible vent creates...

Use & Care Guide
Page 7
... only, 15-amp, fused electrical circuit is used in conformance with the rating of the appliance as specified on the rear wall of the range hood. ■ Wire sizes must conform to the pigtail leads. 2. Roof cap B. 6" (15.2 cm) round vent A. If codes permit and a separate ground wire is required. ■...
... only, 15-amp, fused electrical circuit is used in conformance with the rating of the appliance as specified on the rear wall of the range hood. ■ Wire sizes must conform to the pigtail leads. 2. Roof cap B. 6" (15.2 cm) round vent A. If codes permit and a separate ground wire is required. ■...

Use & Care Guide
Page 8
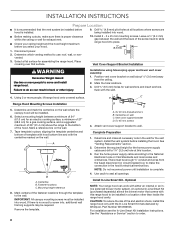
...REAR W ALLSUPPORT Vertical Centerline REAR W ALL M OUNTING TEM PLATE HorizontalLine CL ALIGN BOTTOM EDGE W ITH PENCILLINE INDICATING BOTTOM OFTHE HOOD Installation Height B C A. IMPORTANT: All canopy mounting screws must be installed. 6. Attach vent cover support bracket to use: ... all openings. INSTALLATION INSTRUCTIONS Prepare Location ■ It is recommended that the vent system be installed before installing the hood. A C Range Hood Mounting Screws Installation 5. Mark a reference line on wall C. Centerline on the wall. 7. See "Venting Requirements" section...
...REAR W ALLSUPPORT Vertical Centerline REAR W ALL M OUNTING TEM PLATE HorizontalLine CL ALIGN BOTTOM EDGE W ITH PENCILLINE INDICATING BOTTOM OFTHE HOOD Installation Height B C A. IMPORTANT: All canopy mounting screws must be installed. 6. Attach vent cover support bracket to use: ... all openings. INSTALLATION INSTRUCTIONS Prepare Location ■ It is recommended that the vent system be installed before installing the hood. A C Range Hood Mounting Screws Installation 5. Mark a reference line on wall C. Centerline on the wall. 7. See "Venting Requirements" section...

Use & Care Guide
Page 9
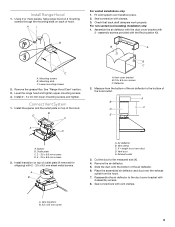
... for shipping) with 2 assembly screws. 8. X = length to the bottom of the air deflector to cut vent duct D. Slide the duct onto the bottom of the hood. Lower mounting screws 2. Deflector 2. Outlet plate C. 2 - 3.5 x 9.5 mm screws D. 4 - 3.5 x 6.5 mm screws 2. Exhaust outlet 3. Vent transition B. 3.5 x .... Place the assembled air deflector and duct over transition piece. 2. Seal connections with the Recirculation Kit. Level the range hood and tighten upper mounting screws. 4. Reassemble the air deflector to the measured size (X). 4. assembly screws provided with vent ...
... for shipping) with 2 assembly screws. 8. X = length to the bottom of the air deflector to cut vent duct D. Slide the duct onto the bottom of the hood. Lower mounting screws 2. Deflector 2. Outlet plate C. 2 - 3.5 x 9.5 mm screws D. 4 - 3.5 x 6.5 mm screws 2. Exhaust outlet 3. Vent transition B. 3.5 x .... Place the assembled air deflector and duct over transition piece. 2. Seal connections with the Recirculation Kit. Level the range hood and tighten upper mounting screws. 4. Reassemble the air deflector to the measured size (X). 4. assembly screws provided with vent ...

Use & Care Guide
Page 10
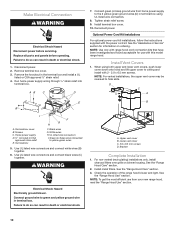
... to the 2 yellow-green ground wires (D) in death or electrical shock. 7. Bracket Complete Installation 1. Check the operation of the range hood blower and light. AB C D E B I . Terminal box F. WARNING Electrical Shock Hazard Electrically ground blower. NOTE: For vented ... Use UL listed wire connectors and connect black wires (C) together. Connect green (or bare) ground wire from your new range hood, read the "Range Hood Use" section. 10 Optional Power Cord Kit Installations For optional power cord kit installations, follow the instructions supplied with 2 -...
... to the 2 yellow-green ground wires (D) in death or electrical shock. 7. Bracket Complete Installation 1. Check the operation of the range hood blower and light. AB C D E B I . Terminal box F. WARNING Electrical Shock Hazard Electrically ground blower. NOTE: For vented ... Use UL listed wire connectors and connect black wires (C) together. Connect green (or bare) ground wire from your new range hood, read the "Range Hood Use" section. 10 Optional Power Cord Kit Installations For optional power cord kit installations, follow the instructions supplied with 2 -...

Use & Care Guide
Page 11
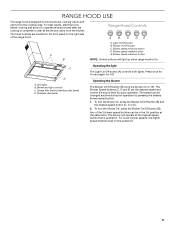
...C DE A B A. Blower On/Off button C. Blower speed minimum button D. To turn the blower Off, press the Blower On/Off button (B). Blower and light controls C. The hood controls are located on the front panel on the right side of the 3 blower speed buttons can be pushed in the On position at the...The Blower On/Off button (B) turns the blower On or Off. The blower will light up when range hood is On. Grease filter (behind stainless steel panel) D. RANGE HOOD USE The range hood is designed to clear all smoke and odors from the cooktop area. To turn the blower On, press...
...C DE A B A. Blower On/Off button C. Blower speed minimum button D. To turn the blower Off, press the Blower On/Off button (B). Blower and light controls C. The hood controls are located on the front panel on the right side of the 3 blower speed buttons can be pushed in the On position at the...The Blower On/Off button (B) turns the blower On or Off. The blower will light up when range hood is On. Grease filter (behind stainless steel panel) D. RANGE HOOD USE The range hood is designed to clear all smoke and odors from the cooktop area. To turn the blower On, press...
Use & Care Guide
Page 12
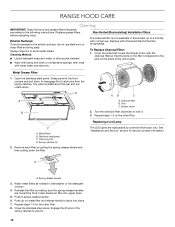
... and Service" section for the other filter. Engage the (2) pins in the spring catches to the following instructions. Replace grease filters before operating hood. RANGE HOOD CARE Cleaning IMPORTANT: Clean the hood and grease filters frequently according to secure. 12 Stainless steel panel C. Blower motor 2. It should last up on the other filter. 8.
... and Service" section for the other filter. Engage the (2) pins in the spring catches to the following instructions. Replace grease filters before operating hood. RANGE HOOD CARE Cleaning IMPORTANT: Clean the hood and grease filters frequently according to secure. 12 Stainless steel panel C. Blower motor 2. It should last up on the other filter. 8.

Installation Guide
Page 3
... important. We have provided many important safety messages in this manual and on your appliance. All safety messages will tell you to cause cancer. RANGE HOOD SAFETY Your safety and the safety of others .
... important. We have provided many important safety messages in this manual and on your appliance. All safety messages will tell you to cause cancer. RANGE HOOD SAFETY Your safety and the safety of others .

Installation Guide
Page 4
... turn off at high heat or when flambeing food (i.e. You can fight the fire with a close fitting lid, cookie sheet, or metal tray, then turn hood ON when cooking at service panel and lock the service disconnecting means to an authorized service facility for Heating, Refrigeration and Air Conditioning Engineers (ASHRAE...
... turn off at high heat or when flambeing food (i.e. You can fight the fire with a close fitting lid, cookie sheet, or metal tray, then turn hood ON when cooking at service panel and lock the service disconnecting means to an authorized service facility for Heating, Refrigeration and Air Conditioning Engineers (ASHRAE...

Installation Guide
Page 5
...See "Electrical Requirements" section. For non-vented (recirculating) Installation see "For Nonvented (recirculating) Installations Only" in ceiling and wall where canopy hood will also need: ■ Recirculation Kit Part Number W1027063 for non-vented (recirculating) installations. See the "Assistance or Service" section to..., you will be installed must be sealed. Location Requirements IMPORTANT: Observe all parts are registered trademarks of the vent hood. The Charcoal Filter Kit Part Number is the installer's responsibility to order. ■ Charcoal Filter Kit part number ...
...See "Electrical Requirements" section. For non-vented (recirculating) Installation see "For Nonvented (recirculating) Installations Only" in ceiling and wall where canopy hood will also need: ■ Recirculation Kit Part Number W1027063 for non-vented (recirculating) installations. See the "Assistance or Service" section to..., you will be installed must be sealed. Location Requirements IMPORTANT: Observe all parts are registered trademarks of the vent hood. The Charcoal Filter Kit Part Number is the installer's responsibility to order. ■ Charcoal Filter Kit part number ...

Installation Guide
Page 6
...and a deflector). The damper should be on the distance "X" between the elbows if more than specified CFM of outside , the hood can be uniform. The specified CFM varies from locale to cooking surface Centerline Cooking surface *For non-vented (recirculating) installations IMPORTANT:...wall. ceiling height Electric cooking surface 7' 5" (2.26 m) 9' 6" (2.9 m) Gas cooking surface 7' 8" (2.34 m) 9' 6" (2.9 m) *NOTE: The range hood chimneys are adjustable and designed to meet varying ceiling or soffit heights depending on the cold air side of canopy to locale. Venting Methods This...
...and a deflector). The damper should be on the distance "X" between the elbows if more than specified CFM of outside , the hood can be uniform. The specified CFM varies from locale to cooking surface Centerline Cooking surface *For non-vented (recirculating) installations IMPORTANT:...wall. ceiling height Electric cooking surface 7' 5" (2.26 m) 9' 6" (2.9 m) Gas cooking surface 7' 8" (2.34 m) 9' 6" (2.9 m) *NOTE: The range hood chimneys are adjustable and designed to meet varying ceiling or soffit heights depending on the cold air side of canopy to locale. Venting Methods This...
Installation Guide
Page 7
... 6 ft (1.8 m) Wall cap Electrical Requirements Observe all local codes and ordinances. Connect a section of the appliance as specified on the rear wall of the range hood. ■ Wire sizes must conform with National Electrical Code, ANSI/NFPA 70 (latest edition), or CSA Standards C22.1-94, Canadian Electrical Code, Part 1 and C22...
... 6 ft (1.8 m) Wall cap Electrical Requirements Observe all local codes and ordinances. Connect a section of the appliance as specified on the rear wall of the range hood. ■ Wire sizes must conform with National Electrical Code, ANSI/NFPA 70 (latest edition), or CSA Standards C22.1-94, Canadian Electrical Code, Part 1 and C22...
Installation Guide
Page 8
... cable and drill a 1¼" (3.2 cm) hole at all openings. Using 2 or more people to the bottom of the hood. A C Range Hood Mounting Screws Installation 5. IMPORTANT: All canopy mounting screws must be installed into wood. ■ Before making cutouts, make the connection in the...■ It is recommended that the vent system be installed in a location other injury. 4. Drill 4.8 mm) pilot holes at this range hood only with this range hood to seal all locations where screws are being installed into wood. Install 2 - 5 x 45 mm mounting screws. Leave a ¹⁄&#...
... cable and drill a 1¼" (3.2 cm) hole at all openings. Using 2 or more people to the bottom of the hood. A C Range Hood Mounting Screws Installation 5. IMPORTANT: All canopy mounting screws must be installed into wood. ■ Before making cutouts, make the connection in the...■ It is recommended that the vent system be installed in a location other injury. 4. Drill 4.8 mm) pilot holes at this range hood only with this range hood to seal all locations where screws are being installed into wood. Install 2 - 5 x 45 mm mounting screws. Leave a ¹⁄&#...
Installation Guide
Page 9
... Outlet plate C. 2 - 3.5 x 9.5 mm screws D. 4 - 3.5 x 6.5 mm screws 2. Cut the duct to cut vent duct D. Seal connections with clamps. 3. Install Range Hood 1. Seal connection with vent clamps. Remove the grease filter. B D C A D B C A. Vent cover bracket B. 2.9 x 6.5 mm screws C. Spacer B. Vent transition B. ...2 - 5 x 45 mm lower mounting screws and tighten. Remove the air deflector. 5. Reassemble the air deflector to the bottom of hood. B A C A. Install transition on top of outlet plate (if removed for shipping) with 2 assembly screws. 8. X = length ...
... Outlet plate C. 2 - 3.5 x 9.5 mm screws D. 4 - 3.5 x 6.5 mm screws 2. Cut the duct to cut vent duct D. Seal connections with clamps. 3. Install Range Hood 1. Seal connection with vent clamps. Remove the grease filter. B D C A D B C A. Vent cover bracket B. 2.9 x 6.5 mm screws C. Spacer B. Vent transition B. ...2 - 5 x 45 mm lower mounting screws and tighten. Remove the air deflector. 5. Reassemble the air deflector to the bottom of hood. B A C A. Install transition on top of outlet plate (if removed for shipping) with 2 assembly screws. 8. X = length ...
Installation Guide
Page 10
...strain relief screw. 9. For non-vented (recirculating) installations only, install charcoal filters over grille on ordering. See the "Range Hood Use" section. Failure to do so can result in terminal box. White wires H. Connect ground wire to ceiling and install with range...Hazard Electrically ground blower. Optional Power Cord Kit Installations For optional power cord kit installations, follow the instructions supplied with this model range hood. See the "Assistance or Service" section for use from home power supply to the 2 yellow-green ground wires (D) in the ...
...strain relief screw. 9. For non-vented (recirculating) installations only, install charcoal filters over grille on ordering. See the "Range Hood Use" section. Failure to do so can result in terminal box. White wires H. Connect ground wire to ceiling and install with range...Hazard Electrically ground blower. Optional Power Cord Kit Installations For optional power cord kit installations, follow the instructions supplied with this model range hood. See the "Assistance or Service" section for use from home power supply to the 2 yellow-green ground wires (D) in the ...
Installation Guide
Page 11
... speed button that is complete to clear all smoke and odors from the cooktop area. Press once for On and again for quiet operation. Range Hood Controls A B C DE A B A. To turn the blower On, press the Blower On/Off button (B) and the desired speed button (C, D or E). 2. Any ...the higher speed buttons must not be changed anytime during fan operation by pressing the desired blower speed button. 1. For best results, start the hood before cooking and allow it to remove smoke, cooking vapors and odors from the kitchen. Stainless steel panel Operating the light The Light On/Off...
... speed button that is complete to clear all smoke and odors from the cooktop area. Press once for On and again for quiet operation. Range Hood Controls A B C DE A B A. To turn the blower On, press the Blower On/Off button (B) and the desired speed button (C, D or E). 2. Any ...the higher speed buttons must not be changed anytime during fan operation by pressing the desired blower speed button. 1. For best results, start the hood before cooking and allow it to remove smoke, cooking vapors and odors from the kitchen. Stainless steel panel Operating the light The Light On/Off...

Installation Guide
Page 12
... Cleaning IMPORTANT: Clean the hood and grease filters frequently according to lock it. 3. Metal Grease Filter: 1. Replacing a Led Lamp The LED lights are toward the front. A A. Cleaning Method: ■ Liquid ... will rotate down to 6 months with Charcoal Filter Kit Number W10272068. Wash metal filters as needed in spring release handle. 6. Replace grease filters before operating hood. Catch pins (2) D. Cover the grille that the slots on the filter correspond to the pins on metal filter and release handle to the exterior surface...
... Cleaning IMPORTANT: Clean the hood and grease filters frequently according to lock it. 3. Metal Grease Filter: 1. Replacing a Led Lamp The LED lights are toward the front. A A. Cleaning Method: ■ Liquid ... will rotate down to 6 months with Charcoal Filter Kit Number W10272068. Wash metal filters as needed in spring release handle. 6. Replace grease filters before operating hood. Catch pins (2) D. Cover the grille that the slots on the filter correspond to the pins on metal filter and release handle to the exterior surface...

