
Use & Care Guide
Page 3
... gasoline, away from your wine cellar, follow instructions. All safety messages will follow instructions. IMPORTANT SAFETY INSTRUCTIONS WARNING: To reduce the risk of fire, electric shock, or injury when using your old wine cellar. ■ Do not remove ground prong. ■ Use nonflammable cleaner. ■ Do not use an adapter. ■ Do not use an extension cord. ■ Disconnect power before operating. IMPORTANT: Child entrapment...
... gasoline, away from your wine cellar, follow instructions. All safety messages will follow instructions. IMPORTANT SAFETY INSTRUCTIONS WARNING: To reduce the risk of fire, electric shock, or injury when using your old wine cellar. ■ Do not remove ground prong. ■ Use nonflammable cleaner. ■ Do not use an adapter. ■ Do not use an extension cord. ■ Disconnect power before operating. IMPORTANT: Child entrapment...
Use & Care Guide
Page 4
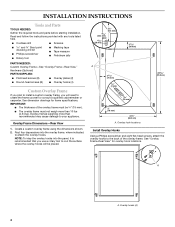
... frame using the dimensions shown. 2. Hardware (Optional) PARTS SUPPLIED: ■ Flat-head screws (8) ■ Overlay plates (2) ■ Round-head screws (8) ■ Overlay hooks (4) Custom Overlay Frame If you plan to install a custom overlay frame, you use a rotary tool to rout the surface where the overlay hooks will need to your appliance. See "Overlay Frame-Rear View" for frame specifications...
... frame using the dimensions shown. 2. Hardware (Optional) PARTS SUPPLIED: ■ Flat-head screws (8) ■ Overlay plates (2) ■ Round-head screws (8) ■ Overlay hooks (4) Custom Overlay Frame If you plan to install a custom overlay frame, you use a rotary tool to rout the surface where the overlay hooks will need to your appliance. See "Overlay Frame-Rear View" for frame specifications...
Use & Care Guide
Page 5
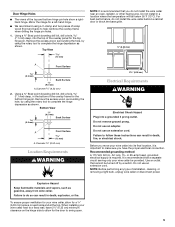
... installation, cleaning, or removing a light bulb, unplug wine cellar or disconnect power. Recommended grounding method A 115 Volt, 60 Hz., AC only, 15- When installing your wine cellar be turned off by using the rotary tool to complete the hinge depression as gasoline, away from wine cellar. It is required. Using a ³⁄₈" Brad point doweling drill bit, drill a hole 7.1 mm) deep, in a location where the temperature...
... installation, cleaning, or removing a light bulb, unplug wine cellar or disconnect power. Recommended grounding method A 115 Volt, 60 Hz., AC only, 15- When installing your wine cellar be turned off by using the rotary tool to complete the hinge depression as gasoline, away from wine cellar. It is required. Using a ³⁄₈" Brad point doweling drill bit, drill a hole 7.1 mm) deep, in a location where the temperature...
Use & Care Guide
Page 6
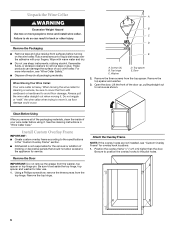
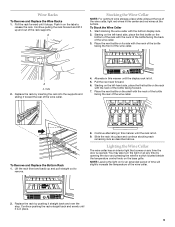
... for service. For more people to move it, as shown. Top hinge C. Lift the front of the door up, pulling straight out to set aside the top hinge, top spacer and washer for later use sharp instruments, rubbing alcohol, flammable fluids, or abrasive cleaners to do so can damage the surface of your wine cellar before turning on the wine cellar...
... for service. For more people to move it, as shown. Top hinge C. Lift the front of the door up, pulling straight out to set aside the top hinge, top spacer and washer for later use sharp instruments, rubbing alcohol, flammable fluids, or abrasive cleaners to do so can damage the surface of your wine cellar before turning on the wine cellar...
Use & Care Guide
Page 7
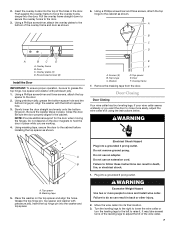
... install wine cellar. Be sure the washer stays in back or other injury. 2. Turn the leveling legs to the right to lower the wine cellar or turn the leveling legs to the left to the door. 3. E F A. WARNING A B A. Door C. Slowly lower the door straight and evenly onto the bottom hinge pin. Top hinge C. Place the washer on the door magnets to hold the door in the door. Door F. NOTE: Provide additional support...
... install wine cellar. Be sure the washer stays in back or other injury. 2. Turn the leveling legs to the right to lower the wine cellar or turn the leveling legs to the left to the door. 3. E F A. WARNING A B A. Door C. Slowly lower the door straight and evenly onto the bottom hinge pin. Top hinge C. Place the washer on the door magnets to hold the door in the door. Door F. NOTE: Provide additional support...
Use & Care Guide
Page 8
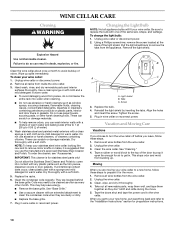
.... The high efficiency compressor and fans may hear water running . Dimmer Upper Lower F A B C D A. Dimmer B. If not, tilt the wine cellar slightly more turns, and you like . Replace the two screws. Most of wine, use the wine producer's recommended temperature setting. Adjusting Controls The mid-setting indicated in the previous section should turn both front leveling screws to the refrigerant flowing in your wine cellar. ■ You may cause your wine cellar to the next...
.... The high efficiency compressor and fans may hear water running . Dimmer Upper Lower F A B C D A. Dimmer B. If not, tilt the wine cellar slightly more turns, and you like . Replace the two screws. Most of wine, use the wine producer's recommended temperature setting. Adjusting Controls The mid-setting indicated in the previous section should turn both front leveling screws to the refrigerant flowing in your wine cellar. ■ You may cause your wine cellar to the next...
Use & Care Guide
Page 9
... wine cellar, light red wines in the center and red wines at any time the door is opened. Lighting the Wine Cellar The wine cellar has an interior light that comes on the tabs to remove. 8. Replace the rack by inserting the rack into place and continue stocking each remaining rack as described above. Push in this manner until the display rack is full. 9. Place the next bottle on the shelf...
... wine cellar, light red wines in the center and red wines at any time the door is opened. Lighting the Wine Cellar The wine cellar has an interior light that comes on the tabs to remove. 8. Replace the rack by inserting the rack into place and continue stocking each remaining rack as described above. Push in this manner until the display rack is full. 9. Place the next bottle on the shelf...
Use & Care Guide
Page 10
...'s approved Stainless Steel Cleaner and Polish. Light shield B. Unplug the wine cellar. 3. Clean the wine cellar. Using a Phillips screwdriver, remove the screw located at the back of warm water and baking soda (2 tbs to 1 qt [26 g to replace the bulb with any plastic parts such as every other harsh cleaning tools. Remove all wine bottles from the wine cellar. 2. IMPORTANT: This cleaner is suggested that...
...'s approved Stainless Steel Cleaner and Polish. Light shield B. Unplug the wine cellar. 3. Clean the wine cellar. Using a Phillips screwdriver, remove the screw located at the back of warm water and baking soda (2 tbs to 1 qt [26 g to replace the bulb with any plastic parts such as every other harsh cleaning tools. Remove all wine bottles from the wine cellar. 2. IMPORTANT: This cleaner is suggested that...

Use & Care Guide
Page 11
... an unnecessary service call. Do not remove ground prong. At normal temperatures, expect your motor to run about 40% to open WARNING Explosion Hazard Use nonflammable cleaner. This obstructs air transfer and makes the motor work ■ Is the power supply cord unplugged? To avoid humidity buildup, try to get everything you need out of the wine cellar at once, keep wine bottles positioned...
... an unnecessary service call. Do not remove ground prong. At normal temperatures, expect your motor to run about 40% to open WARNING Explosion Hazard Use nonflammable cleaner. This obstructs air transfer and makes the motor work ■ Is the power supply cord unplugged? To avoid humidity buildup, try to get everything you need out of the wine cellar at once, keep wine bottles positioned...

Use & Care Guide
Page 12
..., repair parts distributors, and services companies. If you need replacement parts If you need further assistance, you only use factory specified replacement parts. In Canada Call the KitchenAid Canada Customer eXperience Centre toll free: 1-800-807-6777. KitchenAid designated service technicians are trained to fulfill the product warranty and provide afterwarranty service, anywhere in death, explosion, or fire. In Canada, call 1-800-442-9991 and ask for the appropriate part number listed...
..., repair parts distributors, and services companies. If you need replacement parts If you need further assistance, you only use factory specified replacement parts. In Canada Call the KitchenAid Canada Customer eXperience Centre toll free: 1-800-807-6777. KitchenAid designated service technicians are trained to fulfill the product warranty and provide afterwarranty service, anywhere in death, explosion, or fire. In Canada, call 1-800-442-9991 and ask for the appropriate part number listed...
Use & Care Guide
Page 13
.... This warranty gives you specific legal rights, and you . If you think you ever need repair service, first see the "Troubleshooting" section of the refrigerator/freezer cavity liner (including labor costs) if the part cracks due to defects in accordance with electrical or plumbing codes, or use or when it is operated and maintained according to instructions attached to or furnished with KitchenAid's published installation instructions...
.... This warranty gives you specific legal rights, and you . If you think you ever need repair service, first see the "Troubleshooting" section of the refrigerator/freezer cavity liner (including labor costs) if the part cracks due to defects in accordance with electrical or plumbing codes, or use or when it is operated and maintained according to instructions attached to or furnished with KitchenAid's published installation instructions...
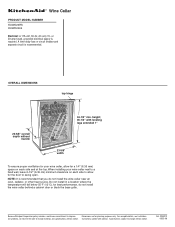
Dimension Guide
Page 1
.... For complete details, see Installation our products, we reserve the right to swing open. Because Whirlpool Corporation policy includes a continuous commitment to change materials and specifications without handle 34-1/2" min. or 20-amp fused, grounded electrical supply is recommended that you do not install the wine cellar behind a cabinet door or block the base grille. NOTE: It is required. Instructions packed with leveling legs extended...
.... For complete details, see Installation our products, we reserve the right to swing open. Because Whirlpool Corporation policy includes a continuous commitment to change materials and specifications without handle 34-1/2" min. or 20-amp fused, grounded electrical supply is recommended that you do not install the wine cellar behind a cabinet door or block the base grille. NOTE: It is required. Instructions packed with leveling legs extended...


