Use & Care Guide
Page 4
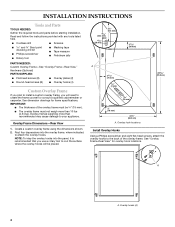
...hooks (4) 4 Overlay Frame Dimensions-Rear View 1. Create a custom overlay frame using the dimensions shown. 2. Overlay hook locations Install Overlay Hooks Using a Phillips screwdriver and eight flat-head screws, attach the overlay hooks to the back of the overlay frame must ...custom overlay frame, you use a rotary tool to rout the surface where the overlay hooks will need to attach the overlay hooks. Overlay frames weighing more than recommended may cause damage to your appliance. See "Overlay Frame-Rear View" for frame specifications. Rout four depressions into the panel...
...hooks (4) 4 Overlay Frame Dimensions-Rear View 1. Create a custom overlay frame using the dimensions shown. 2. Overlay hook locations Install Overlay Hooks Using a Phillips screwdriver and eight flat-head screws, attach the overlay hooks to the back of the overlay frame must ...custom overlay frame, you use a rotary tool to rout the surface where the overlay hooks will need to attach the overlay hooks. Overlay frames weighing more than recommended may cause damage to your appliance. See "Overlay Frame-Rear View" for frame specifications. Rout four depressions into the panel...
Use & Care Guide
Page 6
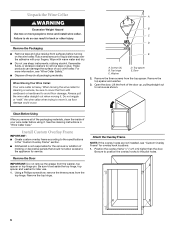
...damage the surface of your fingers. Remove the three screws from the top hinge. See the cleaning instructions in back or other injury. Attach the Overlay Frame NOTE: If the overlay hooks are not installed, see "Wine Cellar Safety." ■ Dispose of liquid dish soap ...when trying to remove as floor damage could occur. Lift the front of molding or decorative panels that would not allow access to the specifications in the "Custom Overlay Frame" section. ■ KitchenAid is heavy. Clean Before Using After you remove all packaging materials. Remove the Packaging ■...
...damage the surface of your fingers. Remove the three screws from the top hinge. See the cleaning instructions in back or other injury. Attach the Overlay Frame NOTE: If the overlay hooks are not installed, see "Wine Cellar Safety." ■ Dispose of liquid dish soap ...when trying to remove as floor damage could occur. Lift the front of molding or decorative panels that would not allow access to the specifications in the "Custom Overlay Frame" section. ■ KitchenAid is heavy. Clean Before Using After you remove all packaging materials. Remove the Packaging ■...
Use & Care Guide
Page 7
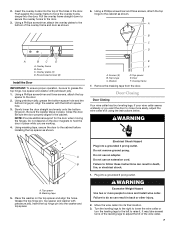
...remove ground prong. Pull the overlay frame straight down to secure the overlay hooks to close more people to the door. 2. Using a Phillips screwdriver, attach the overlay plates to force the overlay hooks deeper into the top of the holes in back or other injury. 2. Overlay frame 7. Remove the ...wine cellar into the washer and top spacer. Using a Phillips screwdriver and three screws, attach the top spacer to move and install wine cellar. Failure to raise it. Turn the leveling legs to the right to lower the wine cellar or turn the leveling legs to the left to follow ...
...remove ground prong. Pull the overlay frame straight down to secure the overlay hooks to close more people to the door. 2. Using a Phillips screwdriver, attach the overlay plates to force the overlay hooks deeper into the top of the holes in back or other injury. 2. Overlay frame 7. Remove the ...wine cellar into the washer and top spacer. Using a Phillips screwdriver and three screws, attach the top spacer to move and install wine cellar. Failure to raise it. Turn the leveling legs to the right to lower the wine cellar or turn the leveling legs to the left to follow ...
Use & Care Guide
Page 10
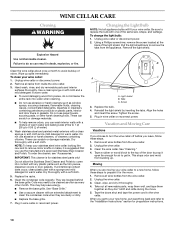
... . 1. This stops odor and mold from the appliance. Take out all racks from the wine cellar. 2. Be sure to replace the bulb with an extended attachment to the top of water). 4. Using a Phillips screwdriver, remove the screw located at the back of odors. These can wash interior walls with any plastic...
... . 1. This stops odor and mold from the appliance. Take out all racks from the wine cellar. 2. Be sure to replace the bulb with an extended attachment to the top of water). 4. Using a Phillips screwdriver, remove the screw located at the back of odors. These can wash interior walls with any plastic...
Use & Care Guide
Page 13
... of purchase, when this major appliance is operated and maintained according to instructions attached to or furnished with the product, KitchenAid brand of Whirlpool Corporation or Whirlpool Canada LP (hereafter "KitchenAid") will pay for factory specified parts and repair labor to correct defects in ... use of original purchase date is operated and maintained according to instructions attached to or furnished with the product, KitchenAid will pay for factory specified parts and repair labor for other rights that is used for the following information about your major appliance to better...
... of purchase, when this major appliance is operated and maintained according to instructions attached to or furnished with the product, KitchenAid brand of Whirlpool Corporation or Whirlpool Canada LP (hereafter "KitchenAid") will pay for factory specified parts and repair labor to correct defects in ... use of original purchase date is operated and maintained according to instructions attached to or furnished with the product, KitchenAid will pay for factory specified parts and repair labor for other rights that is used for the following information about your major appliance to better...