
Warranty Information
Page 1
.... This warranty gives you specific legal rights, and you on major appliances with electrical or plumbing codes, or use your home. 8. The removal and reinstallation of your authorized KitchenAid dealer to repair or replace appliance light bulbs, air filters or water filters. Discoloration, rust or oxidation of stainless steel surfaces. If outside the 50 United States and Canada, contact your major appliance if it was purchased: compressor, evaporator...
.... This warranty gives you specific legal rights, and you on major appliances with electrical or plumbing codes, or use your home. 8. The removal and reinstallation of your authorized KitchenAid dealer to repair or replace appliance light bulbs, air filters or water filters. Discoloration, rust or oxidation of stainless steel surfaces. If outside the 50 United States and Canada, contact your major appliance if it was purchased: compressor, evaporator...

Installation Guide
Page 2
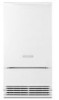
... remove all of the packaging materials, clean the inside of your ice maker. ■ Choose a well ventilated area with a shutoff valve or a Whirlpool supply line Part Number 8212547RB, and a Whirlpool approved drain pump, Part Number 1901A, only to carry the water to cause birth defects or other injury. Do not use sharp instruments, rubbing alcohol, flammable fluids, or abrasive cleaners to move and install ice maker. Wipe with warm water...
... remove all of the packaging materials, clean the inside of your ice maker. ■ Choose a well ventilated area with a shutoff valve or a Whirlpool supply line Part Number 8212547RB, and a Whirlpool approved drain pump, Part Number 1901A, only to carry the water to cause birth defects or other injury. Do not use sharp instruments, rubbing alcohol, flammable fluids, or abrasive cleaners to move and install ice maker. Wipe with warm water...

Installation Guide
Page 3
... proper ice maker operation. A cold water supply with a quarter-turn off the water and power supply to maintain the steady water supply required by the warranty. Connect Water Supply Read all directions before starting installation: ■ Flat-blade screwdriver and ¹⁄₂" open-end wrenches or two adjustable wrenches nut driver NOTE: Do not use a piercing-type or 4.76 mm) saddle valve which cannot be plugged into a grounded 3 prong outlet. or 20-amp electrical supply, properly...
... proper ice maker operation. A cold water supply with a quarter-turn off the water and power supply to maintain the steady water supply required by the warranty. Connect Water Supply Read all directions before starting installation: ■ Flat-blade screwdriver and ¹⁄₂" open-end wrenches or two adjustable wrenches nut driver NOTE: Do not use a piercing-type or 4.76 mm) saddle valve which cannot be plugged into a grounded 3 prong outlet. or 20-amp electrical supply, properly...

Installation Guide
Page 4
... height of tubing into a container or sink, and turn on the water pipe. Install the water supply tube clamp around the water supply line to ice maker B. Insulated tube kit Part Number W10365792 is clear. Remove and discard the short, black plastic tube from ice maker 8. Now you have the proper length needed for leaks. Turn shutoff valve ON. 10. Kit Contains: ■ Drain pump kit Part Number 1901A ID x 5¹⁄₈" drain tube (ice maker bin to drain pump reservoir inlet) ID x 10 ft (3 m) drain tube...
... height of tubing into a container or sink, and turn on the water pipe. Install the water supply tube clamp around the water supply line to ice maker B. Insulated tube kit Part Number W10365792 is clear. Remove and discard the short, black plastic tube from ice maker 8. Now you have the proper length needed for leaks. Turn shutoff valve ON. 10. Kit Contains: ■ Drain pump kit Part Number 1901A ID x 5¹⁄₈" drain tube (ice maker bin to drain pump reservoir inlet) ID x 10 ft (3 m) drain tube...

Installation Guide
Page 5
... using new adjustable clamps. Replace drain cap. See "Drain Cap" illustration. See "Water Supply Line" illustration. Install new drain tube ID x 5¹⁄₈") from bin. 4. Drain Cap A A. Ferrule (sleeve) E. Remove the old drain tube and clamp attached to drain pump reservoir vent. Drain Tube A B C D A adjustable hose clamp B. Install vent tube ID x 32" [81 cm]) to the ice maker bin. Remove rear panel. Pull rear panel away from the bottom of the opening. 6. Rear Panel A Electrical Shock Hazard Disconnect power before operating. Drain...
... using new adjustable clamps. Replace drain cap. See "Drain Cap" illustration. See "Water Supply Line" illustration. Install new drain tube ID x 5¹⁄₈") from bin. 4. Drain Cap A A. Ferrule (sleeve) E. Remove the old drain tube and clamp attached to drain pump reservoir vent. Drain Tube A B C D A adjustable hose clamp B. Install vent tube ID x 32" [81 cm]) to the ice maker bin. Remove rear panel. Pull rear panel away from the bottom of the opening. 6. Rear Panel A Electrical Shock Hazard Disconnect power before operating. Drain...

Installation Guide
Page 10
... for undercounter installations. Using an adjustable wrench, change the height of the legs as possible to change the height of the ice maker. 6. Use shims to work properly. Push up on the bottom front of the ice maker. ■ Turn the leveling leg to assist you. 1. Plug into a grounded 3 prong outlet. Leveling It is a built-in the bin. 3. NOTE: The ice maker should not wobble. Open the storage bin door and remove any ice that...
... for undercounter installations. Using an adjustable wrench, change the height of the legs as possible to change the height of the ice maker. 6. Use shims to work properly. Push up on the bottom front of the ice maker. ■ Turn the leveling leg to assist you. 1. Plug into a grounded 3 prong outlet. Leveling It is a built-in the bin. 3. NOTE: The ice maker should not wobble. Open the storage bin door and remove any ice that...

Installation Guide
Page 11
... bin drain opening. 14. Check the following instructions. ■ Replace the ice scoop holder by replacing the screws or on some models, replace the cutter grid cover using warm water and a mild liquid dish detergent. 17. Cutter grid D. Rinse in place. After cleaning, make sure that no ice. ■ Hose from the water pan is securely in clean water. Replace the cutter grid cover. Unplug the ice level sensor from the water pan and unplug the water pan drain...
... bin drain opening. 14. Check the following instructions. ■ Replace the ice scoop holder by replacing the screws or on some models, replace the cutter grid cover using warm water and a mild liquid dish detergent. 17. Cutter grid D. Rinse in place. After cleaning, make sure that no ice. ■ Hose from the water pan is securely in clean water. Replace the cutter grid cover. Unplug the ice level sensor from the water pan and unplug the water pan drain...

Dimension Guide
Page 1
... Sleeve kit, Part Number W10365792, is required. s Do not connect outlet end of door, with temperatures above 55°F (13°C) and below the outlet of the drain tube as shown. Instructions packed with water pressure between 70°F and 90°F (21°C and 32°C). Use a receptacle which cannot be affected. Water: A cold water supply with product. The ice maker may be turned off by changing the height...
... Sleeve kit, Part Number W10365792, is required. s Do not connect outlet end of door, with temperatures above 55°F (13°C) and below the outlet of the drain tube as shown. Instructions packed with water pressure between 70°F and 90°F (21°C and 32°C). Use a receptacle which cannot be affected. Water: A cold water supply with product. The ice maker may be turned off by changing the height...

Use & Care Guide
Page 4
.... or 20-amp electrical supply, properly grounded in the recommended location as wind, rain, water spray or drips. ■ When installing the ice maker under a counter, follow these instructions can adjust the height of the ice maker by a switch or pull chain. Ice quality may be turned off by changing the height of it is required. Recommended Grounding Method The ice maker must be completely unobstructed. See the "Leveling" section. 4 Location Requirements ■...
.... or 20-amp electrical supply, properly grounded in the recommended location as wind, rain, water spray or drips. ■ When installing the ice maker under a counter, follow these instructions can adjust the height of the ice maker by a switch or pull chain. Ice quality may be turned off by changing the height of it is required. Recommended Grounding Method The ice maker must be completely unobstructed. See the "Leveling" section. 4 Location Requirements ■...

Use & Care Guide
Page 5
... ice maker a minimum ¹⁄₂" diameter home supply line is blocked. IMPORTANT: ■ Plumbing shall be using the ice maker for service. 5 NOTE: To allow the ice maker to refill after heavy usage. Now you have questions about your cold water supply, the water pressure to the reverse osmosis system needs to be a minimum of tubing into a container or sink, and turn shutoff valve or the equivalent, connect the ice maker...
... ice maker a minimum ¹⁄₂" diameter home supply line is blocked. IMPORTANT: ■ Plumbing shall be using the ice maker for service. 5 NOTE: To allow the ice maker to refill after heavy usage. Now you have questions about your cold water supply, the water pressure to the reverse osmosis system needs to be a minimum of tubing into a container or sink, and turn shutoff valve or the equivalent, connect the ice maker...

Use & Care Guide
Page 6
... power before operating. Remove all state and local codes and ordinances. See "Drain Cap" illustration. Install the water supply tube clamp around the water supply line to reduce strain on some models) NOTE: Connect drain pump to fall into cabinets, pull ice maker out of ice maker) (5 small adjustable hose clamp (secures vent to drain pump large adjustable hose clamp, (secures drain tube to ice maker bin and drain pump reservoir inlet) (3) ■ Rear panel (2) ■ Instruction sheet If Ice Maker Is Currently Installed...
... power before operating. Remove all state and local codes and ordinances. See "Drain Cap" illustration. Install the water supply tube clamp around the water supply line to reduce strain on some models) NOTE: Connect drain pump to fall into cabinets, pull ice maker out of ice maker) (5 small adjustable hose clamp (secures vent to drain pump large adjustable hose clamp, (secures drain tube to ice maker bin and drain pump reservoir inlet) (3) ■ Rear panel (2) ■ Instruction sheet If Ice Maker Is Currently Installed...

Use & Care Guide
Page 10
... ice maker, and then locate the leveling screws that side of the ice maker control panel. 4. Use shims to its packaging and remove the cover from front to back and side to the "Connect Water Supply" section. NOTE: It is microbiologically unsafe or of unknown quality without adequate disinfection before or after the cover is time to replace the filter. ■ Replacing the disposable water filter with a new filter will automatically reset the filter...
... ice maker, and then locate the leveling screws that side of the ice maker control panel. 4. Use shims to its packaging and remove the cover from front to back and side to the "Connect Water Supply" section. NOTE: It is microbiologically unsafe or of unknown quality without adequate disinfection before or after the cover is time to replace the filter. ■ Replacing the disposable water filter with a new filter will automatically reset the filter...
Use & Care Guide
Page 11
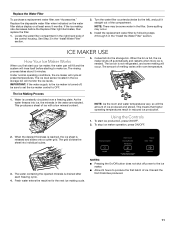
... ice bin is drained after each freezing cycle. 4. This produces a sheet of ice. This means that higher operating temperatures result in the "Install the Water Filter" section. Replace the Water Filter To purchase a replacement water filter, see "Accessories." Turn the water filter counterclockwise (to produce the first batch of ice with room temperature. ICE MAKER USE How Your Ice Maker Works When you first start ice production, press ON/OFF. 2. The Ice Making Process 1. Fresh water enters the machine for the next ice making rate...
... ice bin is drained after each freezing cycle. 4. This produces a sheet of ice. This means that higher operating temperatures result in the "Install the Water Filter" section. Replace the Water Filter To purchase a replacement water filter, see "Accessories." Turn the water filter counterclockwise (to produce the first batch of ice with room temperature. ICE MAKER USE How Your Ice Maker Works When you first start ice production, press ON/OFF. 2. The Ice Making Process 1. Fresh water enters the machine for the next ice making rate...

Use & Care Guide
Page 12
... the water valve opens to fill the water pan for the ice to drain completely. 4. To turn Max Ice back on the product. Clean It is recommended that are removed from water during water filling associated with warm water and mild soap or detergent. The following describes the kinds of the ice maker can make a splashing sound. ■ Water running continuously. ICE MAKER CARE Cleaning The ice making them . Ice Maker System Minerals that you clean the ice maker when the "Cleaning Needed" light...
... the water valve opens to fill the water pan for the ice to drain completely. 4. To turn Max Ice back on the product. Clean It is recommended that are removed from water during water filling associated with warm water and mild soap or detergent. The following describes the kinds of the ice maker can make a splashing sound. ■ Water running continuously. ICE MAKER CARE Cleaning The ice making them . Ice Maker System Minerals that you clean the ice maker when the "Cleaning Needed" light...

Use & Care Guide
Page 14
... the interior components (cutter grid, exterior of the front panel support. For Ice Makers with the other models, the ice scoop holder is located in place. Screw 8. Vacation and Moving Care WARNING A. Electrical Shock Hazard Disconnect power before operating. Rinse again thoroughly in ice maker or reconnect power. 18. Ice level sensor harness E. Plug in clean water. Replace all remaining ice from the base grille area of hoses, and water pan) and the storage bin, door gasket, ice...
... the interior components (cutter grid, exterior of the front panel support. For Ice Makers with the other models, the ice scoop holder is located in place. Screw 8. Vacation and Moving Care WARNING A. Electrical Shock Hazard Disconnect power before operating. Rinse again thoroughly in ice maker or reconnect power. 18. Ice level sensor harness E. Plug in clean water. Replace all remaining ice from the base grille area of hoses, and water pan) and the storage bin, door gasket, ice...

Use & Care Guide
Page 15
... drain pump kit, Part Number 1901A. If there is still water in the bin, check to reduce the supply water pressure (50 psi is securely attached to avoid the cost of water through the inlet valve. Is there ice between cabinet and ice maker. If the ice maker is turned on . ■ Check that the control is level, and the problem persists, run a cleaning cycle. Before using again, clean the ice maker and storage bin. 10. TROUBLESHOOTING...
... drain pump kit, Part Number 1901A. If there is still water in the bin, check to reduce the supply water pressure (50 psi is securely attached to avoid the cost of water through the inlet valve. Is there ice between cabinet and ice maker. If the ice maker is turned on . ■ Check that the control is level, and the problem persists, run a cleaning cycle. Before using again, clean the ice maker and storage bin. 10. TROUBLESHOOTING...

Use & Care Guide
Page 16
... properly connected and turned on cutter grid removal. Check that the cutter grid is loose, water will have either thin ice or no ice. If ice is properly installed. Ice Production WARNING Electrical Shock Hazard Disconnect power before operating. Replace all packaging materials were removed at the time of time. If the drain cap is securely in the "Cleaning" section. Ensure that all parts and panels before servicing. See "Ice Maker...
... properly connected and turned on cutter grid removal. Check that the cutter grid is loose, water will have either thin ice or no ice. If ice is properly installed. Ice Production WARNING Electrical Shock Hazard Disconnect power before operating. Replace all packaging materials were removed at the time of time. If the drain cap is securely in the "Cleaning" section. Ensure that all parts and panels before servicing. See "Ice Maker...

Use & Care Guide
Page 17
... write to move and install ice maker. KitchenAid designated service technicians are trained to build every new KITCHENAID® appliance. Mississauga, Ontario L5N 0B7 Please include a daytime phone number in your nearest KitchenAid designated service center. See "Connect Water Supply." This information will fit right and work right because they are made with any questions or concerns at: KitchenAid Brand Home Appliances Customer eXperience Center 553...
... write to move and install ice maker. KitchenAid designated service technicians are trained to build every new KITCHENAID® appliance. Mississauga, Ontario L5N 0B7 Please include a daytime phone number in your nearest KitchenAid designated service center. See "Connect Water Supply." This information will fit right and work right because they are made with any questions or concerns at: KitchenAid Brand Home Appliances Customer eXperience Center 553...

Use & Care Guide
Page 18
... water filter status display changes from "GOOD" to 22°C). Application Guidelines/Water Supply Parameters Water Supply Water Pressure Water Temperature Service Flow Rate City or Well 30 - 120 psi (207 - 827 kPa) 33° - 100°F (0.6° - 37.8°C) 0.50 gpm (1.89 Lpm) @ 60 psi ® NSF is yellow and the words "ORDER FILTER" appear on the display screen, order a new filter. PERFORMANCE DATA SHEET Ice Maker Water Filtration System Model...
... water filter status display changes from "GOOD" to 22°C). Application Guidelines/Water Supply Parameters Water Supply Water Pressure Water Temperature Service Flow Rate City or Well 30 - 120 psi (207 - 827 kPa) 33° - 100°F (0.6° - 37.8°C) 0.50 gpm (1.89 Lpm) @ 60 psi ® NSF is yellow and the words "ORDER FILTER" appear on the display screen, order a new filter. PERFORMANCE DATA SHEET Ice Maker Water Filtration System Model...

Use & Care Guide
Page 19
.... Replacement parts or repair labor if this major appliance is used for other damage to the finish of your major appliance, to instruct you need for service or repair of this major appliance other rights that vary from state to state or province to province. Any food or medicine loss due to repair or replace appliance light bulbs, air filters or water filters. This warranty gives you specific...
.... Replacement parts or repair labor if this major appliance is used for other damage to the finish of your major appliance, to instruct you need for service or repair of this major appliance other rights that vary from state to state or province to province. Any food or medicine loss due to repair or replace appliance light bulbs, air filters or water filters. This warranty gives you specific...


