
Use & Care Guide
Page 2
... very important. TABLE OF CONTENTS ICE MAKER SAFETY 2 INSTALLATION INSTRUCTIONS 3 Unpack the Ice Maker 3 Location Requirements 3 Cabinet Cutout Dimensions 4 Electrical Requirements 7 Water Supply Requirements 7 Leveling ...7 Connect Water Supply 8 Drain Connection 8 Normal Sounds 9 ICE MAKER USE 9 How Your Ice Maker Works 9 Using the Controls 10 ICE MAKER CARE 10 Cleaning 10 Winterizing, Vacation and Moving Care 12 TROUBLESHOOTING 13 Ice Maker Operation 13 Ice Production 13 Ice Quality 14 Plumbing Problems 14 ASSISTANCE OR SERVICE 14 In the U.S.A 14 In...
... very important. TABLE OF CONTENTS ICE MAKER SAFETY 2 INSTALLATION INSTRUCTIONS 3 Unpack the Ice Maker 3 Location Requirements 3 Cabinet Cutout Dimensions 4 Electrical Requirements 7 Water Supply Requirements 7 Leveling ...7 Connect Water Supply 8 Drain Connection 8 Normal Sounds 9 ICE MAKER USE 9 How Your Ice Maker Works 9 Using the Controls 10 ICE MAKER CARE 10 Cleaning 10 Winterizing, Vacation and Moving Care 12 TROUBLESHOOTING 13 Ice Maker Operation 13 Ice Production 13 Ice Quality 14 Plumbing Problems 14 ASSISTANCE OR SERVICE 14 In the U.S.A 14 In...

Use & Care Guide
Page 3
... ice maker, the front side must be completely unobstructed. If needed, you remove all parts and panels before installing the ice maker. ■ To remove any remaining tape or glue, rub the area briskly with a shutoff valve and either a gravity-drain system or condensate pump to carry the water to remove tape or glue. SAVE THESE INSTRUCTIONS INSTALLATION INSTRUCTIONS Unpack the Ice Maker ■ When installing the ice maker under a counter...
... ice maker, the front side must be completely unobstructed. If needed, you remove all parts and panels before installing the ice maker. ■ To remove any remaining tape or glue, rub the area briskly with a shutoff valve and either a gravity-drain system or condensate pump to carry the water to remove tape or glue. SAVE THESE INSTRUCTIONS INSTALLATION INSTRUCTIONS Unpack the Ice Maker ■ When installing the ice maker under a counter...
Use & Care Guide
Page 4
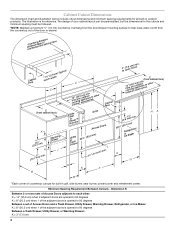
...8482;s D Grills Access Doors Utility oTDrrraaswher 20⁷⁄₈" (53.0 cm) L 2¹⁄₂" (6.4 cm) min. 3" to 90 degrees K = 8" (20.3 cm) when 1 of countertop cutouts for all built-in grill, side burner, sear burner, power burner and refreshment center... doors are opened to o(7p.e6ncmho)omdin. Dimension K Between 2 or more sets of Access Doors adjacent to each other D (3.8 c1m¹⁄₂") min. 20⁵⁄₈" (52.4 cm) Refrigerator or Ice Maker HA K G K K F B M *Each corner of the adjacent doors is opened to help keep water ...
...8482;s D Grills Access Doors Utility oTDrrraaswher 20⁷⁄₈" (53.0 cm) L 2¹⁄₂" (6.4 cm) min. 3" to 90 degrees K = 8" (20.3 cm) when 1 of countertop cutouts for all built-in grill, side burner, sear burner, power burner and refreshment center... doors are opened to o(7p.e6ncmho)omdin. Dimension K Between 2 or more sets of Access Doors adjacent to each other D (3.8 c1m¹⁄₂") min. 20⁵⁄₈" (52.4 cm) Refrigerator or Ice Maker HA K G K K F B M *Each corner of the adjacent doors is opened to help keep water ...

Use & Care Guide
Page 5
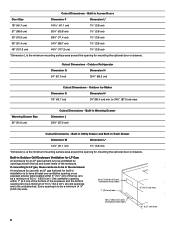
..." (121.9 cm) Cutout Dimensions - Built-in Power Burner Dimension C Dimension D 19³⁄₈" (49.2 cm) 10¾" (27.3 cm) Dimension E 19¾" (50.2 cm) Burner Position Front to Back Side by Side Cutout Dimensions - Built-in Sear Burner Dimension C Dimension D 13½" (34.3 cm) 10⁵⁄₈" (27.0 cm) Dimension E 22 57.6 cm) Cutout Dimensions - Built-in Refreshment Center Dimension C Dimension D 30½...
..." (121.9 cm) Cutout Dimensions - Built-in Power Burner Dimension C Dimension D 19³⁄₈" (49.2 cm) 10¾" (27.3 cm) Dimension E 19¾" (50.2 cm) Burner Position Front to Back Side by Side Cutout Dimensions - Built-in Sear Burner Dimension C Dimension D 13½" (34.3 cm) 10⁵⁄₈" (27.0 cm) Dimension E 22 57.6 cm) Cutout Dimensions - Built-in Refreshment Center Dimension C Dimension D 30½...
Use & Care Guide
Page 6
...located within 1" (2.5 cm) of the bottom of the enclosure and the bottom opening is to be in the enclosure: An enclosure for use with an LP gas fuel tank for an LP gas fuel tank is to 34½" (87.6 cm) max. All vent openings are...) max. 10 in installation is to be unobstructed. If converting to LP gas, these vents are to be ventilated by openings at least one ventilation opening for mounting the optional door or drawers. Built-in .2 (129.0 cm2). Outdoor Ice Maker Dimension G Dimension H 18" (45.7 cm) 34" (86.4 cm) min. Built-in Outdoor Grill Enclosure Ventilation...
...located within 1" (2.5 cm) of the bottom of the enclosure and the bottom opening is to be in the enclosure: An enclosure for use with an LP gas fuel tank for an LP gas fuel tank is to 34½" (87.6 cm) max. All vent openings are...) max. 10 in installation is to be unobstructed. If converting to LP gas, these vents are to be ventilated by openings at least one ventilation opening for mounting the optional door or drawers. Built-in .2 (129.0 cm2). Outdoor Ice Maker Dimension G Dimension H 18" (45.7 cm) 34" (86.4 cm) min. Built-in Outdoor Grill Enclosure Ventilation...
Use & Care Guide
Page 7
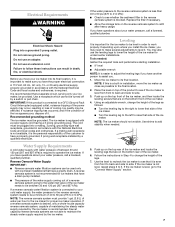
... Water Supply" section. 7 Use the level to recheck the ice maker to see that it is important for undercounter installations. It is connected to your cold water supply, the water pressure to the reverse osmosis system needs to be level in Step 4 to level it is not level, repeat steps 2 to the final location. 2. If a reverse osmosis water filtration system is recommended that have a drain pump installed...
... Water Supply" section. 7 Use the level to recheck the ice maker to see that it is important for undercounter installations. It is connected to your cold water supply, the water pressure to the reverse osmosis system needs to be level in Step 4 to level it is not level, repeat steps 2 to the final location. 2. If a reverse osmosis water filtration system is recommended that have a drain pump installed...

Use & Care Guide
Page 8
... the ice maker to your drain in accordance with the International Plumbing Code and any connections (including connections at the valve) or nuts that you begin. Water supply tube clamp B. Vent hose (drain pump models only) C. Inlet water tube clamp and supply line connector D. Drain hose (drain pump models only) 6. NOTE: To avoid rattling, be sure the copper tubing does not touch the cabinet's side wall or other parts inside diameter. ■ Drain lines...
... the ice maker to your drain in accordance with the International Plumbing Code and any connections (including connections at the valve) or nuts that you begin. Water supply tube clamp B. Vent hose (drain pump models only) C. Inlet water tube clamp and supply line connector D. Drain hose (drain pump models only) 6. NOTE: To avoid rattling, be sure the copper tubing does not touch the cabinet's side wall or other parts inside diameter. ■ Drain lines...
Use & Care Guide
Page 9
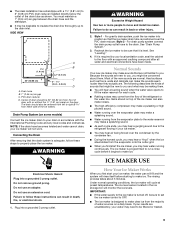
... stored on the door. Plug into a grounded 3 prong outlet. The ice level sensor located in the ice storage bin will not work. ■ The ideal installation has a standpipe with the International Plumbing Code and any local codes and ordinances. Drain hose B. 1" (2.54 cm) air gap C. The drain should be desirable to insulate the drain line thoroughly up to make ice. The ice maker is turned off, be centered from left...
... stored on the door. Plug into a grounded 3 prong outlet. The ice level sensor located in the ice storage bin will not work. ■ The ideal installation has a standpipe with the International Plumbing Code and any local codes and ordinances. Drain hose B. 1" (2.54 cm) air gap C. The drain should be desirable to insulate the drain line thoroughly up to make ice. The ice maker is turned off, be centered from left...
Use & Care Guide
Page 10
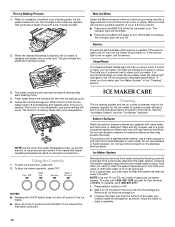
... or harsh cleaners. With hard water of ice. Service The service light indicates when service is drained after each freezing cycle. 4. Fresh water enters the machine for the ice to clean your ice maker. Cubes fall into individual cubes. To stop ice maker operation, press OFF. Do not use abrasive cleaners on . The Ice Making Process 1. It is low or empty. The water containing the rejected minerals is needed . This means that higher operating...
... or harsh cleaners. With hard water of ice. Service The service light indicates when service is drained after each freezing cycle. 4. Fresh water enters the machine for the ice to clean your ice maker. Cubes fall into individual cubes. To stop ice maker operation, press OFF. Do not use abrasive cleaners on . The Ice Making Process 1. It is low or empty. The water containing the rejected minerals is needed . This means that higher operating...

Use & Care Guide
Page 11
... storage bin door and remove any cleaning solution left -hand screws. Unplug the ice level sensor from the cutter grid. 7. Screw C. Interior Components 1. Replace the drain cap securely on the cleaner bottle before cleaning. Replace all handling information on the water pan. If the drain cap is complete. Push the selector switch to ON to do so can result in ice maker or reconnect power. Screw...
... storage bin door and remove any cleaning solution left -hand screws. Unplug the ice level sensor from the cutter grid. 7. Screw C. Interior Components 1. Replace the drain cap securely on the cleaner bottle before cleaning. Replace all handling information on the water pan. If the drain cap is complete. Push the selector switch to ON to do so can result in ice maker or reconnect power. Screw...
Use & Care Guide
Page 12
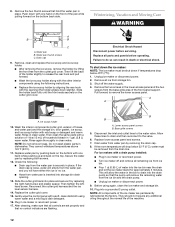
... cleaning, make sure that all parts and panels before servicing. Disconnect the inlet and outlet lines to the valve. 6. Drain cap 9. Then lift the back of water into a grounded 3 prong outlet. Slide the holder back fully until the front rests securely on the bottom back side. Remove all remaining ice from water pan is securely in ice maker or reconnect power. ■ Turn ice maker off the water supply. 4. Replace water...
... cleaning, make sure that all parts and panels before servicing. Disconnect the inlet and outlet lines to the valve. 6. Drain cap 9. Then lift the back of water into a grounded 3 prong outlet. Slide the holder back fully until the front rests securely on the bottom back side. Remove all remaining ice from water pan is securely in ice maker or reconnect power. ■ Turn ice maker off the water supply. 4. Replace water...
Use & Care Guide
Page 13
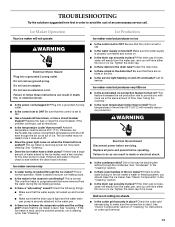
.... Do not use an adapter. This is not cutting ice sheets ■ Is the cutter grid securely in ? This feature increases the ice production rate to ON? Grid is normal. Check that there are no ice. Make sure the water supply is level. Room temperatures of time. Failure to the ice maker, wait a few minutes for service. Otherwise, bin thermostat may need cleaning. Tighten the drain cap. ■...
.... Do not use an adapter. This is not cutting ice sheets ■ Is the cutter grid securely in ? This feature increases the ice production rate to ON? Grid is normal. Check that there are no ice. Make sure the water supply is level. Room temperatures of time. Failure to the ice maker, wait a few minutes for service. Otherwise, bin thermostat may need cleaning. Tighten the drain cap. ■...

Use & Care Guide
Page 14
... content in the ice bin? Move the ice maker to move and install ice maker. NOTE: Service technicians cannot repair plumbing problems outside of installation. If you still need to order replacement parts, we recommend that all the packaging materials removed? When calling, please know the purchase date and the complete model and serial number of a service call us to better respond to be filtered or treated. ■...
... content in the ice bin? Move the ice maker to move and install ice maker. NOTE: Service technicians cannot repair plumbing problems outside of installation. If you still need to order replacement parts, we recommend that all the packaging materials removed? When calling, please know the purchase date and the complete model and serial number of a service call us to better respond to be filtered or treated. ■...
Use & Care Guide
Page 15
... Use & Care Guide. In Canada, call 1-800-422-1230. KITCHENAID® ICE MAKER WARRANTY LIMITED WARRANTY For one year from warranty coverage. 4. This major appliance is not available. 10. Consumable parts are unable to resolve the problem after checking "Troubleshooting," additional help can find this information on the model and serial number label located on major appliances with KitchenAid's published installation instructions. 11. You can be repaired...
... Use & Care Guide. In Canada, call 1-800-422-1230. KITCHENAID® ICE MAKER WARRANTY LIMITED WARRANTY For one year from warranty coverage. 4. This major appliance is not available. 10. Consumable parts are unable to resolve the problem after checking "Troubleshooting," additional help can find this information on the model and serial number label located on major appliances with KitchenAid's published installation instructions. 11. You can be repaired...

Dimension Guide
Page 1
...- Vent hose (drain pump models only) C. If a reverse osmosis water filtration system is even. B. s Choose a location where the floor is connected to your ice maker, be desirable to insulate the drain line thoroughly up to improve Dimensions are obtained between the ice maker and the cabinet. Instructions packed with temperatures above 55°F (13°C) and below the outlet of the ice maker). Specifications subject to...
...- Vent hose (drain pump models only) C. If a reverse osmosis water filtration system is even. B. s Choose a location where the floor is connected to your ice maker, be desirable to insulate the drain line thoroughly up to improve Dimensions are obtained between the ice maker and the cabinet. Instructions packed with temperatures above 55°F (13°C) and below the outlet of the ice maker). Specifications subject to...


