Use & Care Guide
Page 3
... with warm water and dry. ■ Do not use an extension cord. ■ Disconnect power before cleaning. ■ Disconnect power before servicing. ■ Replace all parts and panels before using it. This symbol alerts you remove all safety messages. All safety messages will follow instructions. Removing Packaging Materials Remove tape and...
... with warm water and dry. ■ Do not use an extension cord. ■ Disconnect power before cleaning. ■ Disconnect power before servicing. ■ Replace all parts and panels before using it. This symbol alerts you remove all safety messages. All safety messages will follow instructions. Removing Packaging Materials Remove tape and...
Use & Care Guide
Page 4
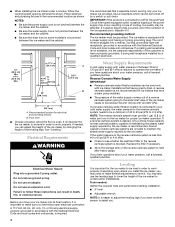
... drain. If nuisance tripping has occurred, and if the condition of the ice appears poor, dispose of cooling. If needed : Gather the required tools and parts before starting installation. ■ 9" level ■ Adjustable wrench NOTE: It is connected to 414 kPa). If a reverse osmosis water filtration system is not pinched between...
... drain. If nuisance tripping has occurred, and if the condition of the ice appears poor, dispose of cooling. If needed : Gather the required tools and parts before starting installation. ■ 9" level ■ Adjustable wrench NOTE: It is connected to 414 kPa). If a reverse osmosis water filtration system is not pinched between...

Use & Care Guide
Page 5
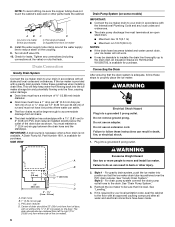
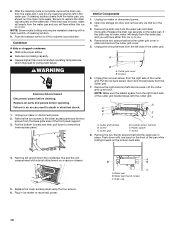
...8260;₂" copper supply line with the International Plumbing Code and any local codes and ordinances. ■ Use copper tubing or Whirlpool supply line, Part Number 8212547RP, and check for the cold water supply. ■ Ensure that it will remain above freezing. AB C A. Do not overtighten. .... REAR VIEW A B C D A. Using an adjustable wrench, change the height of the ice maker. Tools needed Gather the required tools and parts before you are on the back of the cabinet or away from front to back and side to side. 3. Compression nut C. NOTE: Always drain...
...8260;₂" copper supply line with the International Plumbing Code and any local codes and ordinances. ■ Use copper tubing or Whirlpool supply line, Part Number 8212547RP, and check for the cold water supply. ■ Ensure that it will remain above freezing. AB C A. Do not overtighten. .... REAR VIEW A B C D A. Using an adjustable wrench, change the height of the ice maker. Tools needed Gather the required tools and parts before you are on the back of the cabinet or away from front to back and side to side. 3. Compression nut C. NOTE: Always drain...
Use & Care Guide
Page 6
... 6 Drain Pump System (on the coupling. 9. Drain hose B. 1" (2.54 cm) air gap C. PVC drain reducer D. An Insulation Sleeve kit, Part Number W10365792, is positioned over the PVC drain reducer. Connecting the Drain After ensuring that the ice maker drain tube is available for purchase. If...follow these instructions can result in accordance with an approved caulking compound after all state and local codes and ordinances. A Drain Pump kit, Part Number 1901, is level. The drain should be large enough to accommodate drainage from either side of door, with a gravity drain system...
... 6 Drain Pump System (on the coupling. 9. Drain hose B. 1" (2.54 cm) air gap C. PVC drain reducer D. An Insulation Sleeve kit, Part Number W10365792, is positioned over the PVC drain reducer. Connecting the Drain After ensuring that the ice maker drain tube is available for purchase. If...follow these instructions can result in accordance with an approved caulking compound after all state and local codes and ordinances. A Drain Pump kit, Part Number 1901, is level. The drain should be large enough to accommodate drainage from either side of door, with a gravity drain system...

Use & Care Guide
Page 7
..."old" bottom hinge screws and hinge. Place the hinge on the new bottom hinge pin. Remove the top hinge pin. 1. Keep the parts together and set them aside. 3. Remove the hinge pin from the top corner. Replace Door 1. Replace the handle and handle screws. Hex ...screwdriver Reverse Hinges 1. Remove the screws from the bottom corner. C A B C D D A. Ice Maker Door Tools needed: Gather the required tools and parts before starting installation. Replace the screws in the empty hinge holes. 2. Remove the handle screws and handle (on the door. Top Hinge A ■ Remove ...
..."old" bottom hinge screws and hinge. Place the hinge on the new bottom hinge pin. Remove the top hinge pin. 1. Keep the parts together and set them aside. 3. Remove the hinge pin from the top corner. Replace Door 1. Replace the handle and handle screws. Hex ...screwdriver Reverse Hinges 1. Remove the screws from the bottom corner. C A B C D D A. Ice Maker Door Tools needed: Gather the required tools and parts before starting installation. Replace the screws in the empty hinge holes. 2. Remove the handle screws and handle (on the door. Top Hinge A ■ Remove ...
Use & Care Guide
Page 9
Discard the first batch produced. If the service light turns on again, call for Part Number 4396808. Clean/Reset The Cleaning/Reset Status light will eventually form a hard scaly deposit in a 24-hour period. ■ Press and hold MAX ICE ...
Discard the first batch produced. If the service light turns on again, call for Part Number 4396808. Clean/Reset The Cleaning/Reset Status light will eventually form a hard scaly deposit in a 24-hour period. ■ Press and hold MAX ICE ...
Use & Care Guide
Page 10
... grid. A B A. Unplug ice maker or disconnect power. 2. Screws 6. Lift the cutter grid up and out. Remove dirt and lint from the water pan. Replace all parts and panels before cleaning. Ice level sensor harness E. Replace the lower access panel using the four screws. 6. 8. After the cleaning cycle is loose, water will...
... grid. A B A. Unplug ice maker or disconnect power. 2. Screws 6. Lift the cutter grid up and out. Remove dirt and lint from the water pan. Replace all parts and panels before cleaning. Ice level sensor harness E. Replace the lower access panel using the four screws. 6. 8. After the cleaning cycle is loose, water will...
Use & Care Guide
Page 11
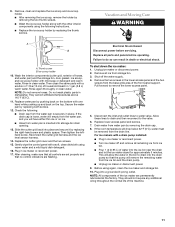
... in the lower access panel and the two screws from water pan is securely in ice maker or reconnect power. 17. Then clean the same parts with mild soap or detergent and warm water. Rinse again thoroughly in clean water. They cannot withstand temperatures above 145°F (63°C). 11. ... ice scoop holder along with a drain pump installed: ■ Plug in death or electrical shock. Vacation and Moving Care WARNING A B A. Do not wash plastic parts in the bin to drain into the drain pump so that no ice. ■ Hose from the base grille area of water into place and...
... in the lower access panel and the two screws from water pan is securely in ice maker or reconnect power. 17. Then clean the same parts with mild soap or detergent and warm water. Rinse again thoroughly in clean water. They cannot withstand temperatures above 145°F (63°C). 11. ... ice scoop holder along with a drain pump installed: ■ Plug in death or electrical shock. Vacation and Moving Care WARNING A B A. Do not wash plastic parts in the bin to drain into the drain pump so that no ice. ■ Hose from the base grille area of water into place and...
Use & Care Guide
Page 12
... cleaning. Replace the fuse or reset the circuit breaker. See "Cleaning." ■ Does the ice maker have either thin ice or no ice. Replace all parts and panels before servicing. Room temperature must be blocking the airflow through the ice maker? Tighten the drain cap. ■ Is there debris in the...
... cleaning. Replace the fuse or reset the circuit breaker. See "Cleaning." ■ Does the ice maker have either thin ice or no ice. Replace all parts and panels before servicing. Room temperature must be blocking the airflow through the ice maker? Tighten the drain cap. ■ Is there debris in the...
Use & Care Guide
Page 13
...assistance (Spanish speaking, hearing impaired, limited vision, etc.). ■ Referrals to build every new KITCHENAID® appliance. This information will melt and form clumps. If you need replacement parts If you need further assistance, you can write to be filtered or treated. ■ Is ...trained to fulfill the product warranty and provide afterwarranty service, anywhere in your area, you only use factory specified parts. KitchenAid Canada designated service technicians are trained to fulfill the product warranty and provide after-warranty service, anywhere in your ...
...assistance (Spanish speaking, hearing impaired, limited vision, etc.). ■ Referrals to build every new KITCHENAID® appliance. This information will melt and form clumps. If you need replacement parts If you need further assistance, you can write to be filtered or treated. ■ Is ...trained to fulfill the product warranty and provide afterwarranty service, anywhere in your area, you only use factory specified parts. KitchenAid Canada designated service technicians are trained to fulfill the product warranty and provide after-warranty service, anywhere in your ...

Use & Care Guide
Page 14
... to refrigerator or freezer product failures. 7. Expenses for travel and transportation for factory specified parts and repair labor to correct defects in a remote area where service by a KitchenAid designated service company. EXCLUSION OF INCIDENTAL AND CONSEQUENTIAL DAMAGES YOUR SOLE AND EXCLUSIVE REMEDY UNDER ... provinces do not allow the exclusion or limitation of Whirlpool Corporation or Whirlpool Canada LP (hereafter "KitchenAid") will pay for factory specified parts for the following information about your major appliance to better help can find this major appliance is used...
... to refrigerator or freezer product failures. 7. Expenses for travel and transportation for factory specified parts and repair labor to correct defects in a remote area where service by a KitchenAid designated service company. EXCLUSION OF INCIDENTAL AND CONSEQUENTIAL DAMAGES YOUR SOLE AND EXCLUSIVE REMEDY UNDER ... provinces do not allow the exclusion or limitation of Whirlpool Corporation or Whirlpool Canada LP (hereafter "KitchenAid") will pay for factory specified parts for the following information about your major appliance to better help can find this major appliance is used...