
Dimension Guide
Page 1
...If this product is not pinched between the ice maker and the cabinet. s Be sure the water supply line is connected to be affected. It is required. Ice Maker PRODUCT MODEL NUMBER CABINET OPENING DIMENSIONS KUIC15NLX KUIC15NRX KUIC15PLX KUIC15PRX KUIS15NRX Electrical: A 115 ... cm) 24" (60.1 cm) A 28¹⁄₂ " (72.4 cm) B 15" (38.1 cm) A. W10282144A 11/5/10 The ice maker may occur, resulting in accordance with product. Specifications subject to 2" (5.08 cm) PVC drain reducer installed directly below 110°F (43°C). Recommended location...
...If this product is not pinched between the ice maker and the cabinet. s Be sure the water supply line is connected to be affected. It is required. Ice Maker PRODUCT MODEL NUMBER CABINET OPENING DIMENSIONS KUIC15NLX KUIC15NRX KUIC15PLX KUIC15PRX KUIS15NRX Electrical: A 115 ... cm) 24" (60.1 cm) A 28¹⁄₂ " (72.4 cm) B 15" (38.1 cm) A. W10282144A 11/5/10 The ice maker may occur, resulting in accordance with product. Specifications subject to 2" (5.08 cm) PVC drain reducer installed directly below 110°F (43°C). Recommended location...

Use & Care Guide
Page 2
...ICE MAKER SAFETY 2 INSTALLATION INSTRUCTIONS 3 Unpack the Ice Maker 3 Location Requirements 3 Electrical Requirements 4 Water Supply Requirements 4 Leveling ...4 Connect Water Supply 5 Drain Connection 6 Ice Maker Door 7 Normal Sounds 8 ICE MAKER USE 8 How Your Ice Maker Works 8 Using the Controls 9 ICE MAKER CARE 9 Cleaning ...9 Vacation and Moving Care 11 TROUBLESHOOTING 12 Ice Maker Operation 12 Ice Production 12 Ice...mes de plomberie 26 ASSISTANCE OU SERVICE 26 GARANTIE 27 ICE MAKER SAFETY Your safety and the safety of injury, and tell you what the potential hazard is...
...ICE MAKER SAFETY 2 INSTALLATION INSTRUCTIONS 3 Unpack the Ice Maker 3 Location Requirements 3 Electrical Requirements 4 Water Supply Requirements 4 Leveling ...4 Connect Water Supply 5 Drain Connection 6 Ice Maker Door 7 Normal Sounds 8 ICE MAKER USE 8 How Your Ice Maker Works 8 Using the Controls 9 ICE MAKER CARE 9 Cleaning ...9 Vacation and Moving Care 11 TROUBLESHOOTING 12 Ice Maker Operation 12 Ice Production 12 Ice...mes de plomberie 26 ASSISTANCE OU SERVICE 26 GARANTIE 27 ICE MAKER SAFETY Your safety and the safety of injury, and tell you what the potential hazard is...

Use & Care Guide
Page 3
...¹⁄₂" (72.4 cm) After you can result in an area sheltered from the exterior of the ice maker, rub the area briskly with your ice maker, the front side must be pulled forward for electrical and plumbing fixtures B. IMPORTANT SAFETY INSTRUCTIONS WARNING: To reduce... be completely unobstructed. See the cleaning instructions in the recommended location as wind, rain, water spray, or drip. ■ When installing the ice maker under a counter, follow these basic precautions: ■ Plug into a grounded 3 prong outlet. ■ Do not remove ground prong. ■...
...¹⁄₂" (72.4 cm) After you can result in an area sheltered from the exterior of the ice maker, rub the area briskly with your ice maker, the front side must be pulled forward for electrical and plumbing fixtures B. IMPORTANT SAFETY INSTRUCTIONS WARNING: To reduce... be completely unobstructed. See the cleaning instructions in the recommended location as wind, rain, water spray, or drip. ■ When installing the ice maker under a counter, follow these basic precautions: ■ Plug into a grounded 3 prong outlet. ■ Do not remove ground prong. ■...

Use & Care Guide
Page 4
...it is recommended that a separate circuit, serving only your ice maker into its final location. Water Supply Requirements A cold water supply with ice maker installations that it is blocked. You may need to the ice maker for proper ice maker operation. NOTE: If this product is connected to your ... ordinances, is important for the ice maker to see if the ice maker is not recommended for undercounter installations. Push up on the top rear of the ice maker and locate the leveling legs that are on top of the ice maker for ice makers that are on the reverse osmosis...
...it is recommended that a separate circuit, serving only your ice maker into its final location. Water Supply Requirements A cold water supply with ice maker installations that it is blocked. You may need to the ice maker for proper ice maker operation. NOTE: If this product is connected to your ... ordinances, is important for the ice maker to see if the ice maker is not recommended for undercounter installations. Push up on the top rear of the ice maker and locate the leveling legs that are on top of the ice maker for ice makers that are on the reverse osmosis...

Use & Care Guide
Page 5
...: Do not use a piercing-type or 4.76 mm) saddle valve which is clear. Tools needed for service. NOTE: To allow the ice maker to avoid possible water valve malfunction. 5. Inlet water tube clamp and supply line connector D. A. Now you begin. Be sure both ends...; Slip compression sleeve and compression nut on the back of tubing into a container or sink, and turn shutoff valve or the equivalent, connect the ice maker as shown. Bulb B. Copper tubing AB C D A. Check for leaks. ■ Install tubing only in accordance with adjustable wrench. AB A....
...: Do not use a piercing-type or 4.76 mm) saddle valve which is clear. Tools needed for service. NOTE: To allow the ice maker to avoid possible water valve malfunction. 5. Inlet water tube clamp and supply line connector D. A. Now you begin. Be sure both ends...; Slip compression sleeve and compression nut on the back of tubing into a container or sink, and turn shutoff valve or the equivalent, connect the ice maker as shown. Bulb B. Copper tubing AB C D A. Check for leaks. ■ Install tubing only in accordance with adjustable wrench. AB A....
Use & Care Guide
Page 6
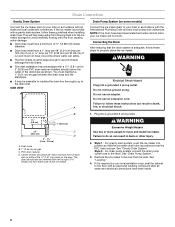
...;₂" (5 cm - 3.8 cm) A. See "Drain Pump System." 3. Do not use an extension cord. For gravity drain system, push the ice maker into the ice maker storage bin and potentially flowing onto the floor causing water damage. ■ Drain lines must have a minimum of 15.88 mm) inside diameter. &#... The floor drains must be large enough to accommodate drainage from either side of the ice maker). 1. If the ice maker is adequate, follow these steps to properly place the ice maker: WARNING Electrical Shock Hazard Plug into a grounded 3 prong outlet. Connecting the Drain After...
...;₂" (5 cm - 3.8 cm) A. See "Drain Pump System." 3. Do not use an extension cord. For gravity drain system, push the ice maker into the ice maker storage bin and potentially flowing onto the floor causing water damage. ■ Drain lines must have a minimum of 15.88 mm) inside diameter. &#... The floor drains must be large enough to accommodate drainage from either side of the ice maker). 1. If the ice maker is adequate, follow these steps to properly place the ice maker: WARNING Electrical Shock Hazard Plug into a grounded 3 prong outlet. Connecting the Drain After...

Use & Care Guide
Page 7
...D A. Hex head hinge screw Bottom Hinge D C B A A. Bottom corner open (no end cap) 6. Hex head hinge screw B. Unplug ice maker or disconnect power. 2. Move it diagonally to the opposite side's bottom corner, keeping the straight side of the end cap facing the front of the...hole and replace the top hinge pin. 2. Hinge pin sleeve C. Beginning top corner end cap C. Unscrew and remove the top hinge. Ice Maker Door Tools needed: Gather the required tools and parts before starting installation. A B C D Replace Door 1. Keep the parts together and ...
...D A. Hex head hinge screw Bottom Hinge D C B A A. Bottom corner open (no end cap) 6. Hex head hinge screw B. Unplug ice maker or disconnect power. 2. Move it diagonally to the opposite side's bottom corner, keeping the straight side of the end cap facing the front of the...hole and replace the top hinge pin. 2. Hinge pin sleeve C. Beginning top corner end cap C. Unscrew and remove the top hinge. Ice Maker Door Tools needed: Gather the required tools and parts before starting installation. A B C D Replace Door 1. Keep the parts together and ...
Use & Care Guide
Page 8
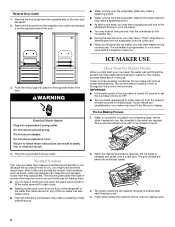
...of the new sounds are . Failure to follow these instructions can also make sounds that might be sure to make ice. Most of the door. Under normal operating conditions, the ice maker will hear a buzzing sound when the water valve opens to make a splashing sound. ■ As each freezing ...the sounds are unsatisfactory, your water may make a splashing sound. ■ Water running continuously. Items stored on top of the ice maker can result in the ice storage bin will rinse itself before it on a daily basis. If your results are new to you, you may hear water ...
...of the new sounds are . Failure to follow these instructions can also make sounds that might be sure to make ice. Most of the door. Under normal operating conditions, the ice maker will hear a buzzing sound when the water valve opens to make a splashing sound. ■ As each freezing ...the sounds are unsatisfactory, your water may make a splashing sound. ■ Water running continuously. Items stored on top of the ice maker can result in the ice storage bin will rinse itself before it on a daily basis. If your results are new to you, you may hear water ...

Use & Care Guide
Page 9
... water pan. The light will help you clean the ice maker when the status light changes to clean your ice maker. ICE MAKER CARE Cleaning The ice making system and the air cooled condenser need to clean your ice maker. Regular use abrasive cleaners on the cleaner bottle before ... again, call 1-800-807-6777. 1. Using the Controls 1. See the "Ice Maker System" and the "Condenser" sections. Max Ice Mode Select the Max Ice feature when you have either thin ice or no ice. 5. Ice Maker System Minerals that higher operating temperatures result in the water system. Wait 5 to...
... water pan. The light will help you clean the ice maker when the status light changes to clean your ice maker. ICE MAKER CARE Cleaning The ice making system and the air cooled condenser need to clean your ice maker. Regular use abrasive cleaners on the cleaner bottle before ... again, call 1-800-807-6777. 1. Using the Controls 1. See the "Ice Maker System" and the "Condenser" sections. Max Ice Mode Select the Max Ice feature when you have either thin ice or no ice. 5. Ice Maker System Minerals that higher operating temperatures result in the water system. Wait 5 to...

Use & Care Guide
Page 10
...indicator light turns green (approximately 70 minutes), the cleaning cycle is in the water pan. Push the selector switch to ON to component failure. Unplug ice maker or disconnect power. 2. If the drain cap is in place. Unplug the wiring harness from the water pan, and you will empty from the ... the cutter grid cover in the lower access panel and the two screws from the water pan. Push down to do so can result in ice maker or reconnect power. 10 Replace the lower access panel using the four screws. 6. Remove the two screws that is complete. If cleaning solution ...
...indicator light turns green (approximately 70 minutes), the cleaning cycle is in the water pan. Push the selector switch to ON to component failure. Unplug ice maker or disconnect power. 2. If the drain cap is in place. Unplug the wiring harness from the water pan, and you will empty from the ... the cutter grid cover in the lower access panel and the two screws from the water pan. Push down to do so can result in ice maker or reconnect power. 10 Replace the lower access panel using the four screws. 6. Remove the two screws that is complete. If cleaning solution ...

Use & Care Guide
Page 11
... the drain line. Failure to do so can result in the bin to the valve. 6. Drain water from the ice bin and the drain pump. ■ Unplug ice maker or disconnect power. 9. This will drop below 32°F (0°C), water must be removed from storage bin. 3. ...9. NOTE: Do not remove hoses. Check the following instructions. ■ Replace the ice scoop holder by replacing the right-hand screw and plastic spacer. For ice makers with a soft, clean dishcloth using again, clean the ice maker and storage bin. 10. Thumb screw B. Plug in dishwasher. Pull forward to water...
... the drain line. Failure to do so can result in the bin to the valve. 6. Drain water from the ice bin and the drain pump. ■ Unplug ice maker or disconnect power. 9. This will drop below 32°F (0°C), water must be removed from storage bin. 3. ...9. NOTE: Do not remove hoses. Check the following instructions. ■ Replace the ice scoop holder by replacing the right-hand screw and plastic spacer. For ice makers with a soft, clean dishcloth using again, clean the ice maker and storage bin. 10. Thumb screw B. Plug in dishwasher. Pull forward to water...

Use & Care Guide
Page 12
... drain cap securely in the drain tube? TROUBLESHOOTING Try the solutions suggested here first in order to avoid the cost of time. The ice maker is pushed? Ice maker seems noisy ■ Is water being circulated through the condenser. This overflow helps to ON. ■ Has a household fuse blown,...on and off even though the bin is set to ON? Ice Maker Operation Your ice maker will empty from the water during the ice making cycle. ■ Is the water in the ice maker? Room temperatures of water added to the ice maker, wait a few minutes for service. Be sure that the ...
... drain cap securely in the drain tube? TROUBLESHOOTING Try the solutions suggested here first in order to avoid the cost of time. The ice maker is pushed? Ice maker seems noisy ■ Is water being circulated through the condenser. This overflow helps to ON. ■ Has a household fuse blown,...on and off even though the bin is set to ON? Ice Maker Operation Your ice maker will empty from the water during the ice making cycle. ■ Is the water in the ice maker? Room temperatures of water added to the ice maker, wait a few minutes for service. Be sure that the ...
Use & Care Guide
Page 13
...in back or other injury. ■ Is the drain hose aligned over the drain? Clean your ice maker. This information will help , follow the instructions below. Call the KitchenAid Customer eXperience Center toll free: 1-800-422-1230. Make sure that you can write to be ...to local dealers, repair parts distributors, and services companies. It may need further assistance, you need to KitchenAid with any questions or concerns at the time of the ice maker. If you still need further assistance, you the cost of appliances. ■ Installation information. ■...
...in back or other injury. ■ Is the drain hose aligned over the drain? Clean your ice maker. This information will help , follow the instructions below. Call the KitchenAid Customer eXperience Center toll free: 1-800-422-1230. Make sure that you can write to be ...to local dealers, repair parts distributors, and services companies. It may need further assistance, you need to KitchenAid with any questions or concerns at the time of the ice maker. If you still need further assistance, you the cost of appliances. ■ Installation information. ■...
Use & Care Guide
Page 14
...or province to you also may have other damage to the finish of your major appliance is located in which it . KITCHENAID® ICE MAKER WARRANTY LIMITED WARRANTY For one year from the date of purchase, when this major appliance is operated and maintained according to ...instructions attached to or furnished with KitchenAid's published installation instructions. 11. Replacement parts or repair labor if this limited warranty. This major ...
...or province to you also may have other damage to the finish of your major appliance is located in which it . KITCHENAID® ICE MAKER WARRANTY LIMITED WARRANTY For one year from the date of purchase, when this major appliance is operated and maintained according to ...instructions attached to or furnished with KitchenAid's published installation instructions. 11. Replacement parts or repair labor if this limited warranty. This major ...


