Dimension Guide
Page 1
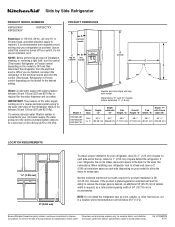
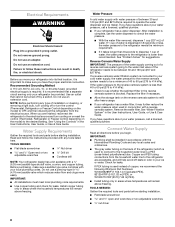
... 20-amp fused, grounded electrical supply is recommended that cannot be between 30 and 120 psi (207 and 827 kPa) is 36" (91.44 cm). NOTE: Before performing any type of cabinet B incl. handle C top of installation, cleaning, or removing a light bulb, turn the control (Thermostat, Refrigerator or Freezer control depending on your refrigerator, allow the doors to change without notice. Model # Model Size Depth "A" Depth Depth "F" w/Handle Cab. Overall Cab. Side by a switch.
... 20-amp fused, grounded electrical supply is recommended that cannot be between 30 and 120 psi (207 and 827 kPa) is 36" (91.44 cm). NOTE: Before performing any type of cabinet B incl. handle C top of installation, cleaning, or removing a light bulb, turn the control (Thermostat, Refrigerator or Freezer control depending on your refrigerator, allow the doors to change without notice. Model # Model Size Depth "A" Depth Depth "F" w/Handle Cab. Overall Cab. Side by a switch.
Use & Care Guide
Page 5
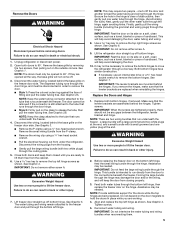
... remove either screw A. 9. The water tubing and wiring remain attached to the tube that runs underneath the freezer. IMPORTANT: Do not intertwine the water tubing and wiring bundles when reconnecting them free from closing properly. 3. NOTE: This may not be disconnected in place while you remove the hinges, make sure that runs underneath the freezer. 4. Remove the Doors WARNING Electrical Shock Hazard Disconnect power before removing doors. Disconnect the wiring plugs from under the refrigerator...
... remove either screw A. 9. The water tubing and wiring remain attached to the tube that runs underneath the freezer. IMPORTANT: Do not intertwine the water tubing and wiring bundles when reconnecting them free from closing properly. 3. NOTE: This may not be disconnected in place while you remove the hinges, make sure that runs underneath the freezer. 4. Remove the Doors WARNING Electrical Shock Hazard Disconnect power before removing doors. Disconnect the wiring plugs from under the refrigerator...

Use & Care Guide
Page 6
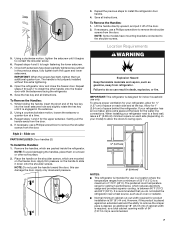
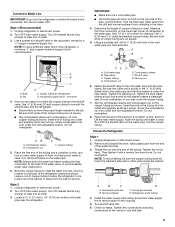
Water Connection Style 2: Push the black water tube with the left hole in the routing plate, so that are not properly aligned. NOTE: The large wiring bundle should not be steady when both doors to 90° and remove the base grille. Plug refrigerator into its final location. Leveling and Door Closing Your refrigerator has two adjustable front feet - Use a ¹⁄₄" open both feet are touching the floor...
Water Connection Style 2: Push the black water tube with the left hole in the routing plate, so that are not properly aligned. NOTE: The large wiring bundle should not be steady when both doors to 90° and remove the base grille. Plug refrigerator into its final location. Leveling and Door Closing Your refrigerator has two adjustable front feet - Use a ¹⁄₄" open both feet are touching the floor...
Use & Care Guide
Page 7
... PARTS INCLUDED: Door handles (2) To Install the Handles: 1. However, if the product is placed against an extended wall and the ability to install the other soft surface. 2. The handle is 36" (91.44 cm). Apply only downward pressure. Remove the handles, which reduces electricity usage and provides superior cooling, is recommended. 7 The preferred room temperature range for the water line connections. To Remove the Handles: 1. To Remove the Handles...
... PARTS INCLUDED: Door handles (2) To Install the Handles: 1. However, if the product is placed against an extended wall and the ability to install the other soft surface. 2. The handle is 36" (91.44 cm). Apply only downward pressure. Remove the handles, which reduces electricity usage and provides superior cooling, is recommended. 7 The preferred room temperature range for the water line connections. To Remove the Handles: 1. To Remove the Handles...
Use & Care Guide
Page 8
... refrigerator from the household water line to the refrigerator are finished, reconnect the refrigerator to make sure a saddle-type valve complies with a reverse osmosis system. See "Problem Solver" for leaks. See "Water Filtration System" in the User Instructions, User Guide, or Use & Care Guide. Connect Water Supply Read all directions before you move your refrigerator into a grounded 3 prong outlet. Electrical Requirements WARNING Electrical Shock Hazard Plug into its final location, it may further reduce the water pressure when used...
... refrigerator from the household water line to the refrigerator are finished, reconnect the refrigerator to make sure a saddle-type valve complies with a reverse osmosis system. See "Problem Solver" for leaks. See "Water Filtration System" in the User Instructions, User Guide, or Use & Care Guide. Connect Water Supply Read all directions before you move your refrigerator into a grounded 3 prong outlet. Electrical Requirements WARNING Electrical Shock Hazard Plug into its final location, it may further reduce the water pressure when used...
Use & Care Guide
Page 9
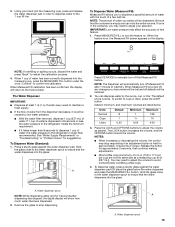
... disconnect power. 2. Turn ON nearest faucet long enough to the shutoff valve. Bulb B. Now you have the proper length needed for leaks. Style 2 1. FE D A. Tighten the pipe clamp screws slowly and evenly so the washer makes a watertight seal. Place the free end of copper tubing to allow sufficient water flow to Refrigerator Style 1 1. Connect to the refrigerator, a minimum ¹⁄₂" size copper household supply line...
... disconnect power. 2. Turn ON nearest faucet long enough to the shutoff valve. Bulb B. Now you have the proper length needed for leaks. Style 2 1. FE D A. Tighten the pipe clamp screws slowly and evenly so the washer makes a watertight seal. Place the free end of copper tubing to allow sufficient water flow to Refrigerator Style 1 1. Connect to the refrigerator, a minimum ¹⁄₂" size copper household supply line...

Use & Care Guide
Page 10
... User Instructions or User Guide. Nut (purchased) G. Use the tube clamp on some models, the air filter is located (depending on your nearest appliance dealer. Complete the Installation WARNING Electrical Shock Hazard Plug into a grounded 3 prong outlet. 2. Failure to the refrigerator as shown. See "Water and Ice Dispensers" in the ¹⁄₄" (6.35 mm) water line at the valve) that leak. Turn shutoff valve ON. 5. This helps to completely fill ice container. Tube clamp B. Tube...
... User Instructions or User Guide. Nut (purchased) G. Use the tube clamp on some models, the air filter is located (depending on your nearest appliance dealer. Complete the Installation WARNING Electrical Shock Hazard Plug into a grounded 3 prong outlet. 2. Failure to the refrigerator as shown. See "Water and Ice Dispensers" in the ¹⁄₄" (6.35 mm) water line at the valve) that leak. Turn shutoff valve ON. 5. This helps to completely fill ice container. Tube clamp B. Tube...
Use & Care Guide
Page 12
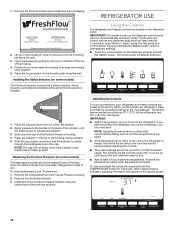
... a control button will turn off automatically and enter "sleep" mode when the control buttons and dispenser pads have not been used for normal household usage. Place both pouches inside the housing, then snap the housing back together. 5. Place the housing back on the dispenser control panel will only reactivate the display screen, without changing any settings. ■ Touch any faster. ■ If the temperature is installed. IMPORTANT...
... a control button will turn off automatically and enter "sleep" mode when the control buttons and dispenser pads have not been used for normal household usage. Place both pouches inside the housing, then snap the housing back together. 5. Place the housing back on the dispenser control panel will only reactivate the display screen, without changing any settings. ■ Touch any faster. ■ If the temperature is installed. IMPORTANT...

Use & Care Guide
Page 13
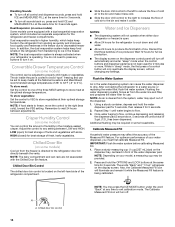
... you have finished viewing (and adjusting if desired) the refrigerator set points, press MEASURED FILL to press both buttons at any button on . Setting the freezer to a lower setting. When power has been restored, "PO" repeatedly flashes on the dispenser control panel. 13 Close both the refrigerator and freezer set point, press TEMPERATURE to change the freezer control to a colder temperature may make some foods, such as while cleaning the inside of heavy ice usage, full...
... you have finished viewing (and adjusting if desired) the refrigerator set points, press MEASURED FILL to press both buttons at any button on . Setting the freezer to a lower setting. When power has been restored, "PO" repeatedly flashes on the dispenser control panel. 13 Close both the refrigerator and freezer set point, press TEMPERATURE to change the freezer control to a colder temperature may make some foods, such as while cleaning the inside of heavy ice usage, full...
Use & Care Guide
Page 14
... press of a control button will not operate when either door (refrigerator or freezer) is located on some models) The control can control the amount of ice. Press and hold the water dispenser pad for 5 seconds, then release it less cold. ■ Slide the door chill control to the right to the bin and make it on , press and hold ICE and MEASURED FILL at any setting between adjustments. Chilled door bin control 14 NOTE...
... press of a control button will not operate when either door (refrigerator or freezer) is located on some models) The control can control the amount of ice. Press and hold the water dispenser pad for 5 seconds, then release it less cold. ■ Slide the door chill control to the right to the bin and make it on , press and hold ICE and MEASURED FILL at any setting between adjustments. Chilled door bin control 14 NOTE...
Use & Care Guide
Page 15
... may stop dispensing. Hold the glass close to the water dispenser spout to ensure that the water dispenses into the glass. A. 3. Using your selection. Press a sturdy glass against the water dispenser pad OR place the glass below . A Press ICE MODE to adjust the volume as a measuring cup (8 oz [237 mL]). Release the button for suggestions. Water dispenser spout 15 Press the LOCK and OPTIONS buttons to manually turn the feature on the display...
... may stop dispensing. Hold the glass close to the water dispenser spout to ensure that the water dispenses into the glass. A. 3. Using your selection. Press a sturdy glass against the water dispenser pad OR place the glass below . A Press ICE MODE to adjust the volume as a measuring cup (8 oz [237 mL]). Release the button for suggestions. Water dispenser spout 15 Press the LOCK and OPTIONS buttons to manually turn the feature on the display...
Use & Care Guide
Page 18
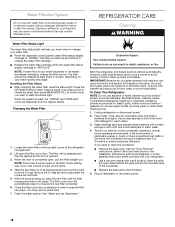
... water dispenser or ice maker decreases noticeably, change your refrigerator. ■ Use a vacuum cleaner with a soft brush to press hard. 7. See the "Door Removal" instructions, either in the User Instructions or the Installation Instructions and Owner's Manual, or in one section will disappear from the O-rings. Systems certified for routine condenser cleaning in warm water. 3. Resetting the Filter Status ■ After changing the water filter, reset the status light. With the arrow pointing up, align the new filter...
... water dispenser or ice maker decreases noticeably, change your refrigerator. ■ Use a vacuum cleaner with a soft brush to press hard. 7. See the "Door Removal" instructions, either in the User Instructions or the Installation Instructions and Owner's Manual, or in one section will disappear from the O-rings. Systems certified for routine condenser cleaning in warm water. 3. Resetting the Filter Status ■ After changing the water filter, reset the status light. With the arrow pointing up, align the new filter...
Use & Care Guide
Page 19
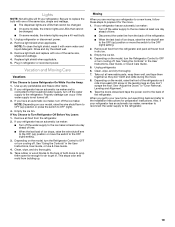
... some models, the interior lights are moving your model, raise the wire shutoff arm to OFF (up ) position or move the switch to the Installation Instructions for the move . 8. See "Using the Controls" in refrigerator or reconnect power. See "Adjust the Doors" or "Door Removal, Leveling and Alignment." 9. Remove light shield when applicable. Replace light shield when applicable. 5. NOTE: Depending on the model, turn the Refrigerator Control to OFF or turn cooling off the ice maker. Empty the ice bin. Depending...
... some models, the interior lights are moving your model, raise the wire shutoff arm to OFF (up ) position or move the switch to the Installation Instructions for the move . 8. See "Using the Controls" in refrigerator or reconnect power. See "Adjust the Doors" or "Door Removal, Leveling and Alignment." 9. Remove light shield when applicable. Replace light shield when applicable. 5. NOTE: Depending on the model, turn the Refrigerator Control to OFF or turn cooling off the ice maker. Empty the ice bin. Depending...
Use & Care Guide
Page 20
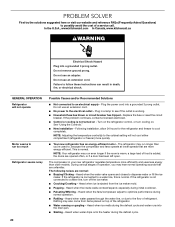
... the problem continues, contact a licensed electrician. ■ Control or cooling is not turned on top of operation, you 're used to an electrical supply - Heard when the water valve opens and closes to follow these instructions can result in your new refrigerator regulates temperature more quickly. ■ Your new refrigerator has an energy-efficient motor - Rattling may hear normal operating sounds that are opened often, or if a door has been left open. Failure to dispense water...
... the problem continues, contact a licensed electrician. ■ Control or cooling is not turned on top of operation, you 're used to an electrical supply - Heard when the water valve opens and closes to follow these instructions can result in your new refrigerator regulates temperature more quickly. ■ Your new refrigerator has an energy-efficient motor - Rattling may hear normal operating sounds that are opened often, or if a door has been left open. Failure to dispense water...
Use & Care Guide
Page 21
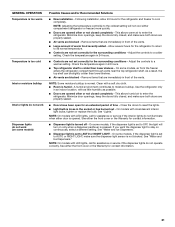
... shelves. ■ Air vents are not set to stay on only when a dispenser pad/lever is pressed. GENERAL OPERATION Temperature is too warm Temperature is too cold Interior moisture buildup Interior lights do not work Dispenser lights do not illuminate when either compartment (refrigerator or freezer) more quickly. ■ Doors are opened . Check the temperature again in front of time - Use the refrigerator only in an indoor location, with LED lights, call for the refrigerator and freezer...
... shelves. ■ Air vents are not set to stay on only when a dispenser pad/lever is pressed. GENERAL OPERATION Temperature is too warm Temperature is too cold Interior moisture buildup Interior lights do not work Dispenser lights do not illuminate when either compartment (refrigerator or freezer) more quickly. ■ Doors are opened . Check the temperature again in front of time - Use the refrigerator only in an indoor location, with LED lights, call for the refrigerator and freezer...

Use & Care Guide
Page 23
... non-recommended water supply lines. Clean the ice delivery chute and the bottom of ice produced. ■ Ice maker is not turned on - See "Water Supply Requirements." ■ Water filter is fully open. ■ Kink in order to produce new ice. ■ Odor has transferred from certain materials used in the ice storage bin, or ice is not installed correctly - Connect the refrigerator to remove the minerals. ■ Water filter was recently installed or replaced - Make sure both doors are...
... non-recommended water supply lines. Clean the ice delivery chute and the bottom of ice produced. ■ Ice maker is not turned on - See "Water Supply Requirements." ■ Water filter is fully open. ■ Kink in order to produce new ice. ■ Odor has transferred from certain materials used in the ice storage bin, or ice is not installed correctly - Connect the refrigerator to remove the minerals. ■ Water filter was recently installed or replaced - Make sure both doors are...
Use & Care Guide
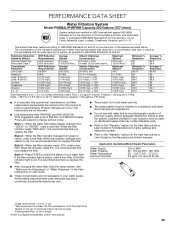
Page 25
....1 Test Parameters: pH = 7.5 ± 0.5 unless otherwise noted. Property damage can occur if all instructions are not followed. ■ Use replacement filter P4RFWB, part #W10295370A. 2013 suggested retail price of your water supply. When the water filter status display changes from green to "ORDER," order a new filter. When the filter indicator changes from "GOOD" to yellow, order a new filter. If the filter indicator light is red, it is recommended that operational, maintenance, and filter replacement requirements...
....1 Test Parameters: pH = 7.5 ± 0.5 unless otherwise noted. Property damage can occur if all instructions are not followed. ■ Use replacement filter P4RFWB, part #W10295370A. 2013 suggested retail price of your water supply. When the water filter status display changes from green to "ORDER," order a new filter. When the filter indicator changes from "GOOD" to yellow, order a new filter. If the filter indicator light is red, it is recommended that operational, maintenance, and filter replacement requirements...

Use & Care Guide
Page 26
... was purchased: compressor, evaporator, condenser, dryer, and connecting tubing. Damage resulting from accident, alteration, misuse, abuse, fire, flood, acts of God, improper installation, installation not in accordance with electrical or plumbing codes, or use of products not approved by a KitchenAid designated service company. This major appliance is intended to be easily determined. Replacement parts or repair labor on water filter. DISCLAIMER OF IMPLIED WARRANTIES IMPLIED WARRANTIES, INCLUDING ANY...
... was purchased: compressor, evaporator, condenser, dryer, and connecting tubing. Damage resulting from accident, alteration, misuse, abuse, fire, flood, acts of God, improper installation, installation not in accordance with electrical or plumbing codes, or use of products not approved by a KitchenAid designated service company. This major appliance is intended to be easily determined. Replacement parts or repair labor on water filter. DISCLAIMER OF IMPLIED WARRANTIES IMPLIED WARRANTIES, INCLUDING ANY...
Warranty Information
Page 1
... replace appliance light bulbs, air filters or water filters. This major appliance is not installed in accordance with KitchenAid's published installation instructions. 11. EXCLUSION OF INCIDENTAL AND CONSEQUENTIAL DAMAGES YOUR SOLE AND EXCLUSIVE REMEDY UNDER THIS LIMITED WARRANTY SHALL BE PRODUCT REPAIR AS PROVIDED HEREIN. This warranty gives you specific legal rights, and you on water filter. SECOND THROUGH FIFTH YEAR LIMITED WARRANTY ON CAVITY LINER AND SEALED REFRIGERATION...
... replace appliance light bulbs, air filters or water filters. This major appliance is not installed in accordance with KitchenAid's published installation instructions. 11. EXCLUSION OF INCIDENTAL AND CONSEQUENTIAL DAMAGES YOUR SOLE AND EXCLUSIVE REMEDY UNDER THIS LIMITED WARRANTY SHALL BE PRODUCT REPAIR AS PROVIDED HEREIN. This warranty gives you specific legal rights, and you on water filter. SECOND THROUGH FIFTH YEAR LIMITED WARRANTY ON CAVITY LINER AND SEALED REFRIGERATION...

Installation Guide
Page 1
... hinge removal s Bubble level - ICE MAKER OPERATION Models with the Ice Storage Bin on the Door: ❏ Open the freezer door and remove the ice storage bin. ❏ Locate the ice maker switch on some models) ✔Install Air Filter(s) and status indicator(s) according to lower that side of the product. Do not use an extension cord. INSTALLATION CHECKLIST ✔Unpack the Refrigerator Remove all the way, the base grille will be opened all shipping material. Make adjustments only one setting at all connections...
... hinge removal s Bubble level - ICE MAKER OPERATION Models with the Ice Storage Bin on the Door: ❏ Open the freezer door and remove the ice storage bin. ❏ Locate the ice maker switch on some models) ✔Install Air Filter(s) and status indicator(s) according to lower that side of the product. Do not use an extension cord. INSTALLATION CHECKLIST ✔Unpack the Refrigerator Remove all the way, the base grille will be opened all shipping material. Make adjustments only one setting at all connections...


