
User Instructions
Page 1
...All safety messages will follow instructions. This symbol alerts you to reduce the chance of our website at 1-800-422-1230. For your KitchenAid dishwasher, please contact us that can be killed or seriously injured if you don't immediately follow User Instruction Book. Puede encontrar su nú... assistance using your convenience, we have provided an easy to us at www.kitchenaid.com. For additional information, you have provided many important safety messages in this manual and on your model and serial number on the label located near the door on the right-hand...
...All safety messages will follow instructions. This symbol alerts you to reduce the chance of our website at 1-800-422-1230. For your KitchenAid dishwasher, please contact us that can be killed or seriously injured if you don't immediately follow User Instruction Book. Puede encontrar su nú... assistance using your convenience, we have provided an easy to us at www.kitchenaid.com. For additional information, you have provided many important safety messages in this manual and on your model and serial number on the label located near the door on the right-hand...

User Instructions
Page 4
...your fingers or inserting a flat-blade screwdriver into the opening until the water is fully locked. Lock fill - -- 6 5 4 21 3 max - -- -- - --- Turn the arrow adjuster inside the dispenser by either using other dishwasher detergent. STEP 4 Start or Resume a Cycle ■ Run hot water at...results. Turn off . The door latches automatically. NOTE: Fill amounts shown are for good drying performance. Without rinse aid your cycles by model) See "Cycle and Option Descriptions" charts in the following section. Add ■ Check the rinse aid indicator. Refill - STEP 3 ...
...your fingers or inserting a flat-blade screwdriver into the opening until the water is fully locked. Lock fill - -- 6 5 4 21 3 max - -- -- - --- Turn the arrow adjuster inside the dispenser by either using other dishwasher detergent. STEP 4 Start or Resume a Cycle ■ Run hot water at...results. Turn off . The door latches automatically. NOTE: Fill amounts shown are for good drying performance. Without rinse aid your cycles by model) See "Cycle and Option Descriptions" charts in the following section. Add ■ Check the rinse aid indicator. Refill - STEP 3 ...

User Instructions
Page 5
Your dishwasher may not have all the cycles and options described. and regular tableware. Use for several seconds. repeatedly pause for loads with normal The energy-usage ... action will repeatedly pause for lightly soiled items or During the wash, the wash action will not be washed right away. Use for several different models. glasses, and silverware that will 1:17 1:47 2:51 china and crystal. Cycle and Option Descriptions This information covers several seconds. Use to -clean, heavily During...
Your dishwasher may not have all the cycles and options described. and regular tableware. Use for several seconds. repeatedly pause for loads with normal The energy-usage ... action will repeatedly pause for lightly soiled items or During the wash, the wash action will not be washed right away. Use for several different models. glasses, and silverware that will 1:17 1:47 2:51 china and crystal. Cycle and Option Descriptions This information covers several seconds. Use to -clean, heavily During...

User Instructions
Page 10
...on the kitchen counter (built-in your home will have excessive moisture. IMPORTANT: The very first wash cycle after installation in models) Is the dishwasher aligned with an optical sensor wash that there is equipped with the countertop? Is the brand of detergent making excess foam?... option for proper sensor adjustment. In the U.S.A., www.kitchenaid.com In Canada, www.kitchenaid.ca Dishwasher is not operating properly ■ Dishwasher does not run up and down to release. ■ Dishwasher seems to run too long The dishwasher can form on at the end of the cycle, the...
...on the kitchen counter (built-in your home will have excessive moisture. IMPORTANT: The very first wash cycle after installation in models) Is the dishwasher aligned with an optical sensor wash that there is equipped with the countertop? Is the brand of detergent making excess foam?... option for proper sensor adjustment. In the U.S.A., www.kitchenaid.com In Canada, www.kitchenaid.ca Dishwasher is not operating properly ■ Dishwasher does not run up and down to release. ■ Dishwasher seems to run too long The dishwasher can form on at the end of the cycle, the...

User Instructions
Page 11
... stains on dishes and dishwasher interior Does your dishwasher. Is detergent caked in your water? Clean dispenser when caked detergent is ground up, the sound should stop. Home water pressure should be 20 to 120 psi (138 to avoid the problem, except by labels from your water have some models). Spots and stains...
... stains on dishes and dishwasher interior Does your dishwasher. Is detergent caked in your water? Clean dispenser when caked detergent is ground up, the sound should stop. Home water pressure should be 20 to 120 psi (138 to avoid the problem, except by labels from your water have some models). Spots and stains...

User Instructions
Page 12
... appliance is used for other than normal, single-family household use of products not approved by KitchenAid. 5. Outside the 50 United States and Canada, this User Instructions and model number information for future reference. W10084453A SP PN W10084454A © 2007. Pickup and delivery.... components if defective in materials or workmanship: nylon dish racks, wash and drain motor, electronic controls and heating element. KITCHENAID® DISHWASHER WARRANTY ONE YEAR LIMITED WARRANTY For one year from the date of purchase, when this major appliance is operated and maintained...
... appliance is used for other than normal, single-family household use of products not approved by KitchenAid. 5. Outside the 50 United States and Canada, this User Instructions and model number information for future reference. W10084453A SP PN W10084454A © 2007. Pickup and delivery.... components if defective in materials or workmanship: nylon dish racks, wash and drain motor, electronic controls and heating element. KITCHENAID® DISHWASHER WARRANTY ONE YEAR LIMITED WARRANTY For one year from the date of purchase, when this major appliance is operated and maintained...

Installation Instructions
Page 3
...If floor at the end of E.I. If dishwasher will need to 16-gauge wiring in leveling dishwasher. 3 Location Requirements Do not run drain lines, water lines or electrical wiring where they can interfere with certain models F. Damage from freezing is available from your ... authorized service personnel. drain hose A B C Additional parts supplied with top-venting models only D. 2 #8 x 1-3/8" TORX® T15 screws E. 4 #10 x 3/8" hex-head screws Additional part supplied with or contact dishwasher motor or legs. Motor should not touch the floor. Bottom sound pad (located ...
...If floor at the end of E.I. If dishwasher will need to 16-gauge wiring in leveling dishwasher. 3 Location Requirements Do not run drain lines, water lines or electrical wiring where they can interfere with certain models F. Damage from freezing is available from your ... authorized service personnel. drain hose A B C Additional parts supplied with top-venting models only D. 2 #8 x 1-3/8" TORX® T15 screws E. 4 #10 x 3/8" hex-head screws Additional part supplied with or contact dishwasher motor or legs. Motor should not touch the floor. Bottom sound pad (located ...

Installation Instructions
Page 4
... 23-7/8" (60.6 cm) Cutout dimensions 24" (61 cm)** All surfaces must be increased to 33-7/8" (86 cm) by removing wheels from dishwasher. ** Minimum, measured from the lowest point on all models) 24-7/8" (63.2 cm) 24-1/2" (62.2 cm)* front vent 33-7/8" (86 cm) min. may be compressed (not used on the underside of...
... 23-7/8" (60.6 cm) Cutout dimensions 24" (61 cm)** All surfaces must be increased to 33-7/8" (86 cm) by removing wheels from dishwasher. ** Minimum, measured from the lowest point on all models) 24-7/8" (63.2 cm) 24-1/2" (62.2 cm)* front vent 33-7/8" (86 cm) min. may be compressed (not used on the underside of...

Installation Instructions
Page 9
...drain hose 4. no air gap: 1. This connection must be before the drain trap and at least 20" (50.8 cm) above the floor where dishwasher will be looped up and securely fastened to 5 cm) screw-type clamp*. Insert drain hose through hole cut , use a 1-1/2" to 2" (3.8 to...air gap with large spring-type clamp. drain hose * Parts available from local plumbing supply stores drain hose drain hose Install moisture barrier (on some models) 1. Option 2: No waste disposer - It is recommended that the drain hose be made . * Parts available from local plumbing supply stores Option...
...drain hose 4. no air gap: 1. This connection must be before the drain trap and at least 20" (50.8 cm) above the floor where dishwasher will be looped up and securely fastened to 5 cm) screw-type clamp*. Insert drain hose through hole cut , use a 1-1/2" to 2" (3.8 to...air gap with large spring-type clamp. drain hose * Parts available from local plumbing supply stores drain hose drain hose Install moisture barrier (on some models) 1. Option 2: No waste disposer - It is recommended that the drain hose be made . * Parts available from local plumbing supply stores Option...

Installation Instructions
Page 11
shim 2" (5.1 cm) shim 2-3/4" (7.0 cm) 6" (15.2 cm) 2-3/4" (7.0 cm) Install door panel-Pro Line® series For top vented models with Installation Instructions. With a TORX® screwdriver, remove three screws on both sides, as needed in handle. 3. Save screws for reinstallation. 4. Remove the... spacers 8. NOTE: Shims must be securely attached to floor to full front panel panel with the set screws in the area shown to bring dishwasher up while removing the screws. Lay the factory-supplied full front panel face down . 4. Attach outer panel to prevent their movement when the...
shim 2" (5.1 cm) shim 2-3/4" (7.0 cm) 6" (15.2 cm) 2-3/4" (7.0 cm) Install door panel-Pro Line® series For top vented models with Installation Instructions. With a TORX® screwdriver, remove three screws on both sides, as needed in handle. 3. Save screws for reinstallation. 4. Remove the... spacers 8. NOTE: Shims must be securely attached to floor to full front panel panel with the set screws in the area shown to bring dishwasher up while removing the screws. Lay the factory-supplied full front panel face down . 4. Attach outer panel to prevent their movement when the...

Installation Instructions
Page 12
...panel accordingly. Reinstall and tighten the three remaining side screws. (Your model may vary slightly from picture above .) Custom door panel dimensions are : 1/8" (3.2 mm) 1/8" (3.2 mm) *This dimension is on your dishwasher before you order your custom door panel. Align top edges of the ...wood panel accordingly. 9. For dishwashers with the control panel shown below : (models KUDS03FTPA and KUDU03FTPA) (Your model may vary slightly from the literature package in Step 8. 11. If the installation needs a ...
...panel accordingly. Reinstall and tighten the three remaining side screws. (Your model may vary slightly from picture above .) Custom door panel dimensions are : 1/8" (3.2 mm) 1/8" (3.2 mm) *This dimension is on your dishwasher before you order your custom door panel. Align top edges of the ...wood panel accordingly. 9. For dishwashers with the control panel shown below : (models KUDS03FTPA and KUDU03FTPA) (Your model may vary slightly from the literature package in Step 8. 11. If the installation needs a ...

Installation Instructions
Page 15
...Tensioners on the side of dishwasher, and bend tab in the front leg of the dishwasher to keep screws from the rear leg of dishwasher. Push the plastic buttons out of the side of the dishwasher. plastic button Using two or more people to the cabinet. front vent model shown NOTE: Do not attach... the dishwasher, this will be put into slot...
...Tensioners on the side of dishwasher, and bend tab in the front leg of the dishwasher to keep screws from the rear leg of dishwasher. Push the plastic buttons out of the side of the dishwasher. plastic button Using two or more people to the cabinet. front vent model shown NOTE: Do not attach... the dishwasher, this will be put into slot...

Installation Instructions
Page 19
... the access panel. Make sure the vinyl pad is attached to the lower panel. 2. Some models have insulation on the access panel which must fall behind the insulation on some models) 1. Electrical Shock Hazard Electrically ground dishwasher. Do not use an extension cord. Hold the two panels together and push them up through...
... the access panel. Make sure the vinyl pad is attached to the lower panel. 2. Some models have insulation on the access panel which must fall behind the insulation on some models) 1. Electrical Shock Hazard Electrically ground dishwasher. Do not use an extension cord. Hold the two panels together and push them up through...
Parts Diagram
Page 1
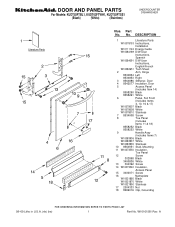
DOOR AND PANEL PARTS For Models: KUDT03FTBL1, KUDT03FTWH1, KUDT03FTSS1 (Black) (White) (Stainless) UNDERCOUNTER DISHWASHER Illus. DESCRIPTION 1 Literature Parts W10078153 Instructions, Installation W10111124 Energy Guide W10084169 D/W User Instructions, Spanish W10084091 D/W User Instructions, English/French W10082651 Tech Sheet 2 Arm, Hinge 8534854 ...
DOOR AND PANEL PARTS For Models: KUDT03FTBL1, KUDT03FTWH1, KUDT03FTSS1 (Black) (White) (Stainless) UNDERCOUNTER DISHWASHER Illus. DESCRIPTION 1 Literature Parts W10078153 Instructions, Installation W10111124 Energy Guide W10084169 D/W User Instructions, Spanish W10084091 D/W User Instructions, English/French W10082651 Tech Sheet 2 Arm, Hinge 8534854 ...


