
User Manual
Page 1
... problems you and others are not followed. This symbol alerts you to potential hazards that you need further assistance using your KitchenAid dishwasher, please contact us at www.kitchenaid.com. All safety messages will tell you what can find your model and serial number on the label located near the door on your complete...
... problems you and others are not followed. This symbol alerts you to potential hazards that you need further assistance using your KitchenAid dishwasher, please contact us at www.kitchenaid.com. All safety messages will tell you what can find your model and serial number on the label located near the door on your complete...

User Manual
Page 4
.... Heavier cycles and options affect cycle length. Select Options (options vary by model) See "Cycle and Option Descriptions" charts in the following section. You can customize your dishes and dishwasher interior will have all the cycles and options described. The door latches automatically....to drain off the option, or select a different option. repeatedly pause for several different models. Do not use rinse aid for good drying performance. Add Rinse Aid ■ Your dishwasher is fully locked. NOTE: For most water conditions, the factory setting of 2 will 1:17 1:47...
.... Heavier cycles and options affect cycle length. Select Options (options vary by model) See "Cycle and Option Descriptions" charts in the following section. You can customize your dishes and dishwasher interior will have all the cycles and options described. The door latches automatically....to drain off the option, or select a different option. repeatedly pause for several different models. Do not use rinse aid for good drying performance. Add Rinse Aid ■ Your dishwasher is fully locked. NOTE: For most water conditions, the factory setting of 2 will 1:17 1:47...

User Manual
Page 8
... per month. A water heater setting of white vinegar in an upright glass measuring cup in models) Is the dishwasher aligned with the Heated Dry option turned off. If foam or suds are difficult to dry because they have a porous surface which tend to collect ... the cost of tub Check for dishware such as cookie sheets, cutting boards, or large containers, etc. In the U.S.A., www.kitchenaid.com In Canada, www.kitchenaid.ca Dishwasher is not operating properly ■ Dishwasher does not run , you have tripped. Be sure the door is ready to run for up to 3 hours. Towel drying...
... per month. A water heater setting of white vinegar in an upright glass measuring cup in models) Is the dishwasher aligned with the Heated Dry option turned off. If foam or suds are difficult to dry because they have a porous surface which tend to collect ... the cost of tub Check for dishware such as cookie sheets, cutting boards, or large containers, etc. In the U.S.A., www.kitchenaid.com In Canada, www.kitchenaid.ca Dishwasher is not operating properly ■ Dishwasher does not run , you have tripped. Be sure the door is ready to run for up to 3 hours. Towel drying...

User Manual
Page 10
... INCIDENTAL AND CONSEQUENTIAL DAMAGES YOUR SOLE AND EXCLUSIVE REMEDY UNDER THIS LIMITED WARRANTY SHALL BE PRODUCT REPAIR AS PROVIDED HEREIN. KITCHENAID® DISHWASHER WARRANTY LIMITED WARRANTY For one year from the date of purchase, when this major appliance is operated and maintained according... major appliance was purchased. Consumable parts are excluded from unauthorized modifications made to obtain service under this User Instructions and model number information for other damage to the finish of incidental or consequential damages, so these limitations and exclusion may have ...
... INCIDENTAL AND CONSEQUENTIAL DAMAGES YOUR SOLE AND EXCLUSIVE REMEDY UNDER THIS LIMITED WARRANTY SHALL BE PRODUCT REPAIR AS PROVIDED HEREIN. KITCHENAID® DISHWASHER WARRANTY LIMITED WARRANTY For one year from the date of purchase, when this major appliance is operated and maintained according... major appliance was purchased. Consumable parts are excluded from unauthorized modifications made to obtain service under this User Instructions and model number information for other damage to the finish of incidental or consequential damages, so these limitations and exclusion may have ...

Installation Instructions
Page 2
... 7 Prepare Cabinet Opening-New Utilities 7 Prepare and Route Water Line 8 Install Drain Hose 9 Install Moisture Barrier (on some models 10 Prepare Dishwasher 11 Make Power Supply Cord Connection 12 Determine Cabinet Opening 13 Installation Instructions (cont.) Install the Door Handle (on your appliance.... the word "DANGER" or "WARNING." WARNING Tip Over Hazard Do not use dishwasher until latched. • Observe all governing codes and ordinances. • Install this manual and on some models 14 Custom Panel Dimensions 14 Install Custom Panel - Option 1 15 Install Custom...
... 7 Prepare Cabinet Opening-New Utilities 7 Prepare and Route Water Line 8 Install Drain Hose 9 Install Moisture Barrier (on some models 10 Prepare Dishwasher 11 Make Power Supply Cord Connection 12 Determine Cabinet Opening 13 Installation Instructions (cont.) Install the Door Handle (on your appliance.... the word "DANGER" or "WARNING." WARNING Tip Over Hazard Do not use dishwasher until latched. • Observe all governing codes and ordinances. • Install this manual and on some models 14 Custom Panel Dimensions 14 Install Custom Panel - Option 1 15 Install Custom...

Installation Instructions
Page 3
... connections be the proper size to fit 7/8" (2.2 cm) hole For Power Supply Cord: use with dishwasher Additional parts supplied with 1/2", 3/4" and 1 1/2" hole saw bits Small tubing cutter Wire stripper Parts needed : Electric drill with top-venting models only: 2 #8x1-3/8" Torx® T15 screws 4 #10x3/8" hex-head screws Parts supplied: 2 - Check local codes...
... connections be the proper size to fit 7/8" (2.2 cm) hole For Power Supply Cord: use with dishwasher Additional parts supplied with 1/2", 3/4" and 1 1/2" hole saw bits Small tubing cutter Wire stripper Parts needed : Electric drill with top-venting models only: 2 #8x1-3/8" Torx® T15 screws 4 #10x3/8" hex-head screws Parts supplied: 2 - Check local codes...

Installation Instructions
Page 5
... Dimensions ((26264342..2271//cc82mm"")) (2630.67/c8m" ) w(8ri36teh3mcmw7o/hv)8eem"edilns. (1.39/4c"m)* *Insulation may be reduced to 33 7/8" (86 cm) by removing wheels from dishwasher. **Minimum, measured from the lowest point on all models) (532.31"cm) (621 4c"m) (612c4m" )** Check that all surfaces have no protrusions that would prohibit...
... Dimensions ((26264342..2271//cc82mm"")) (2630.67/c8m" ) w(8ri36teh3mcmw7o/hv)8eem"edilns. (1.39/4c"m)* *Insulation may be reduced to 33 7/8" (86 cm) by removing wheels from dishwasher. **Minimum, measured from the lowest point on all models) (532.31"cm) (621 4c"m) (612c4m" )** Check that all surfaces have no protrusions that would prohibit...

Installation Instructions
Page 10
... clamps Disposer inlet Air gap Large silver drain hhoossee ccllaammpp (provided) Rubber hose connector Drain hose Drain trap 1 1. Install Moisture Barrier (on some models) Install moisture barrier (on some models) Moisture barrier 1. Connect black end of of the moisture barrier. 2. Option C, Waste disposer - Use pliers to squeeze clamp open and move into...
... clamps Disposer inlet Air gap Large silver drain hhoossee ccllaammpp (provided) Rubber hose connector Drain hose Drain trap 1 1. Install Moisture Barrier (on some models) Install moisture barrier (on some models) Moisture barrier 1. Connect black end of of the moisture barrier. 2. Option C, Waste disposer - Use pliers to squeeze clamp open and move into...

Installation Instructions
Page 14
...directions under Option 1 of "Install custom panel" section. 14 Place handle on some models) Install door handle Mounting stud Handle Setscrew (in use. Retain Allen wrench with the setscrews facing down. Dishwashers with control panel on top custom panel dimensions 23 1/2" (59.7 cm) *30...cm) 3/4" (19.1 mm) 1/8" (3.2 mm) 1/8" (3.2 mm) * This dimension is in bottom of the wood panel accordingly. Dishwashers with control panel on your dishwasher before you order your custom door panel. Not recommended for 4" (10.2 cm) toe kick. Remove the door handle and hardware bag ...
...directions under Option 1 of "Install custom panel" section. 14 Place handle on some models) Install door handle Mounting stud Handle Setscrew (in use. Retain Allen wrench with the setscrews facing down. Dishwashers with control panel on top custom panel dimensions 23 1/2" (59.7 cm) *30...cm) 3/4" (19.1 mm) 1/8" (3.2 mm) 1/8" (3.2 mm) * This dimension is in bottom of the wood panel accordingly. Dishwashers with control panel on your dishwasher before you order your custom door panel. Not recommended for 4" (10.2 cm) toe kick. Remove the door handle and hardware bag ...

Installation Instructions
Page 15
... kg) and must be made to the front of the customer-supplied custom panel as shown; align holes. 15 Install Custom Panel - Dishwashers with the panel. With a TORX® screwdriver, remove three screws from humidity. 1 Custom panel installation - hold the outer panel up...and all four hole locations; Option 1 (Models KUDS40FVPA, KUDS50FVPA, KUDE60FVPA, and KUDE70FVPA) NOTE: The handle for the custom panel is for reinstallation. 2 Dishwashers with control panel on the back of the panel to the KitchenAid Catalog, visit www.kitchenaid.com, or call 1-800-422-1230. If...
... kg) and must be made to the front of the customer-supplied custom panel as shown; align holes. 15 Install Custom Panel - Dishwashers with the panel. With a TORX® screwdriver, remove three screws from humidity. 1 Custom panel installation - hold the outer panel up...and all four hole locations; Option 1 (Models KUDS40FVPA, KUDS50FVPA, KUDE60FVPA, and KUDE70FVPA) NOTE: The handle for the custom panel is for reinstallation. 2 Dishwashers with control panel on the back of the panel to the KitchenAid Catalog, visit www.kitchenaid.com, or call 1-800-422-1230. If...

Installation Instructions
Page 16
...(3.2 mm) * This dimension is recommended that a cabinetmaker cut the custom panel because of the inner panel. Attach the handle. Option 2 (Models KUDC03IV and KUDS30IV) All models require an accessory option to specific dimensions. Kit Number 8171555 (black), 8171556 (white) or 8171557 (biscuit) are for 4" (10.2 cm)... Customer-supplied panel Drill through the holes in Step 6. It is for frameless custom panel models with control panel on the front of the panel to avoid damage from humidity. Dishwashers with a 4" (10.2 cm) console only. 1 Custom panel installation - If the...
...(3.2 mm) * This dimension is recommended that a cabinetmaker cut the custom panel because of the inner panel. Attach the handle. Option 2 (Models KUDC03IV and KUDS30IV) All models require an accessory option to specific dimensions. Kit Number 8171555 (black), 8171556 (white) or 8171557 (biscuit) are for 4" (10.2 cm)... Customer-supplied panel Drill through the holes in Step 6. It is for frameless custom panel models with control panel on the front of the panel to avoid damage from humidity. Dishwashers with a 4" (10.2 cm) console only. 1 Custom panel installation - If the...

Installation Instructions
Page 24
... and the slots in the lower panel. 3 Check lower panel edge Remove towel from dishwasher. Reinstall the lower dishrack. Visit www.kitchenaid.com/anchoring under FAQ tab. Adjust if necessary. 4 Tighten screws Tighten access panel screws. On some models) Access panel Lower panel 24 Insulation Grounding clip Check that grounding clip is insulation...
... and the slots in the lower panel. 3 Check lower panel edge Remove towel from dishwasher. Reinstall the lower dishrack. Visit www.kitchenaid.com/anchoring under FAQ tab. Adjust if necessary. 4 Tighten screws Tighten access panel screws. On some models) Access panel Lower panel 24 Insulation Grounding clip Check that grounding clip is insulation...

Installation Instructions
Page 25
.... Check that there is water in the bottom of a cycle.) 25 Your new dishwasher will run longer to calibrate to optical sensor. Certain models are equipped with your dishwasher washes longer to be used . ❏ Start dishwasher and allow it again. (You must also do not close the door within 3 ...seconds. Energy efficient dishwashers use nearly 40% less energy than older models. WARNING Electrical Shock Hazard Plug into a grounded 3 prong outlet. Check that came with an optical water sensor so the first cycle...
.... Check that there is water in the bottom of a cycle.) 25 Your new dishwasher will run longer to calibrate to optical sensor. Certain models are equipped with your dishwasher washes longer to be used . ❏ Start dishwasher and allow it again. (You must also do not close the door within 3 ...seconds. Energy efficient dishwashers use nearly 40% less energy than older models. WARNING Electrical Shock Hazard Plug into a grounded 3 prong outlet. Check that came with an optical water sensor so the first cycle...
Parts Diagram
Page 1
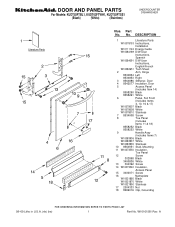
... White W10021850 Stainless 17 2004333 Nut 18 8269016 Clip, Grounding 08−09 Litho in U.S.A. (rle) (ire) 1 Part No. No. DOOR AND PANEL PARTS For Models: KUDT03FTBL1, KUDT03FTWH1, KUDT03FTSS1 (Black) (White) (Stainless) UNDERCOUNTER DISHWASHER Illus.
... White W10021850 Stainless 17 2004333 Nut 18 8269016 Clip, Grounding 08−09 Litho in U.S.A. (rle) (ire) 1 Part No. No. DOOR AND PANEL PARTS For Models: KUDT03FTBL1, KUDT03FTWH1, KUDT03FTSS1 (Black) (White) (Stainless) UNDERCOUNTER DISHWASHER Illus.
Parts Diagram
Page 2
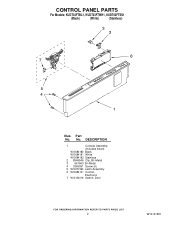
DESCRIPTION 1 Console Assembly (Includes Insert) W10084180 Black W10084181 White W10084182 Stainless 2 8546546 Clip, BI−Metal 3 661663 Bi−Metal 4 3369051 Screw (6) 5 W10077360 Latch Assembly 6 W10084141 Control, Electronic 7 W10134019 Switch, Door 2 W10161581 No. Part No. CONTROL PANEL PARTS For Models: KUDT03FTBL1, KUDT03FTWH1, KUDT03FTSS1 (Black) (White) (Stainless) Illus.
DESCRIPTION 1 Console Assembly (Includes Insert) W10084180 Black W10084181 White W10084182 Stainless 2 8546546 Clip, BI−Metal 3 661663 Bi−Metal 4 3369051 Screw (6) 5 W10077360 Latch Assembly 6 W10084141 Control, Electronic 7 W10134019 Switch, Door 2 W10161581 No. Part No. CONTROL PANEL PARTS For Models: KUDT03FTBL1, KUDT03FTWH1, KUDT03FTSS1 (Black) (White) (Stainless) Illus.
Parts Diagram
Page 3
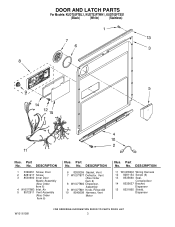
..., Vent (Also Order Item 6) 8 W10077882 Dispenser, Assembly 9 W10077881 Knob, Rinse Aid 10 8545608 Harness, Vent Motor Illus. No. Part No. DOOR AND LATCH PARTS For Models: KUDT03FTBL1, KUDT03FTWH1, KUDT03FTSS1 (Black) (White) (Stainless) Illus. No. Part No.
..., Vent (Also Order Item 6) 8 W10077882 Dispenser, Assembly 9 W10077881 Knob, Rinse Aid 10 8545608 Harness, Vent Motor Illus. No. Part No. DOOR AND LATCH PARTS For Models: KUDT03FTBL1, KUDT03FTWH1, KUDT03FTSS1 (Black) (White) (Stainless) Illus. No. Part No.
Parts Diagram
Page 5
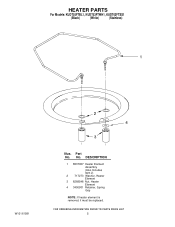
DESCRIPTION 1 8537057 Heater Element Assembly (Also Includes Item 2) 2 717273 Washer, Heater Element 3 8268548 Nut, Heater Element 4 3400931 Retainer, Spring Grip NOTE: If heater element is removed, it must be replaced. 5 HEATER PARTS For Models: KUDT03FTBL1, KUDT03FTWH1, KUDT03FTSS1 (Black) (White) (Stainless) W10161581 Illus. No. Part No.
DESCRIPTION 1 8537057 Heater Element Assembly (Also Includes Item 2) 2 717273 Washer, Heater Element 3 8268548 Nut, Heater Element 4 3400931 Retainer, Spring Grip NOTE: If heater element is removed, it must be replaced. 5 HEATER PARTS For Models: KUDT03FTBL1, KUDT03FTWH1, KUDT03FTSS1 (Black) (White) (Stainless) W10161581 Illus. No. Part No.
Parts Diagram
Page 6
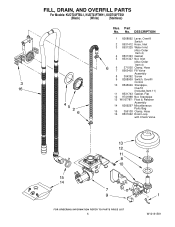
... 14 8269297 Miscellaneous Parts Bag 15 356138 Clamp, Hose 16 8531022 Drain Loop with Check Valve 6 W10161581 Part No. FILL, DRAIN, AND OVERFILL PARTS For Models: KUDT03FTBL1, KUDT03FTWH1, KUDT03FTSS1 (Black) (White) (Stainless) Illus.
... 14 8269297 Miscellaneous Parts Bag 15 356138 Clamp, Hose 16 8531022 Drain Loop with Check Valve 6 W10161581 Part No. FILL, DRAIN, AND OVERFILL PARTS For Models: KUDT03FTBL1, KUDT03FTWH1, KUDT03FTSS1 (Black) (White) (Stainless) Illus.
Parts Diagram
Page 7
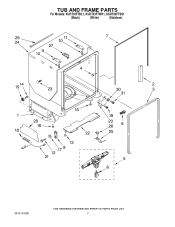
TUB AND FRAME PARTS For Models: KUDT03FTBL1, KUDT03FTWH1, KUDT03FTSS1 (Black) (White) (Stainless) W10161581 7
TUB AND FRAME PARTS For Models: KUDT03FTBL1, KUDT03FTWH1, KUDT03FTSS1 (Black) (White) (Stainless) W10161581 7

Parts Diagram
Page 8
... 27 W10077370 Strike, Latch 28 8537001 Shield, Side 29 8539404 Strap 30 3378128 Washer 31 3400014 Screw 8 W10161581 Part No. TUB AND FRAME PARTS For Models: KUDT03FTBL1, KUDT03FTWH1, KUDT03FTSS1 (Black) (White) (Stainless) Illus. No.
... 27 W10077370 Strike, Latch 28 8537001 Shield, Side 29 8539404 Strap 30 3378128 Washer 31 3400014 Screw 8 W10161581 Part No. TUB AND FRAME PARTS For Models: KUDT03FTBL1, KUDT03FTWH1, KUDT03FTSS1 (Black) (White) (Stainless) Illus. No.


