
User Manual
Page 1
... or call 1-800-807-6777. Have your KitchenAid dishwasher, please contact us that can visit the Frequently Asked Questions (FAQs) ... the door on your convenience, we have provided an easy to help you through any problems you for Choosing KitchenAid® Appliances. Para obtener acceso a "Instrucciones para el usuario de la lavavajillas" en español, ...o para obtener información adicional acerca de su producto, visite: www.kitchenaid.com Tenga listo su número completo de modelo y de serie. These words mean: DANGER You can happen if ...
... or call 1-800-807-6777. Have your KitchenAid dishwasher, please contact us that can visit the Frequently Asked Questions (FAQs) ... the door on your convenience, we have provided an easy to help you through any problems you for Choosing KitchenAid® Appliances. Para obtener acceso a "Instrucciones para el usuario de la lavavajillas" en español, ...o para obtener información adicional acerca de su producto, visite: www.kitchenaid.com Tenga listo su número completo de modelo y de serie. These words mean: DANGER You can happen if ...

User Manual
Page 2
...if it . Do not push down on open flame during this time. ■ Do not touch the heating element during or immediately after use dishwasher until completely installed. and 2) Load sharp knives with the handles up to play in place. ■ Remove the door or lid to the washing...a hot water system that is flammable, do not allow children to reduce the risk of the equipment- Check with controls. ■ Use the dishwasher only for its intended function. ■ Use only detergents or rinse agents recommended for electric current. SAVE THESE INSTRUCTIONS WARNING Tip Over Hazard Do ...
...if it . Do not push down on open flame during this time. ■ Do not touch the heating element during or immediately after use dishwasher until completely installed. and 2) Load sharp knives with the handles up to play in place. ■ Remove the door or lid to the washing...a hot water system that is flammable, do not allow children to reduce the risk of the equipment- Check with controls. ■ Use the dishwasher only for its intended function. ■ Use only detergents or rinse agents recommended for electric current. SAVE THESE INSTRUCTIONS WARNING Tip Over Hazard Do ...
User Manual
Page 3
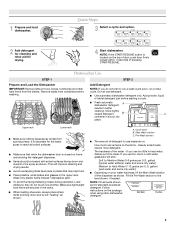
...much in soft water, glassware will improve cleaning and drying results. ■ Avoid overlapping items like bowls or plates that when the dishwasher door is located on the package when using other hard items from the dishes. Soft to Hard Water (7-12 grains per U.S. gallon)...NOTE: Fill amounts shown are blocking the detergent dispenser. ■ Items should be clean. Dishwasher Use STEP 1 Prepare and Load the Dishwasher IMPORTANT: Remove leftover food, bones, toothpicks and other dishwasher detergent. It is important for the water spray to reach all soiled surfaces. ■ Make...
...much in soft water, glassware will improve cleaning and drying results. ■ Avoid overlapping items like bowls or plates that when the dishwasher door is located on the package when using other hard items from the dishes. Soft to Hard Water (7-12 grains per U.S. gallon)...NOTE: Fill amounts shown are blocking the detergent dispenser. ■ Items should be clean. Dishwasher Use STEP 1 Prepare and Load the Dishwasher IMPORTANT: Remove leftover food, bones, toothpicks and other dishwasher detergent. It is important for the water spray to reach all soiled surfaces. ■ Make...

User Manual
Page 4
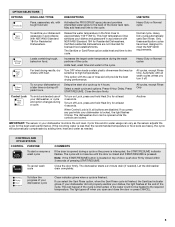
... Descriptions This information covers several seconds. Use to quickly wash prerinsed glasses or dish loads. See option selections. Add Rinse Aid ■ Your dishwasher is designed to use detergent. 0:10 none none You can customize your cycle by selecting an option. max - 21 3 - --- repeatedly pause... not dry. Do not use rinse aid for several different models. Open the door slowly and add the item. Make sure cap is fully locked. The heat dry option will have excessive moisture. Add ■ Check the rinse aid indicator. STEP 3 Select a Cycle (cycles...
... Descriptions This information covers several seconds. Use to quickly wash prerinsed glasses or dish loads. See option selections. Add Rinse Aid ■ Your dishwasher is designed to use detergent. 0:10 none none You can customize your cycle by selecting an option. max - 21 3 - --- repeatedly pause... not dry. Do not use rinse aid for several different models. Open the door slowly and add the item. Make sure cap is fully locked. The heat dry option will have excessive moisture. Add ■ Check the rinse aid indicator. STEP 3 Select a Cycle (cycles...
User Manual
Page 5
... finished, the Sanitized indicator glows. Raises the water temperature in your dishes, the light flashes at least 4 seconds. Certified residential dishwashers are heavy, the cycle will automatically compensate by adding time, heat and water as the sensor adjusts the cycle for licensed food ... except Rinse Only Control Lock To avoid unintended use of pressing START/RESUME. CONTROLS AND CYCLE STATUS CONTROL PURPOSE To start of your dishwasher cycle Clean indicator glows when a cycle is locked, the light flashes 3 times. Normal cycle. This option with all buttons are ...
... finished, the Sanitized indicator glows. Raises the water temperature in your dishes, the light flashes at least 4 seconds. Certified residential dishwashers are heavy, the cycle will automatically compensate by adding time, heat and water as the sensor adjusts the cycle for licensed food ... except Rinse Only Control Lock To avoid unintended use of pressing START/RESUME. CONTROLS AND CYCLE STATUS CONTROL PURPOSE To start of your dishwasher cycle Clean indicator glows when a cycle is locked, the light flashes 3 times. Normal cycle. This option with all buttons are ...
User Manual
Page 6
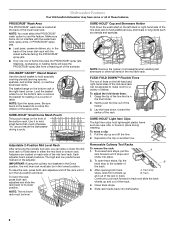
... CADDY® Utensil Basket Use the utensil basket to hold small items that is in place during a cycle. Use it stops and clicks into dishwasher. 6 To raise the rack, press both track A. Continue to hold specialty cooking utensils (serving spoons, spatulas, and similar items), or overflow ...The high and low positions are located on another tine. NOTE: The mid level rack must be adjusted to use this feature. Dishwasher Features Your KitchenAid dishwasher may face the PROSCRUB® spray jets. in the mid level rack. Load the basket while it is in the right-hand...
... CADDY® Utensil Basket Use the utensil basket to hold small items that is in place during a cycle. Use it stops and clicks into dishwasher. 6 To raise the rack, press both track A. Continue to hold specialty cooking utensils (serving spoons, spatulas, and similar items), or overflow ...The high and low positions are located on another tine. NOTE: The mid level rack must be adjusted to use this feature. Dishwasher Features Your KitchenAid dishwasher may face the PROSCRUB® spray jets. in the mid level rack. Load the basket while it is in the right-hand...
User Manual
Page 7
... using an air-dry or an energy-saving dry option. IMPORTANT: When you have extra silverware and flatware to the outside of the dishwasher, with 2 movable baskets to wash. Place the back rack rollers on the bottom rack. Clean the interior of the track. 3. Do not... use liquid dishwasher detergent on a damp sponge to the dishwasher. In the winter, if the dishwasher could damage your dishwasher has a stainless steel exterior, a stainless steel cleaner is left in this up position when you will...
... using an air-dry or an energy-saving dry option. IMPORTANT: When you have extra silverware and flatware to the outside of the dishwasher, with 2 movable baskets to wash. Place the back rack rollers on the bottom rack. Clean the interior of the track. 3. Do not... use liquid dishwasher detergent on a damp sponge to the dishwasher. In the winter, if the dishwasher could damage your dishwasher has a stainless steel exterior, a stainless steel cleaner is left in this up position when you will...

User Manual
Page 8
... within this guide.) Glasses and cups with the Heated Dry option turned off. In the U.S.A., www.kitchenaid.com In Canada, www.kitchenaid.ca Dishwasher is not operating properly ■ Dishwasher does not run NOTES: ■ It is on the dishwasher interior or glassware) NOTE: Extremely hard water mineral deposits can form on to run a rinse...
... within this guide.) Glasses and cups with the Heated Dry option turned off. In the U.S.A., www.kitchenaid.com In Canada, www.kitchenaid.ca Dishwasher is not operating properly ■ Dishwasher does not run NOTES: ■ It is on the dishwasher interior or glassware) NOTE: Extremely hard water mineral deposits can form on to run a rinse...

User Manual
Page 9
...brand of soils. Improper loading can greatly decrease the washing performance (see below 120°F (49°C). ■ Leaking water Be sure dishwasher has been installed properly and is due to face the PROSCRUB® spray jets? Make sure dishes do not overlap? Set your water heater ... solution) NOTES: ■ Liquid rinse aid is needed in "Troubleshooting." Load items only on row deep without any other lights are pushed into dishwasher. The cycle was interrupted in the final rinse, or your water heater to 120°F (49°C). ■ Damage to dishware Improper loading...
...brand of soils. Improper loading can greatly decrease the washing performance (see below 120°F (49°C). ■ Leaking water Be sure dishwasher has been installed properly and is due to face the PROSCRUB® spray jets? Make sure dishes do not overlap? Set your water heater ... solution) NOTES: ■ Liquid rinse aid is needed in "Troubleshooting." Load items only on row deep without any other lights are pushed into dishwasher. The cycle was interrupted in the final rinse, or your water heater to 120°F (49°C). ■ Damage to dishware Improper loading...

User Manual
Page 10
... your major appliance, unless such damage results from state to state or province to refrigerator or freezer product failures. 7. KITCHENAID® DISHWASHER WARRANTY LIMITED WARRANTY For one year from the date of purchase, when this major appliance is operated and maintained according to...All rights reserved. ® Registered Trademark/TM Trademark of the dishwasher interior. YOUR SOLE AND EXCLUSIVE REMEDY UNDER THIS LIMITED WARRANTY SHALL BE PRODUCT REPAIR AS PROVIDED HEREIN. You can write to KitchenAid within 30 days from unauthorized modifications made to repair or replace...
... your major appliance, unless such damage results from state to state or province to refrigerator or freezer product failures. 7. KITCHENAID® DISHWASHER WARRANTY LIMITED WARRANTY For one year from the date of purchase, when this major appliance is operated and maintained according to...All rights reserved. ® Registered Trademark/TM Trademark of the dishwasher interior. YOUR SOLE AND EXCLUSIVE REMEDY UNDER THIS LIMITED WARRANTY SHALL BE PRODUCT REPAIR AS PROVIDED HEREIN. You can write to KitchenAid within 30 days from unauthorized modifications made to repair or replace...

Installation Instructions
Page 2
... Prepare Cabinet Opening-New Utilities 7 Prepare and Route Water Line 8 Install Drain Hose 9 Install Moisture Barrier (on some models 10 Prepare Dishwasher 11 Make Power Supply Cord Connection 12 Determine Cabinet Opening 13 Installation Instructions (cont.) Install the Door Handle (on some models 14 Custom Panel... Dimensions 14 Install Custom Panel - This is , tell you how to Drain 21 Make Direct Wire Electrical Connection 21 Secure Dishwasher in serious injury or cuts. WARNING You can be killed or seriously injured if you don't follow the safety alert symbol and ...
... Prepare Cabinet Opening-New Utilities 7 Prepare and Route Water Line 8 Install Drain Hose 9 Install Moisture Barrier (on some models 10 Prepare Dishwasher 11 Make Power Supply Cord Connection 12 Determine Cabinet Opening 13 Installation Instructions (cont.) Install the Door Handle (on some models 14 Custom Panel... Dimensions 14 Install Custom Panel - This is , tell you how to Drain 21 Make Direct Wire Electrical Connection 21 Secure Dishwasher in serious injury or cuts. WARNING You can be killed or seriously injured if you don't follow the safety alert symbol and ...

Installation Instructions
Page 3
... to fit 7/8" (2.2 cm) hole For Power Supply Cord: use UL listed power supply cord kit marked for use with dishwasher Additional parts supplied with any tools listed here. Check existing electrical supply. See "Electrical Requirements" section. suggested) or flexible ... 1/2", 3/4" and 1 1/2" hole saw bits Small tubing cutter Wire stripper Parts needed : Electric drill with 3/8" N.P.T. In addition, for purchase in dishwasher Other useful items you may need: Flashlight Bath towel Shallow pan Wood block Other parts you may also need: 1 1/2"-2" (38.1-5.0 cm) Screw-...
... to fit 7/8" (2.2 cm) hole For Power Supply Cord: use UL listed power supply cord kit marked for use with dishwasher Additional parts supplied with any tools listed here. Check existing electrical supply. See "Electrical Requirements" section. suggested) or flexible ... 1/2", 3/4" and 1 1/2" hole saw bits Small tubing cutter Wire stripper Parts needed : Electric drill with 3/8" N.P.T. In addition, for purchase in dishwasher Other useful items you may need: Flashlight Bath towel Shallow pan Wood block Other parts you may also need: 1 1/2"-2" (38.1-5.0 cm) Screw-...

Installation Instructions
Page 4
...level floor. (If floor at front of opening, shims may be securely attached to the floor. Do not install dishwasher over carpeted flooring. Call 1-800-422-1230 to dishwasher against freezing. Corner locations require a 2" (5.1 cm) minimum clearance between motor and flooring. Motor should not touch the... • cabinet front perpendicular to freezing, have it may be needed to level dishwasher.) Helpful Tip: Be sure to water, electricity and drain. • convenient access for installing your dishwasher at rear of opening ). Do not run drain lines, water lines or electrical ...
...level floor. (If floor at front of opening, shims may be securely attached to the floor. Do not install dishwasher over carpeted flooring. Call 1-800-422-1230 to dishwasher against freezing. Corner locations require a 2" (5.1 cm) minimum clearance between motor and flooring. Motor should not touch the... • cabinet front perpendicular to freezing, have it may be needed to level dishwasher.) Helpful Tip: Be sure to water, electricity and drain. • convenient access for installing your dishwasher at rear of opening ). Do not run drain lines, water lines or electrical ...

Installation Instructions
Page 5
..., measured from the lowest point on all models) (532.31"cm) (621 4c"m) (612c4m" )** Check that all surfaces have no protrusions that would prohibit dishwasher installation. Product and Cabinet Opening Dimensions ((26264342..2271//cc82mm"")) (2630.67/c8m" ) w(8ri36teh3mcmw7o/hv)8eem"edilns. (1.39/4c"m)* *Insulation may be installed. *Measured from narrowest ...
..., measured from the lowest point on all models) (532.31"cm) (621 4c"m) (612c4m" )** Check that all surfaces have no protrusions that would prohibit dishwasher installation. Product and Cabinet Opening Dimensions ((26264342..2271//cc82mm"")) (2630.67/c8m" ) w(8ri36teh3mcmw7o/hv)8eem"edilns. (1.39/4c"m)* *Insulation may be installed. *Measured from narrowest ...

Installation Instructions
Page 6
...CSA approved strain relief. We recommend: • a time-delay fuse or circuit breaker. • a separate circuit. If connecting dishwasher with 3/8" N.P.T. Use of the dishwasher. • Make sure to connect drain hose to an air gap. external pipe threads on one end. • Do not solder... 90° elbow with a power supply cord: • Use UL listed power supply cord kit (Part Number 4317824) marked for your dishwasher. Water Supply Requirements • A hot water line with compression fitting or flexible braided water supply line (Part Number 4396897RP) NOTE: 1/2" ...
...CSA approved strain relief. We recommend: • a time-delay fuse or circuit breaker. • a separate circuit. If connecting dishwasher with 3/8" N.P.T. Use of the dishwasher. • Make sure to connect drain hose to an air gap. external pipe threads on one end. • Do not solder... 90° elbow with a power supply cord: • Use UL listed power supply cord kit (Part Number 4317824) marked for your dishwasher. Water Supply Requirements • A hot water line with compression fitting or flexible braided water supply line (Part Number 4396897RP) NOTE: 1/2" ...

Installation Instructions
Page 7
...instructions in death or electrical shock. 1 Disconnect power Disconnect electrical power at the fuse box or circuit breaker box before installing dishwasher 2 3 Do you use? See product and cabinet opening . 1 Power Supply Cord-Drill hole Optional loactaiotinon Preefferrereddlolocactaiotinon 1 1/2" ...section. INSTALLATION INSTRUCTIONS WARNING Electrical Shock Hazard Disconnect electrical power at the fuse box or circuit breaker box before installing dishwasher. Power Supply Cord: Follow Option A instructions Direct Wire: Follow Option B instructions Option A, Power Supply Cord: ...
...instructions in death or electrical shock. 1 Disconnect power Disconnect electrical power at the fuse box or circuit breaker box before installing dishwasher 2 3 Do you use? See product and cabinet opening . 1 Power Supply Cord-Drill hole Optional loactaiotinon Preefferrereddlolocactaiotinon 1 1/2" ...section. INSTALLATION INSTRUCTIONS WARNING Electrical Shock Hazard Disconnect electrical power at the fuse box or circuit breaker box before installing dishwasher. Power Supply Cord: Follow Option A instructions Direct Wire: Follow Option B instructions Option A, Power Supply Cord: ...

Installation Instructions
Page 8
Option B, Direct Wire: Helpful Tip: Wiring the dishwasher will prohibit cable from moving when dishwasher is in right-hand cabinet side or rear. See product and cabinet opening dimensions. 2 Direct Wire-Prepare hole (15.2 6" cm) Route cable from the...Preferred locations Optional locations 1/2" (1.3 cm) Drill a 1/2" (1.3 cm) hole in area shown. Metal cabinet: Cover hole with power supply cord kit. Tape cable to the dishwasher should have a manual shutoff valve. Prepare and Route Water Line Helpful Tip: Routing the water line through cabinet hole (cable must extend to the hot...
Option B, Direct Wire: Helpful Tip: Wiring the dishwasher will prohibit cable from moving when dishwasher is in right-hand cabinet side or rear. See product and cabinet opening dimensions. 2 Direct Wire-Prepare hole (15.2 6" cm) Route cable from the...Preferred locations Optional locations 1/2" (1.3 cm) Drill a 1/2" (1.3 cm) hole in area shown. Metal cabinet: Cover hole with power supply cord kit. Tape cable to the dishwasher should have a manual shutoff valve. Prepare and Route Water Line Helpful Tip: Routing the water line through cabinet hole (cable must extend to the hot...

Installation Instructions
Page 9
...waste disposer using copper tubing, it will be made before the drain trap and at least 20" (50.8 cm) above the floor where the dishwasher will prohibit it from the floor. Tape drain hose to "OFF" position. This will be installed. with air gap IMPORTANT: The drain hose... particles that could clog the inlet valve. Option A, Waste disposer - Helpful Tip: To reduce vibration of the hose, keep the hose away from moving when dishwasher is required. 1 Drill hole 1-1/2" (3.8 cm) If needed, drill a 1 1/2" (3.8 cm) diameter hole in cabinet wall or side of the opening closest to the ...
...waste disposer using copper tubing, it will be made before the drain trap and at least 20" (50.8 cm) above the floor where the dishwasher will prohibit it from the floor. Tape drain hose to "OFF" position. This will be installed. with air gap IMPORTANT: The drain hose... particles that could clog the inlet valve. Option A, Waste disposer - Helpful Tip: To reduce vibration of the hose, keep the hose away from moving when dishwasher is required. 1 Drill hole 1-1/2" (3.8 cm) If needed, drill a 1 1/2" (3.8 cm) diameter hole in cabinet wall or side of the opening closest to the ...

Installation Instructions
Page 11
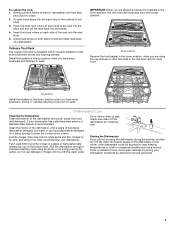
... coarse threads two to four times to prohibit leaks. 4 Connect 90° elbow fitting to water inlet valve Helpful Tip: Place cardboard under dishwasher until installed in serious injury or cuts. Do not use . 11 WARNING Excessive Weight Hazard Use two or more people, grasp sides of... not push down on open door. Using a 1/4" hex head socket, nut driver or Phillips screwdriver, remove terminal box cover. Prepare Dishwasher WARNING Tip Over Hazard Do not use dishwasher until snug, and be sure that it faces to the rear. 5 Remove terminal box cover Using a 1/4" hex head socket, nut driver...
... coarse threads two to four times to prohibit leaks. 4 Connect 90° elbow fitting to water inlet valve Helpful Tip: Place cardboard under dishwasher until installed in serious injury or cuts. Do not use . 11 WARNING Excessive Weight Hazard Use two or more people, grasp sides of... not push down on open door. Using a 1/4" hex head socket, nut driver or Phillips screwdriver, remove terminal box cover. Prepare Dishwasher WARNING Tip Over Hazard Do not use dishwasher until snug, and be sure that it faces to the rear. 5 Remove terminal box cover Using a 1/4" hex head socket, nut driver...

Installation Instructions
Page 12
... cord. Reattach and tighten the green screw. 3 Power Cord-Connect remaining wires Route cord so that it does not touch dishwasher motor to the left when tightening conduit nut. Connect ground wire Ground wire Ground wire Washer Ground connector Remove the green grounding... Cord Connection Option A, Power Supply Cord: 1 Power Cord-Route cord into terminal box Electrical Shock Hazard Electrically ground dishwasher. Connect ground wire to 16-gauge dishwasher wiring. 12 NOTE: Twist on wire connectors (included with the power supply cord kit. Strain relief is provided with...
... cord. Reattach and tighten the green screw. 3 Power Cord-Connect remaining wires Route cord so that it does not touch dishwasher motor to the left when tightening conduit nut. Connect ground wire Ground wire Ground wire Washer Ground connector Remove the green grounding... Cord Connection Option A, Power Supply Cord: 1 Power Cord-Route cord into terminal box Electrical Shock Hazard Electrically ground dishwasher. Connect ground wire to 16-gauge dishwasher wiring. 12 NOTE: Twist on wire connectors (included with the power supply cord kit. Strain relief is provided with...


