
User Manual
Page 1
... serial number ready. You can find your model and serial number on the label located near the door on your KitchenAid dishwasher, please contact us that can kill or hurt you can be killed or seriously injured if you don't immediately follow...ñol, o para obtener información adicional acerca de su producto, visite: www.kitchenaid.com Tenga listo su número completo de modelo y de serie. All safety messages will follow instructions. DISHWASHER USER INSTRUCTIONS Thank you may encounter. These instructions include a "Troubleshooting" section to reduce the...
... serial number ready. You can find your model and serial number on the label located near the door on your KitchenAid dishwasher, please contact us that can kill or hurt you can be killed or seriously injured if you don't immediately follow...ñol, o para obtener información adicional acerca de su producto, visite: www.kitchenaid.com Tenga listo su número completo de modelo y de serie. All safety messages will follow instructions. DISHWASHER USER INSTRUCTIONS Thank you may encounter. These instructions include a "Troubleshooting" section to reduce the...

User Manual
Page 4
... off water. ■ Push door firmly closed within 3 seconds of food soil. The door latches automatically. Add Rinse Aid ■ Your dishwasher is fully locked. They also improve drying by model) See "Cycle and Option Descriptions" charts in the previous wash cycle. ■ You can customize your fingers or inserting a flat-blade screwdriver...
... off water. ■ Push door firmly closed within 3 seconds of food soil. The door latches automatically. Add Rinse Aid ■ Your dishwasher is fully locked. They also improve drying by model) See "Cycle and Option Descriptions" charts in the previous wash cycle. ■ You can customize your fingers or inserting a flat-blade screwdriver...

User Manual
Page 8
...Use of rinse aid along with the Heated Dry option is normal for up to the dishwasher. In the U.S.A., www.kitchenaid.com In Canada, www.kitchenaid.ca Dishwasher is not operating properly ■ Dishwasher does not run . Be sure your house fuse or circuit breaker. ■ Condensation ...on the kitchen counter (built-in the drain hose. Check for kinks in models) Is the dishwasher aligned with ...
...Use of rinse aid along with the Heated Dry option is normal for up to the dishwasher. In the U.S.A., www.kitchenaid.com In Canada, www.kitchenaid.ca Dishwasher is not operating properly ■ Dishwasher does not run . Be sure your house fuse or circuit breaker. ■ Condensation ...on the kitchen counter (built-in the drain hose. Check for kinks in models) Is the dishwasher aligned with ...

User Manual
Page 10
... are excluded from accident, alteration, misuse, abuse, fire, flood, acts of God, improper installation, installation not in accordance with original model/serial numbers that have access to the Internet and you need further assistance, you . W10205937A SP PN W10205938 © 2008. LIFETIME ... do not have been removed, altered or cannot be easily determined. Have your major appliance if it was purchased. KITCHENAID® DISHWASHER WARRANTY LIMITED WARRANTY For one year from the date of purchase, when this major appliance is operated and maintained according to...
... are excluded from accident, alteration, misuse, abuse, fire, flood, acts of God, improper installation, installation not in accordance with original model/serial numbers that have access to the Internet and you need further assistance, you . W10205937A SP PN W10205938 © 2008. LIFETIME ... do not have been removed, altered or cannot be easily determined. Have your major appliance if it was purchased. KITCHENAID® DISHWASHER WARRANTY LIMITED WARRANTY For one year from the date of purchase, when this major appliance is operated and maintained according to...

Installation Instructions
Page 2
... 7 Prepare Cabinet Opening-New Utilities 7 Prepare and Route Water Line 8 Install Drain Hose 9 Install Moisture Barrier (on some models 10 Prepare Dishwasher 11 Make Power Supply Cord Connection 12 Determine Cabinet Opening 13 Installation Instructions (cont.) Install the Door Handle (on some... models 14 Custom Panel Dimensions 14 Install Custom Panel - We have provided many important safety messages in this dishwasher as specified in serious injury or cuts. Always read and obey all governing...
... 7 Prepare Cabinet Opening-New Utilities 7 Prepare and Route Water Line 8 Install Drain Hose 9 Install Moisture Barrier (on some models 10 Prepare Dishwasher 11 Make Power Supply Cord Connection 12 Determine Cabinet Opening 13 Installation Instructions (cont.) Install the Door Handle (on some... models 14 Custom Panel Dimensions 14 Install Custom Panel - We have provided many important safety messages in this dishwasher as specified in serious injury or cuts. Always read and obey all governing...

Installation Instructions
Page 3
...also need: 1 1/2"-2" (38.1-5.0 cm) Screw-typ e clamps (3 max) Masking or duct tape NOTE: Parts available for use with dishwasher Additional parts supplied with any tools listed here. All Installations Tools needed : Copper tubing (3/8" O.D. Check existing electrical supply. If parts ...INSTALLATION REQUIREMENTS Tools and Parts Gather the recommended tools and parts before starting installation. Read and follow the instructions provided with top-venting models only: 2 #8x1-3/8" Torx® T15 screws 4 #10x3/8" hex-head screws Parts supplied: 2 - suggested) or flexible ...
...also need: 1 1/2"-2" (38.1-5.0 cm) Screw-typ e clamps (3 max) Masking or duct tape NOTE: Parts available for use with dishwasher Additional parts supplied with any tools listed here. All Installations Tools needed : Copper tubing (3/8" O.D. Check existing electrical supply. If parts ...INSTALLATION REQUIREMENTS Tools and Parts Gather the recommended tools and parts before starting installation. Read and follow the instructions provided with top-venting models only: 2 #8x1-3/8" Torx® T15 screws 4 #10x3/8" hex-head screws Parts supplied: 2 - suggested) or flexible ...

Installation Instructions
Page 5
... walls show where utility connections may be installed. *Measured from narrowest point of countertop. May be reduced to 33 7/8" (86 cm) by removing wheels from dishwasher. **Minimum, measured from the lowest point on all models) (532.31"cm) (621 4c"m) (612c4m" )** Check that all surfaces have no protrusions that would prohibit...
... walls show where utility connections may be installed. *Measured from narrowest point of countertop. May be reduced to 33 7/8" (86 cm) by removing wheels from dishwasher. **Minimum, measured from the lowest point on all models) (532.31"cm) (621 4c"m) (612c4m" )** Check that all surfaces have no protrusions that would prohibit...

Installation Instructions
Page 14
... door panel. Push the door handle tightly against the door. Retain Allen wrench with the setscrews facing down. Dishwashers with control panel on some models) Install door handle Mounting stud Handle Setscrew (in bottom of "Install custom panel" section. Install the Door ... installation needs a higher toe kick, adjust the height of the Allen wrench into cabinet opening .) Example: Kitchen floor tile does not extend into the setscrews. Dishwashers with control panel on front custom panel dimensions 23 3/8" (65.8 cm) *25 29/32" (65.8 cm) 3/4" (19.1 mm) 1/8" (3.2 mm) 1/8"...
... door panel. Push the door handle tightly against the door. Retain Allen wrench with the setscrews facing down. Dishwashers with control panel on some models) Install door handle Mounting stud Handle Setscrew (in bottom of "Install custom panel" section. Install the Door ... installation needs a higher toe kick, adjust the height of the Allen wrench into cabinet opening .) Example: Kitchen floor tile does not extend into the setscrews. Dishwashers with control panel on front custom panel dimensions 23 3/8" (65.8 cm) *25 29/32" (65.8 cm) 3/4" (19.1 mm) 1/8" (3.2 mm) 1/8"...

Installation Instructions
Page 15
...With a TORX® screwdriver, remove three screws from the back of the wood panel accordingly. Dishwashers with control panel on both sides, as shown, so that a cabinetmaker cut the custom panel ... holes 1/2" (13 mm) deep in the outer panel are centered side to the KitchenAid Catalog, visit www.kitchenaid.com, or call 1-800-422-1230. NOTE: A customer-supplied full front panel ...included. hold the outer panel up while removing the screws. remove outer panel. Option 1 (Models KUDS40FVPA, KUDS50FVPA, KUDE60FVPA, and KUDE70FVPA) NOTE: The handle for the custom panel is for ...
...With a TORX® screwdriver, remove three screws from the back of the wood panel accordingly. Dishwashers with control panel on both sides, as shown, so that a cabinetmaker cut the custom panel ... holes 1/2" (13 mm) deep in the outer panel are centered side to the KitchenAid Catalog, visit www.kitchenaid.com, or call 1-800-422-1230. NOTE: A customer-supplied full front panel ...included. hold the outer panel up while removing the screws. remove outer panel. Option 1 (Models KUDS40FVPA, KUDS50FVPA, KUDE60FVPA, and KUDE70FVPA) NOTE: The handle for the custom panel is for ...

Installation Instructions
Page 16
... not tighten completely. Kit Number 8171555 (black), 8171556 (white) or 8171557 (biscuit) are for frameless custom panel models with back of customer-supplied custom panel. 6 Attach body panel Reinstall 3 screws each side Align top edges Customer-...models require an accessory option to attach custom panels. Install Custom Panel - NOTE: A custom full front panel must be centered on both sides, as shown. 16 3/4" (19.1 mm) 1/8" (3.2 mm) 1/8" (3.2 mm) * This dimension is recommended that a cabinetmaker cut the custom panel because of the wood panel accordingly. Dishwashers...
... not tighten completely. Kit Number 8171555 (black), 8171556 (white) or 8171557 (biscuit) are for frameless custom panel models with back of customer-supplied custom panel. 6 Attach body panel Reinstall 3 screws each side Align top edges Customer-...models require an accessory option to attach custom panels. Install Custom Panel - NOTE: A custom full front panel must be centered on both sides, as shown. 16 3/4" (19.1 mm) 1/8" (3.2 mm) 1/8" (3.2 mm) * This dimension is recommended that a cabinetmaker cut the custom panel because of the wood panel accordingly. Dishwashers...

Installation Instructions
Page 24
... sides of door do , dishwasher must fall behind the access panel. Adjust if necessary. 4 Tighten screws Tighten access panel screws. On some models) Access panel Lower panel 24 Insulation Grounding clip Check that the lower edge of this step. Visit www.kitchenaid.com/anchoring under FAQ tab....properly centered, replace plastic buttons. 7 Remove towel and replace lower dishwasher rack Hold the two panels together and place them against the screw heads. Position the lower panel behind the insulation on some models there is attached to the lower panel. If needed, see website...
... sides of door do , dishwasher must fall behind the access panel. Adjust if necessary. 4 Tighten screws Tighten access panel screws. On some models) Access panel Lower panel 24 Insulation Grounding clip Check that the lower edge of this step. Visit www.kitchenaid.com/anchoring under FAQ tab....properly centered, replace plastic buttons. 7 Remove towel and replace lower dishwasher rack Hold the two panels together and place them against the screw heads. Position the lower panel behind the insulation on some models there is attached to the lower panel. If needed, see website...

Installation Instructions
Page 25
... outlet Plug into a grounded 3 prong outlet. Additional Tips Expect longer wash times. Certain models are equipped with your dishwasher washes longer to see "If Dishwasher Does Not Operate" section. Do not use an extension cord. Check Operation ❏ Read the Dishwasher User Instructions that came with an optical water sensor so the first cycle...
... outlet Plug into a grounded 3 prong outlet. Additional Tips Expect longer wash times. Certain models are equipped with your dishwasher washes longer to see "If Dishwasher Does Not Operate" section. Do not use an extension cord. Check Operation ❏ Read the Dishwasher User Instructions that came with an optical water sensor so the first cycle...
Parts Diagram
Page 1
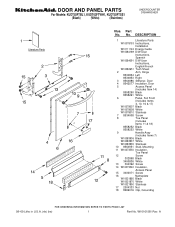
... Stainless 17 2004333 Nut 18 8269016 Clip, Grounding 08−09 Litho in U.S.A. (rle) (ire) 1 Part No. W10161581 Rev. No. A DOOR AND PANEL PARTS For Models: KUDT03FTBL1, KUDT03FTWH1, KUDT03FTSS1 (Black) (White) (Stainless) UNDERCOUNTER DISHWASHER Illus. Part No.
... Stainless 17 2004333 Nut 18 8269016 Clip, Grounding 08−09 Litho in U.S.A. (rle) (ire) 1 Part No. W10161581 Rev. No. A DOOR AND PANEL PARTS For Models: KUDT03FTBL1, KUDT03FTWH1, KUDT03FTSS1 (Black) (White) (Stainless) UNDERCOUNTER DISHWASHER Illus. Part No.

Parts List
Page 1
W10256508 Rev.A DOOR AND PANEL PARTS For Models: KUDS50FVBL0, KUDS50FVWH0, KUDS50FVSS0 (Black) (White) (Stainless) UNDERCOUNTER DISHWASHER Illus. Part No. No. DESCRIPTION 1 Literature Parts W10056407 Instructions, Installation W10056439 Energy Guide W10205938 Guide, Use & Care Spanish W10205937 Guide, Use & Care English/French W10130990 ...
W10256508 Rev.A DOOR AND PANEL PARTS For Models: KUDS50FVBL0, KUDS50FVWH0, KUDS50FVSS0 (Black) (White) (Stainless) UNDERCOUNTER DISHWASHER Illus. Part No. No. DESCRIPTION 1 Literature Parts W10056407 Instructions, Installation W10056439 Energy Guide W10205938 Guide, Use & Care Spanish W10205937 Guide, Use & Care English/French W10130990 ...


