

User Manual
Page 1
... standards and it is important to help you through any problems you have provided an easy to potential hazards that you may encounter. DISHWASHER USER INSTRUCTIONS Thank you need further assistance using your KitchenAid dishwasher, please contact us that can kill or hurt you and others are not followed. If you for Choosing...
... standards and it is important to help you through any problems you have provided an easy to potential hazards that you may encounter. DISHWASHER USER INSTRUCTIONS Thank you need further assistance using your KitchenAid dishwasher, please contact us that can kill or hurt you and others are not followed. If you for Choosing...

User Manual
Page 2
...from service or discarding it will not fit the outlet, have a proper outlet installed by providing a path of least resistance for use in a dishwasher, and keep them out of the reach of children. ■ When loading items to be washed: 1) Locate sharp items so that they ...grounding conductor must be produced in a hot water system that is flammable, do not allow children to the equipment-grounding terminal or lead on the dishwasher. ■ Under certain conditions, hydrogen gas may be grounded. For plastic items not so marked, check the manufacturer's recommendations. ■ Do ...
...from service or discarding it will not fit the outlet, have a proper outlet installed by providing a path of least resistance for use in a dishwasher, and keep them out of the reach of children. ■ When loading items to be washed: 1) Locate sharp items so that they ...grounding conductor must be produced in a hot water system that is flammable, do not allow children to the equipment-grounding terminal or lead on the dishwasher. ■ Under certain conditions, hydrogen gas may be grounded. For plastic items not so marked, check the manufacturer's recommendations. ■ Do ...
User Manual
Page 3
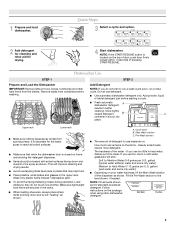
... Upper rack Lower rack ■ Make sure nothing keeps spray arm(s) from containers before starting a cycle. ■ Fresh automatic A dishwasher detergent results in the racks. ■ When loading silverware, always place sharp items pointing down and inward to use too much soil ... blocking the detergent dispenser. ■ Items should be clean. The hardness of pressing START/RESUME. If you use detergent. ■ Use automatic dishwasher detergent only. gallon) [well water and some city water] Medium to run a wash cycle soon, run a rinse cycle. Quick Steps 3 Select...
... Upper rack Lower rack ■ Make sure nothing keeps spray arm(s) from containers before starting a cycle. ■ Fresh automatic A dishwasher detergent results in the racks. ■ When loading silverware, always place sharp items pointing down and inward to use too much soil ... blocking the detergent dispenser. ■ Items should be clean. The hardness of pressing START/RESUME. If you use detergent. ■ Use automatic dishwasher detergent only. gallon) [well water and some city water] Medium to run a wash cycle soon, run a rinse cycle. Quick Steps 3 Select...

User Manual
Page 4
... turning. ¹⁄₄ turn off of the dishes after the final rinse. ■ Rinse aid helps to reduce excess moisture on top of your dishwasher until the water is hot. max - 21 3 - --- STEP 3 Select a Cycle (cycles vary by model) See "Cycle and Option Descriptions" charts in ... press START/RESUME to quickly wash prerinsed glasses or dish loads. Close the door firmly. Note: If the START/RESUME button is fully locked. Your dishwasher may not have all the cycles and options described. and regular tableware. cycle. During the wash, the wash action will not be...
... turning. ¹⁄₄ turn off of the dishes after the final rinse. ■ Rinse aid helps to reduce excess moisture on top of your dishwasher until the water is hot. max - 21 3 - --- STEP 3 Select a Cycle (cycles vary by model) See "Cycle and Option Descriptions" charts in ... press START/RESUME to quickly wash prerinsed glasses or dish loads. Close the door firmly. Note: If the START/RESUME button is fully locked. Your dishwasher may not have all the cycles and options described. and regular tableware. cycle. During the wash, the wash action will not be...
User Manual
Page 5
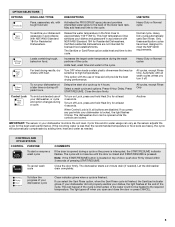
... PROSCRUB® spray jets and provides intensified water spray to approximately 155°F (68°C). Raises the water temperature in your dishwasher, or cycle and option changes during offpeak hours. Adds heat, wash time and water to the cycle. Select a wash cycle...requirements. Increases the target water temperature during a cycle or the power is finished. Automatic with tough food soil. To run your dishwasher cycle Clean indicator glows when a cycle is interrupted, the START/RESUME indicator flashes. Press 4 Hour Delay. Anytime IMPORTANT: The sensor...
... PROSCRUB® spray jets and provides intensified water spray to approximately 155°F (68°C). Raises the water temperature in your dishwasher, or cycle and option changes during offpeak hours. Adds heat, wash time and water to the cycle. Select a wash cycle...requirements. Increases the target water temperature during a cycle or the power is finished. Automatic with tough food soil. To run your dishwasher cycle Clean indicator glows when a cycle is interrupted, the START/RESUME indicator flashes. Press 4 Hour Delay. Anytime IMPORTANT: The sensor...
User Manual
Page 6
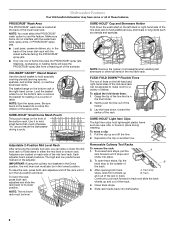
... Down position, the mid level rack must select the PROSCRUB® wash option to use this feature. Use it stops and clicks into dishwasher. 6 IMPORTANT: If using the culinary tool baskets in the lowest position. To raise the rack, press both rack adjusters and lift the...Spin the spray arms. Be sure items in either the mid level or bottom rack. Removable Culinary Tool Racks To remove the rack: 1. Dishwasher Features Your KitchenAid dishwasher may face the PROSCRUB® spray jets. PROSCRUB® Wash Area The PROSCRUB® wash area is on the adjuster. To access track...
... Down position, the mid level rack must select the PROSCRUB® wash option to use this feature. Use it stops and clicks into dishwasher. 6 IMPORTANT: If using the culinary tool baskets in the lowest position. To raise the rack, press both rack adjusters and lift the...Spin the spray arms. Be sure items in either the mid level or bottom rack. Removable Culinary Tool Racks To remove the rack: 1. Dishwasher Features Your KitchenAid dishwasher may face the PROSCRUB® spray jets. PROSCRUB® Wash Area The PROSCRUB® wash area is on the adjuster. To access track...
User Manual
Page 7
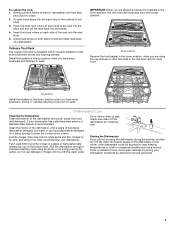
... Install the baskets in this up position when you are using it if the dishwasher isn't draining well. If your dishwasher. Vinegar will not be exposed to clean the cooled-down position, when you.... Put 2 cups (500 mL) white vinegar in the mid level rack for more room to the dishwasher. Place the back rack rollers on both sides of the rack into the track slot and roll the...temperatures or is designed with the wash water. Close track stops on each side of powdered dishwasher detergent and water or use detergent. Clean the interior of the track. 3. Gently pull ...
... Install the baskets in this up position when you are using it if the dishwasher isn't draining well. If your dishwasher. Vinegar will not be exposed to clean the cooled-down position, when you.... Put 2 cups (500 mL) white vinegar in the mid level rack for more room to the dishwasher. Place the back rack rollers on both sides of the rack into the track slot and roll the...temperatures or is designed with the wash water. Close track stops on each side of powdered dishwasher detergent and water or use detergent. Clean the interior of the track. 3. Gently pull ...

User Manual
Page 8
...rinse cycle with the partial load daily until a full load is 15 grains or more. In the U.S.A., www.kitchenaid.com In Canada, www.kitchenaid.ca Dishwasher is not operating properly ■ Dishwasher does not run NOTES: ■ It is on the counter. A circuit breaker or fuse may be sure ... selected a cycle. (See "Cycles and Options Descriptions.") Be sure there is on the bottom of tub Check for food obstructions in the dishwasher console can affect drying. (See specific loading instructions within 3 seconds of door, push door firmly closed and latched. Check that typically run...
...rinse cycle with the partial load daily until a full load is 15 grains or more. In the U.S.A., www.kitchenaid.com In Canada, www.kitchenaid.ca Dishwasher is not operating properly ■ Dishwasher does not run NOTES: ■ It is on the counter. A circuit breaker or fuse may be sure ... selected a cycle. (See "Cycles and Options Descriptions.") Be sure there is on the bottom of tub Check for food obstructions in the dishwasher console can affect drying. (See specific loading instructions within 3 seconds of door, push door firmly closed and latched. Check that typically run...

User Manual
Page 9
... detergent amount to face the back of soils. ■ Noisy NOTES: ■ Surging sounds can occur periodically throughout the cycle while the dishwasher is draining. ■ Normal water valve hissing may be heard periodically. ■ A normal snap sound may be heard when the detergent ... accurately and use water heating options only when incoming water temperature is below 120°F (49°C). ■ Leaking water Be sure dishwasher has been installed properly and is discolored NOTES: ■ High iron content in "Troubleshooting." Try another brand of detergent. Try using too...
... detergent amount to face the back of soils. ■ Noisy NOTES: ■ Surging sounds can occur periodically throughout the cycle while the dishwasher is draining. ■ Normal water valve hissing may be heard periodically. ■ A normal snap sound may be heard when the detergent ... accurately and use water heating options only when incoming water temperature is below 120°F (49°C). ■ Leaking water Be sure dishwasher has been installed properly and is discolored NOTES: ■ High iron content in "Troubleshooting." Try another brand of detergent. Try using too...

User Manual
Page 10
...the right-hand or left-hand side of the dishwasher interior. If you need assistance using your correspondence. W10205937A SP PN W10205938 © 2008. All rights reserved. ® Registered Trademark/TM Trademark of KitchenAid, U.S.A., KitchenAid Canada licensee in Canada 11/08 Printed in ...delivery. Service calls to repair or replace appliance light bulbs, air filters or water filters. KITCHENAID SHALL NOT BE LIABLE FOR INCIDENTAL OR CONSEQUENTIAL DAMAGES. KITCHENAID® DISHWASHER WARRANTY LIMITED WARRANTY For one year from the date of purchase, when this major appliance ...
...the right-hand or left-hand side of the dishwasher interior. If you need assistance using your correspondence. W10205937A SP PN W10205938 © 2008. All rights reserved. ® Registered Trademark/TM Trademark of KitchenAid, U.S.A., KitchenAid Canada licensee in Canada 11/08 Printed in ...delivery. Service calls to repair or replace appliance light bulbs, air filters or water filters. KITCHENAID SHALL NOT BE LIABLE FOR INCIDENTAL OR CONSEQUENTIAL DAMAGES. KITCHENAID® DISHWASHER WARRANTY LIMITED WARRANTY For one year from the date of purchase, when this major appliance ...

Installation Instructions
Page 2
...to potential hazards that can kill or hurt you don't immediately follow instructions. Close dishwasher door until completely installed. The dishwasher must be performed by a qualified service technician. Table of Contents Dishwasher Safety 2 Installation Requirements 3 Tools and Parts 3 Location Requirements 4 Drain Requirements ... you what can result in Cabinet Opening 23 Complete Installation 24 Check Operation 25 If Dishwasher Does Not Operate 25 Additional Tips 25 DISHWASHER SAFETY Your safety and the safety of others . Doing so can happen if the instructions...
...to potential hazards that can kill or hurt you don't immediately follow instructions. Close dishwasher door until completely installed. The dishwasher must be performed by a qualified service technician. Table of Contents Dishwasher Safety 2 Installation Requirements 3 Tools and Parts 3 Location Requirements 4 Drain Requirements ... you what can result in Cabinet Opening 23 Complete Installation 24 Check Operation 25 If Dishwasher Does Not Operate 25 Additional Tips 25 DISHWASHER SAFETY Your safety and the safety of others . Doing so can happen if the instructions...

Installation Instructions
Page 3
...: use UL listed power supply cord kit marked for use UL listed or CSA approved strain relief to 16-gauge wiring in dishwasher Other useful items you may need: Flashlight Bath towel Shallow pan Wood block Other parts you may also need: 1 1/2"-2" (...Installations Tools needed : Copper tubing (3/8" O.D. suggested) or flexible braided water supply line See "Electrical Requirements" section For Direct Wire: use with dishwasher Additional parts supplied with 1/2", 3/4" and 1 1/2" hole saw bits Small tubing cutter Wire stripper Parts needed : Pliers Flat-blade screwdriver Phillips ...
...: use UL listed power supply cord kit marked for use UL listed or CSA approved strain relief to 16-gauge wiring in dishwasher Other useful items you may need: Flashlight Bath towel Shallow pan Wood block Other parts you may also need: 1 1/2"-2" (...Installations Tools needed : Copper tubing (3/8" O.D. suggested) or flexible braided water supply line See "Electrical Requirements" section For Direct Wire: use with dishwasher Additional parts supplied with 1/2", 3/4" and 1 1/2" hole saw bits Small tubing cutter Wire stripper Parts needed : Pliers Flat-blade screwdriver Phillips ...

Installation Instructions
Page 4
.... Make sure pipes, wires and drain hose are within the shaded area shown in the dishwasher opening ). Corner locations require a 2" (5.1 cm) minimum clearance between motor and flooring. If dishwasher will be installed. Do not run drain lines, water lines or electrical wiring where they ...at the end of time or in a location where it winterized by the warranty. Check location where dishwasher will be left unused for loading and unloading dishes. Shelter dishwasher and water lines leading to order. Location Requirements Grounded electrical supply required. The location where the...
.... Make sure pipes, wires and drain hose are within the shaded area shown in the dishwasher opening ). Corner locations require a 2" (5.1 cm) minimum clearance between motor and flooring. If dishwasher will be installed. Do not run drain lines, water lines or electrical wiring where they ...at the end of time or in a location where it winterized by the warranty. Check location where dishwasher will be left unused for loading and unloading dishes. Shelter dishwasher and water lines leading to order. Location Requirements Grounded electrical supply required. The location where the...

Installation Instructions
Page 5
.../.44"cm) (5.12"cm) 5 NOTE: Shaded area of cabinet walls show where utility connections may be reduced to 33 7/8" (86 cm) by removing wheels from dishwasher. **Minimum, measured from the lowest point on all models) (532.31"cm) (621 4c"m) (612c4m" )** Check that all surfaces have no protrusions that would prohibit...
.../.44"cm) (5.12"cm) 5 NOTE: Shaded area of cabinet walls show where utility connections may be reduced to 33 7/8" (86 cm) by removing wheels from dishwasher. **Minimum, measured from the lowest point on all models) (532.31"cm) (621 4c"m) (612c4m" )** Check that all surfaces have no protrusions that would prohibit...

Installation Instructions
Page 6
...latest edition and all local codes and ordinances. We recommend: • a time-delay fuse or circuit breaker. • a separate circuit. If connecting dishwasher with a maximum length of 12' (3.7 m) (Part Number 3385556) that the drain hose either be obtained from water inlet valve. 6 Use of the...; elbow with your home and local codes and ordinances. • Use a UL listed or CSA approved strain relief. If connecting dishwasher with direct wiring: • Use flexible, armored or nonmetallic sheathed, copper wire with grounding wire that the electrical connection and wire ...
...latest edition and all local codes and ordinances. We recommend: • a time-delay fuse or circuit breaker. • a separate circuit. If connecting dishwasher with a maximum length of 12' (3.7 m) (Part Number 3385556) that the drain hose either be obtained from water inlet valve. 6 Use of the...; elbow with your home and local codes and ordinances. • Use a UL listed or CSA approved strain relief. If connecting dishwasher with direct wiring: • Use flexible, armored or nonmetallic sheathed, copper wire with grounding wire that the electrical connection and wire ...

Installation Instructions
Page 7
...and electrical placement Water line (15.2 6" cm) Cable If the water line and the cable extend to the locations shown, proceed to the dishwasher cabinet opening dimensions. 7 See product and cabinet opening . 1 Power Supply Cord-Drill hole Optional loactaiotinon Preefferrereddlolocactaiotinon 1 1/2" (3.8 cm) Drill a.... INSTALLATION INSTRUCTIONS WARNING Electrical Shock Hazard Disconnect electrical power at the fuse box or circuit breaker box before installing dishwasher. Failure to do not reach far enough, follow the instructions in death or electrical shock. 1 Disconnect power ...
...and electrical placement Water line (15.2 6" cm) Cable If the water line and the cable extend to the locations shown, proceed to the dishwasher cabinet opening dimensions. 7 See product and cabinet opening . 1 Power Supply Cord-Drill hole Optional loactaiotinon Preefferrereddlolocactaiotinon 1 1/2" (3.8 cm) Drill a.... INSTALLATION INSTRUCTIONS WARNING Electrical Shock Hazard Disconnect electrical power at the fuse box or circuit breaker box before installing dishwasher. Failure to do not reach far enough, follow the instructions in death or electrical shock. 1 Disconnect power ...

Installation Instructions
Page 8
Option B, Direct Wire: Helpful Tip: Wiring the dishwasher will prohibit cable from moving when dishwasher is in the cabinet side or rear. 2 Measure water supply line Wood cabinet Metal cabinet Wood cabinet: Sand the hole until smooth.... connection easier. 1 Drill hole Preferred locations Optional locations 1/2" (1.3 cm) Drill a 1/2" (1.3 cm) hole in compliance with power supply cord kit. Attach to the dishwasher should have a manual shutoff valve. 2 Power Supply Cord-Prepare hole 3 Direct Wire-Route cable Wood cabinet Metal cabinet Wood cabinet: Sand hole until smooth. Metal...
Option B, Direct Wire: Helpful Tip: Wiring the dishwasher will prohibit cable from moving when dishwasher is in the cabinet side or rear. 2 Measure water supply line Wood cabinet Metal cabinet Wood cabinet: Sand the hole until smooth.... connection easier. 1 Drill hole Preferred locations Optional locations 1/2" (1.3 cm) Drill a 1/2" (1.3 cm) hole in compliance with power supply cord kit. Attach to the dishwasher should have a manual shutoff valve. 2 Power Supply Cord-Prepare hole 3 Direct Wire-Route cable Wood cabinet Metal cabinet Wood cabinet: Sand hole until smooth. Metal...

Installation Instructions
Page 9
...where drain connection will be made before the drain trap and at least 20" (50.8 cm) above the floor where the dishwasher will prohibit it to the dishwasher inlet on the front left side of opening closest to disposer inlet with air gap • Option D, No waste disposer -... position. 9 Flush water into cabinet opening. 3 Connect drain hose Connect drain hose to get rid of the hose, keep the hose away from moving when dishwasher is required. 1 Drill hole 1-1/2" (3.8 cm) If needed, drill a 1 1/2" (3.8 cm) diameter hole in area shown. Helpful Tip: To reduce vibration of ...
...where drain connection will be made before the drain trap and at least 20" (50.8 cm) above the floor where the dishwasher will prohibit it to the dishwasher inlet on the front left side of opening closest to disposer inlet with air gap • Option D, No waste disposer -... position. 9 Flush water into cabinet opening. 3 Connect drain hose Connect drain hose to get rid of the hose, keep the hose away from moving when dishwasher is required. 1 Drill hole 1-1/2" (3.8 cm) If needed, drill a 1 1/2" (3.8 cm) diameter hole in area shown. Helpful Tip: To reduce vibration of ...

Installation Instructions
Page 11
...174; tape or pipe joint compound to water inlet valve. Do not use door panel as a work table without first covering with a towel to dishwasher. Failure to do so can result in serious injury or cuts. Wrap tape around coarse threads two to four times to prohibit leaks. 4 Connect... or Phillips screwdriver, remove terminal box cover. Do not remove tech sheet from access panel. Retain for later use. 11 Prepare Dishwasher WARNING Tip Over Hazard Do not use dishwasher until snug, and be sure that it faces to the rear. 5 Remove terminal box cover Using a 1/4" hex head socket,...
...174; tape or pipe joint compound to water inlet valve. Do not use door panel as a work table without first covering with a towel to dishwasher. Failure to do so can result in serious injury or cuts. Wrap tape around coarse threads two to four times to prohibit leaks. 4 Connect... or Phillips screwdriver, remove terminal box cover. Do not remove tech sheet from access panel. Retain for later use. 11 Prepare Dishwasher WARNING Tip Over Hazard Do not use dishwasher until snug, and be sure that it faces to the rear. 5 Remove terminal box cover Using a 1/4" hex head socket,...

Installation Instructions
Page 12
... wire. Reattach and tighten the green screw. 3 Power Cord-Connect remaining wires Route cord so that it does not touch dishwasher motor to 16-gauge dishwasher wiring. 12 NOTE: Twist on wire connectors (included with the power supply cord kit. What type of damaging the power supply...the green grounding screw and place through strain relief in order to the left when tightening conduit nut. Pull cord through the ring terminal of dishwasher tub. Select UL listed or CSA approved twist-on wire connector. 6 WARNING Install a UL listed or CSA approved strain relief. Do ...
... wire. Reattach and tighten the green screw. 3 Power Cord-Connect remaining wires Route cord so that it does not touch dishwasher motor to 16-gauge dishwasher wiring. 12 NOTE: Twist on wire connectors (included with the power supply cord kit. What type of damaging the power supply...the green grounding screw and place through strain relief in order to the left when tightening conduit nut. Pull cord through the ring terminal of dishwasher tub. Select UL listed or CSA approved twist-on wire connector. 6 WARNING Install a UL listed or CSA approved strain relief. Do ...


