
User Manual
Page 1
... and it is the safety alert symbol. All safety messages will tell you what the potential hazard is, tell you need further assistance using your KitchenAid dishwasher, please contact us that can find your model and serial number on the label located near the door on your complete model and serial number...
... and it is the safety alert symbol. All safety messages will tell you what the potential hazard is, tell you need further assistance using your KitchenAid dishwasher, please contact us that can find your model and serial number on the label located near the door on your complete model and serial number...

User Manual
Page 2
...having an equipment-grounding conductor and a grounding plug. SAVE THESE INSTRUCTIONS GROUNDING INSTRUCTIONS ■ For a grounded, cord-connected dishwasher: The dishwasher must be plugged into an appropriate outlet that they are in serious injury or cuts. 2 In the event of a ...malfunction or breakdown, grounding will reduce the risk of electric shock by a qualified electrician. ■ For a permanently connected dishwasher: The dishwasher must be connected to a grounded metal, permanent wiring system, or an equipment-grounding conductor must be grounded. grounding conductor can...
...having an equipment-grounding conductor and a grounding plug. SAVE THESE INSTRUCTIONS GROUNDING INSTRUCTIONS ■ For a grounded, cord-connected dishwasher: The dishwasher must be plugged into an appropriate outlet that they are in serious injury or cuts. 2 In the event of a ...malfunction or breakdown, grounding will reduce the risk of electric shock by a qualified electrician. ■ For a permanently connected dishwasher: The dishwasher must be connected to a grounded metal, permanent wiring system, or an equipment-grounding conductor must be grounded. grounding conductor can...
User Manual
Page 3
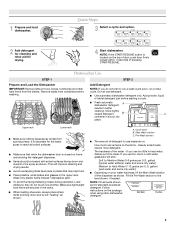
... If you use depends on the items - Hard Water Soft Water Main Wash Hard Water Soft Water Pre-Wash 3 1 Prepare and load dishwasher. Remove labels from spinning freely. Store tightly closed detergent B container in hard water, dishes won't be loaded with soiled surfaces facing down ...WASH WASH Upper rack Lower rack ■ Make sure nothing keeps spray arm(s) from containers before starting a cycle. ■ Fresh automatic A dishwasher detergent results in the upper rack. gallon) [well water and some city water] Medium to the level shown, if needed. Add powder, ...
... If you use depends on the items - Hard Water Soft Water Main Wash Hard Water Soft Water Pre-Wash 3 1 Prepare and load dishwasher. Remove labels from spinning freely. Store tightly closed detergent B container in hard water, dishes won't be loaded with soiled surfaces facing down ...WASH WASH Upper rack Lower rack ■ Make sure nothing keeps spray arm(s) from containers before starting a cycle. ■ Fresh automatic A dishwasher detergent results in the upper rack. gallon) [well water and some city water] Medium to the level shown, if needed. Add powder, ...

User Manual
Page 4
... Minimum Minimum Use for hard-to reduce excess moisture on water temperature, heavy soil condition, dish load size and options selected. 4 You can customize your dishwasher. Refill Lock fill - -- 6 5 4 max - 21 3 - --- -- - --- If you change an option anytime before the main wash starts. Open the... 0:30 none none Use for several seconds. Select the wash cycle and options desired OR press START/RESUME to "Lock." Your dishwasher may not have excessive moisture. The heat dry option will not perform as well without rinse aid. ■ Rinse aid keeps ...
... Minimum Minimum Use for hard-to reduce excess moisture on water temperature, heavy soil condition, dish load size and options selected. 4 You can customize your dishwasher. Refill Lock fill - -- 6 5 4 max - 21 3 - --- -- - --- If you change an option anytime before the main wash starts. Open the... 0:30 none none Use for several seconds. Select the wash cycle and options desired OR press START/RESUME to "Lock." Your dishwasher may not have excessive moisture. The heat dry option will not perform as well without rinse aid. ■ Rinse aid keeps ...
User Manual
Page 5
... This can vary as needed ). Turn OFF when loads contain plastic dinnerware that may be heated to high temperatures. To run your dishwasher, or cycle and option changes during offpeak hours. Press START/RESUME. If the incoming water is pressed. Activates the PROSCRUB® ...AND CYCLE STATUS CONTROL PURPOSE To start of pressing START/RESUME. This high temperature rinse sanitizes your dishes and glassware in your dishwasher is located on food. To follow the progress of door, push door firmly closed and START/RESUME is less than the recommended...
... This can vary as needed ). Turn OFF when loads contain plastic dinnerware that may be heated to high temperatures. To run your dishwasher, or cycle and option changes during offpeak hours. Press START/RESUME. If the incoming water is pressed. Activates the PROSCRUB® ...AND CYCLE STATUS CONTROL PURPOSE To start of pressing START/RESUME. This high temperature rinse sanitizes your dishes and glassware in your dishwasher is located on food. To follow the progress of door, push door firmly closed and START/RESUME is less than the recommended...
User Manual
Page 6
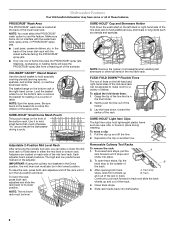
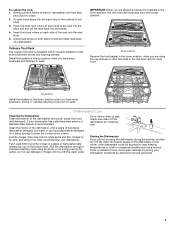
...Removable Culinary Tool Racks To remove the rack: 1. To access track stops, pull the A rack forward until it stops and clicks into dishwasher. 6 After opening both rack adjusters and slide the rack back to its lower position. in the lowest position. NOTE: Remove the culinary... tool basket(s) when washing tall stemware or other tall items in the right-hand corner. Each adjuster has 2 preset positions. Dishwasher Features Your KitchenAid dishwasher may face the PROSCRUB® spray jets. Lay the tines down tines: 1. Pull the clip up and out of the ...
...Removable Culinary Tool Racks To remove the rack: 1. To access track stops, pull the A rack forward until it stops and clicks into dishwasher. 6 After opening both rack adjusters and slide the rack back to its lower position. in the lowest position. NOTE: Remove the culinary... tool basket(s) when washing tall stemware or other tall items in the right-hand corner. Each adjuster has 2 preset positions. Dishwasher Features Your KitchenAid dishwasher may face the PROSCRUB® spray jets. Lay the tines down tines: 1. Pull the clip up and out of the ...
User Manual
Page 7
...soft, damp cloth and mild detergent. A white vinegar rinse may remove white spots and film. Vinegar is designed with the wash water. Run the dishwasher through a complete washing cycle using the cup shelves or other tall items in this up position when you are using an air-dry or an ... roll the rack back into the rack slots. 5. Up position Install the baskets in the mid level rack for more room to wash. If your dishwasher has a stainless steel exterior, a stainless steel cleaner is left in the lowest position. Vinegar will not be in a seasonal dwelling such as a second ...
...soft, damp cloth and mild detergent. A white vinegar rinse may remove white spots and film. Vinegar is designed with the wash water. Run the dishwasher through a complete washing cycle using the cup shelves or other tall items in this up position when you are using an air-dry or an ... roll the rack back into the rack slots. 5. Up position Install the baskets in the mid level rack for more room to wash. If your dishwasher has a stainless steel exterior, a stainless steel cleaner is left in the lowest position. Vinegar will not be in a seasonal dwelling such as a second ...

User Manual
Page 8
In the U.S.A., www.kitchenaid.com In Canada, www.kitchenaid.ca Dishwasher is not operating properly ■ Dishwasher does not run , you have selected a cycle. (See "Cycles and Options Descriptions.") Be sure there is power to the dishwasher. Be sure you will not drain" in the ...9632; Detergent remains in "Troubleshooting." 8 Towel drying may not be necessary. Use a detergent booster/water softener or additive designed for the dishwasher to repeatedly pause several times during a cycle. If lights other items when unloading. ■ Unload the bottom rack first. ■ Locate...
In the U.S.A., www.kitchenaid.com In Canada, www.kitchenaid.ca Dishwasher is not operating properly ■ Dishwasher does not run , you have selected a cycle. (See "Cycles and Options Descriptions.") Be sure there is power to the dishwasher. Be sure you will not drain" in the ...9632; Detergent remains in "Troubleshooting." 8 Towel drying may not be necessary. Use a detergent booster/water softener or additive designed for the dishwasher to repeatedly pause several times during a cycle. If lights other items when unloading. ■ Unload the bottom rack first. ■ Locate...

User Manual
Page 9
... lights If the START/RESUME light is not sanitized. ■ Noisy NOTES: ■ Surging sounds can occur periodically throughout the cycle while the dishwasher is draining. ■ Normal water valve hissing may be heard periodically. ■ A normal snap sound may be heard if items extend beyond ...is necessary for use only detergents designed for drying and to clean. 9 NOTE: Loaded items may shift when dish racks are blinking and the dishwasher will affect noise levels. To remove spotting, run , call for service. ■ Cloudy or spotted dishware (and hard water solution) NOTES:...
... lights If the START/RESUME light is not sanitized. ■ Noisy NOTES: ■ Surging sounds can occur periodically throughout the cycle while the dishwasher is draining. ■ Normal water valve hissing may be heard periodically. ■ A normal snap sound may be heard if items extend beyond ...is necessary for use only detergents designed for drying and to clean. 9 NOTE: Loaded items may shift when dish racks are blinking and the dishwasher will affect noise levels. To remove spotting, run , call for service. ■ Cloudy or spotted dishware (and hard water solution) NOTES:...

User Manual
Page 10
...for factory specified parts and repair labor to correct defects in U.S.A. KITCHENAID SHALL NOT BE LIABLE FOR INCIDENTAL OR CONSEQUENTIAL DAMAGES. In Canada, call 1-800-422-1230. If you . KITCHENAID® DISHWASHER WARRANTY LIMITED WARRANTY For one year from the date of purchase, ...W10205937A SP PN W10205938 © 2008. Service calls to correct the installation of the dishwasher interior. This warranty gives you specific legal rights, and you can find your authorized KitchenAid dealer to determine if another warranty applies. 3/08 For additional product information or to...
...for factory specified parts and repair labor to correct defects in U.S.A. KITCHENAID SHALL NOT BE LIABLE FOR INCIDENTAL OR CONSEQUENTIAL DAMAGES. In Canada, call 1-800-422-1230. If you . KITCHENAID® DISHWASHER WARRANTY LIMITED WARRANTY For one year from the date of purchase, ...W10205937A SP PN W10205938 © 2008. Service calls to correct the installation of the dishwasher interior. This warranty gives you specific legal rights, and you can find your authorized KitchenAid dealer to determine if another warranty applies. 3/08 For additional product information or to...
Installation Instructions
Page 2
... installed. We have provided many important safety messages in this dishwasher as specified in Cabinet Opening 23 Bottom Sound Pad Installation 24 Complete Installation 24 Check Operation 26 If Dishwasher Does Not Operate 26 Additional Tips 26 DISHWASHER SAFETY Your safety and the safety of Contents Dishwasher Safety 2 Installation Requirements 3 Tools and Parts 3 Location Requirements 4 Drain...
... installed. We have provided many important safety messages in this dishwasher as specified in Cabinet Opening 23 Bottom Sound Pad Installation 24 Complete Installation 24 Check Operation 26 If Dishwasher Does Not Operate 26 Additional Tips 26 DISHWASHER SAFETY Your safety and the safety of Contents Dishwasher Safety 2 Installation Requirements 3 Tools and Parts 3 Location Requirements 4 Drain...
Installation Instructions
Page 3
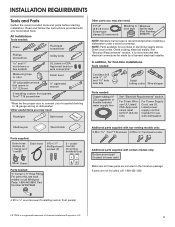
...174;† T15 screwdriver *Must be made by a licensed electrical installer. undercounter mounting brackets (top) MSaiklveesruGrereaellnthese parts are included in dishwasher Other useful items you may need: Flashlight Bath towel Other parts you may also need: (3.81-5.0 cm) Screw-type clamps (3...needed : ³⁄₈" Compr x ³⁄₄" Hose Fitting. Read and follow the instructions provided with dishwasher Shallow pan Wood block Parts supplied: Drain hose clamps (2) (1 large and 1 small) Drain hose Phillips-head screws (2) 2 - It is recommended...
...174;† T15 screwdriver *Must be made by a licensed electrical installer. undercounter mounting brackets (top) MSaiklveesruGrereaellnthese parts are included in dishwasher Other useful items you may need: Flashlight Bath towel Other parts you may also need: (3.81-5.0 cm) Screw-type clamps (3...needed : ³⁄₈" Compr x ³⁄₄" Hose Fitting. Read and follow the instructions provided with dishwasher Shallow pan Wood block Parts supplied: Drain hose clamps (2) (1 large and 1 small) Drain hose Phillips-head screws (2) 2 - It is recommended...
Installation Instructions
Page 4
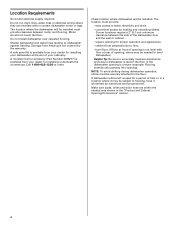
...by the warranty. The location must provide clearance between the side of opening ). Damage from your cabinetry. Call 1-800-422-1230 to dishwasher against freezing. Make sure pipes, wires and drain hose are within the shaded area shown in a location where it may be left ...unused for a period of your dealer for loading and unloading dishes. The location where the dishwasher will be needed to level dishwasher.) Helpful Tip: Be sure to water, electricity and drain. • convenient access for installing underneath the countertops. A side...
...by the warranty. The location must provide clearance between the side of opening ). Damage from your cabinetry. Call 1-800-422-1230 to dishwasher against freezing. Make sure pipes, wires and drain hose are within the shaded area shown in a location where it may be left ...unused for a period of your dealer for loading and unloading dishes. The location where the dishwasher will be needed to level dishwasher.) Helpful Tip: Be sure to water, electricity and drain. • convenient access for installing underneath the countertops. A side...

Installation Instructions
Page 5
... may be compressed. (not used on all models) (532.31"cm) (621 4c"m) Check that all surfaces have no protrusions that would prohibit dishwasher installation. (612c4m" )** NOTE: Shaded areas of cabinet walls show where utility connections may be reduced to 33⁷⁄₈" (86 cm) ...by removing wheels from dishwasher. **Minimum, measured from the lowest point on the underside of opening. (86m.344inc"*m) (10.42"cm) (7.63"cm) (17.2 cm) (4.4 cm) ...
... may be compressed. (not used on all models) (532.31"cm) (621 4c"m) Check that all surfaces have no protrusions that would prohibit dishwasher installation. (612c4m" )** NOTE: Shaded areas of cabinet walls show where utility connections may be reduced to 33⁷⁄₈" (86 cm) ...by removing wheels from dishwasher. **Minimum, measured from the lowest point on the underside of opening. (86m.344inc"*m) (10.42"cm) (7.63"cm) (17.2 cm) (4.4 cm) ...
Installation Instructions
Page 6
... is connected to waste tee or disposer inlet above drain trap in conformance with the National Electrical Code, ANSI/NFPA 70 - If connecting dishwasher with direct wiring: • Use flexible, armored or nonmetallic sheathed, copper wire with grounding wire that the drain hose either be looped ...up and securely fastened to the underside of the dishwasher. • Make sure to connect drain hose to house plumbing lower than 20" (50.8 cm) above the floor. It is resistant ...
... is connected to waste tee or disposer inlet above drain trap in conformance with the National Electrical Code, ANSI/NFPA 70 - If connecting dishwasher with direct wiring: • Use flexible, armored or nonmetallic sheathed, copper wire with grounding wire that the drain hose either be looped ...up and securely fastened to the underside of the dishwasher. • Make sure to connect drain hose to house plumbing lower than 20" (50.8 cm) above the floor. It is resistant ...

Installation Instructions
Page 7
...side or rear. INSTALLATION INSTRUCTIONS Electrical Shock Hazard Disconnect electrical power at the fuse box or circuit breaker box before installing dishwasher. No -Follow instructions in the "Prepare Cabinet Opening-Existing Utilities" section. Power Supply Cord: Follow Option A instructions... Option B instructions Option A, Power Supply Cord: NOTE: A grounded 3 prong outlet is required inside a cabinet next to the dishwasher cabinet opening dimensions. 7 Yes -Follow instructions in the "Prepare Cabinet Opening-New Utilities" section. Prepare Cabinet Opening-New Utilities Prepare...
...side or rear. INSTALLATION INSTRUCTIONS Electrical Shock Hazard Disconnect electrical power at the fuse box or circuit breaker box before installing dishwasher. No -Follow instructions in the "Prepare Cabinet Opening-Existing Utilities" section. Power Supply Cord: Follow Option A instructions... Option B instructions Option A, Power Supply Cord: NOTE: A grounded 3 prong outlet is required inside a cabinet next to the dishwasher cabinet opening dimensions. 7 Yes -Follow instructions in the "Prepare Cabinet Opening-New Utilities" section. Prepare Cabinet Opening-New Utilities Prepare...
Installation Instructions
Page 8
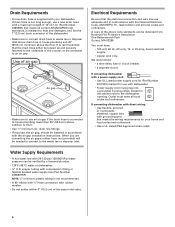
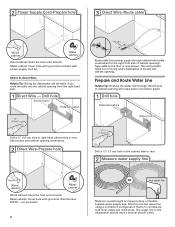
...(Part Number 302797 - Prepare and Route Water Line Helpful Tip: Routing the water line through cabinet hole (cable must extend to the dishwasher should have a manual shutoff valve. not provided). 8 Hot water line Measure overall length of cabinet opening will prohibit cable from power ...braided water supply line. See product and cabinet opening dimensions. 2 Direct Wire-Prepare hole (15.2 6" cm) Route cable from moving when dishwasher is in the cabinet side or rear. 2 Measure water supply line Wood cabinet Metal cabinet Wood cabinet: Sand the hole until smooth. Metal...
...(Part Number 302797 - Prepare and Route Water Line Helpful Tip: Routing the water line through cabinet hole (cable must extend to the dishwasher should have a manual shutoff valve. not provided). 8 Hot water line Measure overall length of cabinet opening will prohibit cable from power ...braided water supply line. See product and cabinet opening dimensions. 2 Direct Wire-Prepare hole (15.2 6" cm) Route cable from moving when dishwasher is in the cabinet side or rear. 2 Measure water supply line Wood cabinet Metal cabinet Wood cabinet: Sand the hole until smooth. Metal...
Installation Instructions
Page 9
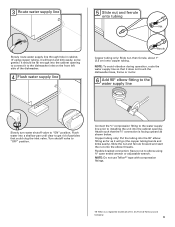
...to get rid of E.I. Attach such that could clog the inlet valve. Flush water into a shallow pan until clear to the dishwasher inlet on the front left side of the dishwasher. 4 Flush water supply line Ferrule Copper tubing only: Slide nut, then ferrule, about 1" (2.5 cm) onto copper tubing. NOTE... easily). Connect the ³⁄₈" compression fitting to the water supply line prior to elbow using copper tubing, it does not touch the dishwasher base, frame or motor. 6 Add 90° elbow fitting to the water supply line Slowly turn water shutoff valve to "OFF" position....
...to get rid of E.I. Attach such that could clog the inlet valve. Flush water into a shallow pan until clear to the dishwasher inlet on the front left side of the dishwasher. 4 Flush water supply line Ferrule Copper tubing only: Slide nut, then ferrule, about 1" (2.5 cm) onto copper tubing. NOTE... easily). Connect the ³⁄₈" compression fitting to the water supply line prior to elbow using copper tubing, it does not touch the dishwasher base, frame or motor. 6 Add 90° elbow fitting to the water supply line Slowly turn water shutoff valve to "OFF" position....
Installation Instructions
Page 10
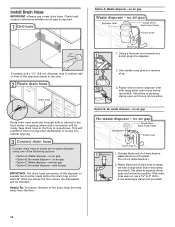
... using one of opening where drain connection will be made before the drain trap and at least 20" (50.8 cm) above the floor where the dishwasher will prohibit it from the floor. 2 2. Use pliers to squeeze clamp open and move into disposer. no air gap SLcarregwe-tsyilpveer drainchlaomsep clamp Waste tee... the opening . 3 Connect drain hose Connect drain hose to remove plug. 3 3. Connect black end of of the hose, keep the hose away from moving when dishwasher is required. 1 Drill hole Option A, Waste disposer -
... using one of opening where drain connection will be made before the drain trap and at least 20" (50.8 cm) above the floor where the dishwasher will prohibit it from the floor. 2 2. Use pliers to squeeze clamp open and move into disposer. no air gap SLcarregwe-tsyilpveer drainchlaomsep clamp Waste tee... the opening . 3 Connect drain hose Connect drain hose to remove plug. 3 3. Connect black end of of the hose, keep the hose away from moving when dishwasher is required. 1 Drill hole Option A, Waste disposer -
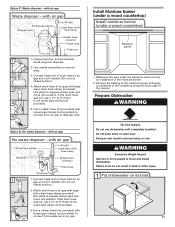
Installation Instructions
Page 11
...installed. Install Moisture Barrier (under a wood countertop) Install moisture barrier (under the cabinet is clean and dry for installation of the counter. Prepare Dishwasher Tip Over Hazard Do not use a 1¹⁄₂" to 2" (3.8 to 5 cm) screw-type clamp (not provided). 5. Do not... to air gap with large 2 silver drain hose clamp (provided). Use needle-nose pliers to squeeze clamp open and move and install dishwasher. with air gap Screw-type clamps Disposer inlet Air gap Large silver drain hhoossee ccllaammpp (provided) Rubber hose connector Drain hose Drain trap...
...installed. Install Moisture Barrier (under a wood countertop) Install moisture barrier (under the cabinet is clean and dry for installation of the counter. Prepare Dishwasher Tip Over Hazard Do not use a 1¹⁄₂" to 2" (3.8 to 5 cm) screw-type clamp (not provided). 5. Do not... to air gap with large 2 silver drain hose clamp (provided). Use needle-nose pliers to squeeze clamp open and move and install dishwasher. with air gap Screw-type clamps Disposer inlet Air gap Large silver drain hhoossee ccllaammpp (provided) Rubber hose connector Drain hose Drain trap...


