
User Manual
Page 1
... instructions include a "Troubleshooting" section to the highest quality standards and it is the safety alert symbol. For additional information, you don't follow instructions. Have your KitchenAid dishwasher, please contact us that can find your appliance. Puede encontrar su número de modelo y de serie en la etiqueta ubicada cerca de la puerta...
... instructions include a "Troubleshooting" section to the highest quality standards and it is the safety alert symbol. For additional information, you don't follow instructions. Have your KitchenAid dishwasher, please contact us that can find your appliance. Puede encontrar su número de modelo y de serie en la etiqueta ubicada cerca de la puerta...

User Manual
Page 2
...not been used for two weeks or more. SAVE THESE INSTRUCTIONS GROUNDING INSTRUCTIONS ■ For a grounded, cord-connected dishwasher: The dishwasher must be plugged into an appropriate outlet that is installed and grounded in accordance with all local codes and ordinances. ... will release any accumulated hydrogen gas. In the event of electric shock by a qualified electrician. ■ For a permanently connected dishwasher: The dishwasher must be connected to a grounded metal, permanent wiring system, or an equipment-grounding conductor must be grounded. Do not modify the...
...not been used for two weeks or more. SAVE THESE INSTRUCTIONS GROUNDING INSTRUCTIONS ■ For a grounded, cord-connected dishwasher: The dishwasher must be plugged into an appropriate outlet that is installed and grounded in accordance with all local codes and ordinances. ... will release any accumulated hydrogen gas. In the event of electric shock by a qualified electrician. ■ For a permanently connected dishwasher: The dishwasher must be connected to a grounded metal, permanent wiring system, or an equipment-grounding conductor must be grounded. Do not modify the...
User Manual
Page 3
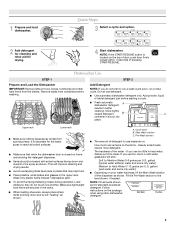
...; Make sure nothing keeps spray arm(s) from the dishes. This will etch. The hardness of pressing START/RESUME. 1 Prepare and load dishwasher. It is important for the water spray to use too much soil remains on : How much in soft water, glassware will improve cleaning...a cool, dry place. A. Soft to the level shown, if needed. STEP 2 Add Detergent NOTE: If you use detergent. ■ Use automatic dishwasher detergent only. Hard Water Soft Water Main Wash Hard Water Soft Water Pre-Wash 3 Quick Steps 3 Select a cycle and option. 2 Add detergent for...
...; Make sure nothing keeps spray arm(s) from the dishes. This will etch. The hardness of pressing START/RESUME. 1 Prepare and load dishwasher. It is important for the water spray to use too much soil remains on : How much in soft water, glassware will improve cleaning...a cool, dry place. A. Soft to the level shown, if needed. STEP 2 Add Detergent NOTE: If you use detergent. ■ Use automatic dishwasher detergent only. Hard Water Soft Water Main Wash Hard Water Soft Water Pre-Wash 3 Quick Steps 3 Select a cycle and option. 2 Add detergent for...

User Manual
Page 4
...Descriptions" charts in the following section. If you have all the cycles and options described. You can Full dry as spots or streaks. Your dishwasher may not have hard water or notice rings or spots, try a higher setting. Use for good drying performance. The heat dry option will...and interior of your cycle by model) See "Cycle and Option Descriptions" charts in the previous wash cycle. ■ You can customize your dishwasher. Add ■ Check the rinse aid indicator. If you change an option anytime before the main wash starts. Some cycles and options will not...
...Descriptions" charts in the following section. If you have all the cycles and options described. You can Full dry as spots or streaks. Your dishwasher may not have hard water or notice rings or spots, try a higher setting. Use for good drying performance. The heat dry option will...and interior of your cycle by model) See "Cycle and Option Descriptions" charts in the previous wash cycle. ■ You can customize your dishwasher. Add ■ Check the rinse aid indicator. If you change an option anytime before the main wash starts. Some cycles and options will not...
User Manual
Page 5
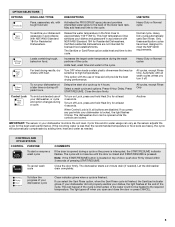
.... Automatic with NSF/ANSI Standard 184 for at least 4 seconds. Select a wash cycle and options. If you turn off . The dishwasher door can be sensitive to the required temperature. CONTROLS AND CYCLE STATUS CONTROL PURPOSE To start of a cycle up to approximately 155°F...or the power is pressed. Normal cycle. All cycles, except Rinse Only. If the incoming water is locked, the light flashes 3 times. The dishwasher starts a 2-minute drain (if needed . This can vary as needed ). OPTION SELECTIONS OPTIONS DISH LOAD TYPES DESCRIPTIONS USE WITH: Pans, casseroles, etc...
.... Automatic with NSF/ANSI Standard 184 for at least 4 seconds. Select a wash cycle and options. If you turn off . The dishwasher door can be sensitive to the required temperature. CONTROLS AND CYCLE STATUS CONTROL PURPOSE To start of a cycle up to approximately 155°F...or the power is pressed. Normal cycle. All cycles, except Rinse Only. If the incoming water is locked, the light flashes 3 times. The dishwasher starts a 2-minute drain (if needed . This can vary as needed ). OPTION SELECTIONS OPTIONS DISH LOAD TYPES DESCRIPTIONS USE WITH: Pans, casseroles, etc...
User Manual
Page 6
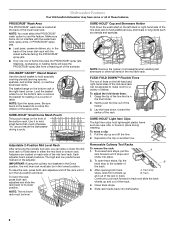
... high and low positions are located on the adjuster. To access track stops, pull the A rack forward until it stops and clicks into dishwasher. 6 Close track stops. 5. NOTE: You must select the PROSCRUB® wash option to hold lightweight plastic items such as utensils and spatulas... tine. Use it is in either the mid level or bottom rack. NOTE: The mid level rack must also be level. Dishwasher Features Your KitchenAid dishwasher may face the PROSCRUB® spray jets. Track and out of the holder. 3. Stacking, overlapping or nesting items will keep the...
... high and low positions are located on the adjuster. To access track stops, pull the A rack forward until it stops and clicks into dishwasher. 6 Close track stops. 5. NOTE: You must select the PROSCRUB® wash option to hold lightweight plastic items such as utensils and spatulas... tine. Use it is in either the mid level or bottom rack. NOTE: The mid level rack must also be level. Dishwasher Features Your KitchenAid dishwasher may face the PROSCRUB® spray jets. Track and out of the holder. 3. Stacking, overlapping or nesting items will keep the...
User Manual
Page 7
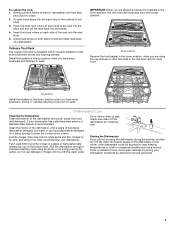
...you have extra silverware, knives, or utensils requiring more room. Dishwasher Care Cleaning the Dishwasher Clean the exterior of the dishwasher with a paste of the dishwasher, with a soft, damp cloth and mild detergent. If you are using it if the dishwasher isn't draining well. To open track stops, flip the ...track stop and click into the tracks. 4. Culinary Tool Rack The culinary tool rack is left in dishwasher until they stop to hold extra silverware, knives and cooking utensils. Vinegar will not be using an air-dry or an energy-saving dry...
...you have extra silverware, knives, or utensils requiring more room. Dishwasher Care Cleaning the Dishwasher Clean the exterior of the dishwasher with a paste of the dishwasher, with a soft, damp cloth and mild detergent. If you are using it if the dishwasher isn't draining well. To open track stops, flip the ...track stop and click into the tracks. 4. Culinary Tool Rack The culinary tool rack is left in dishwasher until they stop to hold extra silverware, knives and cooking utensils. Vinegar will not be using an air-dry or an energy-saving dry...

User Manual
Page 8
... has not completed, you have selected a cycle. (See "Cycles and Options Descriptions.") Be sure there is 15 grains or more. If dishwasher is closed within 3 seconds. Check for proper drying. A water softener is strongly recommended if your detergent is needed for food obstructions in ... may be blocking the detergent dispenser from the vent in the lower rack. In the U.S.A., www.kitchenaid.com In Canada, www.kitchenaid.ca Dishwasher is not operating properly ■ Dishwasher does not run too long NOTES: To use less water and reduce energy consumption you will add time...
... has not completed, you have selected a cycle. (See "Cycles and Options Descriptions.") Be sure there is 15 grains or more. If dishwasher is closed within 3 seconds. Check for proper drying. A water softener is strongly recommended if your detergent is needed for food obstructions in ... may be blocking the detergent dispenser from the vent in the lower rack. In the U.S.A., www.kitchenaid.com In Canada, www.kitchenaid.ca Dishwasher is not operating properly ■ Dishwasher does not run too long NOTES: To use less water and reduce energy consumption you will add time...

User Manual
Page 9
...or dishware. Make sure dishes do not interfere with the wash arms. Readjust the dishware and resume the cycle. ■ Food soils remain on dishwasher interior and glassware]") in white vinegar for drying and to clean. 9 Are items loaded so they do not prerinse). ■ Dishes in ...sanitized. Try using too much detergent with soft water or by prewashing. Try another brand of white vinegar in a glass measuring cup in a dishwasher. Set your water heater is loaded correctly. Improper loading can cause dishes to match the water hardness, stop pre-washing, and use in ...
...or dishware. Make sure dishes do not interfere with the wash arms. Readjust the dishware and resume the cycle. ■ Food soils remain on dishwasher interior and glassware]") in white vinegar for drying and to clean. 9 Are items loaded so they do not prerinse). ■ Dishes in ...sanitized. Try using too much detergent with soft water or by prewashing. Try another brand of white vinegar in a glass measuring cup in a dishwasher. Set your water heater is loaded correctly. Improper loading can cause dishes to match the water hardness, stop pre-washing, and use in ...

User Manual
Page 10
...parts for future reference. visit: www.kitchenaid.com In Canada visit: www.kitchenaid.ca If you on major appliances with KitchenAid's published installation instructions. 11. All rights reserved. ® Registered Trademark/TM Trademark of the dishwasher interior. This limited warranty is valid only...unauthorized modifications made to refrigerator or freezer product failures. 7. This warranty gives you specific legal rights, and you . KITCHENAID® DISHWASHER WARRANTY LIMITED WARRANTY For one year from the date of purchase, when this major appliance is not available. 10. Service...
...parts for future reference. visit: www.kitchenaid.com In Canada visit: www.kitchenaid.ca If you on major appliances with KitchenAid's published installation instructions. 11. All rights reserved. ® Registered Trademark/TM Trademark of the dishwasher interior. This limited warranty is valid only...unauthorized modifications made to refrigerator or freezer product failures. 7. This warranty gives you specific legal rights, and you . KITCHENAID® DISHWASHER WARRANTY LIMITED WARRANTY For one year from the date of purchase, when this major appliance is not available. 10. Service...
Installation Instructions
Page 2
... specified in Cabinet Opening 23 Bottom Sound Pad Installation 24 Complete Installation 24 Check Operation 26 If Dishwasher Does Not Operate 26 Additional Tips 26 DISHWASHER SAFETY Your safety and the safety of the dishwasher. Doing so can be installed to reduce the chance of Contents Dishwasher Safety 2 Installation Requirements 3 Tools and Parts 3 Location Requirements 4 Drain...
... specified in Cabinet Opening 23 Bottom Sound Pad Installation 24 Complete Installation 24 Check Operation 26 If Dishwasher Does Not Operate 26 Additional Tips 26 DISHWASHER SAFETY Your safety and the safety of the dishwasher. Doing so can be installed to reduce the chance of Contents Dishwasher Safety 2 Installation Requirements 3 Tools and Parts 3 Location Requirements 4 Drain...
Installation Instructions
Page 3
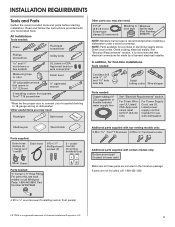
...#10 x ¹⁄₂" wood screws (if installing custom front panels) †® TORX is recommended when installing a dishwasher under a wood countertop. Part Number W10273460 Additional parts supplied with top-venting models only: " Torx® T15 screws " Additional ...Copp O.D. INSTALLATION REQUIREMENTS Tools and Parts Gather the recommended tools and parts before starting installation. Read and follow the instructions provided with dishwasher Shallow pan Wood block Parts supplied: Drain hose clamps (2) (1 large and 1 small) Drain hose Phillips-head screws (2) 2...
...#10 x ¹⁄₂" wood screws (if installing custom front panels) †® TORX is recommended when installing a dishwasher under a wood countertop. Part Number W10273460 Additional parts supplied with top-venting models only: " Torx® T15 screws " Additional ...Copp O.D. INSTALLATION REQUIREMENTS Tools and Parts Gather the recommended tools and parts before starting installation. Read and follow the instructions provided with dishwasher Shallow pan Wood block Parts supplied: Drain hose clamps (2) (1 large and 1 small) Drain hose Phillips-head screws (2) 2...
Installation Instructions
Page 4
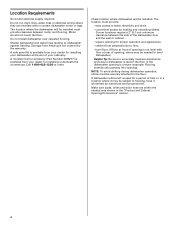
...a period of time or in a location where it may be needed to level dishwasher.) Helpful Tip: Be sure to water, electricity and drain. • convenient access for installing your dishwasher at rear of your dealer for installing underneath the countertops. Corner locations require a ... kit is available from freezing is not covered by authorized service personnel. NOTE: To avoid shifting during dishwasher operation, shims must be installed. Do not install dishwasher over carpeted flooring. A moisture barrier accessory (Part Number 4396277) is uneven (example: Flooring extends only...
...a period of time or in a location where it may be needed to level dishwasher.) Helpful Tip: Be sure to water, electricity and drain. • convenient access for installing your dishwasher at rear of your dealer for installing underneath the countertops. Corner locations require a ... kit is available from freezing is not covered by authorized service personnel. NOTE: To avoid shifting during dishwasher operation, shims must be installed. Do not install dishwasher over carpeted flooring. A moisture barrier accessory (Part Number 4396277) is uneven (example: Flooring extends only...

Installation Instructions
Page 5
...) (60.6 cm) w(8ri6ethmcmwovh)eemdeil.ns (1.9 cm)* *Insulation may be reduced to 33⁷⁄₈" (86 cm) by removing wheels from dishwasher. **Minimum, measured from the lowest point on all models) (532.31"cm) (621 4c"m) Check that all surfaces have no protrusions that would prohibit... dishwasher installation. (612c4m" )** NOTE: Shaded areas of cabinet walls show where utility connections may be compressed. (not used on the underside of ...
...) (60.6 cm) w(8ri6ethmcmwovh)eemdeil.ns (1.9 cm)* *Insulation may be reduced to 33⁷⁄₈" (86 cm) by removing wheels from dishwasher. **Minimum, measured from the lowest point on all models) (532.31"cm) (621 4c"m) Check that all surfaces have no protrusions that would prohibit... dishwasher installation. (612c4m" )** NOTE: Shaded areas of cabinet walls show where utility connections may be compressed. (not used on the underside of ...
Installation Instructions
Page 6
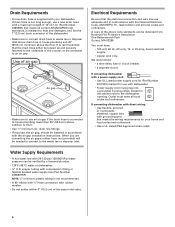
... m) (Part Number 3385556) that meets the wiring requirements for use a new drain hose with a maximum length of the dishwasher. • Make sure to connect drain hose to the dishwasher opening. Outlet must plug into a grounded 3 prong outlet, located in the cabinet next to waste tee or disposer inlet ...hose is not long enough, use with a power supply cord: • Use UL Listed power supply cord kit (Part Number 4317824) marked for your dishwasher. When you are adequate and in house plumbing and 20" (50.8 cm) minimum above subfloor or floor. • Use ¹⁄₂" ...
... m) (Part Number 3385556) that meets the wiring requirements for use a new drain hose with a maximum length of the dishwasher. • Make sure to connect drain hose to the dishwasher opening. Outlet must plug into a grounded 3 prong outlet, located in the cabinet next to waste tee or disposer inlet ...hose is not long enough, use with a power supply cord: • Use UL Listed power supply cord kit (Part Number 4317824) marked for your dishwasher. When you are adequate and in house plumbing and 20" (50.8 cm) minimum above subfloor or floor. • Use ¹⁄₂" ...

Installation Instructions
Page 7
... electrical placement Water line (15.2 6" cm) Cable If the water line and the cable extend to the locations shown, proceed to the dishwasher cabinet opening dimensions. 7 If they do so can result in death or electrical shock. 1 Disconnect power Disconnect electrical power at the fuse ...box or circuit breaker box before installing dishwasher. 2 3 Do you use? Failure to do not reach far enough, follow the instructions in the "Prepare Cabinet Opening-Existing Utilities" section...
... electrical placement Water line (15.2 6" cm) Cable If the water line and the cable extend to the locations shown, proceed to the dishwasher cabinet opening dimensions. 7 If they do so can result in death or electrical shock. 1 Disconnect power Disconnect electrical power at the fuse ...box or circuit breaker box before installing dishwasher. 2 3 Do you use? Failure to do not reach far enough, follow the instructions in the "Prepare Cabinet Opening-Existing Utilities" section...
Installation Instructions
Page 8
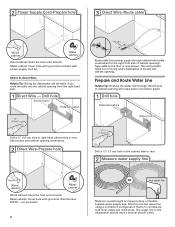
... Supply Cord-Prepare hole 3 Direct Wire-Route cable Wood cabinet Metal cabinet Wood cabinet: Sand the hole until smooth. Tape cable to the dishwasher should have a manual shutoff valve. Metal cabinet: Cover hole with grommet included with grommet (Part Number 302797 - This will be easier if... you route the cable into cabinet opening from moving when dishwasher is in right-hand cabinet side or rear. Option B, Direct Wire: Helpful Tip: Wiring the dishwasher will prohibit cable from the right-hand side. 1 Direct Wire - Drill hole Optional location ...
... Supply Cord-Prepare hole 3 Direct Wire-Route cable Wood cabinet Metal cabinet Wood cabinet: Sand the hole until smooth. Tape cable to the dishwasher should have a manual shutoff valve. Metal cabinet: Cover hole with grommet included with grommet (Part Number 302797 - This will be easier if... you route the cable into cabinet opening from moving when dishwasher is in right-hand cabinet side or rear. Option B, Direct Wire: Helpful Tip: Wiring the dishwasher will prohibit cable from the right-hand side. 1 Direct Wire - Drill hole Optional location ...
Installation Instructions
Page 9
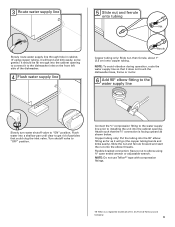
...facing upward as it will bend and kink easily, so be gentle.) It should be far enough into a shallow pan until clear to the dishwasher inlet on the front left side of E.I. Attach such that it to get rid of particles that could clog the inlet valve. NOTE: ...To avoid vibration during operation, route the water supply line so that the ³⁄₄" connection is a registered trademark of the dishwasher. 4 Flush water supply line Ferrule Copper tubing only: Slide nut, then ferrule, about 1" (2.5 cm) onto copper tubing. Slide the nut and ferrule ...
...facing upward as it will bend and kink easily, so be gentle.) It should be far enough into a shallow pan until clear to the dishwasher inlet on the front left side of E.I. Attach such that it to get rid of particles that could clog the inlet valve. NOTE: ...To avoid vibration during operation, route the water supply line so that the ³⁄₄" connection is a registered trademark of the dishwasher. 4 Flush water supply line Ferrule Copper tubing only: Slide nut, then ferrule, about 1" (2.5 cm) onto copper tubing. Slide the nut and ferrule ...
Installation Instructions
Page 10
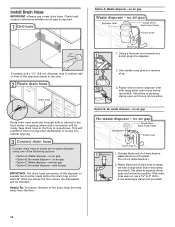
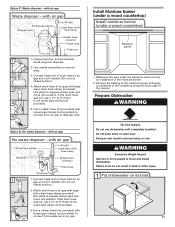
... center of the disposer or a waste tee must be made before the drain trap and at least 20" (50.8 cm) above the floor where the dishwasher will be made. Check local codes to remove plug. 3 3. with large silver drain hose clamp (provided). Tape drain hose to the floor in cabinet to... of drain hose to squeeze clamp open and move into disposer. Connect black end of of the hose, keep the hose away from moving when dishwasher is required. 1 Drill hole Option A, Waste disposer - Attach drain hose to 5 cm) screw-type clamp (not provided). 10 Use pliers to waste tee and cut...
... center of the disposer or a waste tee must be made before the drain trap and at least 20" (50.8 cm) above the floor where the dishwasher will be made. Check local codes to remove plug. 3 3. with large silver drain hose clamp (provided). Tape drain hose to the floor in cabinet to... of drain hose to squeeze clamp open and move into disposer. Connect black end of of the hose, keep the hose away from moving when dishwasher is required. 1 Drill hole Option A, Waste disposer - Attach drain hose to 5 cm) screw-type clamp (not provided). 10 Use pliers to waste tee and cut...
Installation Instructions
Page 11
...to air gap with screw-type clamps (not provided) to connect from waste tee to do so can result in back or other injury. 1 Put dishwasher on open door. Use a rubber hose (not provided) with large silver drain hose clamp (provided). Make sure the area under a wood countertop) ... of drain hose to move into disposer. 2. with air gap Waste disposer - Prepare Dishwasher Tip Over Hazard Do not use a 1¹⁄₂" to 2" (3.8 to squeeze clamp open and move and install dishwasher. Connect black end of the counter. Excessive Weight Hazard Use two or more people to...
...to air gap with screw-type clamps (not provided) to connect from waste tee to do so can result in back or other injury. 1 Put dishwasher on open door. Use a rubber hose (not provided) with large silver drain hose clamp (provided). Make sure the area under a wood countertop) ... of drain hose to move into disposer. 2. with air gap Waste disposer - Prepare Dishwasher Tip Over Hazard Do not use a 1¹⁄₂" to 2" (3.8 to squeeze clamp open and move and install dishwasher. Connect black end of the counter. Excessive Weight Hazard Use two or more people to...


