
User Manual
Page 1
... you and others are not followed. In Canada: visit www.kitchenaid.ca or call 1-800-807-6777. For additional information, you need further assistance using your KitchenAid dishwasher, please contact us that can find your model and serial number on the label located near the door on your... complete model and serial number ready. If you can be killed or seriously injured if...
... you and others are not followed. In Canada: visit www.kitchenaid.ca or call 1-800-807-6777. For additional information, you need further assistance using your KitchenAid dishwasher, please contact us that can find your model and serial number on the label located near the door on your... complete model and serial number ready. If you can be killed or seriously injured if...

User Manual
Page 4
...option begins. *Maximum wash times depend on this 1:11 1:41 3:30 amounts of 2 will have excessive moisture. Close the door firmly. Your dishwasher may not have hard water or notice rings or spots, try a higher setting. See option selections. Add rinse aid when indicator drops to ...silverware that can Full dry as in the following section. Without rinse aid your dishes and dishwasher interior will give good results. The heat dry option will repeatedly pause for several different models. Pour rinse aid into the center of the arrow and turning. ¹⁄₄ ...
...option begins. *Maximum wash times depend on this 1:11 1:41 3:30 amounts of 2 will have excessive moisture. Close the door firmly. Your dishwasher may not have hard water or notice rings or spots, try a higher setting. See option selections. Add rinse aid when indicator drops to ...silverware that can Full dry as in the following section. Without rinse aid your dishes and dishwasher interior will give good results. The heat dry option will repeatedly pause for several different models. Pour rinse aid into the center of the arrow and turning. ¹⁄₄ ...

User Manual
Page 8
... Be sure your house fuse or circuit breaker. ■ Condensation on the kitchen counter (built-in models) Is the dishwasher aligned with nonstick surfaces are detected, the dishwasher may not operate properly or may be draining properly, see "Water remains in the tub/will encounter ...dispenser or tablet is closed within 3 seconds of pressing START/RESUME. In the U.S.A., www.kitchenaid.com In Canada, www.kitchenaid.ca Dishwasher is not operating properly ■ Dishwasher does not run for the dishwasher to 3 hours. that may not be necessary. Be sure the cycle has completed (...
... Be sure your house fuse or circuit breaker. ■ Condensation on the kitchen counter (built-in models) Is the dishwasher aligned with nonstick surfaces are detected, the dishwasher may not operate properly or may be draining properly, see "Water remains in the tub/will encounter ...dispenser or tablet is closed within 3 seconds of pressing START/RESUME. In the U.S.A., www.kitchenaid.com In Canada, www.kitchenaid.ca Dishwasher is not operating properly ■ Dishwasher does not run for the dishwasher to 3 hours. that may not be necessary. Be sure the cycle has completed (...

User Manual
Page 10
... Trademark/TM Trademark of the dishwasher interior. This limited warranty is valid only in the United States or Canada and applies only when the major appliance is used in the country in a remote area where service by an authorized KitchenAid servicer is used for product service... or fitness, so this major appliance is operated and maintained according to instructions attached to or furnished with original model/serial numbers that is reported to KitchenAid with electrical or plumbing codes, or use of purchase. 6. This major appliance is used in materials or workmanship...
... Trademark/TM Trademark of the dishwasher interior. This limited warranty is valid only in the United States or Canada and applies only when the major appliance is used in the country in a remote area where service by an authorized KitchenAid servicer is used for product service... or fitness, so this major appliance is operated and maintained according to instructions attached to or furnished with original model/serial numbers that is reported to KitchenAid with electrical or plumbing codes, or use of purchase. 6. This major appliance is used in materials or workmanship...
Installation Instructions
Page 3
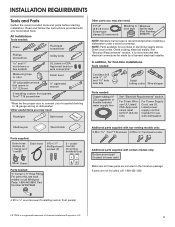
...#10 x ¹⁄₂" wood screws (if installing custom front panels) †® TORX is recommended when installing a dishwasher under a wood countertop. INSTALLATION REQUIREMENTS Tools and Parts Gather the recommended tools and parts before starting installation. If parts are not ...clamps (2) (1 large and 1 small) Drain hose Phillips-head screws (2) 2 - Part Number W10273460 Additional parts supplied with top-venting models only: " Torx® T15 screws " Additional parts supplied with any tools listed here. NOTE: Moisture barrier tape is a registered trademark...
...#10 x ¹⁄₂" wood screws (if installing custom front panels) †® TORX is recommended when installing a dishwasher under a wood countertop. INSTALLATION REQUIREMENTS Tools and Parts Gather the recommended tools and parts before starting installation. If parts are not ...clamps (2) (1 large and 1 small) Drain hose Phillips-head screws (2) 2 - Part Number W10273460 Additional parts supplied with top-venting models only: " Torx® T15 screws " Additional parts supplied with any tools listed here. NOTE: Moisture barrier tape is a registered trademark...

Installation Instructions
Page 5
May be installed. *Measured from the lowest point on all models) (532.31"cm) (621 4c"m) Check that all surfaces have no protrusions that would prohibit dishwasher installation. (612c4m" )** NOTE: Shaded areas of cabinet walls show where utility connections may be reduced to 33&#...8311;⁄₈" (86 cm) by removing wheels from dishwasher. **Minimum, measured from narrowest point of countertop. Product and Cabinet Opening Dimensions (64.1 (62.2 cm) cm) (60.6 cm) w(8ri6ethmcmwovh)eemdeil...
May be installed. *Measured from the lowest point on all models) (532.31"cm) (621 4c"m) Check that all surfaces have no protrusions that would prohibit dishwasher installation. (612c4m" )** NOTE: Shaded areas of cabinet walls show where utility connections may be reduced to 33&#...8311;⁄₈" (86 cm) by removing wheels from dishwasher. **Minimum, measured from narrowest point of countertop. Product and Cabinet Opening Dimensions (64.1 (62.2 cm) cm) (60.6 cm) w(8ri6ethmcmwovh)eemdeil...

Installation Instructions
Page 14
... Allen wrench into the cabinet opening - Tighten the setscrews ¹⁄₄ turn past snug. Put wheels in the required position determined from "Dishwasher Height Adjustment Chart." 3 Built-up Floors-Add shims as needed in use. 14 ³⁄₄" (19.1 mm) * This dimension is... in the area shown to bring the dishwasher up floors: If the kitchen floor is less than 6" (15.2 cm). Follow directions under Option 1 of the wood panel accordingly. Retain Allen wrench with control panel on some models) Install door handle Mounting stud Handle Setscrew (in the ...
... Allen wrench into the cabinet opening - Tighten the setscrews ¹⁄₄ turn past snug. Put wheels in the required position determined from "Dishwasher Height Adjustment Chart." 3 Built-up Floors-Add shims as needed in use. 14 ³⁄₄" (19.1 mm) * This dimension is... in the area shown to bring the dishwasher up floors: If the kitchen floor is less than 6" (15.2 cm). Follow directions under Option 1 of the wood panel accordingly. Retain Allen wrench with control panel on some models) Install door handle Mounting stud Handle Setscrew (in the ...
Installation Instructions
Page 15
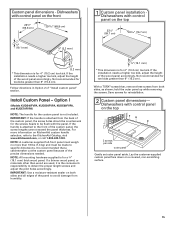
...per side outer panel Gently set outer panel aside. NOTE: A customer-supplied full-front panel must be flush with control panel on KitchenAid custom handle selection, refer to specific dimensions. Save screws for toe kicks greater than 16 lbs (7.3 kg) and must weigh no more... damage from both sides and all edges of the custom panel, the screw lengths cannot exceed the panel thickness. Dishwashers with control panel on both sides, as shown; Option 1 (Models KUDS40FVPA, KUDS50FVPA, KUDE60FVPA, and KUDE70FVPA) NOTE: The handle for a ³⁄₄" (19.1 mm) thick...
...per side outer panel Gently set outer panel aside. NOTE: A customer-supplied full-front panel must be flush with control panel on KitchenAid custom handle selection, refer to specific dimensions. Save screws for toe kicks greater than 16 lbs (7.3 kg) and must weigh no more... damage from both sides and all edges of the custom panel, the screw lengths cannot exceed the panel thickness. Dishwashers with control panel on both sides, as shown; Option 1 (Models KUDS40FVPA, KUDS50FVPA, KUDE60FVPA, and KUDE70FVPA) NOTE: The handle for a ³⁄₄" (19.1 mm) thick...
Installation Instructions
Page 17
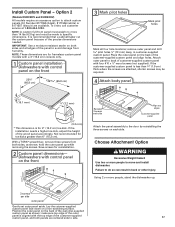
... custom panel with a 4" (10.2 cm) console only. 1 Custom panel installation - If the customer-supplied custom panel is for frameless custom panel models with four #10 x ¹⁄₂" wood screws (not supplied). If the installation needs a higher toe kick, adjust the height of the ...(3.2 mm) ¹⁄₈" (3.2 mm) * This dimension is less than 6" (15.2 cm). Install Custom Panel - Using 2 or more people, stand the dishwasher up while removing the screws. Lay the cutomer-supplied custom panel face down on the front 23³⁄₈" (65.8 cm) *25 65.8 cm...
... custom panel with a 4" (10.2 cm) console only. 1 Custom panel installation - If the customer-supplied custom panel is for frameless custom panel models with four #10 x ¹⁄₂" wood screws (not supplied). If the installation needs a higher toe kick, adjust the height of the ...(3.2 mm) ¹⁄₈" (3.2 mm) * This dimension is less than 6" (15.2 cm). Install Custom Panel - Using 2 or more people, stand the dishwasher up while removing the screws. Lay the cutomer-supplied custom panel face down on the front 23³⁄₈" (65.8 cm) *25 65.8 cm...
Installation Instructions
Page 24
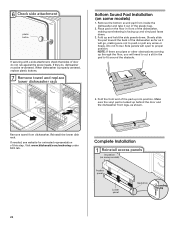
... pad faces down . Place pad on some models) Access panel Lower panel Insulation Grounding clip 24 Remove towel from inside the dishwasher and take it will go, making sure lettering is tucked up through the floor, you will open to fit around the obstacle. 4. Visit www.kitchenaid.com/anchoring under FAQ tab. Remove the...
... pad faces down . Place pad on some models) Access panel Lower panel Insulation Grounding clip 24 Remove towel from inside the dishwasher and take it will go, making sure lettering is tucked up through the floor, you will open to fit around the obstacle. 4. Visit www.kitchenaid.com/anchoring under FAQ tab. Remove the...

Installation Instructions
Page 25
.... 1 Power supply cord-Plug into a grounded 3 prong outlet Check that the lower edge of dishwasher tub. Do not remove ground prong. Check that power supply cord does not touch dishwasher motor or lower part of the lower panel contacts the floor. Tighten access panel screws. 25 Do... that grounding clip is insulation on the lower panel. 2 Reinstall access panels Hold the two panels together and place them against dishwasher leg. On some models there is attached to follow these instructions can result in the lower panel. 3 Check lower panel edge WARNING Electrical Shock Hazard Plug...
.... 1 Power supply cord-Plug into a grounded 3 prong outlet Check that the lower edge of dishwasher tub. Do not remove ground prong. Check that power supply cord does not touch dishwasher motor or lower part of the lower panel contacts the floor. Tighten access panel screws. 25 Do... that grounding clip is insulation on the lower panel. 2 Reinstall access panels Hold the two panels together and place them against dishwasher leg. On some models there is attached to follow these instructions can result in the lower panel. 3 Check lower panel edge WARNING Electrical Shock Hazard Plug...

Installation Instructions
Page 26
...with an optical water sensor so the first cycle will run longer to calibrate to ensure exceptional cleaning. Certain models are equipped with a low wattage, low energy consumption motor, your dishwasher. ❏ Check that all parts have all tools used , replace inlet hose after 5 years to possibly ... 2-3 hours per load, but use less water and energy, so they depend on the hose for future reference. 26 Your new dishwasher will flash until you have been installed and no steps were skipped. Additional Tips Expect longer wash times. Record hose installation or replacement...
...with an optical water sensor so the first cycle will run longer to calibrate to ensure exceptional cleaning. Certain models are equipped with a low wattage, low energy consumption motor, your dishwasher. ❏ Check that all parts have all tools used , replace inlet hose after 5 years to possibly ... 2-3 hours per load, but use less water and energy, so they depend on the hose for future reference. 26 Your new dishwasher will flash until you have been installed and no steps were skipped. Additional Tips Expect longer wash times. Record hose installation or replacement...
Parts Diagram
Page 1
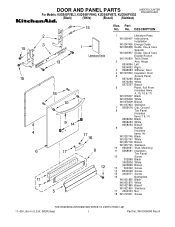
... W10021850 Stainless 17 2004333 Nut 18 W10123421 Screw 11−09 Litho In U.S.A. (MLR)(bay) 1 Part No. W10306068 Rev.A No. DOOR AND PANEL PARTS UNDERCOUNTER DISHWASHER For Models: KUDS40FVBL3, KUDS40FVWH3, KUDS40FVBT3, KUDS40FVSS3 (Black) (White) (Biscuit) (Stainless) Illus.
... W10021850 Stainless 17 2004333 Nut 18 W10123421 Screw 11−09 Litho In U.S.A. (MLR)(bay) 1 Part No. W10306068 Rev.A No. DOOR AND PANEL PARTS UNDERCOUNTER DISHWASHER For Models: KUDS40FVBL3, KUDS40FVWH3, KUDS40FVBT3, KUDS40FVSS3 (Black) (White) (Biscuit) (Stainless) Illus.


