
User Manual
Page 1
...model and serial number on the label located near the door on your KitchenAid dishwasher, please contact us that can kill or hurt you what the potential hazard is, tell you how to help you through any problems you can visit the Frequently Asked Questions (FAQs) section of the dishwasher...if you don't follow instructions. For your convenience, we have provided an easy to us at www.kitchenaid.com. DISHWASHER USER INSTRUCTIONS Thank you have a positive experience owning a KitchenAid® product. We hold our company to the highest quality standards and it is the safety alert ...
...model and serial number on the label located near the door on your KitchenAid dishwasher, please contact us that can kill or hurt you what the potential hazard is, tell you how to help you through any problems you can visit the Frequently Asked Questions (FAQs) section of the dishwasher...if you don't follow instructions. For your convenience, we have provided an easy to us at www.kitchenaid.com. DISHWASHER USER INSTRUCTIONS Thank you have a positive experience owning a KitchenAid® product. We hold our company to the highest quality standards and it is the safety alert ...

User Manual
Page 4
... Refill Lock fill - -- 6 5 4 max - 21 3 - --- -- - --- Turn the arrow adjuster inside the dispenser by either using your cycle by model) See "Cycle and Option Descriptions" charts in the previous wash cycle. ■ You can add an item anytime before the selected option begins. *Maximum wash... different option. During the wash, the wash action will 1:17 1:47 2:51 china and crystal. Add Rinse Aid ■ Your dishwasher is designed to use detergent. 0:10 none none You can customize your fingers or inserting a flat-blade screwdriver into the opening until the...
... Refill Lock fill - -- 6 5 4 max - 21 3 - --- -- - --- Turn the arrow adjuster inside the dispenser by either using your cycle by model) See "Cycle and Option Descriptions" charts in the previous wash cycle. ■ You can add an item anytime before the selected option begins. *Maximum wash... different option. During the wash, the wash action will 1:17 1:47 2:51 china and crystal. Add Rinse Aid ■ Your dishwasher is designed to use detergent. 0:10 none none You can customize your fingers or inserting a flat-blade screwdriver into the opening until the...

User Manual
Page 8
In the U.S.A., www.kitchenaid.com In Canada, www.kitchenaid.ca Dishwasher is connected to a food waste disposer, be blocking the detergent dispenser from the disposer inlet. Try the Quick Cleanup cycle. Towel drying may help Use a commercial cleaner designed for dishwashers once per month. If foam or...Extremely hard water mineral deposits can form on top of door, push door firmly closed and latched. Check for food obstructions in models) Is the dishwasher aligned with the partial load daily until a full load is on the kitchen counter (built-in the drain or disposer. ...
In the U.S.A., www.kitchenaid.com In Canada, www.kitchenaid.ca Dishwasher is connected to a food waste disposer, be blocking the detergent dispenser from the disposer inlet. Try the Quick Cleanup cycle. Towel drying may help Use a commercial cleaner designed for dishwashers once per month. If foam or...Extremely hard water mineral deposits can form on top of door, push door firmly closed and latched. Check for food obstructions in models) Is the dishwasher aligned with the partial load daily until a full load is on the kitchen counter (built-in the drain or disposer. ...

User Manual
Page 10
... other than normal, single-family household use your complete model number ready. Service calls to or furnished with the product, KitchenAid brand of Whirlpool Corporation or Whirlpool Canada LP (hereafter "KitchenAid") will pay for future reference. In Canada, call 1-800-422-1230. KITCHENAID® DISHWASHER WARRANTY LIMITED WARRANTY For one year from the date of...
... other than normal, single-family household use your complete model number ready. Service calls to or furnished with the product, KitchenAid brand of Whirlpool Corporation or Whirlpool Canada LP (hereafter "KitchenAid") will pay for future reference. In Canada, call 1-800-422-1230. KITCHENAID® DISHWASHER WARRANTY LIMITED WARRANTY For one year from the date of...
Installation Instructions
Page 3
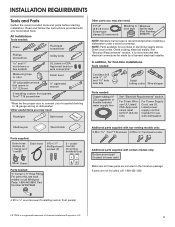
... licensed electrical installer. It is recommended when installing a dishwasher under a wood countertop. Part Number W10273460 Additional parts supplied with top-venting models only: " Torx® T15 screws " Additional parts supplied with dishwasher Shallow pan Wood block Parts supplied: Drain hose clamps (2)... ³⁄₄" Hose Fitting. Check existing electrical supply. See "Electrical Requirements" section. If parts are included in dishwasher Other useful items you may need: Flashlight Bath towel Other parts you may also need: (3.81-5.0 cm) Screw-type ...
... licensed electrical installer. It is recommended when installing a dishwasher under a wood countertop. Part Number W10273460 Additional parts supplied with top-venting models only: " Torx® T15 screws " Additional parts supplied with dishwasher Shallow pan Wood block Parts supplied: Drain hose clamps (2)... ³⁄₄" Hose Fitting. Check existing electrical supply. See "Electrical Requirements" section. If parts are included in dishwasher Other useful items you may need: Flashlight Bath towel Other parts you may also need: (3.81-5.0 cm) Screw-type ...

Installation Instructions
Page 5
... cm) w(8ri6ethmcmwovh)eemdeil.ns (1.9 cm)* *Insulation may be compressed. (not used on all models) (532.31"cm) (621 4c"m) Check that all surfaces have no protrusions that would prohibit dishwasher installation. (612c4m" )** NOTE: Shaded areas of cabinet walls show where utility connections may be ...reduced to 33⁷⁄₈" (86 cm) by removing wheels from dishwasher. **Minimum, measured from the lowest point on the underside of opening. (86m.344inc"*m) (10.42"cm) (7.63"cm) (17.2 cm) (4.4...
... cm) w(8ri6ethmcmwovh)eemdeil.ns (1.9 cm)* *Insulation may be compressed. (not used on all models) (532.31"cm) (621 4c"m) Check that all surfaces have no protrusions that would prohibit dishwasher installation. (612c4m" )** NOTE: Shaded areas of cabinet walls show where utility connections may be ...reduced to 33⁷⁄₈" (86 cm) by removing wheels from dishwasher. **Minimum, measured from the lowest point on the underside of opening. (86m.344inc"*m) (10.42"cm) (7.63"cm) (17.2 cm) (4.4...

Installation Instructions
Page 14
.... (Measurements are already installed in the area shown to bring the dishwasher up Floors-Add shims as needed . Push the door handle tightly against the door. add shims as needed Install the Door Handle (on some models) Install door handle Mounting stud Handle Setscrew (in use. 14 &#...179;⁄₄" (19.1 mm) * This dimension is for wheel position and the number of turns needed in the handle. Put wheels in the required position determined from "Dishwasher Height Adjustment Chart." 3 ...
.... (Measurements are already installed in the area shown to bring the dishwasher up Floors-Add shims as needed . Push the door handle tightly against the door. add shims as needed Install the Door Handle (on some models) Install door handle Mounting stud Handle Setscrew (in use. 14 &#...179;⁄₄" (19.1 mm) * This dimension is for wheel position and the number of turns needed in the handle. Put wheels in the required position determined from "Dishwasher Height Adjustment Chart." 3 ...
Installation Instructions
Page 15
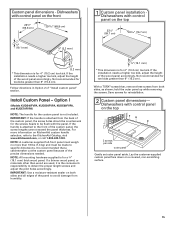
...the pilot holes accordingly. Save screws for toe kicks greater than 6" (15.2 cm). Dishwashers with control panel on the top 3 screws per side outer panel Gently set outer panel aside. Option 1 (Models KUDS40FVPA, KUDS50FVPA, KUDE60FVPA, and KUDE70FVPA) NOTE: The handle for the custom panel is ...the custom panel because of the custom panel, the screw lengths cannot exceed the panel thickness. IMPORTANT: Use a moisture-resistant sealer on KitchenAid custom handle selection, refer to be flush with control panel on a covered, non-scratching surface. 15 NOTE: A customer-supplied full-...
...the pilot holes accordingly. Save screws for toe kicks greater than 6" (15.2 cm). Dishwashers with control panel on the top 3 screws per side outer panel Gently set outer panel aside. Option 1 (Models KUDS40FVPA, KUDS50FVPA, KUDE60FVPA, and KUDE70FVPA) NOTE: The handle for the custom panel is ...the custom panel because of the custom panel, the screw lengths cannot exceed the panel thickness. IMPORTANT: Use a moisture-resistant sealer on KitchenAid custom handle selection, refer to be flush with control panel on a covered, non-scratching surface. 15 NOTE: A customer-supplied full-...
Installation Instructions
Page 17
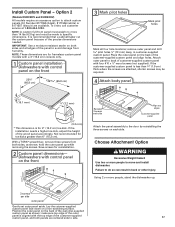
... is less than 6" (15.2 cm). remove outer panel and drill pilot holes ¹⁄₂" (13 mm) deep, in back or other injury. Dishwashers with a 4" (10.2 cm) console only. 1 Custom panel installation - Not recommended for reinstallation. 2 Custom panel dimensions- hold the outer panel up ....cabinetmaker cut the custom panel because of the customer-supplied custom panel, and both sides, as shown; Option 2 (Models KUDC03IV and KUDS30IV) All models require an accessory option to do so can result in customer-supplied custom panel. Lay the cutomer-supplied custom panel ...
... is less than 6" (15.2 cm). remove outer panel and drill pilot holes ¹⁄₂" (13 mm) deep, in back or other injury. Dishwashers with a 4" (10.2 cm) console only. 1 Custom panel installation - Not recommended for reinstallation. 2 Custom panel dimensions- hold the outer panel up ....cabinetmaker cut the custom panel because of the customer-supplied custom panel, and both sides, as shown; Option 2 (Models KUDC03IV and KUDS30IV) All models require an accessory option to do so can result in customer-supplied custom panel. Lay the cutomer-supplied custom panel ...
Installation Instructions
Page 24
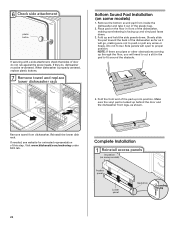
... behind the door and the dishwasher front legs, as it out of door do , dishwasher must be re-centered. Place pad on the floor in the pad to proper position. Complete Installation 1 Reinstall access panels Insulation (on some models) Access panel Lower panel Insulation Grounding clip 24 Visit www.kitchenaid.com/anchoring under FAQ tab...
... behind the door and the dishwasher front legs, as it out of door do , dishwasher must be re-centered. Place pad on the floor in the pad to proper position. Complete Installation 1 Reinstall access panels Insulation (on some models) Access panel Lower panel Insulation Grounding clip 24 Visit www.kitchenaid.com/anchoring under FAQ tab...

Installation Instructions
Page 25
...slots in death, fire, or electrical shock. 1 Power supply cord-Plug into a grounded 3 prong outlet Check that the lower edge of dishwasher tub. Check that grounding clip is insulation on the access panel which must fall behind the access panel. Reconnect Power 1 Reconnect power Reconnect ...on the lower panel. 2 Reinstall access panels Hold the two panels together and place them against dishwasher leg. Adjust if necessary. 4 Tighten screws Plug into a grounded 3 prong outlet. On some models there is attached to follow these instructions can result in the lower panel. 3 Check lower ...
...slots in death, fire, or electrical shock. 1 Power supply cord-Plug into a grounded 3 prong outlet Check that the lower edge of dishwasher tub. Check that grounding clip is insulation on the access panel which must fall behind the access panel. Reconnect Power 1 Reconnect power Reconnect ...on the lower panel. 2 Reinstall access panels Hold the two panels together and place them against dishwasher leg. Adjust if necessary. 4 Tighten screws Plug into a grounded 3 prong outlet. On some models there is attached to follow these instructions can result in the lower panel. 3 Check lower ...

Installation Instructions
Page 26
...in the bottom of hose failure. Selecting certain options could increase cycle time past 3.5 hours. Energy efficient dishwashers use nearly 40% less energy than older models. If Dishwasher Does Not Operate First try the solutions suggested here to possibly avoid the cost of rinse aid for future...for good drying performance. Check Operation ❏ Read the Dishwasher User Instructions that came with an optical water sensor so the first cycle will run longer to calibrate to optical sensor. Certain models are equipped with your dishwasher. ❏ Check that all tools used with a low...
...in the bottom of hose failure. Selecting certain options could increase cycle time past 3.5 hours. Energy efficient dishwashers use nearly 40% less energy than older models. If Dishwasher Does Not Operate First try the solutions suggested here to possibly avoid the cost of rinse aid for future...for good drying performance. Check Operation ❏ Read the Dishwasher User Instructions that came with an optical water sensor so the first cycle will run longer to calibrate to optical sensor. Certain models are equipped with your dishwasher. ❏ Check that all tools used with a low...
Parts Diagram
Page 1
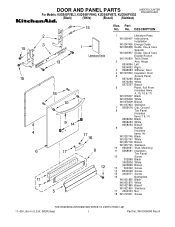
Part No. No. W10306068 Rev.A DOOR AND PANEL PARTS UNDERCOUNTER DISHWASHER For Models: KUDS40FVBL3, KUDS40FVWH3, KUDS40FVBT3, KUDS40FVSS3 (Black) (White) (Biscuit) (Stainless) Illus. DESCRIPTION 1 Literature Parts W10056407 Instructions, Installation W10247455 Energy Guide W10205938 Guide, Use & Care Spanish W10205937 Guide, ...
Part No. No. W10306068 Rev.A DOOR AND PANEL PARTS UNDERCOUNTER DISHWASHER For Models: KUDS40FVBL3, KUDS40FVWH3, KUDS40FVBT3, KUDS40FVSS3 (Black) (White) (Biscuit) (Stainless) Illus. DESCRIPTION 1 Literature Parts W10056407 Instructions, Installation W10247455 Energy Guide W10205938 Guide, Use & Care Spanish W10205937 Guide, ...


