Installation Guide
Page 2
...-Existing Utilities 7 Prepare Cabinet Opening-New Utilities 7 Prepare and Route Water Line 8 Install Drain Hose 9 Install Moisture Barrier (under a wood countertop 11 Prepare Dishwasher 12 Make Power Supply Cord Connection 13 Determine Cabinet Opening 14 INSTALLATION INSTRUCTIONS (CONT.) Install Door Handle (on some ... Electrical 22 Secure Dishwasher in serious injury or cuts. Do not push down on some models 15 Custom Panel Dimensions 15 Install Custom Panel 16 Choose Attachment Option 18 Move Dishwasher Close to Cabinet Opening 19 Connect to Water Supply 21 Connect to...
...-Existing Utilities 7 Prepare Cabinet Opening-New Utilities 7 Prepare and Route Water Line 8 Install Drain Hose 9 Install Moisture Barrier (under a wood countertop 11 Prepare Dishwasher 12 Make Power Supply Cord Connection 13 Determine Cabinet Opening 14 INSTALLATION INSTRUCTIONS (CONT.) Install Door Handle (on some ... Electrical 22 Secure Dishwasher in serious injury or cuts. Do not push down on some models 15 Custom Panel Dimensions 15 Install Custom Panel 16 Choose Attachment Option 18 Move Dishwasher Close to Cabinet Opening 19 Connect to Water Supply 21 Connect to...
Installation Guide
Page 3
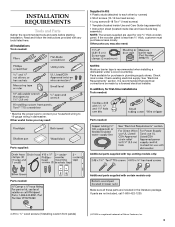
...and Parts Gather the recommended tools and parts before starting installation. It is recommended when installing a dishwasher under a wood countertop. Check local codes. If the wooden panel is a registered trademark of Saturn Fasteners, Inc. 3 In addition, for purchase in plumbing supply stores. If ... models only Make sure all these parts are not included, call 1-800-422-1230. 4 #10 x ¹/₂" wood screws (if installing custom front panels) †®TORX is less than ³⁄₄" thick, customer must purchase screws locally. All Installations Tools needed ...
...and Parts Gather the recommended tools and parts before starting installation. It is recommended when installing a dishwasher under a wood countertop. Check local codes. If the wooden panel is a registered trademark of Saturn Fasteners, Inc. 3 In addition, for purchase in plumbing supply stores. If ... models only Make sure all these parts are not included, call 1-800-422-1230. 4 #10 x ¹/₂" wood screws (if installing custom front panels) †®TORX is less than ³⁄₄" thick, customer must purchase screws locally. All Installations Tools needed ...
Installation Guide
Page 16
...to do so. NOTES: ■ The handle for the custom panel is not included. ■ All mounting hardware supplied is the customer's responsibility to be countersunk for a ³⁄₄" (19.1 mm) thick wood panel. If a thinner wood panel or materials other injury. Failure to do so can result in back... or other than 16 lbs (7.3 kg) and must weigh no more than wood are used, it is for the screws heads to obtain the ...
...to do so. NOTES: ■ The handle for the custom panel is not included. ■ All mounting hardware supplied is the customer's responsibility to be countersunk for a ³⁄₄" (19.1 mm) thick wood panel. If a thinner wood panel or materials other injury. Failure to do so can result in back... or other than 16 lbs (7.3 kg) and must weigh no more than wood are used, it is for the screws heads to obtain the ...

Installation Guide
Page 17
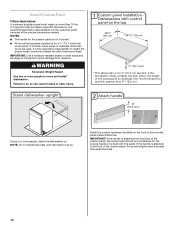
... tape is flush with metal door slots; Mark 4 pilot holes on the first try. Align the studs on the custom wood panel to occur on the wooden panel using the template provided. Attach the 4 plastic studs to keep from the custom tape by pulling straight down until the top... Check custom tape alignment with the top of the door. Repeat steps for ³⁄₄" thick panel. Slide wood panel down on the door assembly. Remove the backing from drilling through panel. Ensure that the tape does not overhang the metal door on the metal door (see image) and apply...
... tape is flush with metal door slots; Mark 4 pilot holes on the first try. Align the studs on the custom wood panel to occur on the wooden panel using the template provided. Attach the 4 plastic studs to keep from the custom tape by pulling straight down until the top... Check custom tape alignment with the top of the door. Repeat steps for ³⁄₄" thick panel. Slide wood panel down on the door assembly. Remove the backing from drilling through panel. Ensure that the tape does not overhang the metal door on the metal door (see image) and apply...
Installation Guide
Page 18
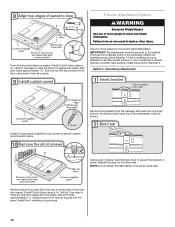
... a pair of the door using the door liner hole as a guide. This will be secured to secure custom wood panel in back or other side. Predrill 2 pilot holes using a drill bit. Use tape to mark the drill bit to secure the bracket in top corners... IMPORTANT: The dishwasher must be done later. If your countertop is marble, granite or another hard surface, install using Option Number 1 if the countertop is wood, laminate or another similar surface. Failure to gauge the hole depth. NOTE: Do not attach the dishwasher. Attach the brackets using Option Number 2. Use tape...
... a pair of the door using the door liner hole as a guide. This will be secured to secure custom wood panel in back or other side. Predrill 2 pilot holes using a drill bit. Use tape to mark the drill bit to secure the bracket in top corners... IMPORTANT: The dishwasher must be done later. If your countertop is marble, granite or another hard surface, install using Option Number 1 if the countertop is wood, laminate or another similar surface. Failure to gauge the hole depth. NOTE: Do not attach the dishwasher. Attach the brackets using Option Number 2. Use tape...


