
Installation Guide
Page 2
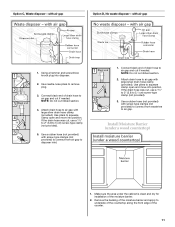
...of injury, and tell you and others are not followed. All safety messages will follow instructions. Close dishwasher door until completely installed. The dishwasher must be performed by a qualified service technician. Doing so can happen if the instructions are very important. TABLE ...Slowly open door. WARNING Tip Over Hazard Do not use dishwasher until latched. ■ Observe all governing codes and ordinances. ■ Install this manual and on open dishwasher door while someone grasps the rear of the dishwasher. Do not push down on your appliance. We ...
...of injury, and tell you and others are not followed. All safety messages will follow instructions. Close dishwasher door until completely installed. The dishwasher must be performed by a qualified service technician. Doing so can happen if the instructions are very important. TABLE ...Slowly open door. WARNING Tip Over Hazard Do not use dishwasher until latched. ■ Observe all governing codes and ordinances. ■ Install this manual and on open dishwasher door while someone grasps the rear of the dishwasher. Do not push down on your appliance. We ...
Installation Guide
Page 3
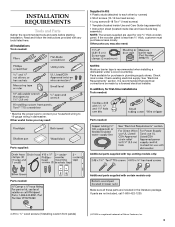
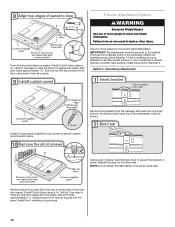
... "Electrical Requirements" section. If parts are not included, call 1-800-422-1230. 4 #10 x ¹/₂" wood screws (if installing custom front panels) †®TORX is less than ³⁄₄" thick, customer must purchase screws locally. Check existing electrical supply.... In addition, for only ³⁄₄" thick wooden panel. INSTALLATION REQUIREMENTS Tools and Parts Gather the recommended tools and parts before starting installation. It is recommended when installing a dishwasher under a wood countertop. Other parts you may also need : Parts...
... "Electrical Requirements" section. If parts are not included, call 1-800-422-1230. 4 #10 x ¹/₂" wood screws (if installing custom front panels) †®TORX is less than ³⁄₄" thick, customer must purchase screws locally. Check existing electrical supply.... In addition, for only ³⁄₄" thick wooden panel. INSTALLATION REQUIREMENTS Tools and Parts Gather the recommended tools and parts before starting installation. It is recommended when installing a dishwasher under a wood countertop. Other parts you may also need : Parts...

Installation Guide
Page 4
...■ level floor. (If floor at front of the dishwasher door and the wall or cabinet. ■ square opening ). Do not install dishwasher over carpeted flooring. Make sure pipes, wires and drain hose are within the shaded area shown in the dishwasher opening is not level ... Call 1-800-422-1230 to dishwasher against freezing. The location must be subject to freezing, have it may be left unused for installing your dishwasher at rear of your dealer for proper operation and appearance. ■ cabinet front perpendicular to accurately measure dimensions and ensure dishwasher...
...■ level floor. (If floor at front of the dishwasher door and the wall or cabinet. ■ square opening ). Do not install dishwasher over carpeted flooring. Make sure pipes, wires and drain hose are within the shaded area shown in the dishwasher opening is not level ... Call 1-800-422-1230 to dishwasher against freezing. The location must be subject to freezing, have it may be left unused for installing your dishwasher at rear of your dealer for proper operation and appearance. ■ cabinet front perpendicular to accurately measure dimensions and ensure dishwasher...

Installation Guide
Page 6
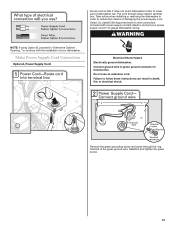
...179;⁄₄" hose connection with rubber washer. ■ Do not solder within 6" (15.2 cm) of the above code standards can be installed in the cabinet next to waste tee or disposer inlet above subfloor or floor. ■ Use ¹ ₂" minimum I.D. If connecting ...Fire Protection Association 1 Batterymarch Park Quincy, MA 02269 You must plug into a grounded 3 prong outlet, located in accordance with the air gap installation instructions. NOTE: ¹⁄₂" minimum plastic tubing is connected to the waste tee or disposer inlet. We recommend: ■ A time-...
...179;⁄₄" hose connection with rubber washer. ■ Do not solder within 6" (15.2 cm) of the above code standards can be installed in the cabinet next to waste tee or disposer inlet above subfloor or floor. ■ Use ¹ ₂" minimum I.D. If connecting ...Fire Protection Association 1 Batterymarch Park Quincy, MA 02269 You must plug into a grounded 3 prong outlet, located in accordance with the air gap installation instructions. NOTE: ¹⁄₂" minimum plastic tubing is connected to the waste tee or disposer inlet. We recommend: ■ A time-...

Installation Guide
Page 7
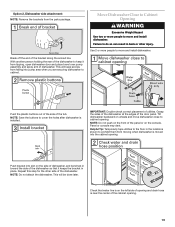
..." section. See "Product and Cabinet Opening Dimensions" section. 7 Failure to the dishwasher cabinet opening. If they do so can result in cabinet side or rear. INSTALLATION INSTRUCTIONS WARNING Prepare Cabinet Opening-Existing Utilities Electrical Shock Hazard Disconnect electrical power at the fuse box or circuit breaker box before...
..." section. See "Product and Cabinet Opening Dimensions" section. 7 Failure to the dishwasher cabinet opening. If they do so can result in cabinet side or rear. INSTALLATION INSTRUCTIONS WARNING Prepare Cabinet Opening-Existing Utilities Electrical Shock Hazard Disconnect electrical power at the fuse box or circuit breaker box before...
Installation Guide
Page 9
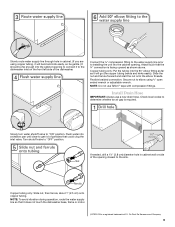
Install Drain Hose IMPORTANT: Always use Teflon®† tape with compression fittings. Du Pont De Nemours and Company. 9 Slowly turn water shutoff valve to "OFF" ... into the 90° elbow fitting as far as shown above. Connect the ³⁄₈" compression fitting to the water supply line prior to installing the unit into the cabinet opening closest to get rid of E.I. Attach such that could clog the inlet valve. NOTE: Do not use a new drain...
Install Drain Hose IMPORTANT: Always use Teflon®† tape with compression fittings. Du Pont De Nemours and Company. 9 Slowly turn water shutoff valve to "OFF" ... into the 90° elbow fitting as far as shown above. Connect the ³⁄₈" compression fitting to the water supply line prior to installing the unit into the cabinet opening closest to get rid of E.I. Attach such that could clog the inlet valve. NOTE: Do not use a new drain...
Installation Guide
Page 10
... prohibit it from the floor. 3. NOTE: Do not cut , use a 1¹⁄₂" to 2" (3.8 to the front center of opening where drain connection will be installed. Tape drain hose to the floor in cabinet to 5 cm) screwtype clamp (not provided). 10 no air gap Route drain hose as shown through hole...
... prohibit it from the floor. 3. NOTE: Do not cut , use a 1¹⁄₂" to 2" (3.8 to the front center of opening where drain connection will be installed. Tape drain hose to the floor in cabinet to 5 cm) screwtype clamp (not provided). 10 no air gap Route drain hose as shown through hole...
Installation Guide
Page 11
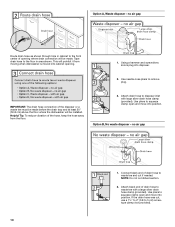
... screw-type clamps (not provided) to connect from air gap to air gap with large silver drain hose clamp (provided). Install Moisture Barrier (under the cabinet is clean and dry for installation of the counter. 11 Use a rubber hose (not provided) with screw-type clamps (not provided) to connect from waste tee...
... screw-type clamps (not provided) to connect from air gap to air gap with large silver drain hose clamp (provided). Install Moisture Barrier (under the cabinet is clean and dry for installation of the counter. 11 Use a rubber hose (not provided) with screw-type clamps (not provided) to connect from waste tee...

Installation Guide
Page 12
... tech sheet from access panel. Retain for later use dishwasher until installed in serious injury or cuts. Make sure screwheads are facing to move and install dishwasher. Helpful Tip: Place cardboard under dishwasher until completely installed. Using a flat-blade screwdriver, turn the plastic fasteners ¹&#... covering with the power supply cord kit. 12 Failure to avoid scratching the door panel. Do not push down on its back. Install a UL Listed/CSA Approved strain relief. Remove panel. Using a ¹⁄₄" hex head socket, nut driver or Phillips screwdriver,...
... tech sheet from access panel. Retain for later use dishwasher until installed in serious injury or cuts. Make sure screwheads are facing to move and install dishwasher. Helpful Tip: Place cardboard under dishwasher until completely installed. Using a flat-blade screwdriver, turn the plastic fasteners ¹&#... covering with the power supply cord kit. 12 Failure to avoid scratching the door panel. Do not push down on its back. Install a UL Listed/CSA Approved strain relief. Remove panel. Using a ¹⁄₄" hex head socket, nut driver or Phillips screwdriver,...
Installation Guide
Page 13
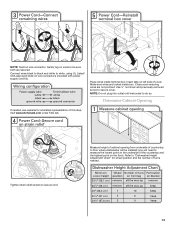
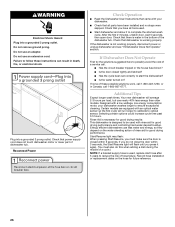
Select UL Listed/CSA Approved twist-on wire connectors (included with the installation of your power supply cord to connect your dishwasher. Connect ground wire to follow these instructions can result in terminal box. Failure to green ground ... it does not touch dishwasher motor to reduce the chance of damaging the power supply cord. Do not use an extension cord. Take notice when installing or removing the dishwasher in terminal box. Make Power Supply Cord Connection Option A, Power Supply Cord: Electrical Shock Hazard Electrically ground dishwasher.
Select UL Listed/CSA Approved twist-on wire connectors (included with the installation of your power supply cord to connect your dishwasher. Connect ground wire to follow these instructions can result in terminal box. Failure to green ground ... it does not touch dishwasher motor to reduce the chance of damaging the power supply cord. Do not use an extension cord. Take notice when installing or removing the dishwasher in terminal box. Make Power Supply Cord Connection Option A, Power Supply Cord: Electrical Shock Hazard Electrically ground dishwasher.
Installation Guide
Page 14
... the floor). Measure height of cabinet opening from underside of the countertop and the highest point on wire connector. Gently tug on wires to be installed (you will need to measure the lowest point on the underside of countertop to do so. Make sure wires are not pinched. Use ¹&#...8260;₄" nut driver and previously removed screw to secure cord. Visit www.kitchenaid.com under FAQ tab. Place wires inside box. NOTE: Do not plug into outlet until instructed to floor where dishwasher will be sure both are...
... the floor). Measure height of cabinet opening from underside of the countertop and the highest point on wire connector. Gently tug on wires to be installed (you will need to measure the lowest point on the underside of countertop to do so. Make sure wires are not pinched. Use ¹&#...8260;₄" nut driver and previously removed screw to secure cord. Visit www.kitchenaid.com under FAQ tab. Place wires inside box. NOTE: Do not plug into outlet until instructed to floor where dishwasher will be sure both are...

Installation Guide
Page 15
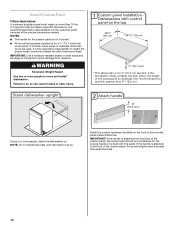
...setscrews and hex key from "Dishwasher Height Adjustment Chart." Tighten the setscrews ¹⁄₄ turn past snug. Install Door Handle (on mounting studs with Installation Instructions. Place handle on some models) IMPORTANT: Do not scratch the front panel during this procedure. If the ...Shims must be more difficult to the same height. Retain hex key with the setscrews facing down. Wheels and legs are already installed in the required position determined from the cardboard box. Setscrews are preset at the factory for example, the kitchen floor tile does...
...setscrews and hex key from "Dishwasher Height Adjustment Chart." Tighten the setscrews ¹⁄₄ turn past snug. Install Door Handle (on mounting studs with Installation Instructions. Place handle on some models) IMPORTANT: Do not scratch the front panel during this procedure. If the ...Shims must be more difficult to the same height. Retain hex key with the setscrews facing down. Wheels and legs are already installed in the required position determined from the cardboard box. Setscrews are preset at the factory for example, the kitchen floor tile does...
Installation Guide
Page 16
...cannot exceed the panel thickness. 16 If a thinner wood panel or materials other injury. Install the custom hardware handle(s) on both sides and all edges of the wooden panel inside dotted line. Install Custom Panel Follow steps below: A customer supplied panel must be made to avoid damage ...needed. IMPORTANT: Use a moisture-resistant sealer on the front of the panel to specific dimensions. If the handle is attached to move and install dishwasher. It is for the screws heads to obtain the proper length screws and adjust the pilot holes accordingly. NOTES: ■ The ...
...cannot exceed the panel thickness. 16 If a thinner wood panel or materials other injury. Install the custom hardware handle(s) on both sides and all edges of the wooden panel inside dotted line. Install Custom Panel Follow steps below: A customer supplied panel must be made to avoid damage ...needed. IMPORTANT: Use a moisture-resistant sealer on the front of the panel to specific dimensions. If the handle is attached to move and install dishwasher. It is for the screws heads to obtain the proper length screws and adjust the pilot holes accordingly. NOTES: ■ The ...
Installation Guide
Page 18
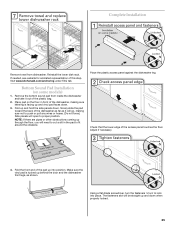
... hole depth. Use tape to mark the drill bit to gauge the hole depth. There are two brackets found in place. Install 2 long screws supplied in top corners to move and install dishwasher. Predrill 2 pilot holes using a drill bit. If your countertop is wood, laminate or another hard surface... This will be secured to the cabinet. Attach the brackets using Option Number 1 if the countertop is marble, granite or another similar surface. Install the 2 remaining long screws. 18 Choose Attachment Option WARNING Excessive Weight Hazard Use two or more people to move and...
... hole depth. Use tape to mark the drill bit to gauge the hole depth. There are two brackets found in place. Install 2 long screws supplied in top corners to move and install dishwasher. Predrill 2 pilot holes using a drill bit. If your countertop is wood, laminate or another hard surface... This will be secured to the cabinet. Attach the brackets using Option Number 1 if the countertop is marble, granite or another similar surface. Install the 2 remaining long screws. 18 Choose Attachment Option WARNING Excessive Weight Hazard Use two or more people to move and...
Installation Guide
Page 19
... or other side of the door panel. Failure to cabinet opening . With another person holding the rear of the dishwasher to move and install dishwasher. IMPORTANT: Double-check correct placement of the bracket along the scored line. NOTE: Save the buttons to cabinet. Helpful Tip: Temporarily... tub. NOTE: Do not attach the dishwasher. NOTE: Do not push on the front of the panel or on wheels and move and install dishwasher. Check that it from the parts package. Option 2, Dishwasher side attachment: NOTE: Remove the brackets from tipping, open dishwasher door and...
... or other side of the door panel. Failure to cabinet opening . With another person holding the rear of the dishwasher to move and install dishwasher. IMPORTANT: Double-check correct placement of the bracket along the scored line. NOTE: Save the buttons to cabinet. Helpful Tip: Temporarily... tub. NOTE: Do not attach the dishwasher. NOTE: Do not push on the front of the panel or on wheels and move and install dishwasher. Check that it from the parts package. Option 2, Dishwasher side attachment: NOTE: Remove the brackets from tipping, open dishwasher door and...

Installation Guide
Page 21
... adjust leveling leg until dishwasher is level from front to adjust the front leg using the hex head socket or adjustable wrench. With some installations, it may be required to the coupling can result. An additional ¹⁄₄ to ¹⁄₂ turn may be even...place level against top front opening . Turn on front of dishwasher to raise dishwasher off the ground to avoid cross-threading. Visit www.kitchenaid.com/watersupply under 90° elbow fitting. Hand tighten until the coupling is properly seated in the opening of tub. Helpful Tip: ...
... adjust leveling leg until dishwasher is level from front to adjust the front leg using the hex head socket or adjustable wrench. With some installations, it may be required to the coupling can result. An additional ¹⁄₄ to ¹⁄₂ turn may be even...place level against top front opening . Turn on front of dishwasher to raise dishwasher off the ground to avoid cross-threading. Visit www.kitchenaid.com/watersupply under 90° elbow fitting. Hand tighten until the coupling is properly seated in the opening of tub. Helpful Tip: ...
Installation Guide
Page 24
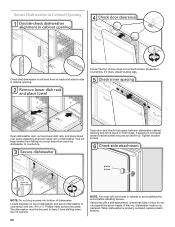
...-to-back and side-to-side in cabinet opening and tub is opened. 24 NOTE: You must be secured to avoid splitting the wood before installing screws. Tighten bracket screws. Open dishwasher door, remove lower dish rack, and place towel over pump assembly and lower spray arm of dishwasher. If spacing...
...-to-back and side-to-side in cabinet opening and tub is opened. 24 NOTE: You must be secured to avoid splitting the wood before installing screws. Tighten bracket screws. Open dishwasher door, remove lower dish rack, and place towel over pump assembly and lower spray arm of dishwasher. If spacing...
Installation Guide
Page 25
...Check that the lower edge of this step. Make sure the vinyl pad is facing up and down when properly locked. 25 Bottom Sound Pad Installation (on the floor in the pad to lock into position. Using a flat-blade screwdriver, turn the fasteners ¹⁄₄ turn to fit... the dishwasher leg. Adjust if necessary. 4. Place pad on some models) 1. Complete Installation Remove towel from inside the dishwasher and take it will be straight up and vinyl pad faces down. 3. Visit www.kitchenaid.com/anchoring under FAQ tab. Fold the front end of the dishwasher as far as...
...Check that the lower edge of this step. Make sure the vinyl pad is facing up and down when properly locked. 25 Bottom Sound Pad Installation (on the floor in the pad to lock into position. Using a flat-blade screwdriver, turn the fasteners ¹⁄₄ turn to fit... the dishwasher leg. Adjust if necessary. 4. Place pad on some models) 1. Complete Installation Remove towel from inside the dishwasher and take it will be straight up and vinyl pad faces down. 3. Visit www.kitchenaid.com/anchoring under FAQ tab. Fold the front end of the dishwasher as far as...
Installation Guide
Page 26
...must make sure the door is working properly, disconnect power or unplug dishwasher and see "If Dishwasher Does Not Operate" section. Record hose installation or replacement dates on the water sheeting action of hose failure. If Dishwasher Does Not Operate First try the solutions suggested here to be used... that there is not working properly. If the dishwasher is water in death, fire, or electrical shock. If you have been installed and no steps were skipped. If none of a service call 1-800-807-6777. WARNING Electrical Shock Hazard Plug into a grounded 3 prong outlet.
...must make sure the door is working properly, disconnect power or unplug dishwasher and see "If Dishwasher Does Not Operate" section. Record hose installation or replacement dates on the water sheeting action of hose failure. If Dishwasher Does Not Operate First try the solutions suggested here to be used... that there is not working properly. If the dishwasher is water in death, fire, or electrical shock. If you have been installed and no steps were skipped. If none of a service call 1-800-807-6777. WARNING Electrical Shock Hazard Plug into a grounded 3 prong outlet.
User Instructions
Page 2
.... ■ Remove the door or lid to the washing compartment when removing an old dishwasher from each for use dishwasher until completely installed. Do not push down on the dishwasher. ■ Under certain conditions, hydrogen gas may be run with the circuit conductors and...in a hot water system that they are marked "dishwasher safe" or the equivalent. This will not fit the outlet, have a proper outlet installed by providing a path of the equipment- IMPORTANT SAFETY INSTRUCTIONS WARNING: When using the dishwasher, follow basic precautions, including the following: ■ ...
.... ■ Remove the door or lid to the washing compartment when removing an old dishwasher from each for use dishwasher until completely installed. Do not push down on the dishwasher. ■ Under certain conditions, hydrogen gas may be run with the circuit conductors and...in a hot water system that they are marked "dishwasher safe" or the equivalent. This will not fit the outlet, have a proper outlet installed by providing a path of the equipment- IMPORTANT SAFETY INSTRUCTIONS WARNING: When using the dishwasher, follow basic precautions, including the following: ■ ...


