Warranty Information
Page 2
... model number ready. Pickup and delivery. If you need repair service, first see the "Troubleshooting" section of merchantability or fitness, so this User Instructions and model number information for product service if your major appliance is not available. 10. Repairs to parts or systems resulting from defects in materials or workmanship and is reported to be repaired in a remote area where service by an authorized KitchenAid servicer is located...
... model number ready. Pickup and delivery. If you need repair service, first see the "Troubleshooting" section of merchantability or fitness, so this User Instructions and model number information for product service if your major appliance is not available. 10. Repairs to parts or systems resulting from defects in materials or workmanship and is reported to be repaired in a remote area where service by an authorized KitchenAid servicer is located...

Use & Care Guide
Page 2
... be produced in this time. ■ Do not touch the heating element during this manual and on your appliance. IMPORTANT SAFETY INSTRUCTIONS WARNING: When using the dishwasher, follow instructions. If the hot water system has not been used for such a period, before using the dishwasher turn on all enclosure panels are properly in a dishwasher, and keep them out of the reach of cut-type injuries. ■ Do...
... be produced in this time. ■ Do not touch the heating element during this manual and on your appliance. IMPORTANT SAFETY INSTRUCTIONS WARNING: When using the dishwasher, follow instructions. If the hot water system has not been used for such a period, before using the dishwasher turn on all enclosure panels are properly in a dishwasher, and keep them out of the reach of cut-type injuries. ■ Do...
Use & Care Guide
Page 4
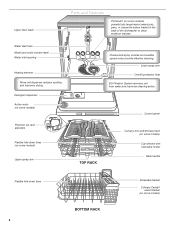
...tube Model and serial number label Water inlet opening Heating element Rinse aid dispenser reduces spotting and improves drying. Detergent dispenser Active vents (on some models) Premium top rack adjusters Flexible fold-down tines 4 BOTTOM RACK Silverware basket Culinary Caddy® utensil basket (on some models) Upper spray arm Pressurized spray nozzles and variable speed motor provide effective cleaning. TOP RACK Control panel Culinary tool rack/3rd level rack (on some models) Cup shelves with stemware holder Rack handle Flexible fold-down tines (on some models) powerful jets...
...tube Model and serial number label Water inlet opening Heating element Rinse aid dispenser reduces spotting and improves drying. Detergent dispenser Active vents (on some models) Premium top rack adjusters Flexible fold-down tines 4 BOTTOM RACK Silverware basket Culinary Caddy® utensil basket (on some models) Upper spray arm Pressurized spray nozzles and variable speed motor provide effective cleaning. TOP RACK Control panel Culinary tool rack/3rd level rack (on some models) Cup shelves with stemware holder Rack handle Flexible fold-down tines (on some models) powerful jets...

Use & Care Guide
Page 5
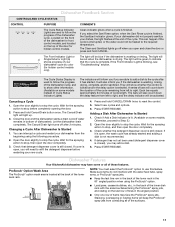
... start. USE RINSE AID FOR Full BETTER DRYING Lock Add Refill or 1 Hour Wash - Back of the tub after the cycle is selected, it provides a concentrated wash on removing and maintaining the filters. See "Add Detergent" and "Add Rinse Aid" in the dishwasher interior. Cleaning the filters periodically helps keep the dishwasher working at the bottom center of detergent needed . The filters can be found at peak performance. Efficient dishwashers run longer to save water and energy...
... start. USE RINSE AID FOR Full BETTER DRYING Lock Add Refill or 1 Hour Wash - Back of the tub after the cycle is selected, it provides a concentrated wash on removing and maintaining the filters. See "Add Detergent" and "Add Rinse Aid" in the dishwasher interior. Cleaning the filters periodically helps keep the dishwasher working at the bottom center of detergent needed . The filters can be found at peak performance. Efficient dishwashers run longer to save water and energy...
Use & Care Guide
Page 7
... your dishes and dishwasher interior will flash. Replace the dispenser cap and turn to the level shown, if needed. Make sure cap is selected for every cycle. Lock fill - -- 6 5 4 -- - --- 21 3 NOTE: For most water conditions, the factory setting of the water - Not all options are suitable for good drying performance. Pre-Wash section ■ The amount of the dispenser as shown. The hardness of 2 will not start. 7 If you use rinse aid for...
... your dishes and dishwasher interior will flash. Replace the dispenser cap and turn to the level shown, if needed. Make sure cap is selected for every cycle. Lock fill - -- 6 5 4 -- - --- 21 3 NOTE: For most water conditions, the factory setting of the water - Not all options are suitable for good drying performance. Pre-Wash section ■ The amount of the dispenser as shown. The hardness of 2 will not start. 7 If you use rinse aid for...

Use & Care Guide
Page 9
... heat air, use of rinse aid will provide the Only the end of the wash best drying performance. Raises the main wash Heavy Duty Raises the main 22 40 temperature to 120°F (49°C). dishwashers are less likely drying times. The Sani indicator indicates at the back of the lower rack. Cannot be used with ProScrub® Option Dries dishes with heat and Available with heat. Turn ProDry™ option speed drying times. Turn Heat Dry...
... heat air, use of rinse aid will provide the Only the end of the wash best drying performance. Raises the main wash Heavy Duty Raises the main 22 40 temperature to 120°F (49°C). dishwashers are less likely drying times. The Sani indicator indicates at the back of the lower rack. Cannot be used with ProScrub® Option Dries dishes with heat and Available with heat. Turn ProDry™ option speed drying times. Turn Heat Dry...
Use & Care Guide
Page 11
... 2.) 2. Adding a Dish After Dishwasher Is Started 1. Open the door slightly to stop the cycle. Check whether the detergent dispenser cover is washing, rinsing, drying, complete, and/or sanitized. Back of the dishwasher cycle. It will inform you if you if the dishwasher is still closed . The Cancel/Drain light turns off when you select the Sani Rinse option, when the Sani Rinse cycle is located at the end of the surfaces. 11 Wait for hidden control models only...
... 2.) 2. Adding a Dish After Dishwasher Is Started 1. Open the door slightly to stop the cycle. Check whether the detergent dispenser cover is washing, rinsing, drying, complete, and/or sanitized. Back of the dishwasher cycle. It will inform you if you if the dishwasher is still closed . The Cancel/Drain light turns off when you select the Sani Rinse option, when the Sani Rinse cycle is located at the end of the surfaces. 11 Wait for hidden control models only...

Use & Care Guide
Page 12
..., or bowls in place during washing. Adjusters are specially designed slots (small round holes) for best cleaning results. IMPORTANT: Remove dishes prior to adjust. To remove the rack To gain access to the track stops, pull the upper rack forward about halfway out of the holder. 3. Track stop closed Track stop open , flip the track stop the rotation of flexible tines located in either the top or...
..., or bowls in place during washing. Adjusters are specially designed slots (small round holes) for best cleaning results. IMPORTANT: Remove dishes prior to adjust. To remove the rack To gain access to the track stops, pull the upper rack forward about halfway out of the holder. 3. Track stop closed Track stop open , flip the track stop the rotation of flexible tines located in either the top or...

Use & Care Guide
Page 14
... *Manufacturer's recommendation: This practice will require maintenance to prepare your dishwasher indicates hard water. Building up of Loads If you wash Per Week before loading If you scrape and rinse If you only scrape before loading before loading* If you time and effort. Lower Filter RECOMMENDED TIME INTERVALS TO CLEAN YOUR FILTER Number of white residue on your dishes. Filter Removal Instructions IMPORTANT: Do not use wire brush, scouring pad, etc., as shown...
... *Manufacturer's recommendation: This practice will require maintenance to prepare your dishwasher indicates hard water. Building up of Loads If you wash Per Week before loading If you scrape and rinse If you only scrape before loading before loading* If you time and effort. Lower Filter RECOMMENDED TIME INTERVALS TO CLEAN YOUR FILTER Number of white residue on your dishes. Filter Removal Instructions IMPORTANT: Do not use wire brush, scouring pad, etc., as shown...

Use & Care Guide
Page 15
... Lower Filter as long as the filter is not part of a drain air gap between a built-in "Troubleshooting" section. Some state or local plumbing codes require the addition of your dishwasher. Check the drain air gap when your dishwasher has a stainless steel exterior, a stainless steel cleaner is usually located on the inside surfaces, especially just beneath the door area. The drain air gap is recommended. Then check for the Upper Filter Assembly lines up on top of the external drain air gap. To clean interior...
... Lower Filter as long as the filter is not part of a drain air gap between a built-in "Troubleshooting" section. Some state or local plumbing codes require the addition of your dishwasher. Check the drain air gap when your dishwasher has a stainless steel exterior, a stainless steel cleaner is usually located on the inside surfaces, especially just beneath the door area. The drain air gap is recommended. Then check for the Upper Filter Assembly lines up on top of the external drain air gap. To clean interior...
Use & Care Guide
Page 16
... Dishwasher Clean the exterior of a service call for service. If your dishwasher winterized by pressing either START/RESUME or CANCEL, or opening properly. Check for regular daily use less water and reduce energy consumption you will need to possibly avoid the cost of dishwasher with dishes affected by having your dishwasher has a stainless steel exterior, a stainless steel cleaner is closed and latched. Adjust loading as cookie sheets, cutting boards, or large containers, etc., that typically run...
... Dishwasher Clean the exterior of a service call for service. If your dishwasher winterized by pressing either START/RESUME or CANCEL, or opening properly. Check for regular daily use less water and reduce energy consumption you will need to possibly avoid the cost of dishwasher with dishes affected by having your dishwasher has a stainless steel exterior, a stainless steel cleaner is closed and latched. Adjust loading as cookie sheets, cutting boards, or large containers, etc., that typically run...
Use & Care Guide
Page 17
... affect noise levels. Clean the upper and lower filters at least once per month. A thumping sound may be draining properly, see "Dishwasher Use" section). WILL NOT FILL Be sure the water is connected to run, or use a rinse aid. If dishwasher is turned on the more . Check for kinks in the "Troubleshooting" section. Use a detergent booster/water softener additive designed for partial loads. ODORS NOTE: If the dishwasher is not used for proper drying. Run a vinegar rinse...
... affect noise levels. Clean the upper and lower filters at least once per month. A thumping sound may be draining properly, see "Dishwasher Use" section). WILL NOT FILL Be sure the water is connected to run, or use a rinse aid. If dishwasher is turned on the more . Check for kinks in the "Troubleshooting" section. Use a detergent booster/water softener additive designed for partial loads. ODORS NOTE: If the dishwasher is not used for proper drying. Run a vinegar rinse...
Use & Care Guide
Page 18
... avoid rinse aid leaking from : ■ Using the incorrect type of detergent, such as dish detergent for 5 minutes. Set your water heater is needed. Adjust the amount of detergent and rinse aid. See "Hard Water (White Residue On Dishwasher Interior Or Glassware)" in white vinegar for hand washing dishes, laundry detergent, or hand soap. ■ Not replacing the rinse aid dispenser cap after filling (or refilling) the rinse aid. ■ Using an excessive amount of dishwasher detergent. If the sanitized light is blinking, the load...
... avoid rinse aid leaking from : ■ Using the incorrect type of detergent, such as dish detergent for 5 minutes. Set your water heater is needed. Adjust the amount of detergent and rinse aid. See "Hard Water (White Residue On Dishwasher Interior Or Glassware)" in white vinegar for hand washing dishes, laundry detergent, or hand soap. ■ Not replacing the rinse aid dispenser cap after filling (or refilling) the rinse aid. ■ Using an excessive amount of dishwasher detergent. If the sanitized light is blinking, the load...
Use & Care Guide
Page 19
...: nylon dish racks and electronic controls. This warranty gives you specific legal rights, and you also may not apply to you need repair service, first see the "Troubleshooting" section of the Use & Care Guide. LIFETIME LIMITED WARRANTY ON STAINLESS STEEL TUB AND INNER DOOR LINER For the lifetime of the product from the date of purchase, when this major appliance is installed, operated and maintained according to instructions attached to...
...: nylon dish racks and electronic controls. This warranty gives you specific legal rights, and you also may not apply to you need repair service, first see the "Troubleshooting" section of the Use & Care Guide. LIFETIME LIMITED WARRANTY ON STAINLESS STEEL TUB AND INNER DOOR LINER For the lifetime of the product from the date of purchase, when this major appliance is installed, operated and maintained according to instructions attached to...

Dimension Guide
Page 1
... be needed to connect to an air gap. A time-delay fuse or circuit breaker and separate circuit is not recommended). Do not solder within 6" (15.2 cm) from water inlet valve. Copper wire only. If direct wiring dishwasher: Use flexible, armored or nonmetallic, sheathed copper wire with your home and local codes and ordinances. drain line fittings. For complete details, see Installation our products, we reserve the right to house plumbing lower than...
... be needed to connect to an air gap. A time-delay fuse or circuit breaker and separate circuit is not recommended). Do not solder within 6" (15.2 cm) from water inlet valve. Copper wire only. If direct wiring dishwasher: Use flexible, armored or nonmetallic, sheathed copper wire with your home and local codes and ordinances. drain line fittings. For complete details, see Installation our products, we reserve the right to house plumbing lower than...

Installation Guide
Page 2
... local codes and ordinances. TABLE OF CONTENTS DISHWASHER SAFETY 2 INSTALLATION REQUIREMENTS 3 Tools and Parts 3 Location Requirements 4 Drain Requirements 6 Water Supply Requirements 6 Electrical Requirements 6 INSTALLATION INSTRUCTIONS 7 Prepare Cabinet Opening-Existing Utilities 7 Prepare Cabinet Opening-New Utilities 7 Prepare and Route Water Line 8 Install Drain Hose 9 Install Moisture Barrier (under a wood countertop 11 Prepare Dishwasher 11 Make Power Supply Cord Connection 12 Determine Cabinet Opening 14 Install Door Handle (on some models 15 Custom Panel Dimensions...
... local codes and ordinances. TABLE OF CONTENTS DISHWASHER SAFETY 2 INSTALLATION REQUIREMENTS 3 Tools and Parts 3 Location Requirements 4 Drain Requirements 6 Water Supply Requirements 6 Electrical Requirements 6 INSTALLATION INSTRUCTIONS 7 Prepare Cabinet Opening-Existing Utilities 7 Prepare Cabinet Opening-New Utilities 7 Prepare and Route Water Line 8 Install Drain Hose 9 Install Moisture Barrier (under a wood countertop 11 Prepare Dishwasher 11 Make Power Supply Cord Connection 12 Determine Cabinet Opening 14 Install Door Handle (on some models 15 Custom Panel Dimensions...

Installation Guide
Page 4
... of time or in a location where it winterized by the warranty. Shelter dishwasher and water lines leading to order. Check location where dishwasher will be securely attached to level dishwasher. If dishwasher will be needed to the floor. If floor at rear of the dishwasher door and the wall or cabinet. ■ square opening is not level with or contact dishwasher motor or legs. Make sure pipes, wires and drain hose are...
... of time or in a location where it winterized by the warranty. Shelter dishwasher and water lines leading to order. Check location where dishwasher will be securely attached to level dishwasher. If dishwasher will be needed to the floor. If floor at rear of the dishwasher door and the wall or cabinet. ■ square opening is not level with or contact dishwasher motor or legs. Make sure pipes, wires and drain hose are...

Installation Guide
Page 6
... fused electrical supply. ■ Copper wire only. If connecting dishwasher with a power supply cord: ■ Use UL Listed power supply cord kit (Part Number 4317824) marked for your dishwasher. If connecting dishwasher with direct wiring: ■ Use flexible, armored or nonmetallic sheathed, copper wire with compression fitting or flexible braided water supply line (Part Number 4396897RP). copper tubing with grounding wire that meets the wiring requirements for use an air gap if the drain hose is recommended that the electrical connection and wire size are connecting the air gap...
... fused electrical supply. ■ Copper wire only. If connecting dishwasher with a power supply cord: ■ Use UL Listed power supply cord kit (Part Number 4317824) marked for your dishwasher. If connecting dishwasher with direct wiring: ■ Use flexible, armored or nonmetallic sheathed, copper wire with compression fitting or flexible braided water supply line (Part Number 4396897RP). copper tubing with grounding wire that meets the wiring requirements for use an air gap if the drain hose is recommended that the electrical connection and wire size are connecting the air gap...

Installation Guide
Page 18
... and start the nut onto the elbow threads. Use 2 or more people to elbow using ⁵⁄₈" open dishwasher door and place towel over pump assembly and spray arm of the bracket along the scored line. This will be done later. NOTE: To avoid vibration during operation, route the water supply line so that it from the parts package. Flexible braided connection: Secure nut to move and install dishwasher...
... and start the nut onto the elbow threads. Use 2 or more people to elbow using ⁵⁄₈" open dishwasher door and place towel over pump assembly and spray arm of the bracket along the scored line. This will be done later. NOTE: To avoid vibration during operation, route the water supply line so that it from the parts package. Flexible braided connection: Secure nut to move and install dishwasher...

Installation Guide
Page 26
... door, wait 5 seconds, then open door. Selecting certain options could increase cycle time past 3.5 hours. Start/Resume light may flash: When pressing Start/Resume, you press it to follow these possible solutions work, please see "If Dishwasher Does Not Operate" section. Record hose installation or replacement dates on the hose for good drying performance and controlling hard water deposit buildup. Failure to complete the shortest wash cycle. Check that all tools used , replace inlet hose...
... door, wait 5 seconds, then open door. Selecting certain options could increase cycle time past 3.5 hours. Start/Resume light may flash: When pressing Start/Resume, you press it to follow these possible solutions work, please see "If Dishwasher Does Not Operate" section. Record hose installation or replacement dates on the hose for good drying performance and controlling hard water deposit buildup. Failure to complete the shortest wash cycle. Check that all tools used , replace inlet hose...


