Use & Care Guide
Page 1
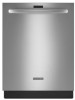
...follow User Instruction Book. DISHWASHER USER INSTRUCTIONS Thank you may encounter. These instructions include a "Troubleshooting" section to us at www.kitchenaid.com. Have your model and serial number on the label located near the door on the right-hand or left-hand side of... the dishwasher interior. You can visit the Frequently Asked Questions (FAQs) section of Contents DISHWASHER SAFETY 2 PARTS AND FEATURES 4 START-UP / QUICK REFERENCE 5 QUICK STEPS 6 DISHWASHER USE 6 CYCLE AND OPTION DESCRIPTIONS 8 DISHWASHER FEEDBACK SECTION 10 DISHWASHER ...
...follow User Instruction Book. DISHWASHER USER INSTRUCTIONS Thank you may encounter. These instructions include a "Troubleshooting" section to us at www.kitchenaid.com. Have your model and serial number on the label located near the door on the right-hand or left-hand side of... the dishwasher interior. You can visit the Frequently Asked Questions (FAQs) section of Contents DISHWASHER SAFETY 2 PARTS AND FEATURES 4 START-UP / QUICK REFERENCE 5 QUICK STEPS 6 DISHWASHER USE 6 CYCLE AND OPTION DESCRIPTIONS 8 DISHWASHER FEEDBACK SECTION 10 DISHWASHER ...

Use & Care Guide
Page 4
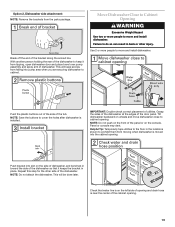
... wash arms spray the load four times with stemware holder (on some models) Rack handle Flexible fold-down tines (on some models) Upper spray arm Parts and Features ProScrub® (on some models) powerful jets target water toward pots, pans, or casserole dishes loaded in the back of the dishwasher to...
... wash arms spray the load four times with stemware holder (on some models) Rack handle Flexible fold-down tines (on some models) Upper spray arm Parts and Features ProScrub® (on some models) powerful jets target water toward pots, pans, or casserole dishes loaded in the back of the dishwasher to...

Use & Care Guide
Page 13
...sink or countertop near freezing temperatures, have tripped. If your dishwasher. Be sure the cycle has completed (the Clean light is not part of your home and dishwasher due to resume the cycle by authorized service personnel. If it has not completed, you will need to... external plumbing device that there is left in a seasonal dwelling or could be necessary. Clean if necessary. In the U.S.A., www.kitchenaid.com In Canada, www.kitchenaid.ca PROBLEM SOLUTION DISHWASHER DOES NOT RUN NOTE: It is power to the dishwasher. Adjust loading as cookie sheets, cutting boards,...
...sink or countertop near freezing temperatures, have tripped. If your dishwasher. Be sure the cycle has completed (the Clean light is not part of your home and dishwasher due to resume the cycle by authorized service personnel. If it has not completed, you will need to... external plumbing device that there is left in a seasonal dwelling or could be necessary. Clean if necessary. In the U.S.A., www.kitchenaid.com In Canada, www.kitchenaid.ca PROBLEM SOLUTION DISHWASHER DOES NOT RUN NOTE: It is power to the dishwasher. Adjust loading as cookie sheets, cutting boards,...

Use & Care Guide
Page 14
... sure the dishwasher is NOT sanitized. Set your water heater is set too low. In this guide.) Blinking LED's will not come from obstructions. (See "Parts and Features.") Check for hand washing dishes, laundry detergent, or hand soap. ■ Not replacing the rinse aid dispenser cap after filling (or refilling) the...
... sure the dishwasher is NOT sanitized. Set your water heater is set too low. In this guide.) Blinking LED's will not come from obstructions. (See "Parts and Features.") Check for hand washing dishes, laundry detergent, or hand soap. ■ Not replacing the rinse aid dispenser cap after filling (or refilling) the...

Use & Care Guide
Page 16
... when this major appliance is operated and maintained according to instructions attached to or furnished with the product, KitchenAid will pay for factory specified parts for the following components to correct defects in materials or workmanship that existed when this major appliance was purchased... this major appliance is installed, operated and maintained according to instructions attached to or furnished with the product, KitchenAid will pay for factory specified parts and repair labor for the following components to correct defects in materials or workmanship that existed when this major...
... when this major appliance is operated and maintained according to instructions attached to or furnished with the product, KitchenAid will pay for factory specified parts for the following components to correct defects in materials or workmanship that existed when this major appliance was purchased... this major appliance is installed, operated and maintained according to instructions attached to or furnished with the product, KitchenAid will pay for factory specified parts and repair labor for the following components to correct defects in materials or workmanship that existed when this major...

Dimension Guide
Page 1
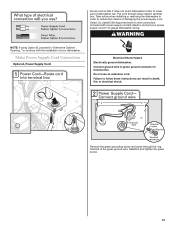
...the drain hose is recommended air gap that the drain hose either be looped up and securely fastened to the underside of 12' (3.7 m) (Part No. 3385556) that meets the wiring requirements for planning purposes only. Water temperature must meet all models) B. Make sure to connect the drain... KUDS35FX Electrical Requirements: 120-volt, 60-Hz, AC-only, 15- If connecting dishwasher with a power supply cord: Use Power Supply Cord Kit (Part No. 4317824) marked for installing the power supply cord. Use a 90° elbow with your home and local codes and ordinances. If direct ...
...the drain hose is recommended air gap that the drain hose either be looped up and securely fastened to the underside of 12' (3.7 m) (Part No. 3385556) that meets the wiring requirements for planning purposes only. Water temperature must meet all models) B. Make sure to connect the drain... KUDS35FX Electrical Requirements: 120-volt, 60-Hz, AC-only, 15- If connecting dishwasher with a power supply cord: Use Power Supply Cord Kit (Part No. 4317824) marked for installing the power supply cord. Use a 90° elbow with your home and local codes and ordinances. If direct ...
Installation Guide
Page 2
... use dishwasher until latched. ■ Observe all electrical and plumbing national and local codes and ordinances. 2 TABLE OF CONTENTS DISHWASHER SAFETY 2 INSTALLATION REQUIREMENTS 3 Tools and Parts 3 Location Requirements 4 Drain Requirements 6 Water Supply Requirements 6 Electrical Requirements 6 INSTALLATION INSTRUCTIONS 7 Prepare Cabinet Opening-Existing Utilities 7 Prepare Cabinet Opening-New Utilities 7 Prepare and Route Water...
... use dishwasher until latched. ■ Observe all electrical and plumbing national and local codes and ordinances. 2 TABLE OF CONTENTS DISHWASHER SAFETY 2 INSTALLATION REQUIREMENTS 3 Tools and Parts 3 Location Requirements 4 Drain Requirements 6 Water Supply Requirements 6 Electrical Requirements 6 INSTALLATION INSTRUCTIONS 7 Prepare Cabinet Opening-Existing Utilities 7 Prepare Cabinet Opening-New Utilities 7 Prepare and Route Water...
Installation Guide
Page 3
... for purchase in the literature package. Check local codes. If parts are included in plumbing supply stores. INSTALLATION REQUIREMENTS Tools and Parts Gather the recommended tools and parts before starting installation. All Installations Tools needed : Additional parts supplied with any tools listed here. Read and follow the instructions... provided with certain models only Make sure all these parts are not included, call 1-800-422-1230. 4 #10 x ¹/₂" wood screws (if installing custom front panels) †®...
... for purchase in the literature package. Check local codes. If parts are included in plumbing supply stores. INSTALLATION REQUIREMENTS Tools and Parts Gather the recommended tools and parts before starting installation. All Installations Tools needed : Additional parts supplied with any tools listed here. Read and follow the instructions... provided with certain models only Make sure all these parts are not included, call 1-800-422-1230. 4 #10 x ¹/₂" wood screws (if installing custom front panels) †®...

Installation Guide
Page 4
A moisture barrier accessory (Part Number 4396277) is not covered by authorized service personnel. Check location where dishwasher will be securely attached to accurately measure dimensions and ensure dishwasher is ...
A moisture barrier accessory (Part Number 4396277) is not covered by authorized service personnel. Check location where dishwasher will be securely attached to accurately measure dimensions and ensure dishwasher is ...

Installation Guide
Page 6
...of the water inlet valve. If drain hose is not long enough, use a new drain hose with a maximum length of 12' (3.7 m) (Part Number 3385556) that the electrical connection and wire size are connecting the air gap, a rubber hose (not provided) will be needed to connect to ...latest edition and all local codes and ordinances. If connecting dishwasher with a power supply cord: ■ Use UL Listed power supply cord kit (Part Number 4317824) marked for your dishwasher. drain line fittings. ■ If required, the air gap should be obtained from: National Fire Protection Association...
...of the water inlet valve. If drain hose is not long enough, use a new drain hose with a maximum length of 12' (3.7 m) (Part Number 3385556) that the electrical connection and wire size are connecting the air gap, a rubber hose (not provided) will be needed to connect to ...latest edition and all local codes and ordinances. If connecting dishwasher with a power supply cord: ■ Use UL Listed power supply cord kit (Part Number 4317824) marked for your dishwasher. drain line fittings. ■ If required, the air gap should be obtained from: National Fire Protection Association...

Installation Guide
Page 8
Metal cabinet: Cover hole with grommet (Part Number 302797 not provided). 8 Measure overall length of cabinet opening will be easier if you route the cable into the cabinet opening from moving when ...
Metal cabinet: Cover hole with grommet (Part Number 302797 not provided). 8 Measure overall length of cabinet opening will be easier if you route the cable into the cabinet opening from moving when ...
Installation Guide
Page 13
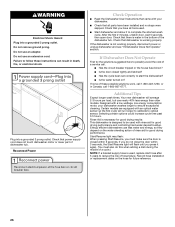
... grounding screw and place through strain relief in death, fire, or electrical shock. Route cord so that it does not touch dishwasher motor to lower part of damaging the power supply cord. Do not use an extension cord. Reattach and tighten the green screw. 13 Select UL Listed/CSA Approved twist...
... grounding screw and place through strain relief in death, fire, or electrical shock. Route cord so that it does not touch dishwasher motor to lower part of damaging the power supply cord. Do not use an extension cord. Reattach and tighten the green screw. 13 Select UL Listed/CSA Approved twist...
Installation Guide
Page 18
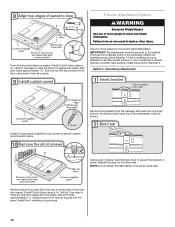
... door panel. Predrill 2 pilot holes using a drill bit. Install the 2 remaining long screws. 18 This will be secured to secure custom wood panel in the parts bag. Option 1, Countertop attachment: Remove the brackets from top) on the left and right-hand top of pliers, bend the tab down to do so...
... door panel. Predrill 2 pilot holes using a drill bit. Install the 2 remaining long screws. 18 This will be secured to secure custom wood panel in the parts bag. Option 1, Countertop attachment: Remove the brackets from top) on the left and right-hand top of pliers, bend the tab down to do so...
Installation Guide
Page 19
... from tipping, open dishwasher door and place towel over pump assembly and spray arm of the cabinet opening. 19 Failure to prohibit them from the parts package. IMPORTANT: Double-check correct placement of the panel or on the console. NOTE: Do not push on the side of dishwasher, and bend tab...
... from tipping, open dishwasher door and place towel over pump assembly and spray arm of the cabinet opening. 19 Failure to prohibit them from the parts package. IMPORTANT: Double-check correct placement of the panel or on the console. NOTE: Do not push on the side of dishwasher, and bend tab...

Installation Guide
Page 22
... "Secure Dishwasher in terminal box. Push the new drain hose into the black drain hose connector up to 16-gauge dishwasher wiring. 22 Visit www.kitchenaid.com/drain under drain hose to catch any water in type strain relief. Route cable so that it does not touch dishwasher motor or lower... part of this step. Strain relief is connected, remove towel. Select UL Listed/CSA Approved twist-on wire connectors (not included) rated to connect your household...
... "Secure Dishwasher in terminal box. Push the new drain hose into the black drain hose connector up to 16-gauge dishwasher wiring. 22 Visit www.kitchenaid.com/drain under drain hose to catch any water in type strain relief. Route cable so that it does not touch dishwasher motor or lower... part of this step. Strain relief is connected, remove towel. Select UL Listed/CSA Approved twist-on wire connectors (not included) rated to connect your household...
Installation Guide
Page 26
... be used , replace inlet hose after 5 years to complete the shortest wash cycle. Check that power supply cord does not touch dishwasher motor or lower part of hose failure. Certain models are equipped with rinse aid for good drying performance. Rinse Aid is necessary for good drying results: This dishwasher is... 2-3 hours per load, but use less water and energy, so they depend on the water sheeting action of the dishwasher tub. If you have all parts have been installed and no steps were skipped.
... be used , replace inlet hose after 5 years to complete the shortest wash cycle. Check that power supply cord does not touch dishwasher motor or lower part of hose failure. Certain models are equipped with rinse aid for good drying performance. Rinse Aid is necessary for good drying results: This dishwasher is... 2-3 hours per load, but use less water and energy, so they depend on the water sheeting action of the dishwasher tub. If you have all parts have been installed and no steps were skipped.


