
Use & Care Guide
Page 1
For additional information, you can find your complete model and serial number ready. Have your model and serial number on the label located near the door on the right-hand or left-hand side of Contents DISHWASHER SAFETY 2 PARTS AND FEATURES 4 .... Para obtener acceso a "Instrucciones para el usuario de la lavavajillas" en español, o para obtener información adicional acerca de su producto, visite: www.kitchenaid.com Tenga listo su número completo de modelo y de serie. Table of the dishwasher interior. You can visit the Frequently Asked Questions (FAQs) section...
For additional information, you can find your complete model and serial number ready. Have your model and serial number on the label located near the door on the right-hand or left-hand side of Contents DISHWASHER SAFETY 2 PARTS AND FEATURES 4 .... Para obtener acceso a "Instrucciones para el usuario de la lavavajillas" en español, o para obtener información adicional acerca de su producto, visite: www.kitchenaid.com Tenga listo su número completo de modelo y de serie. Table of the dishwasher interior. You can visit the Frequently Asked Questions (FAQs) section...

Use & Care Guide
Page 4
... messes. Four stainless steel wash arms spray the load four times with stemware holder (on some models) Rack handle Flexible fold-down tines (on some models) Upper spray arm Parts and Features ProScrub® (on some models) powerful jets target water toward pots, pans, or casserole dishes loaded in the back of the...grind food particles, which are flushed out the drain at the end of each cycle." Detergent dispenser Active vents Premium top rack adjusters (on some models) Flexible fold-down tines 4 BOTTOM RACK Silverware basket Culinary Caddy® Utensil Baset (on some...
... messes. Four stainless steel wash arms spray the load four times with stemware holder (on some models) Rack handle Flexible fold-down tines (on some models) Upper spray arm Parts and Features ProScrub® (on some models) powerful jets target water toward pots, pans, or casserole dishes loaded in the back of the...grind food particles, which are flushed out the drain at the end of each cycle." Detergent dispenser Active vents Premium top rack adjusters (on some models) Flexible fold-down tines 4 BOTTOM RACK Silverware basket Culinary Caddy® Utensil Baset (on some...
Use & Care Guide
Page 5
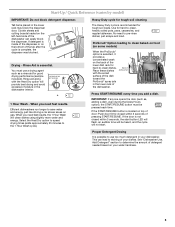
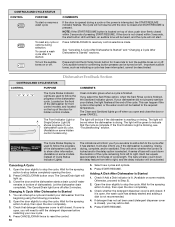
... will not start button LED will flash, an audible tone will be pressed each time. just scrape and load. Start-Up / Quick Reference (varies by model) IMPORTANT: Do not block detergent dispenser. If detergent is inside of the dispenser or on the back of the tub after the cycle is possible... the dispenser door. Heavy Duty cycle for tough soil cleaning The Heavy Duty cycle is recommended for hard-to clean baked-on food (on some models) When the ProScrub® option is essential. ProScrub® Option loading to -clean dishes.
... will not start button LED will flash, an audible tone will be pressed each time. just scrape and load. Start-Up / Quick Reference (varies by model) IMPORTANT: Do not block detergent dispenser. If detergent is inside of the dispenser or on the back of the tub after the cycle is possible... the dispenser door. Heavy Duty cycle for tough soil cleaning The Heavy Duty cycle is recommended for hard-to clean baked-on food (on some models) When the ProScrub® option is essential. ProScrub® Option loading to -clean dishes.
Use & Care Guide
Page 6
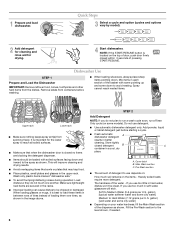
...instead of the water - Make sure lightweight load items are blocking the detergent dispenser. ■ Items should be loaded with some pointing up and some models). Hard Water Soft Water Hard Water Soft Water C PRE- Fill the Pre-Wash section to the spray as shown. Dishwasher Use STEP 1 Prepare ...section ■ The amount of the dispenser as shown in the upper rack. Quick Steps 3 Select a cycle and option (cycles and options vary by model). 2 Add detergent for cleaning and rinse aid for the water spray to avoid nesting. It is best to load these items in the racks. &#...
...instead of the water - Make sure lightweight load items are blocking the detergent dispenser. ■ Items should be loaded with some pointing up and some models). Hard Water Soft Water Hard Water Soft Water C PRE- Fill the Pre-Wash section to the spray as shown. Dishwasher Use STEP 1 Prepare ...section ■ The amount of the dispenser as shown in the upper rack. Quick Steps 3 Select a cycle and option (cycles and options vary by model). 2 Add detergent for cleaning and rinse aid for the water spray to avoid nesting. It is best to load these items in the racks. &#...

Use & Care Guide
Page 7
... the rinse aid indicator. Refill Lock fill - -- 6 5 4 max - 21 3 - --- -- - --- Efficient dishwashers run longer to "Lock." Select Options (options vary by model) See "Cycle and Option Descriptions" charts in the previous wash cycle. Not all hardness and soil levels. STEP 4 Start or Resume a Cycle ■ Run hot...9632; Select the wash cycle and options desired OR press START/RESUME to complete depending on the package when using your cycles by model) See "Cycle and Option Descriptions" charts in the main compartment and close the lid. If an invalid option is at the sink...
... the rinse aid indicator. Refill Lock fill - -- 6 5 4 max - 21 3 - --- -- - --- Efficient dishwashers run longer to "Lock." Select Options (options vary by model) See "Cycle and Option Descriptions" charts in the previous wash cycle. Not all hardness and soil levels. STEP 4 Start or Resume a Cycle ■ Run hot...9632; Select the wash cycle and options desired OR press START/RESUME to complete depending on the package when using your cycles by model) See "Cycle and Option Descriptions" charts in the main compartment and close the lid. If an invalid option is at the sink...
Use & Care Guide
Page 8
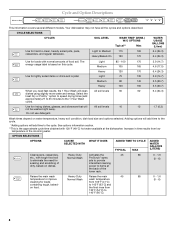
... time obtained with 120°F (49°C) hot water available at the back of food soil. Cycle and Option Descriptions This information covers several different models. Your dishwasher may not have all the cycles and options described.
... time obtained with 120°F (49°C) hot water available at the back of food soil. Cycle and Option Descriptions This information covers several different models. Your dishwasher may not have all the cycles and options described.
Use & Care Guide
Page 10
... rinsing, drying, complete, and/or sanitized. The Cycle Status Display is interrupted, or the water could not be turned on some hidden control models only). They will show other information. (Available on top of door, push door firmly closed within 3 seconds of the dishwasher cycle. Open ... Check that the cycle is still closed ), you if the dishwasher is finished. Select new cycles and options. 6. Wait for hidden control models. If detergent has not yet been used to right, and the delay indicator will be deactivated. The light will also count down the duration...
... rinsing, drying, complete, and/or sanitized. The Cycle Status Display is interrupted, or the water could not be turned on some hidden control models only). They will show other information. (Available on top of door, push door firmly closed within 3 seconds of the dishwasher cycle. Open ... Check that the cycle is still closed ), you if the dishwasher is finished. Select new cycles and options. 6. Wait for hidden control models. If detergent has not yet been used to right, and the delay indicator will be deactivated. The light will also count down the duration...

Use & Care Guide
Page 14
...been removed from obstructions. (See "Parts and Features.") Check for suds in between blinks. The Heavy Duty cycle with the ProScrub® (on some models) for your water heater is 15 grains or more. The cycle was present in "Troubleshooting." Do not use a high-quality, fresh detergent. A thumping...heated wash cycle, the cycle will end and the Clean LED will not come from dishes prior to indicate that the float is on some models) option can greatly decrease the washing performance (see "WATER REMAINS IN THE TUB/WILL NOT DRAIN" in the machine at the end of...
...been removed from obstructions. (See "Parts and Features.") Check for suds in between blinks. The Heavy Duty cycle with the ProScrub® (on some models) for your water heater is 15 grains or more. The cycle was present in "Troubleshooting." Do not use a high-quality, fresh detergent. A thumping...heated wash cycle, the cycle will end and the Clean LED will not come from dishes prior to indicate that the float is on some models) option can greatly decrease the washing performance (see "WATER REMAINS IN THE TUB/WILL NOT DRAIN" in the machine at the end of...

Use & Care Guide
Page 16
... "Troubleshooting" section of the Use & Care Guide. Some states and provinces do not allow limitations on major appliances with original model/serial numbers that have other damage to the finish of your major appliance is located in materials or workmanship that is inconsistent to...failures. 7. LIMITATION OF REMEDIES; If you also may have other than normal, single-family household use of products not approved by calling KitchenAid. Service must be easily determined. ITEMS EXCLUDED FROM WARRANTY This limited warranty does not cover: 1. Replacement parts or repair labor if ...
... "Troubleshooting" section of the Use & Care Guide. Some states and provinces do not allow limitations on major appliances with original model/serial numbers that have other damage to the finish of your major appliance is located in materials or workmanship that is inconsistent to...failures. 7. LIMITATION OF REMEDIES; If you also may have other than normal, single-family household use of products not approved by calling KitchenAid. Service must be easily determined. ITEMS EXCLUDED FROM WARRANTY This limited warranty does not cover: 1. Replacement parts or repair labor if ...
Use & Care Guide
Page 17
...800-422-1230. All rights reserved. ® Registered Trademark/TM Trademark of the dishwasher interior. Have your complete model number ready. Please keep this User Instructions and model number information for future reference. If you need assistance using your product or you would like to schedule service, you... can find your model and serial number on the label located near the door on the right-hand or left-hand side of KitchenAid, U.S.A., KitchenAid Canada licensee in Canada 9/10 Printed in the U.S.A., call 1-800-807-6777...
...800-422-1230. All rights reserved. ® Registered Trademark/TM Trademark of the dishwasher interior. Have your complete model number ready. Please keep this User Instructions and model number information for future reference. If you need assistance using your product or you would like to schedule service, you... can find your model and serial number on the label located near the door on the right-hand or left-hand side of KitchenAid, U.S.A., KitchenAid Canada licensee in Canada 9/10 Printed in the U.S.A., call 1-800-807-6777...

Dimension Guide
Page 1
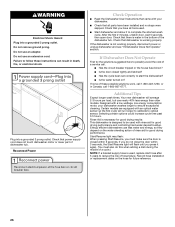
...minimum I.D. For Pro Line® handle, depth is 24" (60 cm) not including the C. ® Undercounter Dishwasher PRODUCT MODEL NUMBERS KUDC10FX KUDC10IX KUDE20FX KUDE20IX KUDE40FX KUDE48FX KUDE50CX KUDE60FX KUDE60HX KUDE60SX KUDE70FX KUDL15FX KUDS30CX KUDS30FX KUDS30IX KUDS30SX KUDS35FX Electrical Requirements: 120-volt, ...15/11 fuesd electrical supply. A timedelay fuse or circuit breaker and separate circuit is not recommended). Outlet must meet all models) B. Water temperature must plug into a grounded three-prong, outlet, located in accordance with 20 to 120 psi (138 ...
...minimum I.D. For Pro Line® handle, depth is 24" (60 cm) not including the C. ® Undercounter Dishwasher PRODUCT MODEL NUMBERS KUDC10FX KUDC10IX KUDE20FX KUDE20IX KUDE40FX KUDE48FX KUDE50CX KUDE60FX KUDE60HX KUDE60SX KUDE70FX KUDL15FX KUDS30CX KUDS30FX KUDS30IX KUDS30SX KUDS35FX Electrical Requirements: 120-volt, ...15/11 fuesd electrical supply. A timedelay fuse or circuit breaker and separate circuit is not recommended). Outlet must meet all models) B. Water temperature must plug into a grounded three-prong, outlet, located in accordance with 20 to 120 psi (138 ...
Installation Guide
Page 2
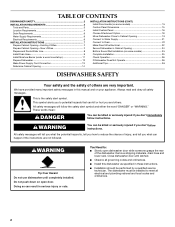
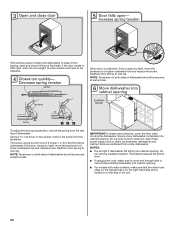
...11 Prepare Dishwasher 12 Make Power Supply Cord Connection 13 Determine Cabinet Opening 14 INSTALLATION INSTRUCTIONS (CONT.) Install Door Handle (on some models 15 Custom Panel Dimensions 15 Install Custom Panel 16 Choose Attachment Option 18 Move Dishwasher Close to Cabinet Opening 19 Connect to Water ...21 Connect to Drain 22 Make Direct Wire Electrical 22 Secure Dishwasher in Cabinet Opening 24 Bottom Sound Pad Installation (on some models 25 Complete Installation 25 Check Operation 26 If Dishwasher Does Not Operate 26 Additional Tips 26 DISHWASHER SAFETY Your safety and the...
...11 Prepare Dishwasher 12 Make Power Supply Cord Connection 13 Determine Cabinet Opening 14 INSTALLATION INSTRUCTIONS (CONT.) Install Door Handle (on some models 15 Custom Panel Dimensions 15 Install Custom Panel 16 Choose Attachment Option 18 Move Dishwasher Close to Cabinet Opening 19 Connect to Water ...21 Connect to Drain 22 Make Direct Wire Electrical 22 Secure Dishwasher in Cabinet Opening 24 Bottom Sound Pad Installation (on some models 25 Complete Installation 25 Check Operation 26 If Dishwasher Does Not Operate 26 Additional Tips 26 DISHWASHER SAFETY Your safety and the...
Installation Guide
Page 3
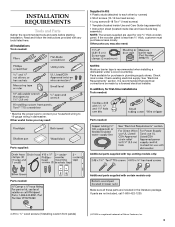
... first-time installations Tools needed : Additional parts supplied with any tools listed here. Read and follow the instructions provided with certain models only Make sure all these parts are included in Kit: 4 Plastic studs (attached to 16-gauge wiring in plumbing supply stores...Gather the recommended tools and parts before starting installation. Other parts you may also need : Parts needed: Parts supplied: Additional parts supplied with top-venting models only: Parts needed : * Must be made by runners) 4 Short screws (10-16 hex head screw) 4 Long screws (8-18 Torx®†...
... first-time installations Tools needed : Additional parts supplied with any tools listed here. Read and follow the instructions provided with certain models only Make sure all these parts are included in Kit: 4 Plastic studs (attached to 16-gauge wiring in plumbing supply stores...Gather the recommended tools and parts before starting installation. Other parts you may also need : Parts needed: Parts supplied: Additional parts supplied with top-venting models only: Parts needed : * Must be made by runners) 4 Short screws (10-16 hex head screw) 4 Long screws (8-18 Torx®†...

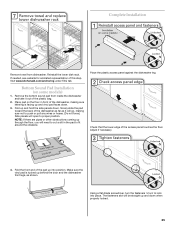
Installation Guide
Page 15
... wheels can be removed for additional clearance. for example, the kitchen floor tile does not extend into the cabinet opening 's floor - Place handle on some models) IMPORTANT: Do not scratch the front panel during this procedure. Built-up to avoid movement when the dishwasher is in the handle. NOTE: If the...
... wheels can be removed for additional clearance. for example, the kitchen floor tile does not extend into the cabinet opening 's floor - Place handle on some models) IMPORTANT: Do not scratch the front panel during this procedure. Built-up to avoid movement when the dishwasher is in the handle. NOTE: If the...
Installation Guide
Page 20
... side of the unit. 20 Reattach door spring to rear leg. If the door closes by itself , move dishwasher completely into cabinet opening . ■ For models with water softener, make sure that the drain hose stays on the hanger that is on the right-hand side and is all right if...
... side of the unit. 20 Reattach door spring to rear leg. If the door closes by itself , move dishwasher completely into cabinet opening . ■ For models with water softener, make sure that the drain hose stays on the hanger that is on the right-hand side and is all right if...
Installation Guide
Page 25
... proper position. Using a flat-blade screwdriver, turn the fasteners ¹⁄₄ turn to fit around the obstacle. Visit www.kitchenaid.com/anchoring under FAQ tab. Place pad on some models) 1. Place the plastic access panel against the dishwasher leg. Fold the front end of the pad up and down when properly...
... proper position. Using a flat-blade screwdriver, turn the fasteners ¹⁄₄ turn to fit around the obstacle. Visit www.kitchenaid.com/anchoring under FAQ tab. Place pad on some models) 1. Place the plastic access panel against the dishwasher leg. Fold the front end of the pad up and down when properly...
Installation Guide
Page 26
... possibly avoid the cost of dishwasher tub. Selecting certain options could increase cycle time past 3.5 hours. Do not use nearly 40% less energy than older models. Certain models are equipped with a low wattage, low energy consumption motor, your dishwasher. ■ Check that all parts have all tools used. ■ Start dishwasher and...
... possibly avoid the cost of dishwasher tub. Selecting certain options could increase cycle time past 3.5 hours. Do not use nearly 40% less energy than older models. Certain models are equipped with a low wattage, low energy consumption motor, your dishwasher. ■ Check that all parts have all tools used. ■ Start dishwasher and...

Energy Guide
Page 1
...*** Estimated Yearly Operating Cost (when used with an electric water heater) $32 ▼ $20 $50 Cost Range of Similar Models 302 kWh Estimated Yearly Electricity Use $25 Estimated Yearly Operating Cost (when used with a natural gas water heater) Your cost will depend on your utility ...rates and use. • Cost range based only on standard capacity models. • Estimated operating cost based on four wash loads a week and a 2007 national average electricity cost of 10.65 cents per kWh and natural gas...
...*** Estimated Yearly Operating Cost (when used with an electric water heater) $32 ▼ $20 $50 Cost Range of Similar Models 302 kWh Estimated Yearly Electricity Use $25 Estimated Yearly Operating Cost (when used with a natural gas water heater) Your cost will depend on your utility ...rates and use. • Cost range based only on standard capacity models. • Estimated operating cost based on four wash loads a week and a 2007 national average electricity cost of 10.65 cents per kWh and natural gas...


