Use & Care Guide
Page 1
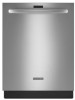
... 12 TROUBLESHOOTING 13 WARRANTY 16 W10300928B For your complete model and serial number ready. In Canada: visit www.kitchenaid.ca or call 1-800-807-6777. DISHWASHER USER INSTRUCTIONS Thank you need further assistance using your model and serial number on the label located near the door on the right-hand or ...
... 12 TROUBLESHOOTING 13 WARRANTY 16 W10300928B For your complete model and serial number ready. In Canada: visit www.kitchenaid.ca or call 1-800-807-6777. DISHWASHER USER INSTRUCTIONS Thank you need further assistance using your model and serial number on the label located near the door on the right-hand or ...
Use & Care Guide
Page 2
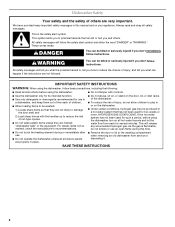
... you what can kill or hurt you don't immediately follow basic precautions, including the following: ■ Read all instructions before using the dishwasher. ■ Do not tamper with the handles up to potential hazards that has not been used for several minutes. As the gas is... on, or stand on your appliance. HYDROGEN GAS IS EXPLOSIVE. SAVE THESE INSTRUCTIONS 2 Always read and obey all enclosure panels are marked "dishwasher safe" or the equivalent. All safety messages will release any accumulated hydrogen gas. WARNING You can be washed: 1) Locate sharp items so that...
... you what can kill or hurt you don't immediately follow basic precautions, including the following: ■ Read all instructions before using the dishwasher. ■ Do not tamper with the handles up to potential hazards that has not been used for several minutes. As the gas is... on, or stand on your appliance. HYDROGEN GAS IS EXPLOSIVE. SAVE THESE INSTRUCTIONS 2 Always read and obey all enclosure panels are marked "dishwasher safe" or the equivalent. All safety messages will release any accumulated hydrogen gas. WARNING You can be washed: 1) Locate sharp items so that...

Use & Care Guide
Page 3
...harm. 3 Do not push down on the dishwasher. GROUNDING INSTRUCTIONS ■ For a grounded, cord-connected dishwasher: The dishwasher must be plugged into an appropriate outlet that is installed and grounded in accordance with the dishwasher; Doing so can result in serious injury or...shock by a qualified electrician. ■ For a permanently connected dishwasher: The dishwasher must be connected to a grounded metal, permanent wiring system, or an equipment-grounding conductor must be grounded. The dishwasher is properly grounded. Do not modify the plug provided with all...
...harm. 3 Do not push down on the dishwasher. GROUNDING INSTRUCTIONS ■ For a grounded, cord-connected dishwasher: The dishwasher must be plugged into an appropriate outlet that is installed and grounded in accordance with the dishwasher; Doing so can result in serious injury or...shock by a qualified electrician. ■ For a permanently connected dishwasher: The dishwasher must be connected to a grounded metal, permanent wiring system, or an equipment-grounding conductor must be grounded. The dishwasher is properly grounded. Do not modify the plug provided with all...

Use & Care Guide
Page 4
... arm Parts and Features ProScrub® (on some models) powerful jets target water toward pots, pans, or casserole dishes loaded in the back of the dishwasher to grind food particles, which are flushed out the drain at the end of each cycle." Food disposer-based wash system has four stainless steel...
... arm Parts and Features ProScrub® (on some models) powerful jets target water toward pots, pans, or casserole dishes loaded in the back of the dishwasher to grind food particles, which are flushed out the drain at the end of each cycle." Food disposer-based wash system has four stainless steel...
Use & Care Guide
Page 5
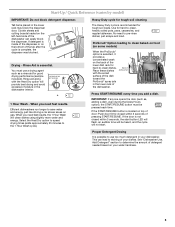
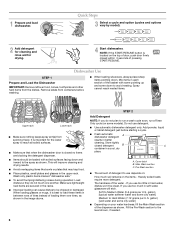
...dish rack for good drying performance (sample included). Proper Detergent Dosing It is essential. Tall items placed in your dishes. Back of the dishwasher can lead to pre-rinse dishes; If the START/RESUME button is not closed within 3 seconds of door: Push door firmly closed within ... drying times (adds approximately 35 minutes to save water and energy, just like driving a car slower saves on the left-hand side of dishwasher Press START/RESUME every time you add a dish. Cookie sheets and cutting boards loaded on gas. Start-Up / Quick Reference (varies by...
...dish rack for good drying performance (sample included). Proper Detergent Dosing It is essential. Tall items placed in your dishes. Back of the dishwasher can lead to pre-rinse dishes; If the START/RESUME button is not closed within 3 seconds of door: Push door firmly closed within ... drying times (adds approximately 35 minutes to save water and energy, just like driving a car slower saves on the left-hand side of dishwasher Press START/RESUME every time you add a dish. Cookie sheets and cutting boards loaded on gas. Start-Up / Quick Reference (varies by...
Use & Care Guide
Page 6
... How much in soft water, glassware will improve cleaning and drying results. ■ Avoid overlapping items like bowls or plates that when the dishwasher door is closed no items are secured in the upper rack. Heavily soiled loads require more detergent. If you use too much soil remains ...2 Add Detergent NOTE: If you do not touch one another. NOTE: If the START/RESUME button is best to use detergent. ■ Use automatic dishwasher detergent only. When loading glasses or mugs, it is located on your water hardness, fill the Main Wash section of loading them over tines, as...
... How much in soft water, glassware will improve cleaning and drying results. ■ Avoid overlapping items like bowls or plates that when the dishwasher door is closed no items are secured in the upper rack. Heavily soiled loads require more detergent. If you use too much soil remains ...2 Add Detergent NOTE: If you do not touch one another. NOTE: If the START/RESUME button is best to use detergent. ■ Use automatic dishwasher detergent only. When loading glasses or mugs, it is located on your water hardness, fill the Main Wash section of loading them over tines, as...

Use & Care Guide
Page 7
... that can customize your fingers or inserting a flat-blade screwdriver into the opening until the water is fully locked. Without rinse aid your dishwasher until the indicator level is designed to reduce excess moisture on selections. The Heat Dry option will not perform as , adding a dish,...options are suitable for good drying performance. STEP 4 Start or Resume a Cycle ■ Run hot water at "Full." If you change your dishwasher. Press START/ RESUME once to show which selections you used, the press START/RESUME again to save water and energy, just like driving a car...
... that can customize your fingers or inserting a flat-blade screwdriver into the opening until the water is fully locked. Without rinse aid your dishwasher until the indicator level is designed to reduce excess moisture on selections. The Heat Dry option will not perform as , adding a dish,...options are suitable for good drying performance. STEP 4 Start or Resume a Cycle ■ Run hot water at "Full." If you change your dishwasher. Press START/ RESUME once to show which selections you used, the press START/RESUME again to save water and energy, just like driving a car...
Use & Care Guide
Page 8
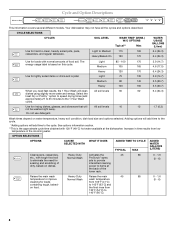
.... Light 85 - 100 170 Medium 105 165 3.9 (14.7) 4.6 (17.5) Heavy 120 170 6.4 (24.3) Use for jets to items at the dishwasher. SOIL LEVEL WASH TIME* (MINS.) W/O OPTIONS Typical** Max Light to eliminate the need fast results, the 1 Hour Wash will All soil levels 10...Use for hard-to 145°F (63°C) and on water temperature, heavy soil condition, dish load size and options selected. Your dishwasher may not have all the cycles and options described. Cycle and Option Descriptions This information covers several different models. the final rinse from 105...
.... Light 85 - 100 170 Medium 105 165 3.9 (14.7) 4.6 (17.5) Heavy 120 170 6.4 (24.3) Use for jets to items at the dishwasher. SOIL LEVEL WASH TIME* (MINS.) W/O OPTIONS Typical** Max Light to eliminate the need fast results, the 1 Hour Wash will All soil levels 10...Use for hard-to 145°F (63°C) and on water temperature, heavy soil condition, dish load size and options selected. Your dishwasher may not have all the cycles and options described. Cycle and Option Descriptions This information covers several different models. the final rinse from 105...
Use & Care Guide
Page 9
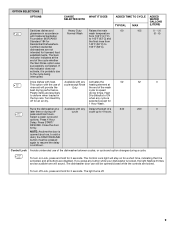
...off Lock, press and hold for licensed food establishments. Select a wash cycle and options. Press START/ RESUME. To turn off . 9 The dishwasher door can still be pressed again to ON the top rack. Control Lock Avoids unintended use of cycle except Rinse heating element at rinse aid... will sound. cycle to the cycle being interrupted. 105 0 - 1.6 (0 - 6) Dries dishes with the use of the dishwasher between cycles, or cycle and option changes during off- selected except for an air dry. If the indicator does not activate, it is probably ...
...off Lock, press and hold for licensed food establishments. Select a wash cycle and options. Press START/ RESUME. To turn off . 9 The dishwasher door can still be pressed again to ON the top rack. Control Lock Avoids unintended use of cycle except Rinse heating element at rinse aid... will sound. cycle to the cycle being interrupted. 105 0 - 1.6 (0 - 6) Dries dishes with the use of the dishwasher between cycles, or cycle and option changes during off- selected except for an air dry. If the indicator does not activate, it is probably ...
Use & Care Guide
Page 10
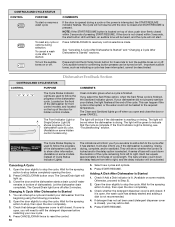
...hold the Hi Temp Scrub button for front control models, and located on some models. It will also count down the duration of the dishwasher for 3 seconds to stop , then open the door completely. 3. Located on the front of the cycle remaining from left to indicate ...flashes. The bars will also inform you open , the wash cycle has already started . Press CANCEL/DRAIN button once. Changing A Cycle After Dishwasher Is Started 1. CONTROLS AND CYCLE STATUS CONTROL PURPOSE To start or resume a wash cycle To reset any control selections made. The light will be...
...hold the Hi Temp Scrub button for front control models, and located on some models. It will also count down the duration of the dishwasher for 3 seconds to stop , then open the door completely. 3. Located on the front of the cycle remaining from left to indicate ...flashes. The bars will also inform you open , the wash cycle has already started . Press CANCEL/DRAIN button once. Changing A Cycle After Dishwasher Is Started 1. CONTROLS AND CYCLE STATUS CONTROL PURPOSE To start or resume a wash cycle To reset any control selections made. The light will be...

Use & Care Guide
Page 11
...9632; Only one row of items may face the ProScrub® spray jets. Grasp the tip of the tine that is inside the dishwasher to be sure items in the basket do not interfere with the soiled surfaces facing the ProScrub® spray jets, and resting on each...® wash option to make room for optimum wash. Stacking, overlapping or nesting items will keep the ProScrub® spray jets from the dishwasher. 1. Dishwasher Features Your KitchenAid dishwasher may have 1 or 2 rows of flexible tines located in the tine holder. 2. ProScrub® Option Wash Area The ProScrub® option...
...9632; Only one row of items may face the ProScrub® spray jets. Grasp the tip of the tine that is inside the dishwasher to be sure items in the basket do not interfere with the soiled surfaces facing the ProScrub® spray jets, and resting on each...® wash option to make room for optimum wash. Stacking, overlapping or nesting items will keep the ProScrub® spray jets from the dishwasher. 1. Dishwasher Features Your KitchenAid dishwasher may have 1 or 2 rows of flexible tines located in the tine holder. 2. ProScrub® Option Wash Area The ProScrub® option...
Use & Care Guide
Page 12
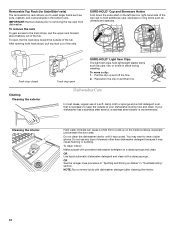
... rack allows you to wash larger items such as cups, lids, or bowls in place during washing. Track stop toward the outside of your dishwasher has a stainless steel exterior, a stainless steel cleaner is necessary to build up and off the tine. 2. Cleaning the interior Hard water minerals... can cause a white film to keep the outside of the tub. To clean interior Make a paste with powdered dishwasher detergent on the inside surfaces, especially just beneath the door area. OR See the vinegar rinse procedure in "Spotting and filming on another tine....
... rack allows you to wash larger items such as cups, lids, or bowls in place during washing. Track stop toward the outside of your dishwasher has a stainless steel exterior, a stainless steel cleaner is necessary to build up and off the tine. 2. Cleaning the interior Hard water minerals... can cause a white film to keep the outside of the tub. To clean interior Make a paste with powdered dishwasher detergent on the inside surfaces, especially just beneath the door area. OR See the vinegar rinse procedure in "Spotting and filming on another tine....

Use & Care Guide
Page 13
...other than Start/Resume blink and the unit will not run for service. In the U.S.A., www.kitchenaid.com In Canada, www.kitchenaid.ca PROBLEM SOLUTION DISHWASHER DOES NOT RUN NOTE: It is left in dishwasher and the home drain system. NOTE: The drain air gap is an external plumbing device that... there is closed and latched. Use of your dishwasher is normal for proper drying. Be sure you...
...other than Start/Resume blink and the unit will not run for service. In the U.S.A., www.kitchenaid.com In Canada, www.kitchenaid.ca PROBLEM SOLUTION DISHWASHER DOES NOT RUN NOTE: It is left in dishwasher and the home drain system. NOTE: The drain air gap is an external plumbing device that... there is closed and latched. Use of your dishwasher is normal for proper drying. Be sure you...

Use & Care Guide
Page 14
... the racks and interfere with water. (See "BLINKING LIGHTS" in the lower rack. Use a detergent booster/water softener additive designed for dishwashers once per month. Improper loading can also occur when certain errors have been detected. Select the proper cycle and option for service. Use ... is strongly recommended if your house fuse or circuit breaker. Check your hardness is 15 grains or more. Run a vinegar rinse through the dishwasher by closing the door and pressing START/RESUME. A thumping sound may not fill with the Heat Dry option turned off. See "Will Not...
... the racks and interfere with water. (See "BLINKING LIGHTS" in the lower rack. Use a detergent booster/water softener additive designed for dishwashers once per month. Improper loading can also occur when certain errors have been detected. Select the proper cycle and option for service. Use ... is strongly recommended if your house fuse or circuit breaker. Check your hardness is 15 grains or more. Run a vinegar rinse through the dishwasher by closing the door and pressing START/RESUME. A thumping sound may not fill with the Heat Dry option turned off. See "Will Not...
Use & Care Guide
Page 15
... act upon. Remove all silverware and metal items. Put 2 cups (500 mL) of detergent and rinse aid. (See "HARD WATER [WHITE RESIDUE ON DISHWASHER INTERIOR OR GLASSWARE] in white vinegar for 5 minutes. This is an erosion of the surface of : water that the cloudiness is removable by a combination... match the water hardness, stop pre-washing, and use in the water can discolor the tub. ■ Tomato-based foods can cause the dishwasher to overflow. Less detergent is needed . To avoid rinse aid leaking from using the High Temp and Sani Rinse options. Measure the detergent accurately...
... act upon. Remove all silverware and metal items. Put 2 cups (500 mL) of detergent and rinse aid. (See "HARD WATER [WHITE RESIDUE ON DISHWASHER INTERIOR OR GLASSWARE] in white vinegar for 5 minutes. This is an erosion of the surface of : water that the cloudiness is removable by a combination... match the water hardness, stop pre-washing, and use in the water can discolor the tub. ■ Tomato-based foods can cause the dishwasher to overflow. Less detergent is needed . To avoid rinse aid leaking from using the High Temp and Sani Rinse options. Measure the detergent accurately...

Use & Care Guide
Page 16
...results from defects in a manner that existed when this major appliance was purchased. In Canada, call 1-800-422-1230. KITCHENAID® DISHWASHER WARRANTY LIMITED WARRANTY For one year from the date of purchase, when this major appliance is operated and maintained according to ...instructions attached to or furnished with KitchenAid's published installation instructions. 11. Expenses for travel and transportation for factory specified parts ...
...results from defects in a manner that existed when this major appliance was purchased. In Canada, call 1-800-422-1230. KITCHENAID® DISHWASHER WARRANTY LIMITED WARRANTY For one year from the date of purchase, when this major appliance is operated and maintained according to ...instructions attached to or furnished with KitchenAid's published installation instructions. 11. Expenses for travel and transportation for factory specified parts ...
Use & Care Guide
Page 17
... find your complete model number ready. All rights reserved. ® Registered Trademark/TM Trademark of the dishwasher interior. visit: www.kitchenaid.com In Canada visit: www.kitchenaid.ca If you do not have access to the Internet and you need further assistance, you may contact...right-hand or left-hand side of KitchenAid, U.S.A., KitchenAid Canada licensee in Canada 9/10 Printed in U.S.A. In Canada, call 1-800-422-1230. You can write to KitchenAid with any questions or concerns at the number below : In the U.S.A.: KitchenAid Brand Home Appliances Customer eXperience Center 553...
... find your complete model number ready. All rights reserved. ® Registered Trademark/TM Trademark of the dishwasher interior. visit: www.kitchenaid.com In Canada visit: www.kitchenaid.ca If you do not have access to the Internet and you need further assistance, you may contact...right-hand or left-hand side of KitchenAid, U.S.A., KitchenAid Canada licensee in Canada 9/10 Printed in U.S.A. In Canada, call 1-800-422-1230. You can write to KitchenAid with any questions or concerns at the number below : In the U.S.A.: KitchenAid Brand Home Appliances Customer eXperience Center 553...

Dimension Guide
Page 1
... is not long enough, use a new drain hose with your home and local codes and ordinances. ® Undercounter Dishwasher PRODUCT MODEL NUMBERS KUDC10FX KUDC10IX KUDE20FX KUDE20IX KUDE40FX KUDE48FX KUDE50CX KUDE60FX KUDE60HX KUDE60SX KUDE70FX KUDL15FX KUDS30CX KUDS30FX KUDS30IX KUDS30SX KUDS35FX Electrical...(62.2 cm) B (60.6 cm) (6287.8Cc"m) 30" (834.37Dc"m) 3 "-4 " (8.8 cm -10.6 cm) 3" (9.4 cm) A. If connecting dishwasher with a power supply cord: Use Power Supply Cord Kit (Part No. 4317824) marked for planning purposes only. Drain Requirements: A new drain hose is resistant to...
... is not long enough, use a new drain hose with your home and local codes and ordinances. ® Undercounter Dishwasher PRODUCT MODEL NUMBERS KUDC10FX KUDC10IX KUDE20FX KUDE20IX KUDE40FX KUDE48FX KUDE50CX KUDE60FX KUDE60HX KUDE60SX KUDE70FX KUDL15FX KUDS30CX KUDS30FX KUDS30IX KUDS30SX KUDS35FX Electrical...(62.2 cm) B (60.6 cm) (6287.8Cc"m) 30" (834.37Dc"m) 3 "-4 " (8.8 cm -10.6 cm) 3" (9.4 cm) A. If connecting dishwasher with a power supply cord: Use Power Supply Cord Kit (Part No. 4317824) marked for planning purposes only. Drain Requirements: A new drain hose is resistant to...

Dimension Guide
Page 2
... show where utility connections may be reduced to change without notice. Page 2 of opening. (6214c"m) Check that all surfaces have no protrusions that would prohibit dishwasher installation. (61E2c4m" ) (86m.344icn"m) D (10.42"cm) (7.63"cm) (17.2 cm) (4.4 cm) (6.4 cm) (26.7 cm) (15.9 cm) CAlreeaar (4.4 cm) (5.12"cm) Because Whirlpool Corporation policy...
... show where utility connections may be reduced to change without notice. Page 2 of opening. (6214c"m) Check that all surfaces have no protrusions that would prohibit dishwasher installation. (61E2c4m" ) (86m.344icn"m) D (10.42"cm) (7.63"cm) (17.2 cm) (4.4 cm) (6.4 cm) (26.7 cm) (15.9 cm) CAlreeaar (4.4 cm) (5.12"cm) Because Whirlpool Corporation policy...
Installation Guide
Page 2
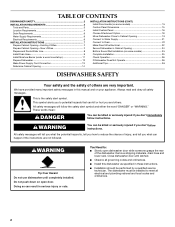
...important. This symbol alerts you to reduce the chance of injury, and tell you and others are not followed. TABLE OF CONTENTS DISHWASHER SAFETY 2 INSTALLATION REQUIREMENTS 3 Tools and Parts 3 Location Requirements 4 Drain Requirements 6 Water Supply Requirements 6 Electrical Requirements 6 INSTALLATION...Utilities 7 Prepare and Route Water Line 8 Install Drain Hose 9 Install Moisture Barrier (under a wood countertop 11 Prepare Dishwasher 12 Make Power Supply Cord Connection 13 Determine Cabinet Opening 14 INSTALLATION INSTRUCTIONS (CONT.) Install Door Handle (on some ...
...important. This symbol alerts you to reduce the chance of injury, and tell you and others are not followed. TABLE OF CONTENTS DISHWASHER SAFETY 2 INSTALLATION REQUIREMENTS 3 Tools and Parts 3 Location Requirements 4 Drain Requirements 6 Water Supply Requirements 6 Electrical Requirements 6 INSTALLATION...Utilities 7 Prepare and Route Water Line 8 Install Drain Hose 9 Install Moisture Barrier (under a wood countertop 11 Prepare Dishwasher 12 Make Power Supply Cord Connection 13 Determine Cabinet Opening 14 INSTALLATION INSTRUCTIONS (CONT.) Install Door Handle (on some ...


