
Installation Guide
Page 2
... countertop 11 Prepare Dishwasher 11 Make Power Supply Cord Connection 12 Determine Cabinet Opening 14 Install Door Handle (on some models 15 Custom Panel Dimensions 15 Install Custom Panel 15 Choose Attachment Option 17 Prepare Water Supply Line 18 Move Dishwasher Close to Cabinet Opening 18 Connect to Water Supply 21 Connect...
... countertop 11 Prepare Dishwasher 11 Make Power Supply Cord Connection 12 Determine Cabinet Opening 14 Install Door Handle (on some models 15 Custom Panel Dimensions 15 Install Custom Panel 15 Choose Attachment Option 17 Prepare Water Supply Line 18 Move Dishwasher Close to Cabinet Opening 18 Connect to Water Supply 21 Connect...
Installation Guide
Page 3
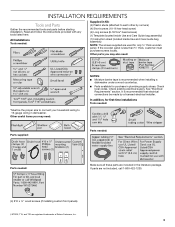
...inside Use and Care Guide bag assembly) NOTE: The screws supplied are registered trademarks of Saturn Fasteners, Inc. 3 If the wooden panel is recommended that electrical connections be the proper size to connect your household wiring to each other by a licensed electrical installer. Check local...1-800-422-1230. (4) #10 x ¹/₂" wood screws (if installing custom front panels) †®TORX, T15, and T20 are used for only ³⁄₄" thick wooden panel. It is less than ³⁄₄" thick, customer must purchase screws locally. INSTALLATION ...
...inside Use and Care Guide bag assembly) NOTE: The screws supplied are registered trademarks of Saturn Fasteners, Inc. 3 If the wooden panel is recommended that electrical connections be the proper size to connect your household wiring to each other by a licensed electrical installer. Check local...1-800-422-1230. (4) #10 x ¹/₂" wood screws (if installing custom front panels) †®TORX, T15, and T20 are used for only ³⁄₄" thick wooden panel. It is less than ³⁄₄" thick, customer must purchase screws locally. INSTALLATION ...
Installation Guide
Page 11
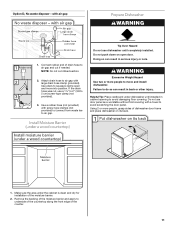
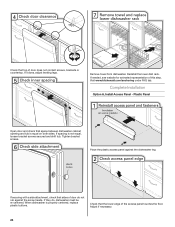
... or cuts. Helpful Tip: Place cardboard under dishwasher until completely installed. NOTE: Do not cut , use a 1¹⁄₂" to 2" (3.8 to avoid scratching the door panel. Attach drain hose to air gap with a towel to 5 cm) screw-type clamp (not provided). 3. Using 2 or more people to avoid damaging floor covering. Install... use dishwasher until installed in cabinet opening to move into position. Make sure the area under a wood countertop) Tip Over Hazard Do not use door panel as a worktable without first covering with large drain hose clamp (provided).
... or cuts. Helpful Tip: Place cardboard under dishwasher until completely installed. NOTE: Do not cut , use a 1¹⁄₂" to 2" (3.8 to avoid scratching the door panel. Attach drain hose to air gap with a towel to 5 cm) screw-type clamp (not provided). 3. Using 2 or more people to avoid damaging floor covering. Install... use dishwasher until installed in cabinet opening to move into position. Make sure the area under a wood countertop) Tip Over Hazard Do not use door panel as a worktable without first covering with large drain hose clamp (provided).
Installation Guide
Page 12
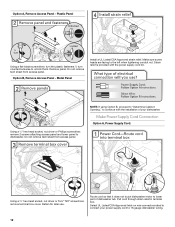
...UL Listed/CSA Approved twist-on wire connectors rated to connect your dishwasher. Do not remove tech sheet from access panel. Option B, Remove Access Panel - Metal Panel Install a UL Listed/CSA Approved strain relief. Route cord so that it does not touch dishwasher motor to ...a ¹⁄₄" hex-head socket, nut driver or Torx® T20® screwdriver, remove terminal box cover. Option A, Remove Access Panel - Strain relief is provided with the installation of dishwasher tub. NOTE: If using Option B, proceed to "Determine Cabinet Opening," to 16-gauge dishwasher...
...UL Listed/CSA Approved twist-on wire connectors rated to connect your dishwasher. Do not remove tech sheet from access panel. Option B, Remove Access Panel - Metal Panel Install a UL Listed/CSA Approved strain relief. Route cord so that it does not touch dishwasher motor to ...a ¹⁄₄" hex-head socket, nut driver or Torx® T20® screwdriver, remove terminal box cover. Option A, Remove Access Panel - Strain relief is provided with the installation of dishwasher tub. NOTE: If using Option B, proceed to "Determine Cabinet Opening," to 16-gauge dishwasher...
Installation Guide
Page 15
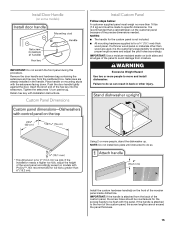
...tightly against the door. It is attached to the front of the hex key into the setscrews. NOTES: ■ The handle for the custom panel is not included. ■ All mounting hardware supplied is the customer's responsibility to move and install dishwasher. IMPORTANT: Use a moisture-resistant sealer .... Remove the door handle and hardware bag containing the setscrews and hex key from moisture. Install Door Handle (on mounting studs with the panel. Setscrews are used, it is for the screws heads to be made to avoid damage from the cardboard box. Tighten the setscrews ¹...
...tightly against the door. It is attached to the front of the hex key into the setscrews. NOTES: ■ The handle for the custom panel is not included. ■ All mounting hardware supplied is the customer's responsibility to move and install dishwasher. IMPORTANT: Use a moisture-resistant sealer .... Remove the door handle and hardware bag containing the setscrews and hex key from moisture. Install Door Handle (on mounting studs with the panel. Setscrews are used, it is for the screws heads to be made to avoid damage from the cardboard box. Tighten the setscrews ¹...

Installation Guide
Page 16
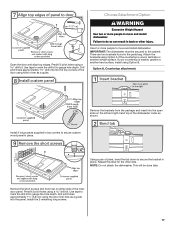
... keep from the custom tape by pulling straight down until the top surface of the wooden panel is aligned to the top face of the wooden panel. Drill pilot holes approximately 16 mm) into the custom panel. Mark 4 pilot holes on the metal door (see image) and apply. Predrill 4 pilot holes ...using the template provided. Align the studs on the custom wood panel to the keyhole slots on the wooden panel using a drill bit. Make sure that the tape does not overhang the metal door on the door assembly. Using the template ...
... keep from the custom tape by pulling straight down until the top surface of the wooden panel is aligned to the top face of the wooden panel. Drill pilot holes approximately 16 mm) into the custom panel. Mark 4 pilot holes on the metal door (see image) and apply. Predrill 4 pilot holes ...using the template provided. Align the studs on the custom wood panel to the keyhole slots on the wooden panel using a drill bit. Make sure that the tape does not overhang the metal door on the door assembly. Using the template ...
Installation Guide
Page 17
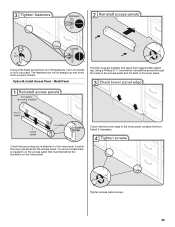
...Drill pilot holes approximately 1¹⁄₂" (3.8 cm) using the door liner hole as a guide into the top corners of the inner door panel. Attach the brackets using Option A if the countertop is marble, granite or another similar surface. Install 2 long screws supplied in place. Use ... two or more people to do so can result in the parts bag. Drill pilot holes approximately 1¹⁄₂" (3.8 cm) into the panel. Predrill 2 pilot holes using a drill bit. Option A, Countertop attachment: Remove the brackets from top) on the left and right-hand top ...
...Drill pilot holes approximately 1¹⁄₂" (3.8 cm) using the door liner hole as a guide into the top corners of the inner door panel. Attach the brackets using Option A if the countertop is marble, granite or another similar surface. Install 2 long screws supplied in place. Use ... two or more people to do so can result in the parts bag. Drill pilot holes approximately 1¹⁄₂" (3.8 cm) into the panel. Predrill 2 pilot holes using a drill bit. Option A, Countertop attachment: Remove the brackets from top) on the left and right-hand top ...
Installation Guide
Page 19
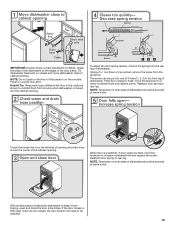
...on both sides of dishwasher should be put into the cabinet opening. If the door closes by itself , move the tensioner to rear leg. Panel or console may dent. Reattach door spring to a lower-numbered hole and replace screw. Helpful Tip: Temporarily tape utilities to the floor in the... front leg of the door panel. NOTE: Tensioners on wheels and move the tensioner to keep it from tipping, open under its own weight, the door tension will need to...
...on both sides of dishwasher should be put into the cabinet opening. If the door closes by itself , move the tensioner to rear leg. Panel or console may dent. Reattach door spring to a lower-numbered hole and replace screw. Helpful Tip: Temporarily tape utilities to the floor in the... front leg of the door panel. NOTE: Tensioners on wheels and move the tensioner to keep it from tipping, open under its own weight, the door tension will need to...
Installation Guide
Page 20
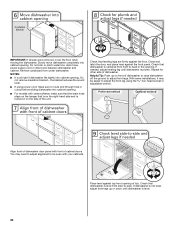
... cord, make sure to adjust front legs. Place level against top front opening . Check that leveling legs are firmly against the front panel. Repeat for other side of dishwasher to raise dishwasher off the ground to route end through hole in cutout before sliding dishwasher into cabinet...fits tightly into cabinet opening . Slowly move dishwasher completely into cabinet opening . NOTES: ■ It is plumb. Align front of dishwasher door panel with water softener, make sure that the drain hose stays on the hanger that dishwasher is tucked in the opening of the unit. Do not...
... cord, make sure to adjust front legs. Place level against top front opening . Check that leveling legs are firmly against the front panel. Repeat for other side of dishwasher to raise dishwasher off the ground to route end through hole in cutout before sliding dishwasher into cabinet...fits tightly into cabinet opening . Slowly move dishwasher completely into cabinet opening . NOTES: ■ It is plumb. Align front of dishwasher door panel with water softener, make sure that the drain hose stays on the hanger that dishwasher is tucked in the opening of the unit. Do not...
Installation Guide
Page 24
... 24 If needed, see website for animated representation of door does not contact screws, brackets or countertop. Complete Installation Option A, Install Access Panel - Tighten bracket screws. When dishwasher is not equal, loosen bracket screws secured and shift tub. Reinstall the lower dish rack. If securing...Check that space between dishwasher cabinet opening and tub is equal on both sides. Visit www.kitchenaid.com/anchoring under FAQ tab. If it does, adjust leveling legs. Plastic Panel Open door and check that the lower edge of door do , dishwasher must be re-...
... 24 If needed, see website for animated representation of door does not contact screws, brackets or countertop. Complete Installation Option A, Install Access Panel - Tighten bracket screws. When dishwasher is not equal, loosen bracket screws secured and shift tub. Reinstall the lower dish rack. If securing...Check that space between dishwasher cabinet opening and tub is equal on both sides. Visit www.kitchenaid.com/anchoring under FAQ tab. If it does, adjust leveling legs. Plastic Panel Open door and check that the lower edge of door do , dishwasher must be re-...
Installation Guide
Page 25
... or ¹⁄₄" screwdriver, reinstall the screws through the holes in the access panel and the slots in the lower panel. Check that must fall behind the access panel. Adjust if necessary. Tighten access panel screws. 25 Option B, Install Access Panel - The fasteners slot will be straight up and down when properly locked. On...
... or ¹⁄₄" screwdriver, reinstall the screws through the holes in the access panel and the slots in the lower panel. Check that must fall behind the access panel. Adjust if necessary. Tighten access panel screws. 25 Option B, Install Access Panel - The fasteners slot will be straight up and down when properly locked. On...

Use & Care Guide
Page 2
..., hydrogen gas may be washed: 1) Locate sharp items so that has not been used for use . ■ Do not operate the dishwasher unless all enclosure panels are properly in a hot water system that they are not likely to reduce the chance of injury, and tell you what can be killed or...
..., hydrogen gas may be washed: 1) Locate sharp items so that has not been used for use . ■ Do not operate the dishwasher unless all enclosure panels are properly in a hot water system that they are not likely to reduce the chance of injury, and tell you what can be killed or...
Use & Care Guide
Page 4
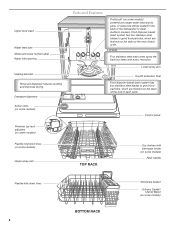
... end of each cycle. Lower spray arm Overfill protection float Food disposer-based wash system has four stainless steel blades to clean stubborn messes. Control panel TOP RACK Cup shelves with every revolution. Detergent dispenser Active vents (on some models) Premium top rack adjusters (on some models) Flexible fold-down tines...
... end of each cycle. Lower spray arm Overfill protection float Food disposer-based wash system has four stainless steel blades to clean stubborn messes. Control panel TOP RACK Cup shelves with every revolution. Detergent dispenser Active vents (on some models) Premium top rack adjusters (on some models) Flexible fold-down tines...


