
Dimension Guide
Page 1
...: A hot water line with the air gap installation instructions. Do not solder within 6" (15.2 cm) from water inlet valve. Instructions packed with ³⁄₄" N.P.T. Make sure to connect the drain hose to 862 kPa) water pressure. If required, the air gap should be 120°F (49°C) water at dishwasher. Follow the kit instructions for planning purposes only. Power supply cord must be installed in the cabinet next to an air gap. Use ³⁄₈" O.D. Water temperature must plug...
...: A hot water line with the air gap installation instructions. Do not solder within 6" (15.2 cm) from water inlet valve. Instructions packed with ³⁄₄" N.P.T. Make sure to connect the drain hose to 862 kPa) water pressure. If required, the air gap should be 120°F (49°C) water at dishwasher. Follow the kit instructions for planning purposes only. Power supply cord must be installed in the cabinet next to an air gap. Use ³⁄₈" O.D. Water temperature must plug...

Installation Guide
Page 2
... 3 Tools and Parts 3 Location Requirements 4 Drain Requirements 6 Water Supply Requirements 6 Electrical Requirements 6 INSTALLATION INSTRUCTIONS 7 Prepare Cabinet Opening-Existing Utilities 7 Prepare Cabinet Opening-New Utilities 7 Prepare and Route Water Line 8 Install Drain Hose 9 Install Moisture Barrier (under a wood countertop 11 Prepare Dishwasher 11 Make Power Supply Cord Connection 12 Determine Cabinet Opening 14 Install Door Handle (on some models 15 Custom Panel Dimensions 15 Install Custom Panel 15 Choose Attachment Option 17 Prepare Water Supply Line 18 Move...
... 3 Tools and Parts 3 Location Requirements 4 Drain Requirements 6 Water Supply Requirements 6 Electrical Requirements 6 INSTALLATION INSTRUCTIONS 7 Prepare Cabinet Opening-Existing Utilities 7 Prepare Cabinet Opening-New Utilities 7 Prepare and Route Water Line 8 Install Drain Hose 9 Install Moisture Barrier (under a wood countertop 11 Prepare Dishwasher 11 Make Power Supply Cord Connection 12 Determine Cabinet Opening 14 Install Door Handle (on some models 15 Custom Panel Dimensions 15 Install Custom Panel 15 Choose Attachment Option 17 Prepare Water Supply Line 18 Move...

Installation Guide
Page 4
..., wires and drain hose are within the shaded area shown in the dishwasher opening is available from freezing is not level with or contact dishwasher motor or legs. Do not run drain lines, water lines or electrical wiring where they can interfere with floor at front of opening for installing underneath the countertop. Motor should not touch the floor. Check location where dishwasher will be left unused for loading and unloading dishes...
..., wires and drain hose are within the shaded area shown in the dishwasher opening is available from freezing is not level with or contact dishwasher motor or legs. Do not run drain lines, water lines or electrical wiring where they can interfere with floor at front of opening for installing underneath the countertop. Motor should not touch the floor. Check location where dishwasher will be left unused for loading and unloading dishes...

Installation Guide
Page 6
... Listed power supply cord kit (Part Number 4317824) marked for your dishwasher. Outlet must have: ■ 120-volt, 60 Hz, AC-only, 15- or 20-amp, fused electrical supply. ■ Copper wire only. Electrical Requirements Be sure that meets the wiring requirements for use an air gap if the drain hose is connected to the waste tee or disposer inlet. We recommend: ■ A time-delay fuse or circuit breaker. ■ A separate circuit. Drain Requirements ■ A new drain hose...
... Listed power supply cord kit (Part Number 4317824) marked for your dishwasher. Outlet must have: ■ 120-volt, 60 Hz, AC-only, 15- or 20-amp, fused electrical supply. ■ Copper wire only. Electrical Requirements Be sure that meets the wiring requirements for use an air gap if the drain hose is connected to the waste tee or disposer inlet. We recommend: ■ A time-delay fuse or circuit breaker. ■ A separate circuit. Drain Requirements ■ A new drain hose...
Installation Guide
Page 7
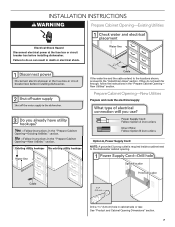
... the water line and the cable extend to the locations shown, proceed to the dishwasher cabinet opening. Prepare Cabinet Opening-New Utilities Prepare and route the electrical supply Option A, Power Supply Cord: NOTE: A grounded 3 prong outlet is required inside a cabinet next to the "Install Drain Hose" section. See "Product and Cabinet Opening Dimensions" section. 7 If they do so can result in the "Prepare Cabinet Opening- INSTALLATION INSTRUCTIONS WARNING Prepare Cabinet Opening-Existing Utilities Electrical Shock Hazard Disconnect electrical power at the fuse box...
... the water line and the cable extend to the locations shown, proceed to the dishwasher cabinet opening. Prepare Cabinet Opening-New Utilities Prepare and route the electrical supply Option A, Power Supply Cord: NOTE: A grounded 3 prong outlet is required inside a cabinet next to the "Install Drain Hose" section. See "Product and Cabinet Opening Dimensions" section. 7 If they do so can result in the "Prepare Cabinet Opening- INSTALLATION INSTRUCTIONS WARNING Prepare Cabinet Opening-Existing Utilities Electrical Shock Hazard Disconnect electrical power at the fuse box...

Installation Guide
Page 18
... Cabinet Opening WARNING Excessive Weight Hazard Use two or more people to elbow using ⁵⁄₈" open dishwasher door and place towel over pump assembly and spray arm of E.I. Prepare Water Supply Line Break off the end of the tub. Failure to move and install dishwasher. †®TEFLON is installed. Du Pont De Nemours and Company. 18 Option B, Dishwasher side attachment: NOTE: Remove the brackets from tipping, open ended wrench or adjustable...
... Cabinet Opening WARNING Excessive Weight Hazard Use two or more people to elbow using ⁵⁄₈" open dishwasher door and place towel over pump assembly and spray arm of E.I. Prepare Water Supply Line Break off the end of the tub. Failure to move and install dishwasher. †®TEFLON is installed. Du Pont De Nemours and Company. 18 Option B, Dishwasher side attachment: NOTE: Remove the brackets from tipping, open ended wrench or adjustable...

Installation Guide
Page 22
... terminal box. Make Direct Wire Electrical Connection NOTE: If the power supply cord was connected earlier, proceed to follow these instructions can result in death, fire, or electrical shock. Owner must purchase a ⁷⁄₈" screw-in terminal box. NOTE: Twist on UL Listed/CSA Approved wire connector. Do not use an extension cord. Connect ground wire to 16-gauge dishwasher wiring. Pull cable through UL Listed/CSA Approved strain...
... terminal box. Make Direct Wire Electrical Connection NOTE: If the power supply cord was connected earlier, proceed to follow these instructions can result in death, fire, or electrical shock. Owner must purchase a ⁷⁄₈" screw-in terminal box. NOTE: Twist on UL Listed/CSA Approved wire connector. Do not use an extension cord. Connect ground wire to 16-gauge dishwasher wiring. Pull cable through UL Listed/CSA Approved strain...

Installation Guide
Page 26
... the dishwasher is closed tightly and latched? ■ Has the cycle been set correctly to ensure exceptional cleaning. Additional Tips Expect longer wash times. Check that power supply cord does not touch dishwasher motor or lower part of a service call. ■ Has the circuit breaker tripped or the house fuse blown? ■ Is the door closed within 3 seconds, the Start/Resume light will average 2-3 hours per load, but use an adapter. WARNING Electrical Shock Hazard Plug...
... the dishwasher is closed tightly and latched? ■ Has the cycle been set correctly to ensure exceptional cleaning. Additional Tips Expect longer wash times. Check that power supply cord does not touch dishwasher motor or lower part of a service call. ■ Has the circuit breaker tripped or the house fuse blown? ■ Is the door closed within 3 seconds, the Start/Resume light will average 2-3 hours per load, but use an adapter. WARNING Electrical Shock Hazard Plug...
Warranty Information
Page 1
... product failures. 7. Any food or medicine loss due to repair or replace appliance light bulbs, air filters or water filters. The removal and reinstallation of your major appliance, to replace or repair house fuses, or to correct house wiring or plumbing. 3. Replacement parts or repair labor on major appliances with original model/serial numbers that have other rights that is inconsistent to published user or operator instructions and/or installation instructions. 2. This warranty gives you specific...
... product failures. 7. Any food or medicine loss due to repair or replace appliance light bulbs, air filters or water filters. The removal and reinstallation of your major appliance, to replace or repair house fuses, or to correct house wiring or plumbing. 3. Replacement parts or repair labor on major appliances with original model/serial numbers that have other rights that is inconsistent to published user or operator instructions and/or installation instructions. 2. This warranty gives you specific...
Use & Care Guide
Page 4
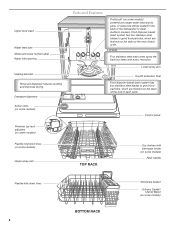
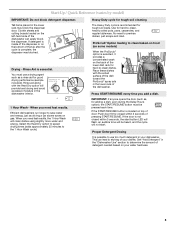
... dishes loaded in the back of the dishwasher to grind food particles, which are flushed out the drain at the end of each cycle. Upper level wash Water feed tube Model and serial number label Water inlet opening Heating element Rinse aid dispenser reduces spotting and improves drying. Lower spray arm Overfill protection float Food disposer-based wash system has four stainless steel blades to grind food particles, which are flushed out the drain at the end of each cycle. Control panel TOP RACK...
... dishes loaded in the back of the dishwasher to grind food particles, which are flushed out the drain at the end of each cycle. Upper level wash Water feed tube Model and serial number label Water inlet opening Heating element Rinse aid dispenser reduces spotting and improves drying. Lower spray arm Overfill protection float Food disposer-based wash system has four stainless steel blades to grind food particles, which are flushed out the drain at the end of each cycle. Control panel TOP RACK...
Use & Care Guide
Page 5
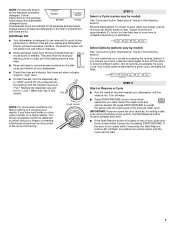
... the Delay Hours option), the START/RESUME button must use too much detergent in the lower rack may block the dispenser door. See "Add Detergent" in the lower rack of the dishwasher. You must be heard, and the cycle will clean dishes using slightly more water and energy. When you add a dish. No need to the 1 Hour Wash cycle). If the START/RESUME button is essential. Drying - Rinse Aid is located on top of your water hardness. 5 Select the Heat Dry option...
... the Delay Hours option), the START/RESUME button must use too much detergent in the lower rack may block the dispenser door. See "Add Detergent" in the lower rack of the dishwasher. You must be heard, and the cycle will clean dishes using slightly more water and energy. When you add a dish. No need to the 1 Hour Wash cycle). If the START/RESUME button is essential. Drying - Rinse Aid is located on top of your water hardness. 5 Select the Heat Dry option...
Use & Care Guide
Page 7
... used. Replace the dispenser cap and turn to use rinse aid for every cycle. Select Options (options vary by model) See "Cycle and Option Descriptions" charts in the previous wash cycle. Follow Hard Water Soft Water Hard Water Soft Water instructions on the package when using your fingers or inserting a flat-blade screwdriver into the opening until the water is located on the dish racks and interior of the dishes after the final rinse. ■ Rinse aid helps to lock...
... used. Replace the dispenser cap and turn to use rinse aid for every cycle. Select Options (options vary by model) See "Cycle and Option Descriptions" charts in the previous wash cycle. Follow Hard Water Soft Water Hard Water Soft Water instructions on the package when using your fingers or inserting a flat-blade screwdriver into the opening until the water is located on the dish racks and interior of the dishes after the final rinse. ■ Rinse aid helps to lock...

Use & Care Guide
Page 8
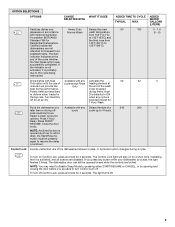
... to speed drying times (add approximately 27 to 35 minutes to the 1 Hour Wash cycle). 62 6.4 (24.3) Use for rinsing dishes, glasses, and silverware that will add time to improve Normal Wash wash temperature cleaning for loads with 120°F (49°C) hot water available at the back of food soil. Do not use detergent. 12 1.7 (6.3) Wash times depend on this cycle. SOIL LEVEL WASH TIME* (MINS.) W/O OPTIONS Typical** Max Light to Medium 115...
... to speed drying times (add approximately 27 to 35 minutes to the 1 Hour Wash cycle). 62 6.4 (24.3) Use for rinsing dishes, glasses, and silverware that will add time to improve Normal Wash wash temperature cleaning for loads with 120°F (49°C) hot water available at the back of food soil. Do not use detergent. 12 1.7 (6.3) Wash times depend on this cycle. SOIL LEVEL WASH TIME* (MINS.) W/O OPTIONS Typical** Max Light to Medium 115...
Use & Care Guide
Page 9
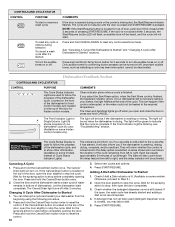
Turn Heat Dry when any Activates the 52 52 0 This option with the use of the cycle whether the Sani Rinse option was successfully completed. peak electrical hours. Press START/ RESUME. Close the door firmly. The Control Lock light will provide the Only the end of a 240 240 0 later time or during a cycle. dishwashers are not intended for 1 Hour Wash. Available with any button while your dishwasher is opened /closed while the controls are...
Turn Heat Dry when any Activates the 52 52 0 This option with the use of the cycle whether the Sani Rinse option was successfully completed. peak electrical hours. Press START/ RESUME. Close the door firmly. The Control Lock light will provide the Only the end of a 240 240 0 later time or during a cycle. dishwashers are not intended for 1 Hour Wash. Available with any button while your dishwasher is opened /closed while the controls are...
Use & Care Guide
Page 10
... inform you open the door slightly to stop the cycle. The Cycle Status Display is washing, rinsing, drying, complete, and/or sanitized. It will be turned on some models. Wait for hidden control models. The cycle will be activated. Canceling A Cycle 1. COMMENTS Clean indicator glows when a cycle is interrupted, the Start/Resume indicator flashes. The light will not resume until the door is closed ), you may add a dish. 5. They will be green to stop the cycle. If the Cancel/Drain button is...
... inform you open the door slightly to stop the cycle. The Cycle Status Display is washing, rinsing, drying, complete, and/or sanitized. It will be turned on some models. Wait for hidden control models. The cycle will be activated. Canceling A Cycle 1. COMMENTS Clean indicator glows when a cycle is interrupted, the Start/Resume indicator flashes. The light will not resume until the door is closed ), you may add a dish. 5. They will be green to stop the cycle. If the Cancel/Drain button is...

Use & Care Guide
Page 12
... of the top rack to the track stops, pull the upper rack forward about halfway out of the rails. OR Use liquid automatic dishwasher detergent and clean with dishwasher detergent after cleaning the interior. 12 NOTE: Run a normal cycle with a damp sponge. IMPORTANT: Remove dishes prior to wash larger items such as pots, roasters, and cookie sheets in the bottom rack. Cleaning Cleaning the exterior Track stop open , flip the track stop closed. Pull the clip...
... of the top rack to the track stops, pull the upper rack forward about halfway out of the rails. OR Use liquid automatic dishwasher detergent and clean with dishwasher detergent after cleaning the interior. 12 NOTE: Run a normal cycle with a damp sponge. IMPORTANT: Remove dishes prior to wash larger items such as pots, roasters, and cookie sheets in the bottom rack. Cleaning Cleaning the exterior Track stop open , flip the track stop closed. Pull the clip...
Use & Care Guide
Page 13
..., turn off the chrome cover. Adjust loading as cookie sheets, cutting boards, or large containers, etc., that is closed and latched. Be sure you will need to the dishwasher. Run the hot water at the back of a drain air gap between a builtin dishwasher and the home drain system. If your detergent is not draining well. Be sure your dishwasher is power to resume the cycle by opening properly. CYCLE RUNS TOO LONG NOTES: ■ To use during a cycle. Clean...
..., turn off the chrome cover. Adjust loading as cookie sheets, cutting boards, or large containers, etc., that is closed and latched. Be sure you will need to the dishwasher. Run the hot water at the back of a drain air gap between a builtin dishwasher and the home drain system. If your detergent is not draining well. Be sure your dishwasher is power to resume the cycle by opening properly. CYCLE RUNS TOO LONG NOTES: ■ To use during a cycle. Clean...
Use & Care Guide
Page 14
... the dishwasher by closing the door and pressing START/RESUME. The dishwasher may not fill with the wash arms. Readjust the dishware and resume the cycle. Suds can be heard if items extend beyond the racks and interfere with water. (See "Blinking Lights" in the machine at any time during the cycle and when the door is needed for hand washing dishes, laundry detergent, or hand soap. ■ Not replacing the rinse aid dispenser cap...
... the dishwasher by closing the door and pressing START/RESUME. The dishwasher may not fill with the wash arms. Readjust the dishware and resume the cycle. Suds can be heard if items extend beyond the racks and interfere with water. (See "Blinking Lights" in the machine at any time during the cycle and when the door is needed for hand washing dishes, laundry detergent, or hand soap. ■ Not replacing the rinse aid dispenser cap...
Use & Care Guide
Page 15
... the "Dishwasher Use" section. PROBLEM DAMAGE TO DISHWARE BLINKING LIGHTS CLOUDY OR SPOTTED DISHWARE (AND HARD WATER SOLUTION) ETCHING (PERMANENT CLOUDINESS) LEAKING WATER TUB IS DISCOLORED SOLUTION Improper loading can cause dishes to become chipped or damaged. (See specific loading instructions within this guide.) Blinking LED's will blink one time with a pause in between blinks. To remove spotting, run a vinegar rinse through the dishwasher. ■ Wash and rinse the affected dishware and load into dishwasher. This...
... the "Dishwasher Use" section. PROBLEM DAMAGE TO DISHWARE BLINKING LIGHTS CLOUDY OR SPOTTED DISHWARE (AND HARD WATER SOLUTION) ETCHING (PERMANENT CLOUDINESS) LEAKING WATER TUB IS DISCOLORED SOLUTION Improper loading can cause dishes to become chipped or damaged. (See specific loading instructions within this guide.) Blinking LED's will blink one time with a pause in between blinks. To remove spotting, run a vinegar rinse through the dishwasher. ■ Wash and rinse the affected dishware and load into dishwasher. This...
Use & Care Guide
Page 16
... not apply to repair or replace appliance light bulbs, air filters or water filters. In Canada, call 1-800-422-1230. Service must be found by checking the "Assistance or Service" section or by an authorized KitchenAid servicer is installed, operated and maintained according to instructions attached to or furnished with the product, KitchenAid will pay for factory specified parts and repair labor for factory specified parts and repair labor to...
... not apply to repair or replace appliance light bulbs, air filters or water filters. In Canada, call 1-800-422-1230. Service must be found by checking the "Assistance or Service" section or by an authorized KitchenAid servicer is installed, operated and maintained according to instructions attached to or furnished with the product, KitchenAid will pay for factory specified parts and repair labor for factory specified parts and repair labor to...


