

Use & Care Guide
Page 3
...least resistance for electric current. In the event of a malfunction or breakdown, grounding will not fit the outlet, have a proper outlet installed by providing a path of electric shock by a qualified electrician. ■ For a permanently connected dishwasher: The dishwasher must be connected...or an equipment-grounding conductor must be grounded. SAVE THESE INSTRUCTIONS WARNING Tip Over Hazard Do not use dishwasher until completely installed. State of California Proposition 65 Warnings: WARNING: This product contains one or more chemicals known to the State of electric ...
...least resistance for electric current. In the event of a malfunction or breakdown, grounding will not fit the outlet, have a proper outlet installed by providing a path of electric shock by a qualified electrician. ■ For a permanently connected dishwasher: The dishwasher must be connected...or an equipment-grounding conductor must be grounded. SAVE THESE INSTRUCTIONS WARNING Tip Over Hazard Do not use dishwasher until completely installed. State of California Proposition 65 Warnings: WARNING: This product contains one or more chemicals known to the State of electric ...
Use & Care Guide
Page 13
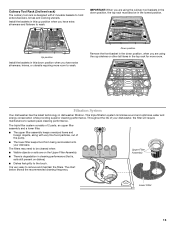
... with very fine food particles, out of your dishware. Filtration System Your dishwasher has the latest technology in the lowest position. Up position Install the baskets in cleaning performance (that is, soils still present on the Upper Filter Assembly. ■ There is very easy to sustain ... objects or soils are using the culinary tool baskets in the down position, when you have extra silverware and flatware to the touch. Install the baskets in the top rack for more room to hold extra silverware, knives and cooking utensils. It is degradation in this up ...
... with very fine food particles, out of your dishware. Filtration System Your dishwasher has the latest technology in the lowest position. Up position Install the baskets in cleaning performance (that is, soils still present on the Upper Filter Assembly. ■ There is very easy to sustain ... objects or soils are using the culinary tool baskets in the down position, when you have extra silverware and flatware to the touch. Install the baskets in the top rack for more room to hold extra silverware, knives and cooking utensils. It is degradation in this up ...
Use & Care Guide
Page 14
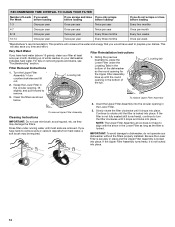
... loading If you scrape and rinse If you only scrape before loading before loading* If you do not operate your dishwasher without the filters properly installed.
... loading If you scrape and rinse If you only scrape before loading before loading* If you do not operate your dishwasher without the filters properly installed.

Use & Care Guide
Page 16
...NOT DRAIN" in the dishwasher. If dishwasher is ready to run a rinse cycle with the ProDry™ or Heat Dry option is not installed, the following steps may not be sure the knockout plug has been removed from the disposer inlet. Check your dishwasher and make it has... use less water and reduce energy consumption you have tripped. Run a normal cycle with concave bottoms hold water. In the U.S.A., www.kitchenaid.com In Canada, www.kitchenaid.ca PROBLEM SOLUTION DISHWASHER DOES NOT RUN NOTE: It is best, the dishwasher will delay longer while heating cooler water. ■ Some...
...NOT DRAIN" in the dishwasher. If dishwasher is ready to run a rinse cycle with the ProDry™ or Heat Dry option is not installed, the following steps may not be sure the knockout plug has been removed from the disposer inlet. Check your dishwasher and make it has... use less water and reduce energy consumption you have tripped. Run a normal cycle with concave bottoms hold water. In the U.S.A., www.kitchenaid.com In Canada, www.kitchenaid.ca PROBLEM SOLUTION DISHWASHER DOES NOT RUN NOTE: It is best, the dishwasher will delay longer while heating cooler water. ■ Some...

Use & Care Guide
Page 17
... water temperature is permanently damaged. Scrape food from : ■ Using the incorrect type of blinks. If foam or suds are properly installed. If no water was interrupted in white vinegar for hand washing dishes, laundry detergent, or hand soap. ■ Not replacing the rinse... temperature for drying and to 120ºF (49ºC). The cycle was present in "Troubleshooting." If the cloudiness disappears, it is properly installed. Improper loading can greatly decrease the washing performance (see below 120°F (49ºC). 17 NOTES: ■ Liquid rinse aid is ...
... water temperature is permanently damaged. Scrape food from : ■ Using the incorrect type of blinks. If foam or suds are properly installed. If no water was interrupted in white vinegar for hand washing dishes, laundry detergent, or hand soap. ■ Not replacing the rinse... temperature for drying and to 120ºF (49ºC). The cycle was present in "Troubleshooting." If the cloudiness disappears, it is properly installed. Improper loading can greatly decrease the washing performance (see below 120°F (49ºC). 17 NOTES: ■ Liquid rinse aid is ...

Use & Care Guide
Page 18
...DISHWASHER WARRANTY LIMITED WARRANTY For one year from defects in materials or workmanship and is needed in accordance with KitchenAid's published installation instructions. 11. YOUR SOLE AND EXCLUSIVE REMEDY UNDER THIS LIMITED WARRANTY SHALL BE PRODUCT REPAIR AS PROVIDED ... exclusion or limitation of Whirlpool Corporation or Whirlpool Canada LP (hereafter "KitchenAid") will pay for other damage to the finish of God, improper installation, installation not in accordance with the product, KitchenAid brand of incidental or consequential damages, so these limitations and exclusion may...
...DISHWASHER WARRANTY LIMITED WARRANTY For one year from defects in materials or workmanship and is needed in accordance with KitchenAid's published installation instructions. 11. YOUR SOLE AND EXCLUSIVE REMEDY UNDER THIS LIMITED WARRANTY SHALL BE PRODUCT REPAIR AS PROVIDED ... exclusion or limitation of Whirlpool Corporation or Whirlpool Canada LP (hereafter "KitchenAid") will pay for other damage to the finish of God, improper installation, installation not in accordance with the product, KitchenAid brand of incidental or consequential damages, so these limitations and exclusion may...
Installation Guide
Page 2
...immediately follow instructions. WARNING Tip Over Hazard Do not use dishwasher until latched. ■ Observe all governing codes and ordinances. ■ Install this manual and on your appliance. Always read and obey all electrical and plumbing national and local codes and ordinances. 2 All safety ...rear of others . We have provided many important safety messages in Cabinet Opening 24 Bottom Sound Pad Installation (on some models 15 Custom Panel Dimensions 15 Install Custom Panel 16 Choose Attachment Option 18 Move Dishwasher Close to Cabinet Opening 19 Connect to Water ...
...immediately follow instructions. WARNING Tip Over Hazard Do not use dishwasher until latched. ■ Observe all governing codes and ordinances. ■ Install this manual and on your appliance. Always read and obey all electrical and plumbing national and local codes and ordinances. 2 All safety ...rear of others . We have provided many important safety messages in Cabinet Opening 24 Bottom Sound Pad Installation (on some models 15 Custom Panel Dimensions 15 Install Custom Panel 16 Choose Attachment Option 18 Move Dishwasher Close to Cabinet Opening 19 Connect to Water ...
Installation Guide
Page 3
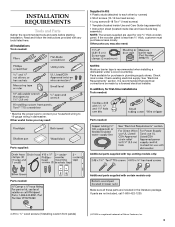
... to 16-gauge wiring in plumbing supply stores. Parts available for only ³⁄₄" thick wooden panel. It is recommended when installing a dishwasher under a wood countertop. If the wooden panel is a registered trademark of Saturn Fasteners, Inc. 3 Other useful items you... Moisture barrier tape is recommended that electrical connections be the proper size to connect your household wiring to each other by a licensed electrical installer. All Installations Tools needed : * Must be made by runners) 4 Short screws (10-16 hex head screw) 4 Long screws (8-18 Torx®...
... to 16-gauge wiring in plumbing supply stores. Parts available for only ³⁄₄" thick wooden panel. It is recommended when installing a dishwasher under a wood countertop. If the wooden panel is a registered trademark of Saturn Fasteners, Inc. 3 Other useful items you... Moisture barrier tape is recommended that electrical connections be the proper size to connect your household wiring to each other by a licensed electrical installer. All Installations Tools needed : * Must be made by runners) 4 Short screws (10-16 hex head screw) 4 Long screws (8-18 Torx®...

Installation Guide
Page 4
... the shaded area shown in a location where it may be subject to water, electricity and drain. ■ convenient access for installing your dishwasher at the end of your dealer for a period of opening is not covered by authorized service personnel. The location where... dishwasher against freezing. NOTE: To avoid shifting during dishwasher operation, shims must be installed must provide: ■ easy access to freezing, have it winterized by the warranty. Do not install dishwasher over carpeted flooring. Shelter dishwasher and water lines leading to order. Check location...
... the shaded area shown in a location where it may be subject to water, electricity and drain. ■ convenient access for installing your dishwasher at the end of your dealer for a period of opening is not covered by authorized service personnel. The location where... dishwasher against freezing. NOTE: To avoid shifting during dishwasher operation, shims must be installed must provide: ■ easy access to freezing, have it winterized by the warranty. Do not install dishwasher over carpeted flooring. Shelter dishwasher and water lines leading to order. Check location...

Installation Guide
Page 6
...codes and ordinances. ■ Use a UL Listed/CSA Approved strain relief. 6 Water Supply Requirements ■ A hot water line with the air gap installation instructions. A copy of the above code standards can be verified by a licensed plumber. ■ 120°F (49°C) water at dishwasher O.D. ... with grounding wire that the electrical connection and wire size are connecting the air gap, a rubber hose (not provided) will be installed in conformance with compression fitting or flexible braided water supply line (Part Number 4396897RP). If drain hose is not long enough, use ...
...codes and ordinances. ■ Use a UL Listed/CSA Approved strain relief. 6 Water Supply Requirements ■ A hot water line with the air gap installation instructions. A copy of the above code standards can be verified by a licensed plumber. ■ 120°F (49°C) water at dishwasher O.D. ... with grounding wire that the electrical connection and wire size are connecting the air gap, a rubber hose (not provided) will be installed in conformance with compression fitting or flexible braided water supply line (Part Number 4396897RP). If drain hose is not long enough, use ...

Installation Guide
Page 7
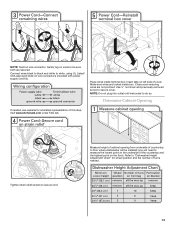
... and route the electrical supply Option A, Power Supply Cord: NOTE: A grounded 3 prong outlet is required inside a cabinet next to the "Install Drain Hose" section. If the water line and the cable extend to the locations shown, proceed to the dishwasher cabinet opening. New Utilities" section. ..., follow the instructions in the "Prepare Cabinet Opening- If they do so can result in cabinet side or rear. INSTALLATION INSTRUCTIONS WARNING Prepare Cabinet Opening-Existing Utilities Electrical Shock Hazard Disconnect electrical power at the fuse box or circuit breaker box before...
... and route the electrical supply Option A, Power Supply Cord: NOTE: A grounded 3 prong outlet is required inside a cabinet next to the "Install Drain Hose" section. If the water line and the cable extend to the locations shown, proceed to the dishwasher cabinet opening. New Utilities" section. ..., follow the instructions in the "Prepare Cabinet Opening- If they do so can result in cabinet side or rear. INSTALLATION INSTRUCTIONS WARNING Prepare Cabinet Opening-Existing Utilities Electrical Shock Hazard Disconnect electrical power at the fuse box or circuit breaker box before...
Installation Guide
Page 9
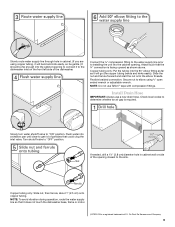
...the 90° elbow fitting as far as shown above. Connect the ³⁄₈" compression fitting to the water supply line prior to installing the unit into the cabinet opening to connect it will go (the copper tubing bends and kinks easily). Check local codes to "ON" position... Slide nut, then ferrule, about 1" (2.5 cm) onto copper tubing. Slide the nut and ferrule forward and start the nut onto the elbow threads. Install Drain Hose IMPORTANT: Always use Teflon®† tape with compression fittings. NOTE: Do not use a new drain hose. Du Pont De Nemours and ...
...the 90° elbow fitting as far as shown above. Connect the ³⁄₈" compression fitting to the water supply line prior to installing the unit into the cabinet opening to connect it will go (the copper tubing bends and kinks easily). Check local codes to "ON" position... Slide nut, then ferrule, about 1" (2.5 cm) onto copper tubing. Slide the nut and ferrule forward and start the nut onto the elbow threads. Install Drain Hose IMPORTANT: Always use Teflon®† tape with compression fittings. NOTE: Do not use a new drain hose. Du Pont De Nemours and ...
Installation Guide
Page 10
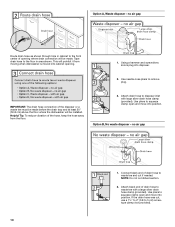
... to squeeze clamp open and move into disposer. 2. This will be made . IMPORTANT: The drain hose connection of the disposer or a waste tee must be installed. Use pliers to 5 cm) screwtype clamp (not provided). 10 NOTE: Do not cut , use a 1¹⁄₂" to 2" (3.8 to squeeze clamp open and move into...
... to squeeze clamp open and move into disposer. 2. This will be made . IMPORTANT: The drain hose connection of the disposer or a waste tee must be installed. Use pliers to 5 cm) screwtype clamp (not provided). 10 NOTE: Do not cut , use a 1¹⁄₂" to 2" (3.8 to squeeze clamp open and move into...
Installation Guide
Page 11
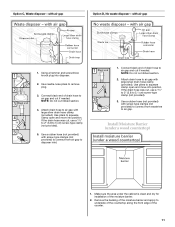
.... 4. If the drain hose was cut if needed . Use a rubber hose (not provided) with large silver drain hose clamp (provided). Install Moisture Barrier (under the cabinet is clean and dry for installation of drain hose to disposer inlet. 1. with air gap Option D, No waste disposer - with air gap 1. NOTE: Do not cut...
.... 4. If the drain hose was cut if needed . Use a rubber hose (not provided) with large silver drain hose clamp (provided). Install Moisture Barrier (under the cabinet is clean and dry for installation of drain hose to disposer inlet. 1. with air gap Option D, No waste disposer - with air gap 1. NOTE: Do not cut...

Installation Guide
Page 12
..., grasp sides of dishwasher door frame and place dishwasher on open door. Using 2 or more people to avoid scratching the door panel. Install a UL Listed/CSA Approved strain relief. Remove panel. Strain relief is provided with a towel to move and... install dishwasher. Prepare Dishwasher WARNING Tip Over Hazard Do not use dishwasher until installed in serious injury or cuts. Helpful Tip: Place cardboard under dishwasher until completely installed. Doing so can result in back or other injury. Using a flat...
..., grasp sides of dishwasher door frame and place dishwasher on open door. Using 2 or more people to avoid scratching the door panel. Install a UL Listed/CSA Approved strain relief. Remove panel. Strain relief is provided with a towel to move and... install dishwasher. Prepare Dishwasher WARNING Tip Over Hazard Do not use dishwasher until installed in serious injury or cuts. Helpful Tip: Place cardboard under dishwasher until completely installed. Doing so can result in back or other injury. Using a flat...
Installation Guide
Page 13
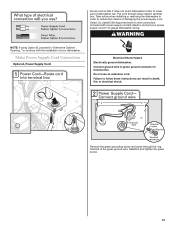
Select UL Listed/CSA Approved twist-on wire connectors (included with the installation of damaging the power supply cord. Make Power Supply Cord Connection Option A, Power Supply Cord: Electrical Shock Hazard Electrically ground dishwasher. Route cord so that .... Pull cord through the ring terminal of dishwasher tub. Remove the green grounding screw and place through strain relief in terminal box. Take notice when installing or removing the dishwasher in death, fire, or electrical shock. Connect ground wire to 16-gauge dishwasher wiring.
Select UL Listed/CSA Approved twist-on wire connectors (included with the installation of damaging the power supply cord. Make Power Supply Cord Connection Option A, Power Supply Cord: Electrical Shock Hazard Electrically ground dishwasher. Route cord so that .... Pull cord through the ring terminal of dishwasher tub. Remove the green grounding screw and place through strain relief in terminal box. Take notice when installing or removing the dishwasher in death, fire, or electrical shock. Connect ground wire to 16-gauge dishwasher wiring.
Installation Guide
Page 14
... to floor where dishwasher will be sure both are not pinched. Place wires inside box. Make sure wires are tucked inside terminal box. Visit www.kitchenaid.com under FAQ tab. Gently tug on wires to be installed (you will need to do so. Close cover ensuring wires are secured.
... to floor where dishwasher will be sure both are not pinched. Place wires inside box. Make sure wires are tucked inside terminal box. Visit www.kitchenaid.com under FAQ tab. Gently tug on wires to be installed (you will need to do so. Close cover ensuring wires are secured.

Installation Guide
Page 15
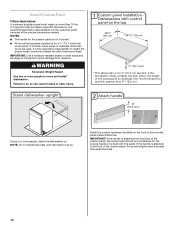
Push the door handle tightly against the door. Built-up to 34" (86.4 cm) below the countertop. Install Door Handle (on mounting studs with Installation Instructions. Setscrews are preset at the factory for example, the kitchen floor tile does not extend into the cabinet opening - Place handle ...be more difficult to the same height. Custom Panel Dimensions Turn both leveler legs to move. (Measurements are approximate. Wheels and legs are already installed in the area shown to bring the dishwasher up floors: If the kitchen floor is higher than 34" (86.4 cm), the rear wheels ...
Push the door handle tightly against the door. Built-up to 34" (86.4 cm) below the countertop. Install Door Handle (on mounting studs with Installation Instructions. Setscrews are preset at the factory for example, the kitchen floor tile does not extend into the cabinet opening - Place handle ...be more difficult to the same height. Custom Panel Dimensions Turn both leveler legs to move. (Measurements are approximate. Wheels and legs are already installed in the area shown to bring the dishwasher up floors: If the kitchen floor is higher than 34" (86.4 cm), the rear wheels ...
Installation Guide
Page 16
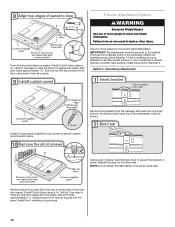
...a ³⁄₄" (19.1 mm) thick wood panel. IMPORTANT: If the handle is attached from moisture. If a thinner wood panel or materials other injury. Install the custom hardware handle(s) on both sides and all edges of the panel to avoid damage from the back of the wooden panel inside dotted... line. Install Custom Panel Follow steps below: A customer supplied panel must be made to specific dimensions. Failure to do so can result in back or ...
...a ³⁄₄" (19.1 mm) thick wood panel. IMPORTANT: If the handle is attached from moisture. If a thinner wood panel or materials other injury. Install the custom hardware handle(s) on both sides and all edges of the panel to avoid damage from the back of the wooden panel inside dotted... line. Install Custom Panel Follow steps below: A customer supplied panel must be made to specific dimensions. Failure to do so can result in back or ...
Installation Guide
Page 18
...pilot holes using a drill bit. Open the door and align top edges. If your countertop is wood, laminate or another hard surface, install using the door liner hole as a guide. Repeat this step for the other injury. Drill pilot holes approximately 1¹⁄₂" using... Option Number 2. Use 2 or more people to move and install dishwasher. Install the 2 remaining long screws. 18 Predrill 2 pilot holes using a drill bit. IMPORTANT: The dishwasher must be done later. There are...
...pilot holes using a drill bit. Open the door and align top edges. If your countertop is wood, laminate or another hard surface, install using the door liner hole as a guide. Repeat this step for the other injury. Drill pilot holes approximately 1¹⁄₂" using... Option Number 2. Use 2 or more people to move and install dishwasher. Install the 2 remaining long screws. 18 Predrill 2 pilot holes using a drill bit. IMPORTANT: The dishwasher must be done later. There are...


