
Use & Care Guide
Page 10
...from the date of purchase, when your major appliance is installed, operated and maintained according to instructions attached to or furnished with the product, KitchenAid will pay for factory specified parts for the following components if defective in the U.S.A., call 1-800-... or plumbing. 2. KITCHENAID® DISHWASHER WARRANTY TWO YEAR LIMITED WARRANTY For two years from the date of purchase, when this major appliance is operated and maintained according to instructions attached to or furnished with the product, KitchenAid or KitchenAid Canada (hereafter "KitchenAid") will pay for...
...from the date of purchase, when your major appliance is installed, operated and maintained according to instructions attached to or furnished with the product, KitchenAid will pay for factory specified parts for the following components if defective in the U.S.A., call 1-800-... or plumbing. 2. KITCHENAID® DISHWASHER WARRANTY TWO YEAR LIMITED WARRANTY For two years from the date of purchase, when this major appliance is operated and maintained according to instructions attached to or furnished with the product, KitchenAid or KitchenAid Canada (hereafter "KitchenAid") will pay for...
Installation Instructions
Page 7
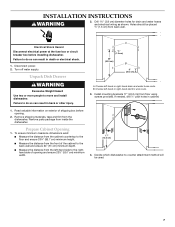
.... Failure to do so can result in cabinet. 1. B. Read valuable information on exterior of the cabinet to the back wall and ensure 24" (61 cm) minimum depth. ■ Measure the distance from the left -hand or right-hand electric wire route. 3. Holes should be...) diameter holes for drain and water hoses and electrical wiring as shown. Disconnect power. 2. Choose left -hand side to -counter attachment method will be placed ½" (1.3 cm) from the dishwasher. To ensure minimum clearance dimensions exist: ■ Measure the distance from the cabinet countertop to move and install...
.... Failure to do so can result in cabinet. 1. B. Read valuable information on exterior of the cabinet to the back wall and ensure 24" (61 cm) minimum depth. ■ Measure the distance from the left -hand or right-hand electric wire route. 3. Holes should be...) diameter holes for drain and water hoses and electrical wiring as shown. Disconnect power. 2. Choose left -hand side to -counter attachment method will be placed ½" (1.3 cm) from the dishwasher. To ensure minimum clearance dimensions exist: ■ Measure the distance from the cabinet countertop to move and install...

Installation Instructions
Page 9
... wire through the right-hand hole, attach the wire to the front of cabinet wall 8" (20.32 cm) above the floor. After routing the electrical wire through the left-hand hole, continue routing the wire along the left -hand side of the opening . 2. Place dishwasher in death or electrical shock. H... along the left -hand side of cabinet opening to back left-hand side of the opening . Route water supply line and drain hoses based on dishwasher. Option 1: Right-hand side utility route Route wire through 1½" (3.81 cm) hole located 8" (20.32 cm) above the floor. Connect water ...
... wire through the right-hand hole, attach the wire to the front of cabinet wall 8" (20.32 cm) above the floor. After routing the electrical wire through the left-hand hole, continue routing the wire along the left -hand side of the opening . 2. Place dishwasher in death or electrical shock. H... along the left -hand side of cabinet opening to back left-hand side of the opening . Route water supply line and drain hoses based on dishwasher. Option 1: Right-hand side utility route Route wire through 1½" (3.81 cm) hole located 8" (20.32 cm) above the floor. Connect water ...
Installation Instructions
Page 11
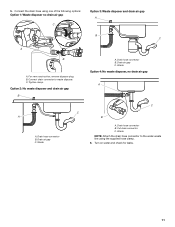
... of the following options: Option 1: Waste disposer no drain air gap A C B A. Option 2: No waste disposer and drain air gap B C A A. Waste A. Drain hose connector B. Waste NOTE: Attach the drain hose connector to waste disposer. Tighten clamp. B. C. Waste Option 4: No waste disposer, no drain air gap C Option 3: Waste disposer and drain air gap...
... of the following options: Option 1: Waste disposer no drain air gap A C B A. Option 2: No waste disposer and drain air gap B C A A. Waste A. Drain hose connector B. Waste NOTE: Attach the drain hose connector to waste disposer. Tighten clamp. B. C. Waste Option 4: No waste disposer, no drain air gap C Option 3: Waste disposer and drain air gap...
Installation Instructions
Page 12
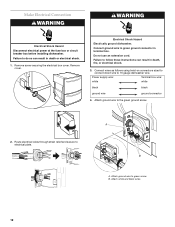
Remove cover. Do not use an extension cord. Failure to green screw. Attach ground wire to follow these instructions can result in death or electrical shock. 1. B. Remove screw securing the electrical box cover.... ground connector in death, fire, or electrical shock. 3. Attach white and black wires. 12 Connect wires as follows using twist-on connectors sized to connect direct wire to 16 gauge dishwasher wire. A B A. Electrical Shock Hazard Electrically ground dishwasher. Make Electrical Connection WARNING WARNING Electrical Shock Hazard Disconnect electrical...
Remove cover. Do not use an extension cord. Failure to green screw. Attach ground wire to follow these instructions can result in death or electrical shock. 1. B. Remove screw securing the electrical box cover.... ground connector in death, fire, or electrical shock. 3. Attach white and black wires. 12 Connect wires as follows using twist-on connectors sized to connect direct wire to 16 gauge dishwasher wire. A B A. Electrical Shock Hazard Electrically ground dishwasher. Make Electrical Connection WARNING WARNING Electrical Shock Hazard Disconnect electrical...
Installation Instructions
Page 14
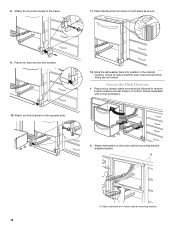
Attach toe kick bracket on both sides as followed to ensure that the drain hose and electrical wiring are not kinked. Slide the dishwasher back into toe kick bracket. 10. Remove top drawer (same procedure as shown. 9. Check to remove ... 2 1 2 2. Secure the Dish Drawers 1. Place trim strip into position in the cabinet opening. Attach dishwasher to the frame. 11. Attach the toe kick bracket to the lower cabinet mounting bracket (installed earlier). Attach dishwasher to lower cabinet mounting bracket. 14 A A. 8. Place flexible side trim strips on the opposite side...
Attach toe kick bracket on both sides as followed to ensure that the drain hose and electrical wiring are not kinked. Slide the dishwasher back into toe kick bracket. 10. Remove top drawer (same procedure as shown. 9. Check to remove ... 2 1 2 2. Secure the Dish Drawers 1. Place trim strip into position in the cabinet opening. Attach dishwasher to the frame. 11. Attach the toe kick bracket to the lower cabinet mounting bracket (installed earlier). Attach dishwasher to lower cabinet mounting bracket. 14 A A. 8. Place flexible side trim strips on the opposite side...
Installation Instructions
Page 15
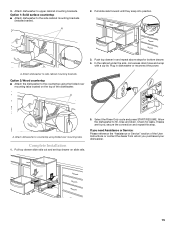
... leaks are found, secure the connection and repeat this step. In the cabinet under the sink, coil excess drain hose and wrap with a zip tie. Attach dishwasher to the side cabinet mounting brackets (installed earlier). A. Pull slide rails forward until they snap into position. 1 3. A ON OFF ON OFF OFF 1 2 A. Option 1: Solid surface...
... leaks are found, secure the connection and repeat this step. In the cabinet under the sink, coil excess drain hose and wrap with a zip tie. Attach dishwasher to the side cabinet mounting brackets (installed earlier). A. Pull slide rails forward until they snap into position. 1 3. A ON OFF ON OFF OFF 1 2 A. Option 1: Solid surface...


