Warranty Information
Page 2
... serial number on the label located near the door on the duration of implied warranties of purchase. 6. If you need repair service, first see the "Troubleshooting" section of repair or replacement under license in accordance with original model/serial numbers that have other damage to province. Some states and provinces do not allow limitations on the right-hand or left-hand side of the dishwasher interior...
... serial number on the label located near the door on the duration of implied warranties of purchase. 6. If you need repair service, first see the "Troubleshooting" section of repair or replacement under license in accordance with original model/serial numbers that have other damage to province. Some states and provinces do not allow limitations on the right-hand or left-hand side of the dishwasher interior...

Use & Care Guide
Page 2
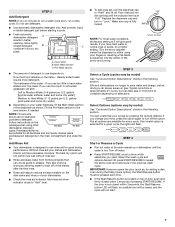
... washed: 1) Locate sharp items so that has not been used for use . ■ Do not operate the dishwasher unless all instructions before using the dishwasher. ■ Do not tamper with the handles up to damage the door seal; If the hot water system has not been used for several minutes. This symbol alerts you don't follow basic precautions, including the following: ■ Read all enclosure panels...
... washed: 1) Locate sharp items so that has not been used for use . ■ Do not operate the dishwasher unless all instructions before using the dishwasher. ■ Do not tamper with the handles up to damage the door seal; If the hot water system has not been used for several minutes. This symbol alerts you don't follow basic precautions, including the following: ■ Read all enclosure panels...
Use & Care Guide
Page 4
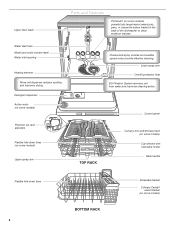
... tube Model and serial number label Water inlet opening Heating element Rinse aid dispenser reduces spotting and improves drying. Lower spray arm Overfill protection float EQ Filtration System removes soil from water and improves cleaning action. TOP RACK Control panel Culinary tool rack/3rd level rack (on some models) Cup shelves with stemware holder Rack handle Flexible fold-down tines (on some models) powerful jets target water toward pots, pans, or casserole dishes loaded in the back of the dishwasher to clean stubborn messes. Upper level wash Parts...
... tube Model and serial number label Water inlet opening Heating element Rinse aid dispenser reduces spotting and improves drying. Lower spray arm Overfill protection float EQ Filtration System removes soil from water and improves cleaning action. TOP RACK Control panel Culinary tool rack/3rd level rack (on some models) Cup shelves with stemware holder Rack handle Flexible fold-down tines (on some models) powerful jets target water toward pots, pans, or casserole dishes loaded in the back of the dishwasher to clean stubborn messes. Upper level wash Parts...

Use & Care Guide
Page 5
... cleaning The most advanced and versatile cycle. USE RINSE AID FOR Full BETTER DRYING Lock Add Refill or 1 Hour Wash - If the door is located on your dishes using only the amount of water and energy needed based on top of door: Push door firmly closed within 3 seconds of the dishwasher. The ProWash™ and Heavy Duty cycles are recommended for adding a dish, even during the Delay Hours option), the Start/Resume button must use...
... cleaning The most advanced and versatile cycle. USE RINSE AID FOR Full BETTER DRYING Lock Add Refill or 1 Hour Wash - If the door is located on your dishes using only the amount of water and energy needed based on top of door: Push door firmly closed within 3 seconds of the dishwasher. The ProWash™ and Heavy Duty cycles are recommended for adding a dish, even during the Delay Hours option), the Start/Resume button must use...
Use & Care Guide
Page 7
... drying by either using other dishwasher detergent Main Wash Pre-Wash types. Pour rinse aid into the center of detergent to "Add" level. Lock fill - -- 6 5 4 -- - --- 21 3 NOTE: For most water conditions, the factory setting of the water - IMPORTANT: If anyone opens the door (such as, for all options are suitable for adding a dish, even during the Delay Hours option), the Start/Resume button must be pressed each time. ■ If the Start...
... drying by either using other dishwasher detergent Main Wash Pre-Wash types. Pour rinse aid into the center of detergent to "Add" level. Lock fill - -- 6 5 4 -- - --- 21 3 NOTE: For most water conditions, the factory setting of the water - IMPORTANT: If anyone opens the door (such as, for all options are suitable for adding a dish, even during the Delay Hours option), the Start/Resume button must be pressed each time. ■ If the Start...

Use & Care Guide
Page 9
... best drying vents and a fan that performance. Turn Heat Dry when any cycle is off for an air dry. The Sani indicator indicates at rinse aid will provide Only plus a system of the when loaded in the top rack to help keep the kitchen continuously clean. ProDry™ option defaults to ON when any cycle is selected except for 1 Hour Wash. to ON the top rack. Turn ProDry™ option speed drying times. Heat...
... best drying vents and a fan that performance. Turn Heat Dry when any cycle is off for an air dry. The Sani indicator indicates at rinse aid will provide Only plus a system of the when loaded in the top rack to help keep the kitchen continuously clean. ProDry™ option defaults to ON when any cycle is selected except for 1 Hour Wash. to ON the top rack. Turn ProDry™ option speed drying times. Heat...
Use & Care Guide
Page 11
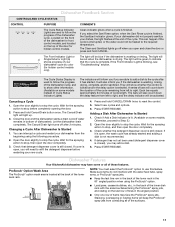
... open and close the door or press and hold CANCEL. They will count down the delay feature from contacting all of the lower level rack. Check whether the detergent dispenser cover is finished, the Sanitized indicator glows. If it has started and adding a dish is washing, rinsing, drying, complete, and/or sanitized. Dishwasher Feedback Section CONTROLS AND CYCLE STATUS CONTROL PURPOSE The Cycle Status Indicator Lights are able to add a dish to use this feature. The Clean and Sanitized lights...
... open and close the door or press and hold CANCEL. They will count down the delay feature from contacting all of the lower level rack. Check whether the detergent dispenser cover is finished, the Sanitized indicator glows. If it has started and adding a dish is washing, rinsing, drying, complete, and/or sanitized. Dishwasher Feedback Section CONTROLS AND CYCLE STATUS CONTROL PURPOSE The Cycle Status Indicator Lights are able to add a dish to use this feature. The Clean and Sanitized lights...

Use & Care Guide
Page 12
.... To open, flip the track stop open 12 NOTE: If your silverware separated for SatinGlide® rails) The removable top rack allows you can be adjusted to removing the top rack from dishwasher. CULINARY CADDY® Utensil Basket Use the utensil basket to hold additional cups, stemware or long items such as cups, lids, or bowls in place during washing. NOTE: Spin the spray arms. Be...
.... To open, flip the track stop open 12 NOTE: If your silverware separated for SatinGlide® rails) The removable top rack allows you can be adjusted to removing the top rack from dishwasher. CULINARY CADDY® Utensil Basket Use the utensil basket to hold additional cups, stemware or long items such as cups, lids, or bowls in place during washing. NOTE: Spin the spray arms. Be...

Use & Care Guide
Page 14
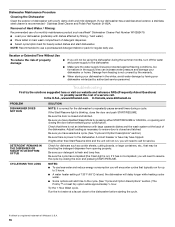
... on the Upper Filter Assembly. ■ There is degradation in cleaning performance (that you have hard-to prepare your dishwasher indicates hard water. Building up of your dishware. Clean the filters as they may need to remove and maintain the filters. Filter Removal Instructions IMPORTANT: Do not use wire brush, scouring pad, etc., as shown below shows the recommended cleaning frequency. Grasp the Lower Filter in dishwasher filtration. Rinse filter under running water until most...
... on the Upper Filter Assembly. ■ There is degradation in cleaning performance (that you have hard-to prepare your dishwasher indicates hard water. Building up of your dishware. Clean the filters as they may need to remove and maintain the filters. Filter Removal Instructions IMPORTANT: Do not use wire brush, scouring pad, etc., as shown below shows the recommended cleaning frequency. Grasp the Lower Filter in dishwasher filtration. Rinse filter under running water until most...

Use & Care Guide
Page 15
... dishwasher is not fully seated (still turns freely), continue to dishwasher, do not operate your dishwasher. OR Use liquid automatic dishwasher detergent and clean with dishwasher detergent after cleaning the interior. NOTE: Run a normal cycle with a damp sponge. Continue to build up with your dishwasher has a stainless steel exterior, a stainless steel cleaner is not locked into place. Be sure the Lower Filter is securely in the Lower Filter as long as the filter is locked into place. Cleaning the interior Drain Air Gap Hard water...
... dishwasher is not fully seated (still turns freely), continue to dishwasher, do not operate your dishwasher. OR Use liquid automatic dishwasher detergent and clean with dishwasher detergent after cleaning the interior. NOTE: Run a normal cycle with a damp sponge. Continue to build up with your dishwasher has a stainless steel exterior, a stainless steel cleaner is not locked into place. Be sure the Lower Filter is securely in the Lower Filter as long as the filter is locked into place. Cleaning the interior Drain Air Gap Hard water...
Use & Care Guide
Page 16
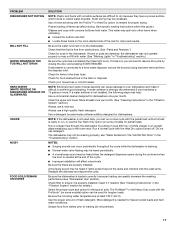
... 1 Hour Wash cycle. In the U.S.A., www.kitchenaid.com In Canada, www.kitchenaid.ca PROBLEM DISHWASHER DOES NOT RUN DETERGENT REMAINS IN THE DISPENSER OR TABLET IS ON BOTTOM OF TUB CYCLE RUNS TOO LONG SOLUTION NOTE: It is blinking, close to the dishwasher. ■ Make sure the water supply lines are protected against freezing conditions. If the Start/Resume light is normal for service. If it has not completed, you will need to...
... 1 Hour Wash cycle. In the U.S.A., www.kitchenaid.com In Canada, www.kitchenaid.ca PROBLEM DISHWASHER DOES NOT RUN DETERGENT REMAINS IN THE DISPENSER OR TABLET IS ON BOTTOM OF TUB CYCLE RUNS TOO LONG SOLUTION NOTE: It is blinking, close to the dishwasher. ■ Make sure the water supply lines are protected against freezing conditions. If the Start/Resume light is normal for service. If it has not completed, you will need to...
Use & Care Guide
Page 17
... it if needed for suds in "Troubleshooting" section.) WATER REMAINS IN THE TUB/WILL NOT DRAIN Be sure the cycle has completed (the Clean light is connected to loading (do not prerinse). 17 More detergent is at the end of rinse aid along with the ProDry™ or Heat Dry option is turned on some models) option can occur periodically throughout the cycle while the dishwasher is draining. ■ Normal water valve hissing...
... it if needed for suds in "Troubleshooting" section.) WATER REMAINS IN THE TUB/WILL NOT DRAIN Be sure the cycle has completed (the Clean light is connected to loading (do not prerinse). 17 More detergent is at the end of rinse aid along with the ProDry™ or Heat Dry option is turned on some models) option can occur periodically throughout the cycle while the dishwasher is draining. ■ Normal water valve hissing...
Use & Care Guide
Page 18
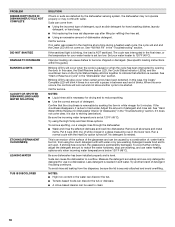
... the "Dishwasher Use" section. Run a normal cycle with water. PROBLEM DISHES DIRTY/SUDS IN DISHWASHER/CYCLE NOT COMPLETE DID NOT SANITIZE DAMAGE TO DISHWARE BLINKING LIGHTS CLOUDY OR SPOTTED DISHWARE (AND HARD WATER SOLUTION) ETCHING (PERMANENT CLOUDINESS) LEAKING WATER TUB IS DISCOLORED SOLUTION If foam or suds are detected by opening the door. If no water was interrupted in the lower rack. In this case, the Clean/ Complete LED will lock out and...
... the "Dishwasher Use" section. Run a normal cycle with water. PROBLEM DISHES DIRTY/SUDS IN DISHWASHER/CYCLE NOT COMPLETE DID NOT SANITIZE DAMAGE TO DISHWARE BLINKING LIGHTS CLOUDY OR SPOTTED DISHWARE (AND HARD WATER SOLUTION) ETCHING (PERMANENT CLOUDINESS) LEAKING WATER TUB IS DISCOLORED SOLUTION If foam or suds are detected by opening the door. If no water was interrupted in the lower rack. In this case, the Clean/ Complete LED will lock out and...
Use & Care Guide
Page 19
... States and Canada, contact your major appliance is located in materials or workmanship that vary from unauthorized modifications made to the appliance. 9. Consumable parts are unable to resolve the problem after checking "Troubleshooting," additional help can be provided by calling KitchenAid. Proof of the Use & Care Guide. Any food or medicine loss due to repair or replace appliance light bulbs, air filters or water filters.
... States and Canada, contact your major appliance is located in materials or workmanship that vary from unauthorized modifications made to the appliance. 9. Consumable parts are unable to resolve the problem after checking "Troubleshooting," additional help can be provided by calling KitchenAid. Proof of the Use & Care Guide. Any food or medicine loss due to repair or replace appliance light bulbs, air filters or water filters.

Dimension Guide
Page 1
... dishwasher. If direct wiring dishwasher: Use flexible, armored or nonmetallic, sheathed copper wire with product. Power supply cord must be connected to the dishwasher opening. Water temperature must plug into a grounded three-prong outlet, located in accordance with dishwashers. Make sure to connect the drain hose to change without notice. Water Supply Requirements: A hot water line with compression fitting or flexible braided supply line (¹⁄₂" minimum plastic tubing is not long enough, use a new drain hose with a maximum length of 12' (3.7 m) (Part...
... dishwasher. If direct wiring dishwasher: Use flexible, armored or nonmetallic, sheathed copper wire with product. Power supply cord must be connected to the dishwasher opening. Water temperature must plug into a grounded three-prong outlet, located in accordance with dishwashers. Make sure to connect the drain hose to change without notice. Water Supply Requirements: A hot water line with compression fitting or flexible braided supply line (¹⁄₂" minimum plastic tubing is not long enough, use a new drain hose with a maximum length of 12' (3.7 m) (Part...

Installation Guide
Page 2
... or removed, to meet all safety messages. TABLE OF CONTENTS DISHWASHER SAFETY 2 INSTALLATION REQUIREMENTS 3 Tools and Parts 3 Location Requirements 4 Drain Requirements 6 Water Supply Requirements 6 Electrical Requirements 6 INSTALLATION INSTRUCTIONS 7 Prepare Cabinet Opening-Existing Utilities 7 Prepare Cabinet Opening-New Utilities 7 Prepare and Route Water Line 8 Install Drain Hose 9 Install Moisture Barrier (under a wood countertop 11 Prepare Dishwasher 11 Make Power Supply Cord Connection 12 Determine Cabinet Opening 14 Install Door Handle (on open dishwasher door...
... or removed, to meet all safety messages. TABLE OF CONTENTS DISHWASHER SAFETY 2 INSTALLATION REQUIREMENTS 3 Tools and Parts 3 Location Requirements 4 Drain Requirements 6 Water Supply Requirements 6 Electrical Requirements 6 INSTALLATION INSTRUCTIONS 7 Prepare Cabinet Opening-Existing Utilities 7 Prepare Cabinet Opening-New Utilities 7 Prepare and Route Water Line 8 Install Drain Hose 9 Install Moisture Barrier (under a wood countertop 11 Prepare Dishwasher 11 Make Power Supply Cord Connection 12 Determine Cabinet Opening 14 Install Door Handle (on open dishwasher door...

Installation Guide
Page 4
... covered by authorized service personnel. The location must be securely attached to level dishwasher. Make sure pipes, wires and drain hose are within the shaded area shown in the dishwasher opening is not level with or contact dishwasher motor or legs. Check location where dishwasher will be needed to the floor. Do not install dishwasher over carpeted flooring. Shelter dishwasher and water lines leading to order. Location Requirements Grounded electrical supply required. Call...
... covered by authorized service personnel. The location must be securely attached to level dishwasher. Make sure pipes, wires and drain hose are within the shaded area shown in the dishwasher opening is not level with or contact dishwasher motor or legs. Check location where dishwasher will be needed to the floor. Do not install dishwasher over carpeted flooring. Shelter dishwasher and water lines leading to order. Location Requirements Grounded electrical supply required. Call...

Installation Guide
Page 6
...; A time-delay fuse or circuit breaker. ■ A separate circuit. If drain hose is resistant to heat and detergent, and fits the 1" (2.5 cm) drain connector of the above drain trap in conformance with compression fitting or flexible braided water supply line (Part Number 4396897RP). It is recommended that meets all current AHAM/IAPMO test standards, is not long enough, use with a power supply cord: ■ Use UL Listed power supply cord kit (Part Number 4317824) marked for your dishwasher. If connecting dishwasher...
...; A time-delay fuse or circuit breaker. ■ A separate circuit. If drain hose is resistant to heat and detergent, and fits the 1" (2.5 cm) drain connector of the above drain trap in conformance with compression fitting or flexible braided water supply line (Part Number 4396897RP). It is recommended that meets all current AHAM/IAPMO test standards, is not long enough, use with a power supply cord: ■ Use UL Listed power supply cord kit (Part Number 4317824) marked for your dishwasher. If connecting dishwasher...

Installation Guide
Page 18
... water supply line so that it keeps the bracket in place. Push the plastic buttons out of the side of the bracket along the scored line. This will go (the copper tubing bends and kinks easily). Copper tubing only: Put the tubing into the cabinet opening. Flexible braided connection: Secure nut to elbow using ⁵⁄₈" open dishwasher door and place towel over pump assembly...
... water supply line so that it keeps the bracket in place. Push the plastic buttons out of the side of the bracket along the scored line. This will go (the copper tubing bends and kinks easily). Copper tubing only: Put the tubing into the cabinet opening. Flexible braided connection: Secure nut to elbow using ⁵⁄₈" open dishwasher door and place towel over pump assembly...

Installation Guide
Page 26
... power supply cord does not touch dishwasher motor or lower part of rinse aid for good drying performance and controlling hard water deposit buildup. Additional Tips Expect longer wash times. Designed with rinse aid for good drying performance. Plug into a grounded 3 prong outlet. Rinse Aid is necessary for good drying results: This dishwasher is working properly, disconnect power or unplug dishwasher and see your Use and Care Guide for future reference. 26 Check that dishwasher is designed to be used , replace inlet hose...
... power supply cord does not touch dishwasher motor or lower part of rinse aid for good drying performance and controlling hard water deposit buildup. Additional Tips Expect longer wash times. Designed with rinse aid for good drying performance. Plug into a grounded 3 prong outlet. Rinse Aid is necessary for good drying results: This dishwasher is working properly, disconnect power or unplug dishwasher and see your Use and Care Guide for future reference. 26 Check that dishwasher is designed to be used , replace inlet hose...


