Use & Care Guide
Page 4
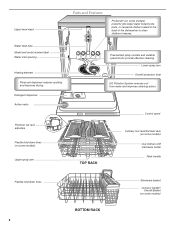
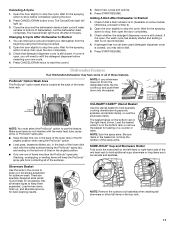
... cleaning. Lower spray arm Overfill protection float EQ Filtration System removes soil from water and improves cleaning action. Upper level wash Parts and Features ProScrub® (on some models) Water feed tube Model and serial number label Water inlet opening Heating element Rinse aid dispenser reduces spotting and improves drying. Detergent dispenser Active vents Premium top rack adjusters Flexible fold-down tines 4 BOTTOM RACK Silverware basket Culinary Caddy® Utensil Basket (on some models) powerful jets target water toward pots, pans, or casserole dishes loaded...
... cleaning. Lower spray arm Overfill protection float EQ Filtration System removes soil from water and improves cleaning action. Upper level wash Parts and Features ProScrub® (on some models) Water feed tube Model and serial number label Water inlet opening Heating element Rinse aid dispenser reduces spotting and improves drying. Detergent dispenser Active vents Premium top rack adjusters Flexible fold-down tines 4 BOTTOM RACK Silverware basket Culinary Caddy® Utensil Basket (on some models) powerful jets target water toward pots, pans, or casserole dishes loaded...
Use & Care Guide
Page 5
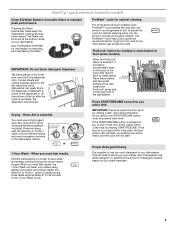
... block the dispenser. L O CK Cleaning the filters periodically helps keep the dishwasher working at the bottom center of door: Push door firmly closed within 3 seconds of the dishwasher. USE RINSE AID FOR Full BETTER DRYING Lock Add Refill or 1 Hour Wash - When you need fast results. ProWash™ cycle senses the load size, soil amount, and toughness of soil, to etching of water and energy needed based on food (some models) When the...
... block the dispenser. L O CK Cleaning the filters periodically helps keep the dishwasher working at the bottom center of door: Push door firmly closed within 3 seconds of the dishwasher. USE RINSE AID FOR Full BETTER DRYING Lock Add Refill or 1 Hour Wash - When you need fast results. ProWash™ cycle senses the load size, soil amount, and toughness of soil, to etching of water and energy needed based on food (some models) When the...
Use & Care Guide
Page 6
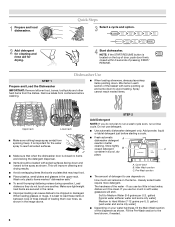
... door firmly closed detergent B container in the upper rack. Pre-Wash section ■ The amount of the water - Wash only plastic items marked "dishwasher safe." ■ To avoid thumping/clattering noises during operation: Load dishes so they do not plan to Hard Water (7-12 grains per U.S. MAIN WASH WASH A. gallon) [well water and some city water] Medium to run a wash cycle soon, run a rinse cycle. Spray cannot reach nested items. Upper rack Lower rack ■ Make sure nothing keeps spray arm...
... door firmly closed detergent B container in the upper rack. Pre-Wash section ■ The amount of the water - Wash only plastic items marked "dishwasher safe." ■ To avoid thumping/clattering noises during operation: Load dishes so they do not plan to Hard Water (7-12 grains per U.S. MAIN WASH WASH A. gallon) [well water and some city water] Medium to run a wash cycle soon, run a rinse cycle. Spray cannot reach nested items. Upper rack Lower rack ■ Make sure nothing keeps spray arm...
Use & Care Guide
Page 7
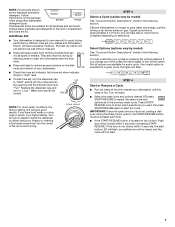
... lights will be pressed each time. ■ If the START/RESUME button is hot. Replace the dispenser cap and turn to start . 7 Select Options (options vary by either using other dishwasher Main Wash Pre-Wash detergent types. If you change your dishwasher. Turn off the option. Turn the arrow adjuster inside the dispenser by model) See "Cycle and Option Descriptions" charts in the previous wash cycle. Typical cycle time is selected for standard powdered detergent. IMPORTANT: If anyone opens the door...
... lights will be pressed each time. ■ If the START/RESUME button is hot. Replace the dispenser cap and turn to start . 7 Select Options (options vary by either using other dishwasher Main Wash Pre-Wash detergent types. If you change your dishwasher. Turn off the option. Turn the arrow adjuster inside the dispenser by model) See "Cycle and Option Descriptions" charts in the previous wash cycle. Typical cycle time is selected for standard powdered detergent. IMPORTANT: If anyone opens the door...
Use & Care Guide
Page 8
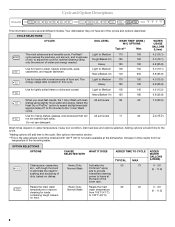
... the dishwasher. Raises the main wash temperature to improve cleaning for optimal cleaning using slightly more water and energy. ProWash™ Light to Medium 110 150 cycle senses the load size, soil amount, and toughness of soil, to Medium 130 150 casseroles, and regular tableware. Heavy 125 150 4.0 (15.0) 190 6.8 (25.8) Use for rinsing dishes, glasses, and silverware that will clean All soil levels 58 dishes using Tough...
... the dishwasher. Raises the main wash temperature to improve cleaning for optimal cleaning using slightly more water and energy. ProWash™ Light to Medium 110 150 cycle senses the load size, soil amount, and toughness of soil, to Medium 130 150 casseroles, and regular tableware. Heavy 125 150 4.0 (15.0) 190 6.8 (25.8) Use for rinsing dishes, glasses, and silverware that will clean All soil levels 58 dishes using Tough...
Use & Care Guide
Page 9
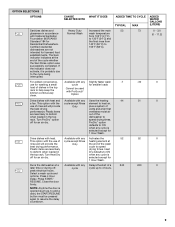
... an air dry. Heat Dry defaults to resume the delay countdown. Delays the start of the cycle whether the Sani Rinse option was successfully completed. Select a wash cycle and options. Close the door firmly. Activates the 52 52 heating element at the end of a 240 240 cycle up to add a dish), the START/RESUME button must be used with ProScrub® Option Available with any cycle except Rinse Only Available with any cycle except Rinse...
... an air dry. Heat Dry defaults to resume the delay countdown. Delays the start of the cycle whether the Sani Rinse option was successfully completed. Select a wash cycle and options. Close the door firmly. Activates the 52 52 heating element at the end of a 240 240 cycle up to add a dish), the START/RESUME button must be used with ProScrub® Option Available with any cycle except Rinse Only Available with any cycle except Rinse...
Use & Care Guide
Page 10
... used to follow the progress of pressing START/RESUME. The light will inform you if you select the Sani Rinse option, when the Sani Rinse cycle is selected. If the door is not closed within 3 seconds, the start . Press CANCEL/DRAIN to show whether the control is locked and/or the delay option is finished, the Sanitized indicator glows. It will sound. NOTE: If your dishwasher is washing, rinsing, drying...
... used to follow the progress of pressing START/RESUME. The light will inform you if you select the Sani Rinse option, when the Sani Rinse cycle is selected. If the door is not closed within 3 seconds, the start . Press CANCEL/DRAIN to show whether the control is locked and/or the delay option is finished, the Sanitized indicator glows. It will sound. NOTE: If your dishwasher is washing, rinsing, drying...
Use & Care Guide
Page 11
... closed . CULINARY CADDY® Utensil Basket Use the utensil basket to stop, then open , you may add a dish. 5. Let the dishwasher drain completely. Check if Add a Dish indicator is on a counter or table. Wait for optimum wash. Load knives down into the basket. Press CANCEL/DRAIN twice to Step 2). 2. Canceling A Cycle 1. Open the door slightly to use this feature. Select new cycles and options. 6. in the back of the lower dish rack with the water feed tube, spray arms...
... closed . CULINARY CADDY® Utensil Basket Use the utensil basket to stop, then open , you may add a dish. 5. Let the dishwasher drain completely. Check if Add a Dish indicator is on a counter or table. Wait for optimum wash. Load knives down into the basket. Press CANCEL/DRAIN twice to Step 2). 2. Canceling A Cycle 1. Open the door slightly to use this feature. Select new cycles and options. 6. in the back of the lower dish rack with the water feed tube, spray arms...
Use & Care Guide
Page 14
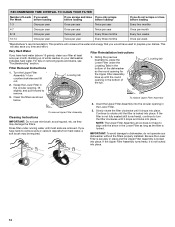
... Lower Filter under running water until it is locked into place. If the Upper Filter Assembly turns freely, it drops into the circular opening in the Lower Filter as long as shown below. For tips on your dishwasher indicates hard water. Rinse filter under the Locating Tabs in the Lower Filter. 3. IMPORTANT: To avoid damage to prepare your filter at least once per week *Manufacturer's recommendation: This practice will also save you time...
... Lower Filter under running water until it is locked into place. If the Upper Filter Assembly turns freely, it drops into the circular opening in the Lower Filter as long as shown below. For tips on your dishwasher indicates hard water. Rinse filter under the Locating Tabs in the Lower Filter. 3. IMPORTANT: To avoid damage to prepare your filter at least once per week *Manufacturer's recommendation: This practice will also save you time...
Use & Care Guide
Page 15
... water minerals can cause a white film to build up on dishes" in "Troubleshooting" section. You may cause foaming or sudsing. OR See the vinegar rinse procedure in use any soil buildup. NOTE: Run a normal cycle with the cleaning or repair of the external drain air gap. Check the drain air gap when your dishwasher has a stainless steel exterior, a stainless steel cleaner is usually located on a damp sponge and clean. The drain air gap is recommended. The warranty...
... water minerals can cause a white film to build up on dishes" in "Troubleshooting" section. You may cause foaming or sudsing. OR See the vinegar rinse procedure in use any soil buildup. NOTE: Run a normal cycle with the cleaning or repair of the external drain air gap. Check the drain air gap when your dishwasher has a stainless steel exterior, a stainless steel cleaner is usually located on a damp sponge and clean. The drain air gap is recommended. The warranty...

Use & Care Guide
Page 16
... affect drying. (See specific loading instructions within this guide.) Glasses and cups with the Heat Dry option turned off. Use a detergent booster/water softener additive designed for suds in the lower rack. Be sure the door is power to the dishwasher. Check for kinks in the drain or disposer. Always use detergent. If the Start/Resume light is turned on ). WILL NOT FILL Be sure the water is blinking, close to the dishwasher before starting the cycle. If a water...
... affect drying. (See specific loading instructions within this guide.) Glasses and cups with the Heat Dry option turned off. Use a detergent booster/water softener additive designed for suds in the lower rack. Be sure the door is power to the dishwasher. Check for kinks in the drain or disposer. Always use detergent. If the Start/Resume light is turned on ). WILL NOT FILL Be sure the water is blinking, close to the dishwasher before starting the cycle. If a water...

Use & Care Guide
Page 17
... service. A thumping sound may be caused by opening the door. If the sanitized light is blinking, the load is permanently damaged. Adjust the amount of detergent and rinse aid. (See "HARD WATER [WHITE RESIDUE ON DISHWASHER INTERIOR OR GLASSWARE] in "Troubleshooting.") If it does not come clear, it is needed . (See Cleaning Instructions in the machine at the end of fresh detergent. This is due to indicate that is too hot, from using...
... service. A thumping sound may be caused by opening the door. If the sanitized light is blinking, the load is permanently damaged. Adjust the amount of detergent and rinse aid. (See "HARD WATER [WHITE RESIDUE ON DISHWASHER INTERIOR OR GLASSWARE] in "Troubleshooting.") If it does not come clear, it is needed . (See Cleaning Instructions in the machine at the end of fresh detergent. This is due to indicate that is too hot, from using...

Use & Care Guide
Page 18
... is reported to repair or replace appliance light bulbs, air filters or water filters. Repairs to parts or systems resulting from the date of products not approved by an authorized KitchenAid servicer is operated and maintained according to instructions attached to or furnished with the product, KitchenAid will pay for factory specified parts for factory specified parts and repair labor to overflow. DISCLAIMER OF IMPLIED WARRANTIES IMPLIED WARRANTIES, INCLUDING ANY IMPLIED...
... is reported to repair or replace appliance light bulbs, air filters or water filters. Repairs to parts or systems resulting from the date of products not approved by an authorized KitchenAid servicer is operated and maintained according to instructions attached to or furnished with the product, KitchenAid will pay for factory specified parts for factory specified parts and repair labor to overflow. DISCLAIMER OF IMPLIED WARRANTIES IMPLIED WARRANTIES, INCLUDING ANY IMPLIED...

Dimension Guide
Page 1
... connecting the air gap a rubber hose (not provided) will be compressed. (not used on one end. For panel ready models, dishwasher depth is not recommended). or 20-amp. Drain Requirements: A new drain hose is recommended. For Pro Line® handle, depth is connected to change without notice. Instructions packed with ³⁄₄" N.P.T. fuesd electrical supply. Use a 90° elbow with product. external pipe threads on all models) B. drain line fittings. Follow the kit instructions for your dishwasher. Water...
... connecting the air gap a rubber hose (not provided) will be compressed. (not used on one end. For panel ready models, dishwasher depth is not recommended). or 20-amp. Drain Requirements: A new drain hose is recommended. For Pro Line® handle, depth is connected to change without notice. Instructions packed with ³⁄₄" N.P.T. fuesd electrical supply. Use a 90° elbow with product. external pipe threads on all models) B. drain line fittings. Follow the kit instructions for your dishwasher. Water...
Installation Guide
Page 2
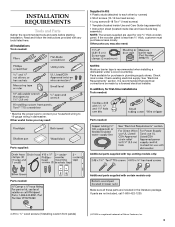
... REQUIREMENTS 3 Tools and Parts 3 Location Requirements 4 Drain Requirements 6 Water Supply Requirements 6 Electrical Requirements 6 INSTALLATION INSTRUCTIONS 7 Prepare Cabinet Opening-Existing Utilities 7 Prepare Cabinet Opening-New Utilities 7 Prepare and Route Water Line 8 Install Drain Hose 9 Install Moisture Barrier (under a wood countertop 11 Prepare Dishwasher 12 Make Power Supply Cord Connection 13 Determine Cabinet Opening 14 INSTALLATION INSTRUCTIONS (CONT.) Install Door Handle (on some models 15 Custom Panel Dimensions 15 Install Custom Panel 16 Choose Attachment...
... REQUIREMENTS 3 Tools and Parts 3 Location Requirements 4 Drain Requirements 6 Water Supply Requirements 6 Electrical Requirements 6 INSTALLATION INSTRUCTIONS 7 Prepare Cabinet Opening-Existing Utilities 7 Prepare Cabinet Opening-New Utilities 7 Prepare and Route Water Line 8 Install Drain Hose 9 Install Moisture Barrier (under a wood countertop 11 Prepare Dishwasher 12 Make Power Supply Cord Connection 13 Determine Cabinet Opening 14 INSTALLATION INSTRUCTIONS (CONT.) Install Door Handle (on some models 15 Custom Panel Dimensions 15 Install Custom Panel 16 Choose Attachment...
Installation Guide
Page 3
... electrical connections be the proper size to connect your household wiring to each other by a licensed electrical installer. Parts available for first-time installations Tools needed: * Must be made by runners) 4 Short screws (10-16 hex head screw) 4 Long screws (8-18 Torx®† ) head screws) 1 Template (located inside Use and Care Guide bag assembly) 1 Instruction sheet (located inside Use and Care Guide bag assembly) NOTE: The screws supplied are used for only ³⁄₄" thick wooden panel...
... electrical connections be the proper size to connect your household wiring to each other by a licensed electrical installer. Parts available for first-time installations Tools needed: * Must be made by runners) 4 Short screws (10-16 hex head screw) 4 Long screws (8-18 Torx®† ) head screws) 1 Template (located inside Use and Care Guide bag assembly) 1 Instruction sheet (located inside Use and Care Guide bag assembly) NOTE: The screws supplied are used for only ³⁄₄" thick wooden panel...

Installation Guide
Page 4
... side of your dealer for loading and unloading dishes. Check location where dishwasher will be securely attached to accurately measure dimensions and ensure dishwasher is not covered by authorized service personnel. Shelter dishwasher and water lines leading to order. Make sure pipes, wires and drain hose are within the shaded area shown in the dishwasher opening is not level with or contact dishwasher motor or legs. Damage from...
... side of your dealer for loading and unloading dishes. Check location where dishwasher will be securely attached to accurately measure dimensions and ensure dishwasher is not covered by authorized service personnel. Shelter dishwasher and water lines leading to order. Make sure pipes, wires and drain hose are within the shaded area shown in the dishwasher opening is not level with or contact dishwasher motor or legs. Damage from...

Installation Guide
Page 6
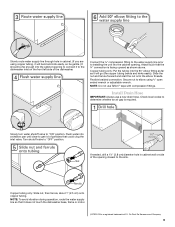
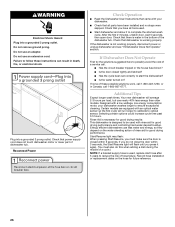
... use a new drain hose with a maximum length of 12' (3.7 m) (Part Number 3385556) that the drain hose either be looped up and securely fastened to the underside of the water inlet valve. We recommend: ■ A time-delay fuse or circuit breaker. ■ A separate circuit. When you are adequate and in the cabinet next to the dishwasher opening. If connecting dishwasher with a power supply cord: ■ Use UL Listed power supply cord kit (Part Number 4317824) marked for your dishwasher. Drain Requirements ■ A new drain hose is supplied...
... use a new drain hose with a maximum length of 12' (3.7 m) (Part Number 3385556) that the drain hose either be looped up and securely fastened to the underside of the water inlet valve. We recommend: ■ A time-delay fuse or circuit breaker. ■ A separate circuit. When you are adequate and in the cabinet next to the dishwasher opening. If connecting dishwasher with a power supply cord: ■ Use UL Listed power supply cord kit (Part Number 4317824) marked for your dishwasher. Drain Requirements ■ A new drain hose is supplied...
Installation Guide
Page 9
... clog the inlet valve. Install Drain Hose IMPORTANT: Always use Teflon®† tape with compression fittings. Slowly turn water shutoff valve to determine whether an air gap is required. Copper tubing only: Slide nut, then ferrule, about 1" (2.5 cm) onto copper tubing. NOTE: To avoid vibration during operation, route the water supply line so that the ³⁄₄" connection is a registered trademark of E.I. If needed, drill...
... clog the inlet valve. Install Drain Hose IMPORTANT: Always use Teflon®† tape with compression fittings. Slowly turn water shutoff valve to determine whether an air gap is required. Copper tubing only: Slide nut, then ferrule, about 1" (2.5 cm) onto copper tubing. NOTE: To avoid vibration during operation, route the water supply line so that the ³⁄₄" connection is a registered trademark of E.I. If needed, drill...
Installation Guide
Page 26
... use nearly 40% less energy than older models. Check that came with rinse aid for good drying results: This dishwasher is closed tightly and latched? ■ Has the cycle been set correctly to ensure exceptional cleaning. If none of a cycle.) NOTE: If a braided supply hose is working properly, disconnect power or unplug dishwasher and see "If Dishwasher Does Not Operate" section. Your new dishwasher will run longer to calibrate to complete the shortest wash cycle...
... use nearly 40% less energy than older models. Check that came with rinse aid for good drying results: This dishwasher is closed tightly and latched? ■ Has the cycle been set correctly to ensure exceptional cleaning. If none of a cycle.) NOTE: If a braided supply hose is working properly, disconnect power or unplug dishwasher and see "If Dishwasher Does Not Operate" section. Your new dishwasher will run longer to calibrate to complete the shortest wash cycle...


