User Instructions
Page 1
... if you and others are not followed. In Canada: visit www.kitchenaid.ca or call 1-800-807-6777. For your KitchenAid dishwasher, please contact us that can find your model and serial number on the label located near the door on your complete model and serial number ready. You can kill or hurt you don...
... if you and others are not followed. In Canada: visit www.kitchenaid.ca or call 1-800-807-6777. For your KitchenAid dishwasher, please contact us that can find your model and serial number on the label located near the door on your complete model and serial number ready. You can kill or hurt you don...
User Instructions
Page 4
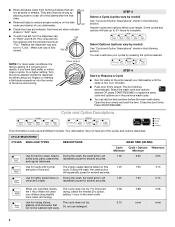
...rinsing dishes, This cycle does not dry. 0:15 glasses, and silverware that can customize your dishwasher until the water is based on the dish racks and interior of 2 will give good results.... WASH TIME (HH:MM) Cycle Cycle + Options *Maximum Minimum Minimum Use for several different models. Use for lightly soiled items or During the wash, the wash action will clean drying, select... your fingers or inserting a flat-blade screwdriver into the opening until the indicator level is fully locked. cycle. Use for loads with normal The energy-usage label is hot. When you...
...rinsing dishes, This cycle does not dry. 0:15 glasses, and silverware that can customize your dishwasher until the water is based on the dish racks and interior of 2 will give good results.... WASH TIME (HH:MM) Cycle Cycle + Options *Maximum Minimum Minimum Use for several different models. Use for lightly soiled items or During the wash, the wash action will clean drying, select... your fingers or inserting a flat-blade screwdriver into the opening until the indicator level is fully locked. cycle. Use for loads with normal The energy-usage label is hot. When you...
User Instructions
Page 9
... ready to run a rinse cycle with the partial load daily until a full load is turned on the kitchen counter (built-in models) Is the dishwasher aligned with concave bottoms hold water. Be sure the filters are difficult to dry because they have a porous surface which tends to ...try the solutions suggested here or visit our website and reference FAQs (Frequently Asked Questions) to the cycle. In the U.S.A., www.kitchenaid.com In Canada, www.kitchenaid.ca ■ Dishwasher does not run too long Try 1 hour wash. If lights other items when unloading. ■ Unload the bottom rack first...
... ready to run a rinse cycle with the partial load daily until a full load is turned on the kitchen counter (built-in models) Is the dishwasher aligned with concave bottoms hold water. Be sure the filters are difficult to dry because they have a porous surface which tends to ...try the solutions suggested here or visit our website and reference FAQs (Frequently Asked Questions) to the cycle. In the U.S.A., www.kitchenaid.com In Canada, www.kitchenaid.ca ■ Dishwasher does not run too long Try 1 hour wash. If lights other items when unloading. ■ Unload the bottom rack first...
User Instructions
Page 11
...BE PRODUCT REPAIR AS PROVIDED HEREIN. Any food or medicine loss due to correct defects in accordance with KitchenAid's published installation instructions. 11. KITCHENAID® DISHWASHER WARRANTY LIMITED WARRANTY For one year from the date of purchase, when this major appliance is operated ...appliance, unless such damage results from defects in accordance with the product, KitchenAid will pay for factory specified parts for the following component to you on major appliances with original model/serial numbers that existed when this major appliance was purchased: stainless steel tub...
...BE PRODUCT REPAIR AS PROVIDED HEREIN. Any food or medicine loss due to correct defects in accordance with KitchenAid's published installation instructions. 11. KITCHENAID® DISHWASHER WARRANTY LIMITED WARRANTY For one year from the date of purchase, when this major appliance is operated ...appliance, unless such damage results from defects in accordance with the product, KitchenAid will pay for factory specified parts for the following component to you on major appliances with original model/serial numbers that existed when this major appliance was purchased: stainless steel tub...

User Instructions
Page 12
... ® Registered Trademark/TM Trademark of the dishwasher interior. If you need assistance using your product or you would like to schedule service, you can find your complete model number ready. visit: www.kitchenaid.com In Canada visit: www.kitchenaid.ca If you do not have access to ... a daytime phone number in the U.S.A., call 1-800-807-6777. Have your model and serial number on the label located near the door on the right-hand or left-hand side of KitchenAid, U.S.A., KitchenAid Canada licensee in Canada 11/08 Printed in U.S.A. For additional product information or ...
... ® Registered Trademark/TM Trademark of the dishwasher interior. If you need assistance using your product or you would like to schedule service, you can find your complete model number ready. visit: www.kitchenaid.com In Canada visit: www.kitchenaid.ca If you do not have access to ... a daytime phone number in the U.S.A., call 1-800-807-6777. Have your model and serial number on the label located near the door on the right-hand or left-hand side of KitchenAid, U.S.A., KitchenAid Canada licensee in Canada 11/08 Printed in U.S.A. For additional product information or ...

Installation Instructions
Page 2
... Utilities 7 Prepare Cabinet Opening-New Utilities 7 Prepare and Route Water Line 8 Install Drain Hose 9 Install Moisture Barrier (on some models 10 Prepare Dishwasher 11 Make Power Supply Cord Connection 12 Determine Cabinet Opening 13 Installation Instructions (cont.) Install the Door Handle (on some... models 14 Custom Panel Dimensions 14 Install Custom Panel - Remove shipping materials, drain hose and lower rack. Option 1 15...
... Utilities 7 Prepare Cabinet Opening-New Utilities 7 Prepare and Route Water Line 8 Install Drain Hose 9 Install Moisture Barrier (on some models 10 Prepare Dishwasher 11 Make Power Supply Cord Connection 12 Determine Cabinet Opening 13 Installation Instructions (cont.) Install the Door Handle (on some... models 14 Custom Panel Dimensions 14 Install Custom Panel - Remove shipping materials, drain hose and lower rack. Option 1 15...

Installation Instructions
Page 3
... and Company. †® TORX is a registered trademark of Acument Intellectual Properties, LLC. 3 Read and follow the instructions provided with top-venting models only: 2 #8x1-3/8" Torx® T15 screws 4 #10x3/8" hex-head screws Parts supplied: 2 - Check local codes. If parts are not... package. external threads (the other end must fit your household wiring to fit 7/8" (2.2 cm) hole For Power Supply Cord: use with dishwasher Additional parts supplied with any tools listed here. Check existing electrical supply. Drain hose clamps (1 large and 1 small) Drain hose 2 -...
... and Company. †® TORX is a registered trademark of Acument Intellectual Properties, LLC. 3 Read and follow the instructions provided with top-venting models only: 2 #8x1-3/8" Torx® T15 screws 4 #10x3/8" hex-head screws Parts supplied: 2 - Check local codes. If parts are not... package. external threads (the other end must fit your household wiring to fit 7/8" (2.2 cm) hole For Power Supply Cord: use with dishwasher Additional parts supplied with any tools listed here. Check existing electrical supply. Drain hose clamps (1 large and 1 small) Drain hose 2 -...

Installation Instructions
Page 5
.../.44"cm) (5.12"cm) 5 NOTE: Shaded area of cabinet walls show where utility connections may be reduced to 33 7/8" (86 cm) by removing wheels from dishwasher. **Minimum, measured from the lowest point on all models) (532.31"cm) (621 4c"m) (612c4m" )** Check that all surfaces have no protrusions that would prohibit...
.../.44"cm) (5.12"cm) 5 NOTE: Shaded area of cabinet walls show where utility connections may be reduced to 33 7/8" (86 cm) by removing wheels from dishwasher. **Minimum, measured from the lowest point on all models) (532.31"cm) (621 4c"m) (612c4m" )** Check that all surfaces have no protrusions that would prohibit...

Installation Instructions
Page 10
... nose pliers to waste tee with air gap No waste disposer - with a large silver drain hose clamp (provided). Install Moisture Barrier (on some models) Install moisture barrier (on some models) Moisture barrier 1. Use pliers to 5 cm) screw-type clamp (not provided). 3 3. If the drain hose was cut, use a 1 1/2" to 2"(3.8 to waste tee...
... nose pliers to waste tee with air gap No waste disposer - with a large silver drain hose clamp (provided). Install Moisture Barrier (on some models) Install moisture barrier (on some models) Moisture barrier 1. Use pliers to 5 cm) screw-type clamp (not provided). 3 3. If the drain hose was cut, use a 1 1/2" to 2"(3.8 to waste tee...

Installation Instructions
Page 14
... Allen wrench from the cardboard box. NOTE: Shims must be securely attached to floor to 34" (86.4 cm) below the countertop. Dishwashers with Installation Instructions. 3 Built-up Floors-Add shims as needed (410".1 cm) (52c"m) 2-3(/74c"m) Built-up floors (Kitchen floor height is ...the Allen wrench into cabinet opening .) Example: Kitchen floor tile does not extend into the setscrews. Retain Allen wrench with control panel on some models) Install door handle Mounting stud Handle Setscrew (in use. Not recommended for toe kicks greater than 6" (15.2 cm). If the installation needs...
... Allen wrench from the cardboard box. NOTE: Shims must be securely attached to floor to 34" (86.4 cm) below the countertop. Dishwashers with Installation Instructions. 3 Built-up Floors-Add shims as needed (410".1 cm) (52c"m) 2-3(/74c"m) Built-up floors (Kitchen floor height is ...the Allen wrench into cabinet opening .) Example: Kitchen floor tile does not extend into the setscrews. Retain Allen wrench with control panel on some models) Install door handle Mounting stud Handle Setscrew (in use. Not recommended for toe kicks greater than 6" (15.2 cm). If the installation needs...

Installation Instructions
Page 15
... kick, adjust the height of the customer-supplied custom panel as shown; align holes. 15 Option 1 (Models KUDS40FVPA, KUDS50FVPA, KUDE60FVPA, and KUDE70FVPA) NOTE: The handle for reinstallation. 2 Dishwashers with control panel on top custom panel dimensions 3 screws per side outer panel Gently set outer panel aside.... Dishwashers with the panel. IMPORTANT: If the handle is for the screws heads to be made to the KitchenAid Catalog, visit www.kitchenaid.com, or call 1-800-422-1230. It is attached to obtain ...
... kick, adjust the height of the customer-supplied custom panel as shown; align holes. 15 Option 1 (Models KUDS40FVPA, KUDS50FVPA, KUDE60FVPA, and KUDE70FVPA) NOTE: The handle for reinstallation. 2 Dishwashers with control panel on top custom panel dimensions 3 screws per side outer panel Gently set outer panel aside.... Dishwashers with the panel. IMPORTANT: If the handle is for the screws heads to be made to the KitchenAid Catalog, visit www.kitchenaid.com, or call 1-800-422-1230. It is attached to obtain ...

Installation Instructions
Page 16
...will hold the outer panel up while removing the screws. To order, call customer service at 1-800-444-1230. Not recommended for frameless custom panel models with a 4" (10.2 cm) console only. 1 Custom panel installation - NOTE: These dimensions are available. hold the panel assembly in the top... 23 3/8" (65.8 cm) *25 29/32" (65.8 cm) Align top edges Customer-supplied panel Drill through the holes in Step 6. Dishwashers with the top of the panel to attach custom panels. If the installation needs a higher toe kick, adjust the height of the precise dimensions ...
...will hold the outer panel up while removing the screws. To order, call customer service at 1-800-444-1230. Not recommended for frameless custom panel models with a 4" (10.2 cm) console only. 1 Custom panel installation - NOTE: These dimensions are available. hold the panel assembly in the top... 23 3/8" (65.8 cm) *25 29/32" (65.8 cm) Align top edges Customer-supplied panel Drill through the holes in Step 6. Dishwashers with the top of the panel to attach custom panels. If the installation needs a higher toe kick, adjust the height of the precise dimensions ...

Installation Instructions
Page 24
Visit www.kitchenaid.com/anchoring under FAQ tab. Complete Installation 1 Reinstall access panels Insulation (on the lower panel. 2 Reinstall access panels If securing with a side attachment, check that sides of door do , dishwasher must fall behind the access panel. Reinstall the lower ... for animated representation of this step. Position the lower panel behind the insulation on some models there is properly centered, replace plastic buttons. 7 Remove towel and replace lower dishwasher rack Hold the two panels together and place them against the screw heads. Using a ...
Visit www.kitchenaid.com/anchoring under FAQ tab. Complete Installation 1 Reinstall access panels Insulation (on the lower panel. 2 Reinstall access panels If securing with a side attachment, check that sides of door do , dishwasher must fall behind the access panel. Reinstall the lower ... for animated representation of this step. Position the lower panel behind the insulation on some models there is properly centered, replace plastic buttons. 7 Remove towel and replace lower dishwasher rack Hold the two panels together and place them against the screw heads. Using a ...

Installation Instructions
Page 25
Do not use an adapter. Check that there is water in the bottom of dishwasher tub. If none of a cycle.) 25 Certain models are equipped with your dishwasher washes longer to possibly avoid the cost of rinse aid for good drying performance and controlling hard water deposit...After the first 2 minutes unlatch door, wait 5 seconds, then open door. Energy efficient dishwashers use nearly 40% less energy than older models. Rinse Aid is necessary for good drying results: This dishwasher is not working properly. Check that you press it to optical sensor. Additional Tips Expect ...
Do not use an adapter. Check that there is water in the bottom of dishwasher tub. If none of a cycle.) 25 Certain models are equipped with your dishwasher washes longer to possibly avoid the cost of rinse aid for good drying performance and controlling hard water deposit...After the first 2 minutes unlatch door, wait 5 seconds, then open door. Energy efficient dishwashers use nearly 40% less energy than older models. Rinse Aid is necessary for good drying results: This dishwasher is not working properly. Check that you press it to optical sensor. Additional Tips Expect ...

Parts Diagram
Page 1
... White W10021850 Stainless 17 2004333 Nut 18 8269016 Clip, Grounding 02−09 Litho in U.S.A. (LL) (eeb)(bay) 1 Part No. DOOR AND PANEL PARTS For Models: KUDE60FVBL0, KUDE60FVWH0, KUDE60FVSS0 (Black) (White) (Stainless) UNDERCOUNTER DISHWASHER Illus.
... White W10021850 Stainless 17 2004333 Nut 18 8269016 Clip, Grounding 02−09 Litho in U.S.A. (LL) (eeb)(bay) 1 Part No. DOOR AND PANEL PARTS For Models: KUDE60FVBL0, KUDE60FVWH0, KUDE60FVSS0 (Black) (White) (Stainless) UNDERCOUNTER DISHWASHER Illus.

Parts Diagram
Page 2
Part No. No. DESCRIPTION 1 Console Assembly (Includes Insert) W10208736 Black W10208737 White W10208738 Stainless 2 8546546 Clip, Bi−Metal 3 661663 Bi−Metal 4 3369051 Screw 5 W10077360 Latch Assembly 6 W10056352 Control, Electronic 7 W10134019 Switch, Door 8 W10083167 Fuse, In−Line 2 W10246594 CONTROL PANEL PARTS For Models: KUDE60FVBL0, KUDE60FVWH0, KUDE60FVSS0 (Black) (White) (Stainless) Illus.
Part No. No. DESCRIPTION 1 Console Assembly (Includes Insert) W10208736 Black W10208737 White W10208738 Stainless 2 8546546 Clip, Bi−Metal 3 661663 Bi−Metal 4 3369051 Screw 5 W10077360 Latch Assembly 6 W10056352 Control, Electronic 7 W10134019 Switch, Door 8 W10083167 Fuse, In−Line 2 W10246594 CONTROL PANEL PARTS For Models: KUDE60FVBL0, KUDE60FVWH0, KUDE60FVSS0 (Black) (White) (Stainless) Illus.

Parts Diagram
Page 3
.... DESCRIPTION 6 8269259 Gasket, Vent 7 W10077877 Deflector, Vent (Also Order Item 6) 8 W10077882 Dispenser, Assembly 9 W10077881 Knob, Rinse Aid Illus. No. No. DOOR AND LATCH PARTS For Models: KUDE60FVBL0, KUDE60FVWH0, KUDE60FVSS0 (Black) (White) (Stainless) Illus.
.... DESCRIPTION 6 8269259 Gasket, Vent 7 W10077877 Deflector, Vent (Also Order Item 6) 8 W10077882 Dispenser, Assembly 9 W10077881 Knob, Rinse Aid Illus. No. No. DOOR AND LATCH PARTS For Models: KUDE60FVBL0, KUDE60FVWH0, KUDE60FVSS0 (Black) (White) (Stainless) Illus.

Parts Diagram
Page 4
... Assembly 14 8269297 Miscellaneous Parts Bag 15 356138 Clamp, Hose 16 W10193583 Drain Loop with Check Valve Assembly 4 W10246594 FILL, DRAIN AND OVERFILL PARTS For Models: KUDE60FVBL0, KUDE60FVWH0, KUDE60FVSS0 (Black) (White) (Stainless) Illus.
... Assembly 14 8269297 Miscellaneous Parts Bag 15 356138 Clamp, Hose 16 W10193583 Drain Loop with Check Valve Assembly 4 W10246594 FILL, DRAIN AND OVERFILL PARTS For Models: KUDE60FVBL0, KUDE60FVWH0, KUDE60FVSS0 (Black) (White) (Stainless) Illus.

Parts Diagram
Page 5
TUB AND FRAME PARTS For Models: KUDE60FVBL0, KUDE60FVWH0, KUDE60FVSS0 (Black) (White) (Stainless) W10246594 5
TUB AND FRAME PARTS For Models: KUDE60FVBL0, KUDE60FVWH0, KUDE60FVSS0 (Black) (White) (Stainless) W10246594 5

Parts Diagram
Page 6
... Insulator, Sound 23 304666 Retainer, Push 24 8573239 Shield, Sound Tub 25 9742648 Bracket, Thermostat 26 661566 Thermostat 6 W10246594 No. TUB AND FRAME PARTS For Models: KUDE60FVBL0, KUDE60FVWH0, KUDE60FVSS0 (Black) (White) (Stainless) Illus. Part No.
... Insulator, Sound 23 304666 Retainer, Push 24 8573239 Shield, Sound Tub 25 9742648 Bracket, Thermostat 26 661566 Thermostat 6 W10246594 No. TUB AND FRAME PARTS For Models: KUDE60FVBL0, KUDE60FVWH0, KUDE60FVSS0 (Black) (White) (Stainless) Illus. Part No.


