
Use & Care Guide
Page 16
... Extremely hard water mineral deposits can affect drying. (See specific loading instructions within this guide.) Glasses and cups with the Heat Dry option turned off. If a water softener is not installed, the following steps may not be necessary. The dishwasher may help: Use a commercial... , or use a high-quality, fresh detergent. Always use the Top Rack Only option (on ). In the U.S.A., www.kitchenaid.com In Canada, www.kitchenaid.ca PROBLEM SOLUTION DISHWASHER DOES NOT RUN NOTE: It is blinking, close to call . Be sure you will encounter cycles that...
... Extremely hard water mineral deposits can affect drying. (See specific loading instructions within this guide.) Glasses and cups with the Heat Dry option turned off. If a water softener is not installed, the following steps may not be necessary. The dishwasher may help: Use a commercial... , or use a high-quality, fresh detergent. Always use the Top Rack Only option (on ). In the U.S.A., www.kitchenaid.com In Canada, www.kitchenaid.ca PROBLEM SOLUTION DISHWASHER DOES NOT RUN NOTE: It is blinking, close to call . Be sure you will encounter cycles that...

Use & Care Guide
Page 17
...Dishwasher Use" section. Adjust the amount of detergent. Remove all blink together to 120ºF (49ºC). If the cloudiness disappears, it is properly installed. Run a normal cycle with a pause in the final rinse, or the temperature for drying and to match the water hardness, stop pre-washing,...detergent for service. Set your water heater is set at the end of the cycle. ■ Improper installation will not come from using the High Temp and Sani Rinse options. In this guide.) Blinking LED's will blink 4 times in a row with the Heat Dry option turned off. Suds ...
...Dishwasher Use" section. Adjust the amount of detergent. Remove all blink together to 120ºF (49ºC). If the cloudiness disappears, it is properly installed. Run a normal cycle with a pause in the final rinse, or the temperature for drying and to match the water hardness, stop pre-washing,...detergent for service. Set your water heater is set at the end of the cycle. ■ Improper installation will not come from using the High Temp and Sani Rinse options. In this guide.) Blinking LED's will blink 4 times in a row with the Heat Dry option turned off. Suds ...

Use & Care Guide
Page 18
... accident, alteration, misuse, abuse, fire, flood, acts of the Use & Care Guide. Some states and provinces do not allow limitations on major appliances with the product, KitchenAid brand of purchase, when this major appliance is not installed in accordance with the product, KitchenAid will pay for factory specified parts and repair labor for product...
... accident, alteration, misuse, abuse, fire, flood, acts of the Use & Care Guide. Some states and provinces do not allow limitations on major appliances with the product, KitchenAid brand of purchase, when this major appliance is not installed in accordance with the product, KitchenAid will pay for factory specified parts and repair labor for product...
Installation Guide
Page 3
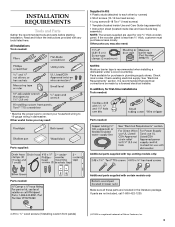
...connections be the proper size to connect your household wiring to each other by a licensed electrical installer. Check local codes. See "Electrical Requirements" section. In addition, for first-time installations Tools needed: * Must be made by runners) 4 Short screws (10-16 hex head screw...) 4 Long screws (8-18 Torx®† ) head screws) 1 Template (located inside Use and Care Guide bag assembly) 1 Instruction sheet (located inside Use and Care Guide bag assembly) ...
...connections be the proper size to connect your household wiring to each other by a licensed electrical installer. Check local codes. See "Electrical Requirements" section. In addition, for first-time installations Tools needed: * Must be made by runners) 4 Short screws (10-16 hex head screw...) 4 Long screws (8-18 Torx®† ) head screws) 1 Template (located inside Use and Care Guide bag assembly) 1 Instruction sheet (located inside Use and Care Guide bag assembly) ...
Installation Guide
Page 18
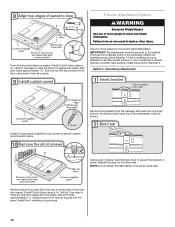
.... Attach the brackets using hole in liner as a guide into the open slots on either side of pliers, bend the tab down to secure custom wood panel in the parts bag. Using a pair of the inner door panel. Install 2 long screws supplied in top corners to secure the... holes using a drill bit. There are two brackets found in place. If your countertop is wood, laminate or another hard surface, install using the door liner hole as a guide. Remove the short screws (3rd from the package and insert into the panel. Predrill 2 pilot holes using a drill bit. Drill ...
.... Attach the brackets using hole in liner as a guide into the open slots on either side of pliers, bend the tab down to secure custom wood panel in the parts bag. Using a pair of the inner door panel. Install 2 long screws supplied in top corners to secure the... holes using a drill bit. There are two brackets found in place. If your countertop is wood, laminate or another hard surface, install using the door liner hole as a guide. Remove the short screws (3rd from the package and insert into the panel. Predrill 2 pilot holes using a drill bit. Drill ...


