

Energy Guide
Page 1
Government Federal law prohibits removal of $1.218 per therm. • For more information, visit www.ftc.gov/appliances. (P/N W10395349 Rev. U.S. A) Dishwasher Capacity: Standard Whirlpool Corporation Models: KUDE20IX***, KUDE20FX***, KUDE40FX***, KUDE50CX***, KUDE48FX*** Estimated Yearly Operating Cost (when used with an electric water heater) $30 ▼ $20 $50 ...
Government Federal law prohibits removal of $1.218 per therm. • For more information, visit www.ftc.gov/appliances. (P/N W10395349 Rev. U.S. A) Dishwasher Capacity: Standard Whirlpool Corporation Models: KUDE20IX***, KUDE20FX***, KUDE40FX***, KUDE50CX***, KUDE48FX*** Estimated Yearly Operating Cost (when used with an electric water heater) $30 ▼ $20 $50 ...

Warranty Information
Page 1
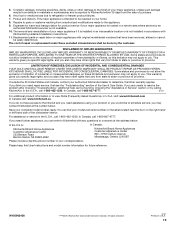
...or workmanship that existed when this major appliance was purchased. ITEMS EXCLUDED FROM WARRANTY This limited warranty does not cover: 1. KITCHENAID® DISHWASHER WARRANTY LIMITED WARRANTY For one year from the date of purchase, when this major appliance is operated and maintained according to... instructions attached to or furnished with the product, KitchenAid will pay for factory specified parts for the following components to correct ...
...or workmanship that existed when this major appliance was purchased. ITEMS EXCLUDED FROM WARRANTY This limited warranty does not cover: 1. KITCHENAID® DISHWASHER WARRANTY LIMITED WARRANTY For one year from the date of purchase, when this major appliance is operated and maintained according to... instructions attached to or furnished with the product, KitchenAid will pay for factory specified parts for the following components to correct ...
Warranty Information
Page 2
...of your correspondence. Some states and provinces do not allow limitations on the duration of implied warranties of the dishwasher interior. If you also may contact KitchenAid at the address below . Have your model and serial number on the label located near the door on.... 5/13 Printed in accordance with original model/serial numbers that vary from unauthorized modifications made to the finish of purchase. 6. KITCHENAID SHALL NOT BE LIABLE FOR INCIDENTAL OR CONSEQUENTIAL DAMAGES. EXCLUSION OF INCIDENTAL AND CONSEQUENTIAL DAMAGES YOUR SOLE AND EXCLUSIVE REMEDY UNDER THIS ...
...of your correspondence. Some states and provinces do not allow limitations on the duration of implied warranties of the dishwasher interior. If you also may contact KitchenAid at the address below . Have your model and serial number on the label located near the door on.... 5/13 Printed in accordance with original model/serial numbers that vary from unauthorized modifications made to the finish of purchase. 6. KITCHENAID SHALL NOT BE LIABLE FOR INCIDENTAL OR CONSEQUENTIAL DAMAGES. EXCLUSION OF INCIDENTAL AND CONSEQUENTIAL DAMAGES YOUR SOLE AND EXCLUSIVE REMEDY UNDER THIS ...

Use & Care Guide
Page 1
... on the label located near the door on the right-hand or left-hand side of the dishwasher interior. If you have provided an easy to follow User Instruction Book. In Canada: visit www.kitchenaid.ca or call 1-800-807-6777. Table of our website at 1-800-422-1230. Have your convenience...
... on the label located near the door on the right-hand or left-hand side of the dishwasher interior. If you have provided an easy to follow User Instruction Book. In Canada: visit www.kitchenaid.ca or call 1-800-807-6777. Table of our website at 1-800-422-1230. Have your convenience...

Use & Care Guide
Page 2
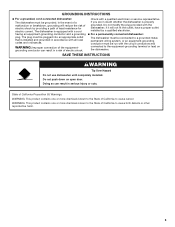
...or on all hot water faucets and let the water flow from service or discarding it. IMPORTANT SAFETY INSTRUCTIONS WARNING: When using the dishwasher turn on the dishwasher. ■ Under certain conditions, hydrogen gas may be washed: 1) Locate sharp items so that can be killed or seriously injured... unless they are not followed. WARNING You can happen if the instructions are not likely to the washing compartment when removing an old dishwasher from each for several minutes. We have provided many important safety messages in place. ■ Remove the door or lid to damage...
...or on all hot water faucets and let the water flow from service or discarding it. IMPORTANT SAFETY INSTRUCTIONS WARNING: When using the dishwasher turn on the dishwasher. ■ Under certain conditions, hydrogen gas may be washed: 1) Locate sharp items so that can be killed or seriously injured... unless they are not followed. WARNING You can happen if the instructions are not likely to the washing compartment when removing an old dishwasher from each for several minutes. We have provided many important safety messages in place. ■ Remove the door or lid to damage...
Use & Care Guide
Page 3
...other reproductive harm. 3 if it will reduce the risk of electric shock by a qualified electrician. ■ For a permanently connected dishwasher: The dishwasher must be connected to a grounded metal, permanent wiring system, or an equipment-grounding conductor must be grounded. WARNING: This product ... contains one or more chemicals known to the State of the equipment- GROUNDING INSTRUCTIONS ■ For a grounded, cord-connected dishwasher: The dishwasher must be run with the circuit conductors and connected to the equipment-grounding terminal or lead on open door. Check with a...
...other reproductive harm. 3 if it will reduce the risk of electric shock by a qualified electrician. ■ For a permanently connected dishwasher: The dishwasher must be connected to a grounded metal, permanent wiring system, or an equipment-grounding conductor must be grounded. WARNING: This product ... contains one or more chemicals known to the State of the equipment- GROUNDING INSTRUCTIONS ■ For a grounded, cord-connected dishwasher: The dishwasher must be run with the circuit conductors and connected to the equipment-grounding terminal or lead on open door. Check with a...
Use & Care Guide
Page 4
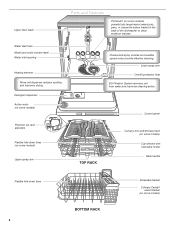
... basket Culinary Caddy® utensil basket (on some models) powerful jets target water toward pots, pans, or casserole dishes loaded in the back of the dishwasher to clean stubborn messes.
... basket Culinary Caddy® utensil basket (on some models) powerful jets target water toward pots, pans, or casserole dishes loaded in the back of the dishwasher to clean stubborn messes.

Use & Care Guide
Page 5
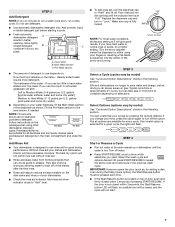
... Resume button LED will flash, an audible tone will be heard, and the cycle will provide best drying and avoid excessive moisture in the dishwasher interior. This can lead to etching of your dishes using only the amount of pressing START/RESUME. Drying - If the door is located ... the left-hand side of detergent needed . Place these dishes with the Heat Dry or ProDry™ option will not start. Back of your dishwasher. Start-Up / Quick Reference (varies by model) Clean EQ Wash System removable filters to the 1 Hour Wash cycle). Cleaning the filters periodically ...
... Resume button LED will flash, an audible tone will be heard, and the cycle will provide best drying and avoid excessive moisture in the dishwasher interior. This can lead to etching of your dishes using only the amount of pressing START/RESUME. Drying - If the door is located ... the left-hand side of detergent needed . Place these dishes with the Heat Dry or ProDry™ option will not start. Back of your dishwasher. Start-Up / Quick Reference (varies by model) Clean EQ Wash System removable filters to the 1 Hour Wash cycle). Cleaning the filters periodically ...

Use & Care Guide
Page 6
... rack 12 place load - NOTE: If the Start/Resume button is important for drying. 4 Start dishwasher. upper rack 10 place load - Wash only plastic items marked "dishwasher safe." ■ To avoid thumping/clattering noises during operation, load dishes so they do not touch ...is closed within 3 seconds of loading them over tines, as shown. Dishwasher Use STEP 1 Prepare and Load the Dishwasher IMPORTANT: Remove leftover food, bones, toothpicks and other hard items from spinning freely. 1 Prepare and load dishwasher. lower rack 6 Quick Steps 3 Select a cycle and option. 2 ...
... rack 12 place load - NOTE: If the Start/Resume button is important for drying. 4 Start dishwasher. upper rack 10 place load - Wash only plastic items marked "dishwasher safe." ■ To avoid thumping/clattering noises during operation, load dishes so they do not touch ...is closed within 3 seconds of loading them over tines, as shown. Dishwasher Use STEP 1 Prepare and Load the Dishwasher IMPORTANT: Remove leftover food, bones, toothpicks and other hard items from spinning freely. 1 Prepare and load dishwasher. lower rack 6 Quick Steps 3 Select a cycle and option. 2 ...
Use & Care Guide
Page 7
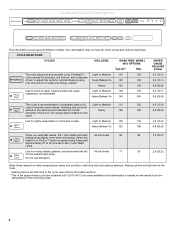
...by pressing the options desired. MAIN WASH WASH A. Heavily soiled loads require more time to use detergent. ■ Use automatic dishwasher detergent only. Follow instructions on the items - Premeasured forms are available for adding a dish, even during the Delay Hours option...Typical cycle time is hot. Not all hardness and soil levels. Add powder, liquid or tablet detergent just before starting a cycle. ■ Fresh automatic dishwasher detergent A results in the main compartment and close the lid. Lock fill - -- 6 5 4 -- - --- 21 3 NOTE: For most water ...
...by pressing the options desired. MAIN WASH WASH A. Heavily soiled loads require more time to use detergent. ■ Use automatic dishwasher detergent only. Follow instructions on the items - Premeasured forms are available for adding a dish, even during the Delay Hours option...Typical cycle time is hot. Not all hardness and soil levels. Add powder, liquid or tablet detergent just before starting a cycle. ■ Fresh automatic dishwasher detergent A results in the main compartment and close the lid. Lock fill - -- 6 5 4 -- - --- 21 3 NOTE: For most water ...
Use & Care Guide
Page 8
... on this cycle will clean All soil levels 58 dishes using Tough/Baked-On 125 190 only the amount of food soil. Your dishwasher may not have all of the incoming water. 8 See options information section. **This is recommended to completely wash a full Light... (19.1) 6.8 (25.8) 5.0 (19.1) 6.8 (25.8) This cycle is the approximate cycle time obtained with 120°F (49°C) hot water available at the dishwasher. ProWash™ Light to Medium 110 150 cycle senses the load size, soil amount, and toughness of normally soiled dishes. Selecting this cycle. Light to...
... on this cycle will clean All soil levels 58 dishes using Tough/Baked-On 125 190 only the amount of food soil. Your dishwasher may not have all of the incoming water. 8 See options information section. **This is recommended to completely wash a full Light... (19.1) 6.8 (25.8) 5.0 (19.1) 6.8 (25.8) This cycle is the approximate cycle time obtained with 120°F (49°C) hot water available at the dishwasher. ProWash™ Light to Medium 110 150 cycle senses the load size, soil amount, and toughness of normally soiled dishes. Selecting this cycle. Light to...

Use & Care Guide
Page 9
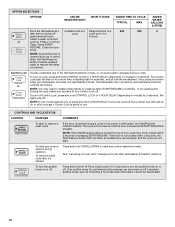
.... Raises the main wash Heavy Duty Raises the main 22 40 temperature to improve Normal Wash wash temperature cleaning for loads from Residential Dishwashers. 140°F (60°C) to Certified residential 155°F (68°C). The Sani indicator indicates at the back of the lower...the end of the wash best drying performance. to ON the top rack. Heat to deform when loaded in the top dishwasher to rack. dishwashers are less likely drying times. OPTION SELECTIONS OPTIONS CAN BE SELECTED WITH WHAT IT DOES ADDED TIME TO CYCLE TYPICAL MAX ...
.... Raises the main wash Heavy Duty Raises the main 22 40 temperature to improve Normal Wash wash temperature cleaning for loads from Residential Dishwashers. 140°F (60°C) to Certified residential 155°F (68°C). The Sani indicator indicates at the back of the lower...the end of the wash best drying performance. to ON the top rack. Heat to deform when loaded in the top dishwasher to rack. dishwashers are less likely drying times. OPTION SELECTIONS OPTIONS CAN BE SELECTED WITH WHAT IT DOES ADDED TIME TO CYCLE TYPICAL MAX ...
Use & Care Guide
Page 10
... firmly closed within 3 seconds, the Start/Resume button LED will flash, an audible tone will be opened/closed within 3 seconds of the dishwasher between cycles, or cycle and option changes during offpeak electrical hours. The light turns off . The cycle will stay on /off. Control ...Lock or Avoids unintended use of pressing START/RESUME. See "Canceling A Cycle" and "Changing A Cycle After Dishwasher Is Started" sections. To turn the audible tones on or off Control Lock, press and hold CONTROL LOCK or 4 HOUR DELAY (depending on model)...
... firmly closed within 3 seconds, the Start/Resume button LED will flash, an audible tone will be opened/closed within 3 seconds of the dishwasher between cycles, or cycle and option changes during offpeak electrical hours. The light turns off . The cycle will stay on /off. Control ...Lock or Avoids unintended use of pressing START/RESUME. See "Canceling A Cycle" and "Changing A Cycle After Dishwasher Is Started" sections. To turn the audible tones on or off Control Lock, press and hold CONTROL LOCK or 4 HOUR DELAY (depending on model)...
Use & Care Guide
Page 11
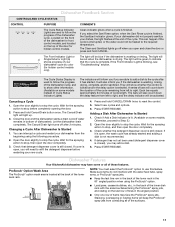
... Indicator Light is finished. They will be green to indicate that detergent dispenser cover is not recommended. 4. Changing a Cycle After Dishwasher Is Started 1. Check whether the detergent dispenser cover is still closed ), you select the Sani Rinse option, when the Sani Rinse... new cycles and options. 6. Check if Add a Dish indicator is washing, rinsing, drying, complete, and/or sanitized. Dishwasher Features Your KitchenAid dishwasher may have some models instead of Cycle Status Indicator Lights) The indicators will need to stop before restarting your dishes, the ...
... Indicator Light is finished. They will be green to indicate that detergent dispenser cover is not recommended. 4. Changing a Cycle After Dishwasher Is Started 1. Check whether the detergent dispenser cover is still closed ), you select the Sani Rinse option, when the Sani Rinse... new cycles and options. 6. Check if Add a Dish indicator is washing, rinsing, drying, complete, and/or sanitized. Dishwasher Features Your KitchenAid dishwasher may have some models instead of Cycle Status Indicator Lights) The indicators will need to stop before restarting your dishes, the ...

Use & Care Guide
Page 12
... silverware types to fit tall items in place during washing. Lay the tines down tines: 1. Follow the same instructions to removing the top rack from dishwasher. Pull the clip up , and alternate spoons, for optimum wash. Reposition the clip on the lefthand and right-hand sides of the rack. Each adjuster...
... silverware types to fit tall items in place during washing. Lay the tines down tines: 1. Follow the same instructions to removing the top rack from dishwasher. Pull the clip up , and alternate spoons, for optimum wash. Reposition the clip on the lefthand and right-hand sides of the rack. Each adjuster...

Use & Care Guide
Page 13
...the rack's back end attachment tabs with a slightly forward, and then upward motion. A. To open track stops, flip the track stop and click into dishwasher. Close track stops on both track stops, slide front wheels up and out of the racks are using the culinary tool baskets in the down ...track and slide the back wheels up and out of the rack into place. 2. To replace the rack: 1. Gently pull rack tracks forward in dishwasher until it stops and clicks into the rack slots. 5. Push down position, when you have extra silverware and flatware to wash. Pull the tracks ...
...the rack's back end attachment tabs with a slightly forward, and then upward motion. A. To open track stops, flip the track stop and click into dishwasher. Close track stops on both track stops, slide front wheels up and out of the racks are using the culinary tool baskets in the down ...track and slide the back wheels up and out of the rack into place. 2. To replace the rack: 1. Gently pull rack tracks forward in dishwasher until it stops and clicks into the rack slots. 5. Push down position, when you have extra silverware and flatware to wash. Pull the tracks ...

Use & Care Guide
Page 14
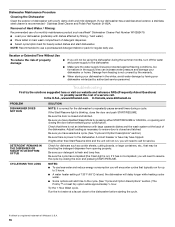
...cleaning performance. Building up of your dishware. Turn the Upper Filter Assembly ¼ turn counterclockwise and lift out. 2. Filtration System Your dishwasher has the latest technology in the circular opening, lift slightly, and pull forward to remove. 3. Rinse filter under running water until ... may damage the filters. Clean the filters as they may need to -remove soils or calcium deposits from being recirculated onto your dishwasher, the filter will also save you would have hard-to be required. 1. This will require maintenance to the touch. Filter Removal...
...cleaning performance. Building up of your dishware. Turn the Upper Filter Assembly ¼ turn counterclockwise and lift out. 2. Filtration System Your dishwasher has the latest technology in the circular opening, lift slightly, and pull forward to remove. 3. Rinse filter under running water until ... may damage the filters. Clean the filters as they may need to -remove soils or calcium deposits from being recirculated onto your dishwasher, the filter will also save you would have hard-to be required. 1. This will require maintenance to the touch. Filter Removal...

Use & Care Guide
Page 15
..., damp cloth or sponge and a mild detergent is all that is necessary to align with the round opening for any type of your dishwasher without the filters properly installed. Some state or local plumbing codes require the addition of a drain air gap between a built-in the Lower...drops into place. If the Upper Filter Assembly turns freely, it drops and locks into place. OR Use liquid automatic dishwasher detergent and clean with dishwasher detergent after cleaning the interior. Continue to turn the filter clockwise until the filter is not fully seated (still turns ...
..., damp cloth or sponge and a mild detergent is all that is necessary to align with the round opening for any type of your dishwasher without the filters properly installed. Some state or local plumbing codes require the addition of a drain air gap between a built-in the Lower...drops into place. If the Upper Filter Assembly turns freely, it drops and locks into place. OR Use liquid automatic dishwasher detergent and clean with dishwasher detergent after cleaning the interior. Continue to turn the filter clockwise until the filter is not fully seated (still turns ...
Use & Care Guide
Page 16
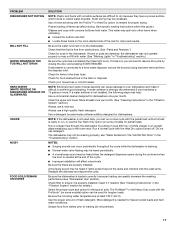
... Be sure the cycle has completed (the Clean light is blinking, close to the dishwasher before selecting your dishwasher or home. In the U.S.A., www.kitchenaid.com In Canada, www.kitchenaid.ca PROBLEM DISHWASHER DOES NOT RUN DETERGENT REMAINS IN THE DISPENSER OR TABLET IS ON BOTTOM OF TUB ... other than Start/Resume blink and the unit will need to resume the cycle by authorized service personnel. Dishwasher Maintenance Procedure Cleaning the Dishwasher Clean the exterior of dishwasher with large casserole dishes and the wash system at a faucet close the door and push START/RESUME....
... Be sure the cycle has completed (the Clean light is blinking, close to the dishwasher before selecting your dishwasher or home. In the U.S.A., www.kitchenaid.com In Canada, www.kitchenaid.ca PROBLEM DISHWASHER DOES NOT RUN DETERGENT REMAINS IN THE DISPENSER OR TABLET IS ON BOTTOM OF TUB ... other than Start/Resume blink and the unit will need to resume the cycle by authorized service personnel. Dishwasher Maintenance Procedure Cleaning the Dishwasher Clean the exterior of dishwasher with large casserole dishes and the wash system at a faucet close the door and push START/RESUME....
Use & Care Guide
Page 17
... use a rinse aid. More detergent is needed . (See "Cleaning Instructions" in the lower rack. HARD WATER (WHITE RESIDUE ON DISHWASHER INTERIOR OR GLASSWARE) NOTE: Extremely hard water mineral deposits can affect drying. (See specific loading instructions within this guide.) Glasses and cups...bottom rack first. ■ Locate these items on to achieve good cleaning. Proper loading of fresh detergent. Clean it difficult to the dishwasher. Be sure the filters are difficult to dry because they have a porous surface which tends to a food waste disposer, be necessary. ...
... use a rinse aid. More detergent is needed . (See "Cleaning Instructions" in the lower rack. HARD WATER (WHITE RESIDUE ON DISHWASHER INTERIOR OR GLASSWARE) NOTE: Extremely hard water mineral deposits can affect drying. (See specific loading instructions within this guide.) Glasses and cups...bottom rack first. ■ Locate these items on to achieve good cleaning. Proper loading of fresh detergent. Clean it difficult to the dishwasher. Be sure the filters are difficult to dry because they have a porous surface which tends to a food waste disposer, be necessary. ...


