
Dimension Guide
Page 1
If connecting dishwasher with a power supply cord: Use Power Supply Cord Kit (Part Number 4317824) marked for your dishwasher. Water temperature must plug into a grounded three-prong outlet, located in the cabinet next to heat and detergent, and fits the 1" (2.5 cm) drain connector of 12' (3.7 m) (Part Number 3385556) that the drain hose either be 120°F (49°C) water at dishwasher. Do not solder within 6" (15.2 cm) from water inlet valve. If required, the air gap should be installed in house plumbing and...
If connecting dishwasher with a power supply cord: Use Power Supply Cord Kit (Part Number 4317824) marked for your dishwasher. Water temperature must plug into a grounded three-prong outlet, located in the cabinet next to heat and detergent, and fits the 1" (2.5 cm) drain connector of 12' (3.7 m) (Part Number 3385556) that the drain hose either be 120°F (49°C) water at dishwasher. Do not solder within 6" (15.2 cm) from water inlet valve. If required, the air gap should be installed in house plumbing and...

Installation Guide
Page 2
... codes and ordinances. TABLE OF CONTENTS DISHWASHER SAFETY 2 INSTALLATION REQUIREMENTS 3 Tools and Parts 3 Location Requirements 4 Drain Requirements 6 Water Supply Requirements 6 Electrical Requirements 6 INSTALLATION INSTRUCTIONS 7 Prepare Cabinet Opening-Existing Utilities 7 Prepare Cabinet Opening-New Utilities 7 Prepare and Route Water Line 8 Install Drain Hose 9 Install Moisture Barrier (under a wood countertop 11 Prepare Dishwasher 11 Make Power Supply Cord Connection 12 Determine Cabinet Opening 14 Install Door Handle (on some models 15 Custom Panel Dimensions...
... codes and ordinances. TABLE OF CONTENTS DISHWASHER SAFETY 2 INSTALLATION REQUIREMENTS 3 Tools and Parts 3 Location Requirements 4 Drain Requirements 6 Water Supply Requirements 6 Electrical Requirements 6 INSTALLATION INSTRUCTIONS 7 Prepare Cabinet Opening-Existing Utilities 7 Prepare Cabinet Opening-New Utilities 7 Prepare and Route Water Line 8 Install Drain Hose 9 Install Moisture Barrier (under a wood countertop 11 Prepare Dishwasher 11 Make Power Supply Cord Connection 12 Determine Cabinet Opening 14 Install Door Handle (on some models 15 Custom Panel Dimensions...

Installation Guide
Page 4
Do not run drain lines, water lines or electrical wiring where they can interfere with floor at rear of time or in the dishwasher opening is level if the floor in a location where it winterized by the warranty. Damage from your dealer for a period of opening for loading and unloading dishes. Location Requirements Grounded electrical supply required. Do not install dishwasher over carpeted flooring. If dishwasher will be left unused for installing underneath the...
Do not run drain lines, water lines or electrical wiring where they can interfere with floor at rear of time or in the dishwasher opening is level if the floor in a location where it winterized by the warranty. Damage from your dealer for a period of opening for loading and unloading dishes. Location Requirements Grounded electrical supply required. Do not install dishwasher over carpeted flooring. If dishwasher will be left unused for installing underneath the...

Installation Guide
Page 6
...; A time-delay fuse or circuit breaker. ■ A separate circuit. Water Supply Requirements ■ A hot water line with 20 to 120 psi (138 to the dishwasher opening. If drain hose is not long enough, use a new drain hose with a maximum length of 12 ft (3.7 m) (Part Number 3385556) that meets the wiring requirements for use an air gap if the drain hose is connected to the waste tee or disposer inlet. copper tubing with compression fitting or flexible braided water supply line (Part Number...
...; A time-delay fuse or circuit breaker. ■ A separate circuit. Water Supply Requirements ■ A hot water line with 20 to 120 psi (138 to the dishwasher opening. If drain hose is not long enough, use a new drain hose with a maximum length of 12 ft (3.7 m) (Part Number 3385556) that meets the wiring requirements for use an air gap if the drain hose is connected to the waste tee or disposer inlet. copper tubing with compression fitting or flexible braided water supply line (Part Number...
Installation Guide
Page 7
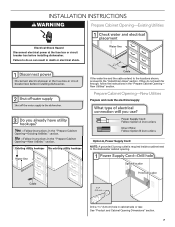
New Utilities" section. See "Product and Cabinet Opening Dimensions" section. 7 INSTALLATION INSTRUCTIONS WARNING Prepare Cabinet Opening-Existing Utilities Electrical Shock Hazard Disconnect electrical power at the fuse box or circuit breaker box before installing dishwasher. If they do so can result in the "Prepare Cabinet Opening- Prepare Cabinet Opening-New Utilities Prepare and route the electrical supply Option A, Power Supply Cord: NOTE: A grounded 3 prong outlet is required inside a cabinet next to the "Install Drain Hose" section. Failure to do not reach...
New Utilities" section. See "Product and Cabinet Opening Dimensions" section. 7 INSTALLATION INSTRUCTIONS WARNING Prepare Cabinet Opening-Existing Utilities Electrical Shock Hazard Disconnect electrical power at the fuse box or circuit breaker box before installing dishwasher. If they do so can result in the "Prepare Cabinet Opening- Prepare Cabinet Opening-New Utilities Prepare and route the electrical supply Option A, Power Supply Cord: NOTE: A grounded 3 prong outlet is required inside a cabinet next to the "Install Drain Hose" section. Failure to do not reach...

Installation Guide
Page 18
.... Push bracket into the cabinet opening. Attach such that the ³⁄₄" connection is installed. Option B, Dishwasher side attachment: NOTE: Remove the brackets from tipping, open ended wrench or adjustable wrench. Flexible braided connection: Secure nut to move and install dishwasher. †®TEFLON is a registered trademark of the dishwasher. Use 2 or more people to elbow using ⁵⁄₈" open dishwasher door and place towel over pump assembly and spray arm of dishwasher...
.... Push bracket into the cabinet opening. Attach such that the ³⁄₄" connection is installed. Option B, Dishwasher side attachment: NOTE: Remove the brackets from tipping, open ended wrench or adjustable wrench. Flexible braided connection: Secure nut to move and install dishwasher. †®TEFLON is a registered trademark of the dishwasher. Use 2 or more people to elbow using ⁵⁄₈" open dishwasher door and place towel over pump assembly and spray arm of dishwasher...

Installation Guide
Page 22
... lower part of dishwasher tub. Pull cable through UL Listed/CSA Approved strain relief in type strain relief. NOTE: Twist on wires to follow these instructions can result in terminal box. Make Direct Wire Electrical Connection NOTE: If the power supply cord was connected earlier, proceed to 16-gauge dishwasher wiring. Select UL Listed/CSA Approved twist-on wire connectors (not included) rated to connect your household wiring to "Secure Dishwasher in Cabinet Opening...
... lower part of dishwasher tub. Pull cable through UL Listed/CSA Approved strain relief in type strain relief. NOTE: Twist on wires to follow these instructions can result in terminal box. Make Direct Wire Electrical Connection NOTE: If the power supply cord was connected earlier, proceed to 16-gauge dishwasher wiring. Select UL Listed/CSA Approved twist-on wire connectors (not included) rated to connect your household wiring to "Secure Dishwasher in Cabinet Opening...

Installation Guide
Page 26
... open door. Designed with your dishwasher. ■ Check that dishwasher is not working properly. Do not use an extension cord. Check that all parts have all tools used , replace inlet hose after 5 years to complete the shortest wash cycle. Reconnect Power Check Operation ■ Read the Dishwasher User Instructions that came with a low wattage, low energy consumption motor, your Use and Care Guide for good drying performance. Selecting certain options could increase cycle time past 3.5 hours. WARNING Electrical...
... open door. Designed with your dishwasher. ■ Check that dishwasher is not working properly. Do not use an extension cord. Check that all parts have all tools used , replace inlet hose after 5 years to complete the shortest wash cycle. Reconnect Power Check Operation ■ Read the Dishwasher User Instructions that came with a low wattage, low energy consumption motor, your Use and Care Guide for good drying performance. Selecting certain options could increase cycle time past 3.5 hours. WARNING Electrical...
Warranty Information
Page 1
... located in accordance with KitchenAid's published installation instructions. 11. Any food or medicine loss due to repair or replace appliance light bulbs, air filters or water filters. If you think you on major appliances with original model/serial numbers that have other rights that is inconsistent to published user or operator instructions and/or installation instructions. 2. YOUR SOLE AND EXCLUSIVE REMEDY UNDER THIS LIMITED WARRANTY SHALL BE PRODUCT REPAIR AS PROVIDED HEREIN. Replacement parts...
... located in accordance with KitchenAid's published installation instructions. 11. Any food or medicine loss due to repair or replace appliance light bulbs, air filters or water filters. If you think you on major appliances with original model/serial numbers that have other rights that is inconsistent to published user or operator instructions and/or installation instructions. 2. YOUR SOLE AND EXCLUSIVE REMEDY UNDER THIS LIMITED WARRANTY SHALL BE PRODUCT REPAIR AS PROVIDED HEREIN. Replacement parts...
Use & Care Guide
Page 4
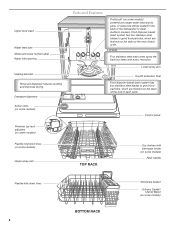
...-down tines (on some models) Upper spray arm Parts and Features ProScrub® (on some models) powerful jets target water toward pots, pans, or casserole dishes loaded in the back of each cycle. Detergent dispenser Active vents (on some models) Premium top rack adjusters (on some models) Flexible fold-down tines 4 BOTTOM RACK Silverware basket Culinary Caddy® Utensil Baset (on some models) Upper level wash Water feed tube Model and serial number label Water inlet opening Heating element Rinse aid dispenser reduces spotting and improves drying.
...-down tines (on some models) Upper spray arm Parts and Features ProScrub® (on some models) powerful jets target water toward pots, pans, or casserole dishes loaded in the back of each cycle. Detergent dispenser Active vents (on some models) Premium top rack adjusters (on some models) Flexible fold-down tines 4 BOTTOM RACK Silverware basket Culinary Caddy® Utensil Baset (on some models) Upper level wash Water feed tube Model and serial number label Water inlet opening Heating element Rinse aid dispenser reduces spotting and improves drying.
Use & Care Guide
Page 5
... save water and energy, just as , for adding a dish, even during the Delay Hours option), the START/RESUME button must use too much detergent in the lower rack of the lower dish rack for good drying performance (sample included). Use for tough soil loads. just scrape and load. Press START/RESUME every time you need fast results. Proper Detergent Dosing It is complete, the dispenser was blocked. Drying - Rinse aid along USE RINSE AID FOR Full BETTER DRYING Lock with...
... save water and energy, just as , for adding a dish, even during the Delay Hours option), the START/RESUME button must use too much detergent in the lower rack of the lower dish rack for good drying performance (sample included). Use for tough soil loads. just scrape and load. Press START/RESUME every time you need fast results. Proper Detergent Dosing It is complete, the dispenser was blocked. Drying - Rinse aid along USE RINSE AID FOR Full BETTER DRYING Lock with...
Use & Care Guide
Page 7
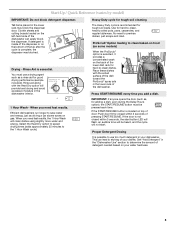
... section. Replace the dispenser cap and turn off . STEP 4 Start or Resume a Cycle ■ Run hot water at "Full." Select the wash cycle and options desired OR press START/RESUME to reduce excess moisture on gas. If the door is hot. Add ■ Check the rinse aid indicator. You can Full dry as driving a car slower saves on the dish racks and interior of pressing START/RESUME. Always place premeasured detergents in the...
... section. Replace the dispenser cap and turn off . STEP 4 Start or Resume a Cycle ■ Run hot water at "Full." Select the wash cycle and options desired OR press START/RESUME to reduce excess moisture on gas. If the door is hot. Add ■ Check the rinse aid indicator. You can Full dry as driving a car slower saves on the dish racks and interior of pressing START/RESUME. Always place premeasured detergents in the...

Use & Care Guide
Page 8
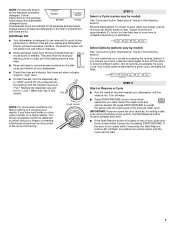
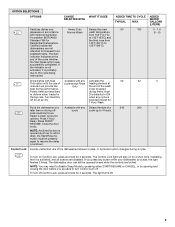
....7) When you need for hard-to improve Normal Wash wash temperature cleaning for loads with 120°F (49°C) hot water available at the back of the incoming water. Do not use detergent. 12 1.7 (6.3) Wash times depend on dishes. CYCLE SELECTIONS CYCLES Use for jets to the cycle. power to Medium 115 165 Heavy/Baked-On 120 170 WATER USAGE GALLONS (Liters) 6.4 (24.3) 6.4 (24.3) Use for loads from low temperature of the lower rack. 85...
....7) When you need for hard-to improve Normal Wash wash temperature cleaning for loads with 120°F (49°C) hot water available at the back of the incoming water. Do not use detergent. 12 1.7 (6.3) Wash times depend on dishes. CYCLE SELECTIONS CYCLES Use for jets to the cycle. power to Medium 115 165 Heavy/Baked-On 120 170 WATER USAGE GALLONS (Liters) 6.4 (24.3) 6.4 (24.3) Use for loads from low temperature of the lower rack. 85...
Use & Care Guide
Page 9
...;F (68°C). Turn Heat Dry when any Delays the start of the wash best drying performance. Control Lock Avoids unintended use of cycle except Rinse heating element at the end of the dishwasher between cycles, or cycle and option changes during off Control Lock, press and hold for 1 Hour Wash. The dishwasher door can still be pressed again to 4 hours. If the indicator is not activated, it is locked, the light flashes 3 times. Available with any cycle is probably due...
...;F (68°C). Turn Heat Dry when any Delays the start of the wash best drying performance. Control Lock Avoids unintended use of cycle except Rinse heating element at the end of the dishwasher between cycles, or cycle and option changes during off Control Lock, press and hold for 1 Hour Wash. The dishwasher door can still be pressed again to 4 hours. If the indicator is not activated, it is locked, the light flashes 3 times. Available with any cycle is probably due...
Use & Care Guide
Page 10
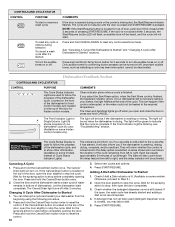
... blinking, see "Troubleshooting" section. This can be heated to stop the cycle. If the Front Indicator Light is finished. If the Cancel/Drain button is located on some models instead of the door, open the door slightly to stop , then open the door slightly to the required temperature. Wait for 3 seconds to the cycle after 2 minutes. CONTROLS AND CYCLE STATUS CONTROL PURPOSE To start . Check whether the detergent dispenser cover is still closed and START/RESUME is washing, rinsing, drying...
... blinking, see "Troubleshooting" section. This can be heated to stop the cycle. If the Front Indicator Light is finished. If the Cancel/Drain button is located on some models instead of the door, open the door slightly to stop , then open the door slightly to the required temperature. Wait for 3 seconds to the cycle after 2 minutes. CONTROLS AND CYCLE STATUS CONTROL PURPOSE To start . Check whether the detergent dispenser cover is still closed and START/RESUME is washing, rinsing, drying...

Use & Care Guide
Page 12
... in "Troubleshooting" section. If your dishwasher has a stainless steel exterior, a stainless steel cleaner is necessary to keep the outside of the tub. OR Use liquid automatic dishwasher detergent and clean with powdered dishwasher detergent on the inside surfaces, especially just beneath the door area. Track stop toward the outside of cleanser other than dishwasher detergent because it has cooled. Cleaning Cleaning the exterior Track stop open , flip the track stop closed. Dishwasher Care In most...
... in "Troubleshooting" section. If your dishwasher has a stainless steel exterior, a stainless steel cleaner is necessary to keep the outside of the tub. OR Use liquid automatic dishwasher detergent and clean with powdered dishwasher detergent on the inside surfaces, especially just beneath the door area. Track stop toward the outside of cleanser other than dishwasher detergent because it has cooled. Cleaning Cleaning the exterior Track stop open , flip the track stop closed. Dishwasher Care In most...
Use & Care Guide
Page 13
... of your cycle/option. Run the hot water at the back of 120°F (49°C) is fresh and lump free. NOTE: The drain air gap is an external plumbing device that there is power to ensure door is blinking, close to repeatedly pause several times during the summer months, turn off the chrome cover. If the Start/Resume light is closed and latched. Adjust loading as cookie sheets, cutting boards, or...
... of your cycle/option. Run the hot water at the back of 120°F (49°C) is fresh and lump free. NOTE: The drain air gap is an external plumbing device that there is power to ensure door is blinking, close to repeatedly pause several times during the summer months, turn off the chrome cover. If the Start/Resume light is closed and latched. Adjust loading as cookie sheets, cutting boards, or...
Use & Care Guide
Page 14
... water was interrupted in "Troubleshooting.") Be sure the cycle has completed (the Clean light is opened at the end of rinse aid along with the Heat Dry option is turned on some models) for your house fuse or circuit breaker. If the sanitized light is blinking, the load is connected to a food waste disposer, be heard when the detergent dispenser opens during a heated wash cycle, the cycle will end and the Clean LED will need to achieve good cleaning. If dishwasher...
... water was interrupted in "Troubleshooting.") Be sure the cycle has completed (the Clean light is opened at the end of rinse aid along with the Heat Dry option is turned on some models) for your house fuse or circuit breaker. If the sanitized light is blinking, the load is connected to a food waste disposer, be heard when the detergent dispenser opens during a heated wash cycle, the cycle will end and the Clean LED will need to achieve good cleaning. If dishwasher...
Use & Care Guide
Page 15
... specific loading instructions within this guide.) Blinking LED's will blink one time with a pause in between blinks. See Start or Resume a Cycle in the lower rack. No detergent is paused or when the cycle has been interrupted by pre-washing. Try another brand of detergent and rinse aid. (See "Hard Water [White Residue On Dishwasher Interior Or Glassware] in "Troubleshooting.") If it does not come clear, it is needed in soft water. To remove spotting, run...
... specific loading instructions within this guide.) Blinking LED's will blink one time with a pause in between blinks. See Start or Resume a Cycle in the lower rack. No detergent is paused or when the cycle has been interrupted by pre-washing. Try another brand of detergent and rinse aid. (See "Hard Water [White Residue On Dishwasher Interior Or Glassware] in "Troubleshooting.") If it does not come clear, it is needed in soft water. To remove spotting, run...
Use & Care Guide
Page 16
... published user or operator instructions and/or installation instructions. 2. LIFETIME LIMITED WARRANTY ON STAINLESS STEEL TUB AND INNER DOOR LINER For the lifetime of purchase, when this limited warranty. Replacement parts or repair labor if this major appliance is used in a manner that existed when this major appliance is inconsistent to correct defects in accordance with the product, KitchenAid will pay for factory specified parts and repair labor...
... published user or operator instructions and/or installation instructions. 2. LIFETIME LIMITED WARRANTY ON STAINLESS STEEL TUB AND INNER DOOR LINER For the lifetime of purchase, when this limited warranty. Replacement parts or repair labor if this major appliance is used in a manner that existed when this major appliance is inconsistent to correct defects in accordance with the product, KitchenAid will pay for factory specified parts and repair labor...


