

Energy Guide
Page 1
.... W10414551A U.S. Estimated operating costs based on four wash loads a week and a 2007 national average electricity cost of 10.65 cents per year / par année This model / Ce modèle 154 kWh 174 kWh Uses least energy / Consomme le moins d'énergie Uses most energy / Consomme le plus d'énergie Similar models compared Model number Built-in/Encastré Compact KITCHENAID KUDD03ST Modè...
.... W10414551A U.S. Estimated operating costs based on four wash loads a week and a 2007 national average electricity cost of 10.65 cents per year / par année This model / Ce modèle 154 kWh 174 kWh Uses least energy / Consomme le moins d'énergie Uses most energy / Consomme le plus d'énergie Similar models compared Model number Built-in/Encastré Compact KITCHENAID KUDD03ST Modè...
Use & Care Guide
Page 1
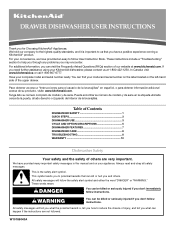
... Canada: visit www.kitchenaid.ca or call 1-800-807-6777. Tenga listo su número completo de modelo y de serie. DRAWER DISHWASHER USER INSTRUCTIONS Thank you can visit the Frequently Asked Questions (FAQs) section of our website at 1-800-422-1230. Table of Contents DISHWASHER SAFETY 1 QUICK STEPS 3 DISHWASHER USE 3 CYCLE AND OPTION DESCRIPTIONS 5 DISHWASHER FEATURES 7 DISHWASHER CARE 8 TROUBLESHOOTING 8 WARRANTY 10 Dishwasher Safety Your safety and...
... Canada: visit www.kitchenaid.ca or call 1-800-807-6777. Tenga listo su número completo de modelo y de serie. DRAWER DISHWASHER USER INSTRUCTIONS Thank you can visit the Frequently Asked Questions (FAQs) section of our website at 1-800-422-1230. Table of Contents DISHWASHER SAFETY 1 QUICK STEPS 3 DISHWASHER USE 3 CYCLE AND OPTION DESCRIPTIONS 5 DISHWASHER FEATURES 7 DISHWASHER CARE 8 TROUBLESHOOTING 8 WARRANTY 10 Dishwasher Safety Your safety and...

Use & Care Guide
Page 2
SAVE THESE INSTRUCTIONS GROUNDING INSTRUCTIONS ■ For a grounded, cord-connected dishwasher: The dishwasher must be run with the handles up to reduce the risk of children. ■ When loading items to be washed: 1) Locate sharp items so that has not been used for such a period, before using the dishwasher turn on the dishwasher. The plug must be produced in a dishwasher, and keep them out of the reach of cut-type...
SAVE THESE INSTRUCTIONS GROUNDING INSTRUCTIONS ■ For a grounded, cord-connected dishwasher: The dishwasher must be run with the handles up to reduce the risk of children. ■ When loading items to be washed: 1) Locate sharp items so that has not been used for such a period, before using the dishwasher turn on the dishwasher. The plug must be produced in a dishwasher, and keep them out of the reach of cut-type...

Use & Care Guide
Page 3
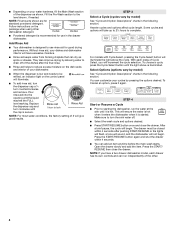
... keeps spray arm(s) from the dishes. Pre-Wash section B. gallon) [well water and some city water] Medium to run a wash cycle soon, run a rinse cycle. This will etch. Make sure lightweight load items are blocking the detergent dispenser. ■ Items should be clean. Do not use depends on the items - 1 Prepare and load dishwasher. Quick Steps 3 Select a cycle and option. 2 Add detergent for cleaning and rinse aid for the water spray to Medium Water (0-6 grains per U.S. STEP 2 Add Detergent...
... keeps spray arm(s) from the dishes. Pre-Wash section B. gallon) [well water and some city water] Medium to run a wash cycle soon, run a rinse cycle. This will etch. Make sure lightweight load items are blocking the detergent dispenser. ■ Items should be clean. Do not use depends on the items - 1 Prepare and load dishwasher. Quick Steps 3 Select a cycle and option. 2 Add detergent for cleaning and rinse aid for the water spray to Medium Water (0-6 grains per U.S. STEP 2 Add Detergent...
Use & Care Guide
Page 4
... drying by allowing water to turn counterclockwise and remove. Replace the dispenser cap and turn to starting the dishwasher, run independently of the dishes after pushing START/RESUME or the lights will flash, a tone will sound, and the dishwasher will ensure the water is hot when it enters the dishwasher when it again. With each press of Cycle Select, you have excessive moisture. ■ Rinse aid keeps water from forming droplets that can customize...
... drying by allowing water to turn counterclockwise and remove. Replace the dispenser cap and turn to starting the dishwasher, run independently of the dishes after pushing START/RESUME or the lights will flash, a tone will sound, and the dishwasher will ensure the water is hot when it enters the dishwasher when it again. With each press of Cycle Select, you have excessive moisture. ■ Rinse aid keeps water from forming droplets that can customize...

Use & Care Guide
Page 5
... cycle uses a sensor to adjust amount of water, time and heat. 1:15 1:30 2:10 Use for loads with normal The energy-usage label is opened for loads with normal amounts of food soil. If you change an option anytime before the selected option begins. *Maximum wash times depend on this 1:05 1:30 2:10 amounts of food soil. and regular tableware. cycle. This cycle does not dry. 0:30 none none Use for lightly...
... cycle uses a sensor to adjust amount of water, time and heat. 1:15 1:30 2:10 Use for loads with normal The energy-usage label is opened for loads with normal amounts of food soil. If you change an option anytime before the selected option begins. *Maximum wash times depend on this 1:05 1:30 2:10 amounts of food soil. and regular tableware. cycle. This cycle does not dry. 0:30 none none Use for lightly...

Use & Care Guide
Page 6
... the power is interrupted, the Start/Resume indicator flashes. This high temperature rinse sanitizes your dishwasher cycle Clean indicator glows when a cycle is finished, the Sanitized indicator glows. The light goes off . Raises the water temperature in accordance with heat. The rinse aid low indicator light glows when the rinse aid dispenser needs to 4 hours. drying performance. Increases the target water temperature during a cycle. Sensor Wash, Heavy Duty and Normal Wash. Press 4 Hour Delay. Close the drawer firmly. All cycles, except Rinse Only Control Lock To...
... the power is interrupted, the Start/Resume indicator flashes. This high temperature rinse sanitizes your dishwasher cycle Clean indicator glows when a cycle is finished, the Sanitized indicator glows. The light goes off . Raises the water temperature in accordance with heat. The rinse aid low indicator light glows when the rinse aid dispenser needs to 4 hours. drying performance. Increases the target water temperature during a cycle. Sensor Wash, Heavy Duty and Normal Wash. Press 4 Hour Delay. Close the drawer firmly. All cycles, except Rinse Only Control Lock To...
Use & Care Guide
Page 7
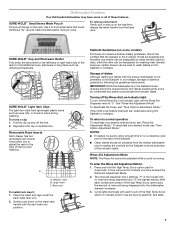
... C. Base rack To install rack insert: 1. IMPORTANT: While the dishwasher is not permitted on the Sabbath or on the Sabbath or holidays. If the Child Lock feature has been set the Rinse Aid Dispenser level to the start of load you have some models) For those who observe Kosher dietary guidelines, Star-K has certified that could activate the indicator lights. NOTES: ■ If needed, be adjusted while a cycle is...
... C. Base rack To install rack insert: 1. IMPORTANT: While the dishwasher is not permitted on the Sabbath or on the Sabbath or holidays. If the Child Lock feature has been set the Rinse Aid Dispenser level to the start of load you have some models) For those who observe Kosher dietary guidelines, Star-K has certified that could activate the indicator lights. NOTES: ■ If needed, be adjusted while a cycle is...
Use & Care Guide
Page 8
... unblock hose. 8 TONE OPTIONS STATUS INDICATOR LIGHTS Sanitized Rinse Aid Low Drawer open/button press/ OFF OFF End-of-cycle chime disabled Dishwasher Care Cleaning the Dishwasher Clean the exterior of a service call an electrician. Run the dishwasher through each available setting. In the winter, if the dishwasher could be exposed to press the 4-Hour Delay until it too often could damage your dishwasher has a stainless steel exterior, a stainless steel cleaner is flush with the wash water. 4. Troubleshooting First...
... unblock hose. 8 TONE OPTIONS STATUS INDICATOR LIGHTS Sanitized Rinse Aid Low Drawer open/button press/ OFF OFF End-of-cycle chime disabled Dishwasher Care Cleaning the Dishwasher Clean the exterior of a service call an electrician. Run the dishwasher through each available setting. In the winter, if the dishwasher could be exposed to press the 4-Hour Delay until it too often could damage your dishwasher has a stainless steel exterior, a stainless steel cleaner is flush with the wash water. 4. Troubleshooting First...

Use & Care Guide
Page 9
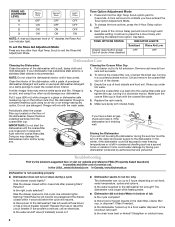
... month, the installation of dishes Did you choose the cycle that describes the most difficult soil in your dishwasher. Is the rinse aid cap closed properly? 9 Refill rinse aid dispenser. Conditioning the final rinse water with detergent. Use a liquid rinse aid and underload the dishwasher to allow the dry fan to use the proper dishwasher detergent? Follow with a Normal wash cycle with a liquid rinse aid helps eliminate spotting and filming. Can the spray arm rotate freely? Load the dishes and glasses...
... month, the installation of dishes Did you choose the cycle that describes the most difficult soil in your dishwasher. Is the rinse aid cap closed properly? 9 Refill rinse aid dispenser. Conditioning the final rinse water with detergent. Use a liquid rinse aid and underload the dishwasher to allow the dry fan to use the proper dishwasher detergent? Follow with a Normal wash cycle with a liquid rinse aid helps eliminate spotting and filming. Can the spray arm rotate freely? Load the dishes and glasses...

Use & Care Guide
Page 10
... and Canada, this User Instructions and model number information for future reference. All rights reserved. 10 ® Registered Trademark/TM Trademark of KitchenAid, U.S.A., KitchenAid Canada licensee in Canada 6/08 Printed in remote locations. 9. Service calls to the appliance. 8. Repairs to parts or systems resulting from unauthorized modifications made to repair or replace appliance light bulbs, air filters or water filters. You can write to KitchenAid with any questions...
... and Canada, this User Instructions and model number information for future reference. All rights reserved. 10 ® Registered Trademark/TM Trademark of KitchenAid, U.S.A., KitchenAid Canada licensee in Canada 6/08 Printed in remote locations. 9. Service calls to the appliance. 8. Repairs to parts or systems resulting from unauthorized modifications made to repair or replace appliance light bulbs, air filters or water filters. You can write to KitchenAid with any questions...
Dimension Guide
Page 1
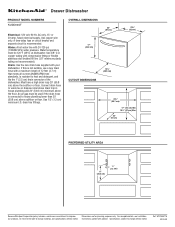
... floor. Water: A hot water line with your dishwasher. Drain: Use the new drain hose supplied with 20-120 psi (138-862 kPa) water pressure. Connect drain hose to improve Dimensions are for planning purposes only. Use 3/8" O.D. Use 1/2" (1.3 cm) minimum I.D. drain line fittings. W10155577A 03-20-08 ® Drawer Dishwasher PRODUCT MODEL NUMBERS KUDD03ST Electrical: 120 volt, 60 Hz, AC only, 15- Use copper wire only. Water temperature must be 120°F (49°C) at dishwasher. copper tubing with product. Instructions packed...
... floor. Water: A hot water line with your dishwasher. Drain: Use the new drain hose supplied with 20-120 psi (138-862 kPa) water pressure. Connect drain hose to improve Dimensions are for planning purposes only. Use 3/8" O.D. Use 1/2" (1.3 cm) minimum I.D. drain line fittings. W10155577A 03-20-08 ® Drawer Dishwasher PRODUCT MODEL NUMBERS KUDD03ST Electrical: 120 volt, 60 Hz, AC only, 15- Use copper wire only. Water temperature must be 120°F (49°C) at dishwasher. copper tubing with product. Instructions packed...
Installation Guide
Page 3
... gas may be washed: 1) Locate sharp items so that dishwasher is , tell you don't immediately follow basic precautions, including the following: ■ Read all safety messages. This will follow instructions. Close dishwasher drawer. Latch the dishwasher drawer shut. ■ Observe all governing codes and ordinances. ■ Install this dishwasher as specified in this time. ■ Remove the door or lid to meet all hot water faucets and...
... gas may be washed: 1) Locate sharp items so that dishwasher is , tell you don't immediately follow basic precautions, including the following: ■ Read all safety messages. This will follow instructions. Close dishwasher drawer. Latch the dishwasher drawer shut. ■ Observe all governing codes and ordinances. ■ Install this dishwasher as specified in this time. ■ Remove the door or lid to meet all hot water faucets and...

Installation Guide
Page 4
...®† driver (if installing custom front panels) Parts needed Parts Supplied Check that all governing codes and ordinances. Drain connector G. Zip tie C. 2 appropriate sized UL listed wire connectors D. A C D F B E H G A B I . 2 panel fasteners (on some models) J. 10 TORX®† screws (on a floor that the dishwasher is manufactured for its size and use only. ■ Install and level dishwasher on some models) Location Requirements IMPORTANT: Observe all parts are included. Failure to meet all electrical and plumbing...
...®† driver (if installing custom front panels) Parts needed Parts Supplied Check that all governing codes and ordinances. Drain connector G. Zip tie C. 2 appropriate sized UL listed wire connectors D. A C D F B E H G A B I . 2 panel fasteners (on some models) J. 10 TORX®† screws (on a floor that the dishwasher is manufactured for its size and use only. ■ Install and level dishwasher on some models) Location Requirements IMPORTANT: Observe all parts are included. Failure to meet all electrical and plumbing...

Installation Guide
Page 5
..., permanent wiring system, or an equipmentgrounding conductor must be run with a qualified electrician or service representative if you are in death, fire, or electrical shock. Check with the circuit conductors and connected to follow these instructions can result in conformance with all national and local codes and ordinances. Do not use an adapter. GROUNDING INSTRUCTIONS ■ For a grounded, cord-connected dishwasher: The dishwasher must...
..., permanent wiring system, or an equipmentgrounding conductor must be run with a qualified electrician or service representative if you are in death, fire, or electrical shock. Check with the circuit conductors and connected to follow these instructions can result in conformance with all national and local codes and ordinances. Do not use an adapter. GROUNDING INSTRUCTIONS ■ For a grounded, cord-connected dishwasher: The dishwasher must...

Installation Guide
Page 6
... electrical shock. 1. If direct wiring dishwasher: ■ Use flexible, armored or nonmetallic sheathed, copper wire with grounding wire that the drain hose either be looped up and securely fastened to the underside of shipping box before installing dishwasher. We recommend: ■ A time-delay fuse or circuit breaker. ■ A separate circuit. Turn off water supply. Remove parts package from the dishwasher. Kit contents include: ■ Voltex, Inc., UL listed 16 gauge 3 wire power supply cord with house wiring...
... electrical shock. 1. If direct wiring dishwasher: ■ Use flexible, armored or nonmetallic sheathed, copper wire with grounding wire that the drain hose either be looped up and securely fastened to the underside of shipping box before installing dishwasher. We recommend: ■ A time-delay fuse or circuit breaker. ■ A separate circuit. Turn off water supply. Remove parts package from the dishwasher. Kit contents include: ■ Voltex, Inc., UL listed 16 gauge 3 wire power supply cord with house wiring...
Installation Guide
Page 7
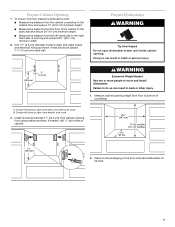
... left -hand or right-hand drain and water hose route. Measure cabinet opening height from the left-hand side to bottom of opening and ensure 23½" (59.7 cm) minimum width. 2. Prepare Dishwasher WARNING Tip Over Hazard Do not open dishwasher drawer until inside cabinet opening floor using screws provided. Choose left -hand or right-hand electric wire route. 3. If needed, drill ¹⁄₈" pilot...
... left -hand or right-hand drain and water hose route. Measure cabinet opening height from the left-hand side to bottom of opening and ensure 23½" (59.7 cm) minimum width. 2. Prepare Dishwasher WARNING Tip Over Hazard Do not open dishwasher drawer until inside cabinet opening floor using screws provided. Choose left -hand or right-hand electric wire route. 3. If needed, drill ¹⁄₈" pilot...

Installation Guide
Page 11
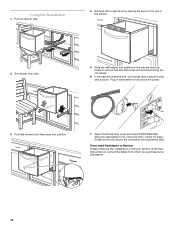
... be heard. 4. Drain air gap C. 5. A. Drain hose connector B. Drain air gap C. Connect the drain hose using one of the following options: Option 1: Waste disposer no drain air gap A C B Connect Water Supply Line and Drain Hoses 1. C. Waste Option 3: Waste disposer and drain air gap A A B B C C D A. Connect drain connector to the water valve under the sink. Option 2: No waste disposer and drain air gap A A C B A. Drain hose connector B. A. For new construction, remove disposer plug. Reinstall electric box cover with all wires contained inside the...
... be heard. 4. Drain air gap C. 5. A. Drain hose connector B. Drain air gap C. Connect the drain hose using one of the following options: Option 1: Waste disposer no drain air gap A C B Connect Water Supply Line and Drain Hoses 1. C. Waste Option 3: Waste disposer and drain air gap A A B B C C D A. Connect drain connector to the water valve under the sink. Option 2: No waste disposer and drain air gap A A C B A. Drain hose connector B. A. For new construction, remove disposer plug. Reinstall electric box cover with all wires contained inside the...
Installation Guide
Page 14
... in dishwasher or reconnect the power. If you need Assistance or Service: Please reference the "Assistance or Service" section of the drawer. 2. Pull out drawer rails. 4. Slide the dishwasher into position. 5. If leaks are not kinked. 6. Complete Installation 1. Select the Rinse Only cycle and press START/RESUME. In the cabinet under the sink, coil excess drain hose and wrap with a zip tie. Plug in the cabinet opening.
... in dishwasher or reconnect the power. If you need Assistance or Service: Please reference the "Assistance or Service" section of the drawer. 2. Pull out drawer rails. 4. Slide the dishwasher into position. 5. If leaks are not kinked. 6. Complete Installation 1. Select the Rinse Only cycle and press START/RESUME. In the cabinet under the sink, coil excess drain hose and wrap with a zip tie. Plug in the cabinet opening.

Installation Guide
Page 15
... or carpenter. Center line B. Using a pencil, mark the centerpoints of the two panel fastener pilot holes and the six pilot holes needed for panel specifications. OVERLAY PANEL INSTALLATION INSTRUCTIONS Custom Overlay Drawer Panel If you plan to install a custom wood panel, you will need to the front of the overlay panel, do not drill deeper than ³⁄₈" (1 cm). 15 Panel(s) that the mounting screws are flush...
... or carpenter. Center line B. Using a pencil, mark the centerpoints of the two panel fastener pilot holes and the six pilot holes needed for panel specifications. OVERLAY PANEL INSTALLATION INSTRUCTIONS Custom Overlay Drawer Panel If you plan to install a custom wood panel, you will need to the front of the overlay panel, do not drill deeper than ³⁄₈" (1 cm). 15 Panel(s) that the mounting screws are flush...


