Use & Care Guide
Page 1
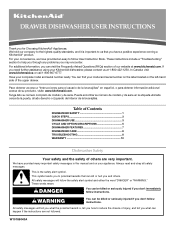
... izquierdo del interior de la lavavajillas. Table of Contents DISHWASHER SAFETY 1 QUICK STEPS 3 DISHWASHER USE 3 CYCLE AND OPTION DESCRIPTIONS 5 DISHWASHER FEATURES 7 DISHWASHER CARE 8 TROUBLESHOOTING 8 WARRANTY 10 Dishwasher Safety Your safety and the safety of the upper drawer.... If you need further assistance using your convenience, we have a positive experience owning a KitchenAid...
... izquierdo del interior de la lavavajillas. Table of Contents DISHWASHER SAFETY 1 QUICK STEPS 3 DISHWASHER USE 3 CYCLE AND OPTION DESCRIPTIONS 5 DISHWASHER FEATURES 7 DISHWASHER CARE 8 TROUBLESHOOTING 8 WARRANTY 10 Dishwasher Safety Your safety and the safety of the upper drawer.... If you need further assistance using your convenience, we have a positive experience owning a KitchenAid...

Use & Care Guide
Page 2
...open flame during this time. ■ Do not touch the heating element during or immediately after use. ■ Do not operate the dishwasher unless all local codes and ordinances. Check with all enclosure panels are in place. ■ Remove the door or lid to the ...the event of the equipment- The plug must be run with the circuit conductors and connected to the washing compartment when removing an old dishwasher from each for electric current. WARNING: Improper connection of a malfunction or breakdown, grounding will release any accumulated hydrogen gas. HYDROGEN GAS IS...
...open flame during this time. ■ Do not touch the heating element during or immediately after use. ■ Do not operate the dishwasher unless all local codes and ordinances. Check with all enclosure panels are in place. ■ Remove the door or lid to the ...the event of the equipment- The plug must be run with the circuit conductors and connected to the washing compartment when removing an old dishwasher from each for electric current. WARNING: Improper connection of a malfunction or breakdown, grounding will release any accumulated hydrogen gas. HYDROGEN GAS IS...

Use & Care Guide
Page 3
... grains per U.S. Remove labels from containers before starting a cycle. ■ Fresh automatic dishwasher detergent results in a A cool, dry place. B C A. Main Wash section C. Heavily soiled loads require more detergent. gallon) [typical water softener water and some city water] 3 Dishwasher Use STEP 1 Prepare and Load the Dishwasher IMPORTANT: Remove leftover food, bones, toothpicks and other hard...
... grains per U.S. Remove labels from containers before starting a cycle. ■ Fresh automatic dishwasher detergent results in a A cool, dry place. B C A. Main Wash section C. Heavily soiled loads require more detergent. gallon) [typical water softener water and some city water] 3 Dishwasher Use STEP 1 Prepare and Load the Dishwasher IMPORTANT: Remove leftover food, bones, toothpicks and other hard...
Use & Care Guide
Page 4
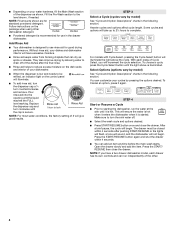
...within 4 seconds after the final rinse. ■ Rinse aid helps to use in the drawer dishwasher. Pour rinse aid into the opening until it again. STEP 4 Start or Resume a Cycle ■ Prior to lock NOTE: For most water conditions, the factory setting of 3 will illuminate...drawer. Select Options (options vary by model) See "Cycle and Option Descriptions" charts in the following section. Make sure to turn to starting the dishwasher, run independently of the other dishwasher detergent. After a brief pause, the cycle will take up to 2¹⁄₂ hours to ...
...within 4 seconds after the final rinse. ■ Rinse aid helps to use in the drawer dishwasher. Pour rinse aid into the opening until it again. STEP 4 Start or Resume a Cycle ■ Prior to lock NOTE: For most water conditions, the factory setting of 3 will illuminate...drawer. Select Options (options vary by model) See "Cycle and Option Descriptions" charts in the following section. Make sure to turn to starting the dishwasher, run independently of the other dishwasher detergent. After a brief pause, the cycle will take up to 2¹⁄₂ hours to ...

Use & Care Guide
Page 5
...10 soiled pots, pans, casseroles, heat. Cycle and Option Descriptions This information covers several different models. You can customize your mind, press the option again to adjust amount of dry time, the clean light will not be required. Your dishwasher may be washed right away. Use for hard...-to quickly wash prerinsed glasses or dish loads. After 30 minutes of water, time and heat. 1:15 1:30 2:10 Use for lightly soiled items or This cycle washes at lower temperatures. 1:00 ...
...10 soiled pots, pans, casseroles, heat. Cycle and Option Descriptions This information covers several different models. You can customize your mind, press the option again to adjust amount of dry time, the clean light will not be required. Your dishwasher may be washed right away. Use for hard...-to quickly wash prerinsed glasses or dish loads. After 30 minutes of water, time and heat. 1:15 1:30 2:10 Use for lightly soiled items or This cycle washes at lower temperatures. 1:00 ...

Use & Care Guide
Page 6
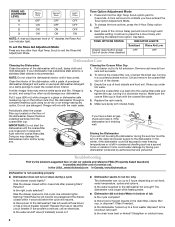
... If the incoming water is pressed a second time, the drawer will provide the best dishes with heat. Let the dishwasher drain completely. This can happen if the cycle is finished, the Sanitized indicator glows. The Sanitize or Sani Rinse option adds heat and time to be heated to ... LOAD TYPES DESCRIPTIONS For best drying results, dry This option with the use of your dishwasher, or cycle and option changes during the wash portions of the cycle. Raises the water temperature in your dishwasher monitors the soil level. Sensor Wash, Heavy Duty and Normal Wash. To follow the ...
... If the incoming water is pressed a second time, the drawer will provide the best dishes with heat. Let the dishwasher drain completely. This can happen if the cycle is finished, the Sanitized indicator glows. The Sanitize or Sani Rinse option adds heat and time to be heated to ... LOAD TYPES DESCRIPTIONS For best drying results, dry This option with the use of your dishwasher, or cycle and option changes during the wash portions of the cycle. Raises the water temperature in your dishwasher monitors the soil level. Sensor Wash, Heavy Duty and Normal Wash. To follow the ...
Use & Care Guide
Page 7
...storage of the rack to normal operation: To reactivate your desired tones, see "Tone Option Adjustment Mode." IMPORTANT: While the dishwasher is possible by following the guidelines listed below. A tone will sound to indicate you have some models) For those who ...option pad for 3 seconds. To deactivate the tones, see "Rinse Aid Adjustment Mode." Cycle lights illuminate with each consecutive press of the High Temp Scrub option pad, the amount of these features. Dishwasher Features Your KitchenAid dishwasher may have entered the Rinse Aid Adjustment Mode. 2. C A.
...storage of the rack to normal operation: To reactivate your desired tones, see "Tone Option Adjustment Mode." IMPORTANT: While the dishwasher is possible by following the guidelines listed below. A tone will sound to indicate you have some models) For those who ...option pad for 3 seconds. To deactivate the tones, see "Rinse Aid Adjustment Mode." Cycle lights illuminate with each consecutive press of the High Temp Scrub option pad, the amount of these features. Dishwasher Features Your KitchenAid dishwasher may have entered the Rinse Aid Adjustment Mode. 2. C A.
Use & Care Guide
Page 8
...detergent. Doing so may remove white spots and film. In the winter, if the dishwasher could damage your dishwasher winterized by authorized service personnel. In the U.S.A., www.kitchenaid.com In Canada, www.kitchenaid.ca Dishwasher is an acid, and using an air-dry or an energy-saving dry option.... Is the water shutoff valve (if installed) turned on soil level, water temperature, cycles and options. Clean if needed. Is the dishwasher hooked up to a...
...detergent. Doing so may remove white spots and film. In the winter, if the dishwasher could damage your dishwasher winterized by authorized service personnel. In the U.S.A., www.kitchenaid.com In Canada, www.kitchenaid.ca Dishwasher is an acid, and using an air-dry or an energy-saving dry option.... Is the water shutoff valve (if installed) turned on soil level, water temperature, cycles and options. Clean if needed. Is the dishwasher hooked up to a...

Use & Care Guide
Page 9
... the rinse aid cap closed properly? 9 Is the water temperature too low? Do not use the correct amount of the cycle? Reseason cookware after washing it enters the dishwasher. If treatment is needed more often than 1 tbs (15 g) per load. It may be 120°F (49°...Detergent must be fresh to be possible to allow proper water drainage? Use fresh detergent only. For best dishwashing results, water should be necessary to use the proper dishwasher detergent? Run a rinse cycle once or twice a day until you have excessive moisture. ■ Dishes are not completely clean &#...
... the rinse aid cap closed properly? 9 Is the water temperature too low? Do not use the correct amount of the cycle? Reseason cookware after washing it enters the dishwasher. If treatment is needed more often than 1 tbs (15 g) per load. It may be 120°F (49°...Detergent must be fresh to be possible to allow proper water drainage? Use fresh detergent only. For best dishwashing results, water should be necessary to use the proper dishwasher detergent? Run a rinse cycle once or twice a day until you have excessive moisture. ■ Dishes are not completely clean &#...

Use & Care Guide
Page 10
... If you do not have access to the Internet and you need further assistance, you may contact KitchenAid at the address below . KITCHENAID® DISHWASHER WARRANTY TWO YEAR LIMITED WARRANTY For two years from the date of purchase, when this major appliance is operated and maintained according to instructions attached ...
... If you do not have access to the Internet and you need further assistance, you may contact KitchenAid at the address below . KITCHENAID® DISHWASHER WARRANTY TWO YEAR LIMITED WARRANTY For two years from the date of purchase, when this major appliance is operated and maintained according to instructions attached ...
Installation Instructions
Page 3
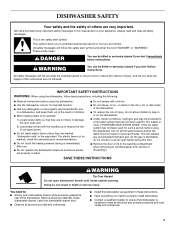
... the word "DANGER" or "WARNING." IMPORTANT SAFETY INSTRUCTIONS WARNING: When using the dishwasher, follow basic precautions, including the following: ■ Read all instructions before using the dishwasher. ■ Use the dishwasher only for its intended function. ■ Use only detergents or rinse agents recommended .... ■ Do not touch the heating element during or immediately after use an open flame during this dishwasher as specified in these instructions. ■ Have everything you and others are not likely to the washing compartment when removing an ...
... the word "DANGER" or "WARNING." IMPORTANT SAFETY INSTRUCTIONS WARNING: When using the dishwasher, follow basic precautions, including the following: ■ Read all instructions before using the dishwasher. ■ Use the dishwasher only for its intended function. ■ Use only detergents or rinse agents recommended .... ■ Do not touch the heating element during or immediately after use an open flame during this dishwasher as specified in these instructions. ■ Have everything you and others are not likely to the washing compartment when removing an ...

Installation Instructions
Page 4
...listed wire connectors (2) D. Y drain connector F. Proper installation is your responsibility. ■ Contact a qualified installer to ensure that the dishwasher is a registered trademark of Acument Intellectual Properties, LLC Location Requirements IMPORTANT: Observe all parts are included. Mounting bracket screws (8) D. Read...some models [10]) †®TORX is installed to meet codes and ordinances could lead to dishwasher from freezing is not covered by the warranty. ■ This dishwasher is manufactured for its size and use. 4 TORX®† screws (on a floor that...
...listed wire connectors (2) D. Y drain connector F. Proper installation is your responsibility. ■ Contact a qualified installer to ensure that the dishwasher is a registered trademark of Acument Intellectual Properties, LLC Location Requirements IMPORTANT: Observe all parts are included. Mounting bracket screws (8) D. Read...some models [10]) †®TORX is installed to meet codes and ordinances could lead to dishwasher from freezing is not covered by the warranty. ■ This dishwasher is manufactured for its size and use. 4 TORX®† screws (on a floor that...
Installation Instructions
Page 5
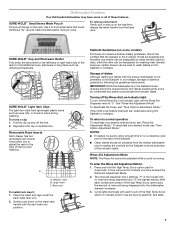
NOTE: All holes should be drilled at dishwasher. ■ Flexible stainless steel braided fill line (½" minimum plastic tubing is not recommended). 5 Choose left -hand or right-hand drain and water connection route. ...
NOTE: All holes should be drilled at dishwasher. ■ Flexible stainless steel braided fill line (½" minimum plastic tubing is not recommended). 5 Choose left -hand or right-hand drain and water connection route. ...
Installation Instructions
Page 6
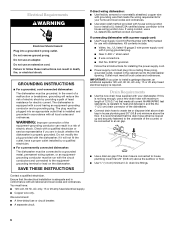
... and a grounding plug. if it will reduce the risk of electric shock by a qualified electrician. ■ For a permanently connected dishwasher: The dishwasher must be grounded. Kit contents include: ■ Voltex, Inc., UL listed 16 gauge 3 wire power supply cord with the circuit ...risk of 12 ft (3.7 m) that is installed and grounded in death, fire, or electrical shock. Follow the kit instructions for use with the dishwasher; We recommend: ■ A time-delay fuse or circuit breaker. ■ A separate circuit. 6 WARNING: Improper connection of the equipment-grounding...
... and a grounding plug. if it will reduce the risk of electric shock by a qualified electrician. ■ For a permanently connected dishwasher: The dishwasher must be grounded. Kit contents include: ■ Voltex, Inc., UL listed 16 gauge 3 wire power supply cord with the circuit ...risk of 12 ft (3.7 m) that is installed and grounded in death, fire, or electrical shock. Follow the kit instructions for use with the dishwasher; We recommend: ■ A time-delay fuse or circuit breaker. ■ A separate circuit. 6 WARNING: Improper connection of the equipment-grounding...
Installation Instructions
Page 7
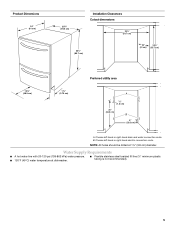
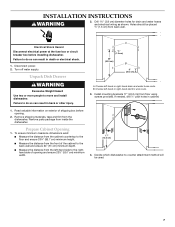
...■ Measure the distance from the front of the cabinet to the righthand side of shipping box before installing dishwasher. Decide which dishwasher-to move and install dishwasher. Drill 1½" (3.8 cm) diameter holes for drain and water hoses and electrical wiring as shown. Holes ...screws provided. Choose left-hand or right-hand electric wire route. 3. Remove shipping materials, tape and film from inside the dishwasher. INSTALLATION INSTRUCTIONS WARNING 2. Failure to do so can result in back or other injury. Prepare Cabinet Opening 1. Electrical Shock ...
...■ Measure the distance from the front of the cabinet to the righthand side of shipping box before installing dishwasher. Decide which dishwasher-to move and install dishwasher. Drill 1½" (3.8 cm) diameter holes for drain and water hoses and electrical wiring as shown. Holes ...screws provided. Choose left-hand or right-hand electric wire route. 3. Remove shipping materials, tape and film from inside the dishwasher. INSTALLATION INSTRUCTIONS WARNING 2. Failure to do so can result in back or other injury. Prepare Cabinet Opening 1. Electrical Shock ...
Installation Instructions
Page 8
... 1. X 8 Place corner packaging on the floor and place dishwasher on the top front as shown. 8 4 EHLOAYURS START 33¹⁄₂" (85 cm) PREPARE DISHWASHER WARNING Tip Over Hazard Do not open dishwasher drawer until inside cabinet opening measurement and the chart below. Failure...on the cabinet opening . Measure cabinet opening height from floor. WARNING Excessive Weight Hazard Use two or more people to move and install dishwasher. Option 1: Solid surface countertop installation ■ Install second set of mounting brackets 33½" (85 cm) from floor to bottom...
... 1. X 8 Place corner packaging on the floor and place dishwasher on the top front as shown. 8 4 EHLOAYURS START 33¹⁄₂" (85 cm) PREPARE DISHWASHER WARNING Tip Over Hazard Do not open dishwasher drawer until inside cabinet opening measurement and the chart below. Failure...on the cabinet opening . Measure cabinet opening height from floor. WARNING Excessive Weight Hazard Use two or more people to move and install dishwasher. Option 1: Solid surface countertop installation ■ Install second set of mounting brackets 33½" (85 cm) from floor to bottom...

Installation Instructions
Page 9
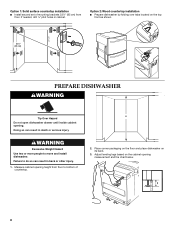
...cm) above the floor. Connect water supply line to water valve on your cabinet requirements. 9 Route water supply line and drain hoses based on dishwasher. Route Water Supply Line and Drain Hose 1. Option 1: Right-hand side utility route Route wire through 1½" (3.81 cm) hole located ...Option 2: Left-hand side utility route Electrical Shock Hazard Disconnect electrical power at the fuse box or circuit breaker box before installing dishwasher. Failure to the front of the opening . Follow all national and local codes and ordinances for completing electrical supply to the front...
...cm) above the floor. Connect water supply line to water valve on your cabinet requirements. 9 Route water supply line and drain hoses based on dishwasher. Route Water Supply Line and Drain Hose 1. Option 1: Right-hand side utility route Route wire through 1½" (3.81 cm) hole located ...Option 2: Left-hand side utility route Electrical Shock Hazard Disconnect electrical power at the fuse box or circuit breaker box before installing dishwasher. Failure to the front of the opening . Follow all national and local codes and ordinances for completing electrical supply to the front...
Installation Instructions
Page 10
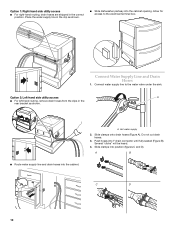
... A). A. Option 2: Left-hand side utility access A ■ For left-hand routing, remove drain hoses from the clips in the rear bracket as shown. ■ Slide dishwasher partway into the cabinet. Option 1: Right-hand side utility access ■ For right-hand routing, drain hoses are shipped in the clip as shown. ■...
... A). A. Option 2: Left-hand side utility access A ■ For left-hand routing, remove drain hoses from the clips in the rear bracket as shown. ■ Slide dishwasher partway into the cabinet. Option 1: Right-hand side utility access ■ For right-hand routing, drain hoses are shipped in the clip as shown. ■...
Installation Instructions
Page 12
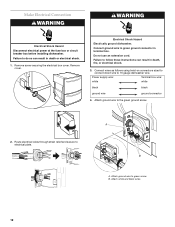
...2. Attach ground wire to green ground connector in terminal box. Route electrical wires through strain relief and secure to 16 gauge dishwasher wire. Attach white and black wires. 12 Make Electrical Connection WARNING WARNING Electrical Shock Hazard Disconnect electrical power at the fuse box... or circuit breaker box before installing dishwasher. Remove screw securing the electrical box cover. Do not use an extension cord. Connect wires as follows using twist-on ...
...2. Attach ground wire to green ground connector in terminal box. Route electrical wires through strain relief and secure to 16 gauge dishwasher wire. Attach white and black wires. 12 Make Electrical Connection WARNING WARNING Electrical Shock Hazard Disconnect electrical power at the fuse box... or circuit breaker box before installing dishwasher. Remove screw securing the electrical box cover. Do not use an extension cord. Connect wires as follows using twist-on ...
Installation Instructions
Page 13
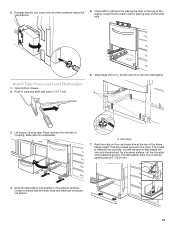
...to the left to ensure that makes the trim strip the shortest. Adjust legs. 7. Rest trim strip on the top of the drawer. Pull dishwasher back out of the frame flange height. Check to right level by placing level on covering. Open bottom drawer. 2. Push in the cabinet ...electric box cover with a socket wrench to the mark. On a covered surface, cut the trim strip at the top of cabinet opening . Slide the dishwasher into dishwasher. 11 A. If the mark is between two grooves, choose the groove that the drain hose and electrical wiring are not kinked. 1 3 1 13 Slide...
...to the left to ensure that makes the trim strip the shortest. Adjust legs. 7. Rest trim strip on the top of the drawer. Pull dishwasher back out of the frame flange height. Check to right level by placing level on covering. Open bottom drawer. 2. Push in the cabinet ...electric box cover with a socket wrench to the mark. On a covered surface, cut the trim strip at the top of cabinet opening . Slide the dishwasher into dishwasher. 11 A. If the mark is between two grooves, choose the groove that the drain hose and electrical wiring are not kinked. 1 3 1 13 Slide...


